Spin to Win Template
Overview
Spin or Spin to Win is another case of the reveal family of participation that presents some special characteristics as the uncovering of the outcome is not by a continuous action taken by the participant but only a single action is required. Because a wheel is involved in the game, it is the the definition of this aspect what makes it different from the other reveal games.
Creating a Spin to Win Template
To create a Spin campaign template, select the Spin option from the emerging popup window that was shown, and you reaffirm your intention in the intermediary window. You’ll be taken to the New template configuration screen where you will find the elements that need to be included in it.
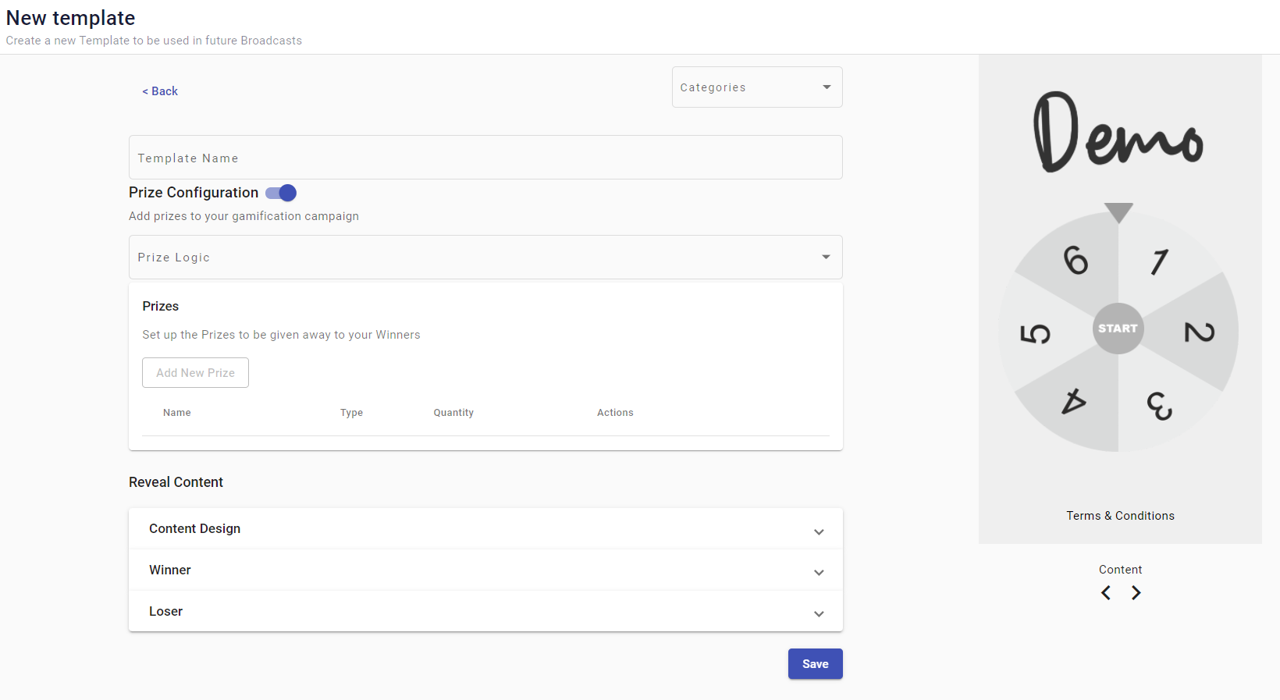
At first glance, in left side panel are all the elements to be defined in the same manner as the other reveal campaigns. On the panel to the right, in the preview area it shows a placeholder with a wheel with numbered slices. And it is the wheel that drives the configuration for the other campaign elements. Let us address the wheel and how it impacts the configuration of the template.
The salient aspects of the wheel are:;
- The number of slices can be anywhere between 5 and 10., arranged as depicted in the figure below.
- The slices need to be of the same size
- The slice numbering starts at 1 at the red slice progressing in a clockwise manner.

Having settled the graphical aspect of the wheel and its slices, the other aspect that needs to be considered is the allocation of the pairing of slices to prizes/outcomes. The possibilities are many, so we will give an example to illustrate the options.
Say we have a campaign in which three different prize types are going to be given away, Free Dessert, Free Drink, and Free Dinner. The likelihood of a prize being awarded will vary according to the number of slices in the wheel. For this case,, if the wheel where to have 5 slices, a participation will have a 3 out of 5 of being a winner. As you increase the number of slices, the likelihood of winning will vary with the number of slices that have been paired with a prize. But the wheel could have been configured in many ways, two of which are presented below. On the left, a 6 slice wheel with 3 winning slices and a 10 slices wheel with 5 winning slices awarding these same three prizes. Study how the pairings between prizes and slices was done.
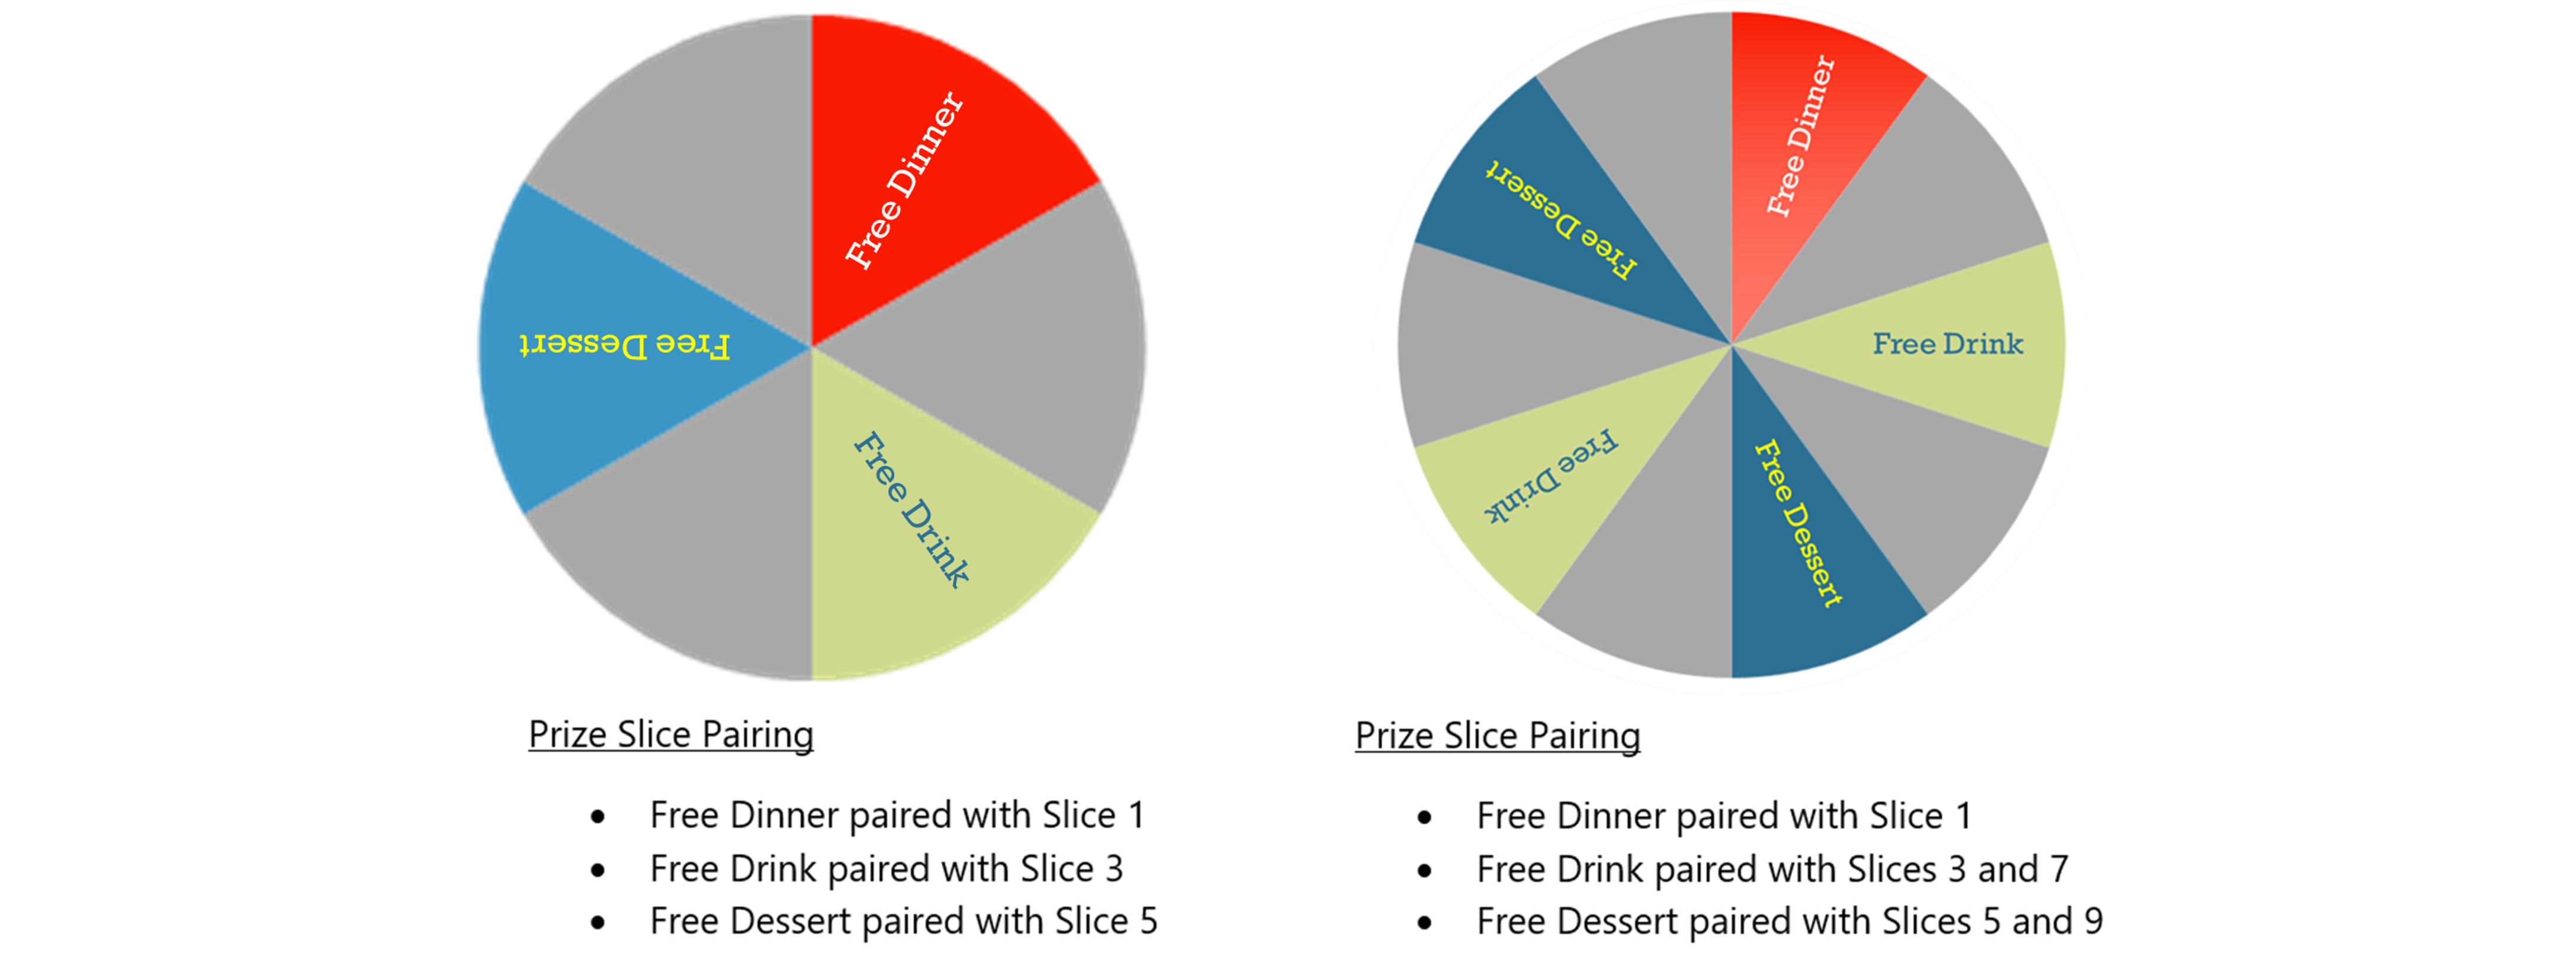
Also notice that slices that were not paired with prizes represent non winning slices. For these two cases, the number of winning and non winning slices were the same but that does not need to be the case. The wheel can be configured with any combination of winning and non winning slices. You have now all the information that is needed to configure a Spin to Win template.
Give your template a name
The initial steps are, from top to bottom, enter the name for the Spin Campaign template.

Set the Prize configuration
The Prize Configuration section is enabled by default. The definition of campaign contents will depend on whether the pRize configuration is enabled or not.
If you are not defining the prizes for the template, disable the Prize Configuration section and skip to the Define Content section.
If you are defining prizes for the campaigns review the Prize Configuration section for a detailed explanation.
DEFINING PRIZES WITHIN A TEMPLATE
When configuring templates that include prizes, you must be aware that when the template is invoked to generate an actual campaign, the prizes in the template will override any prize configuration that you may have defined in the campaign.
Define the Reveal Content
The Reveal Content setup is dependent on whether the Prize Configuration was enabled or not, This is, it can have two possible setups, with or without Prizes included, as shown below.

Reveal Content with Prizes
For the case of Reveal Content with Prizes, there will be three sections to define content for:
- Content Design
- Winner
- Loser
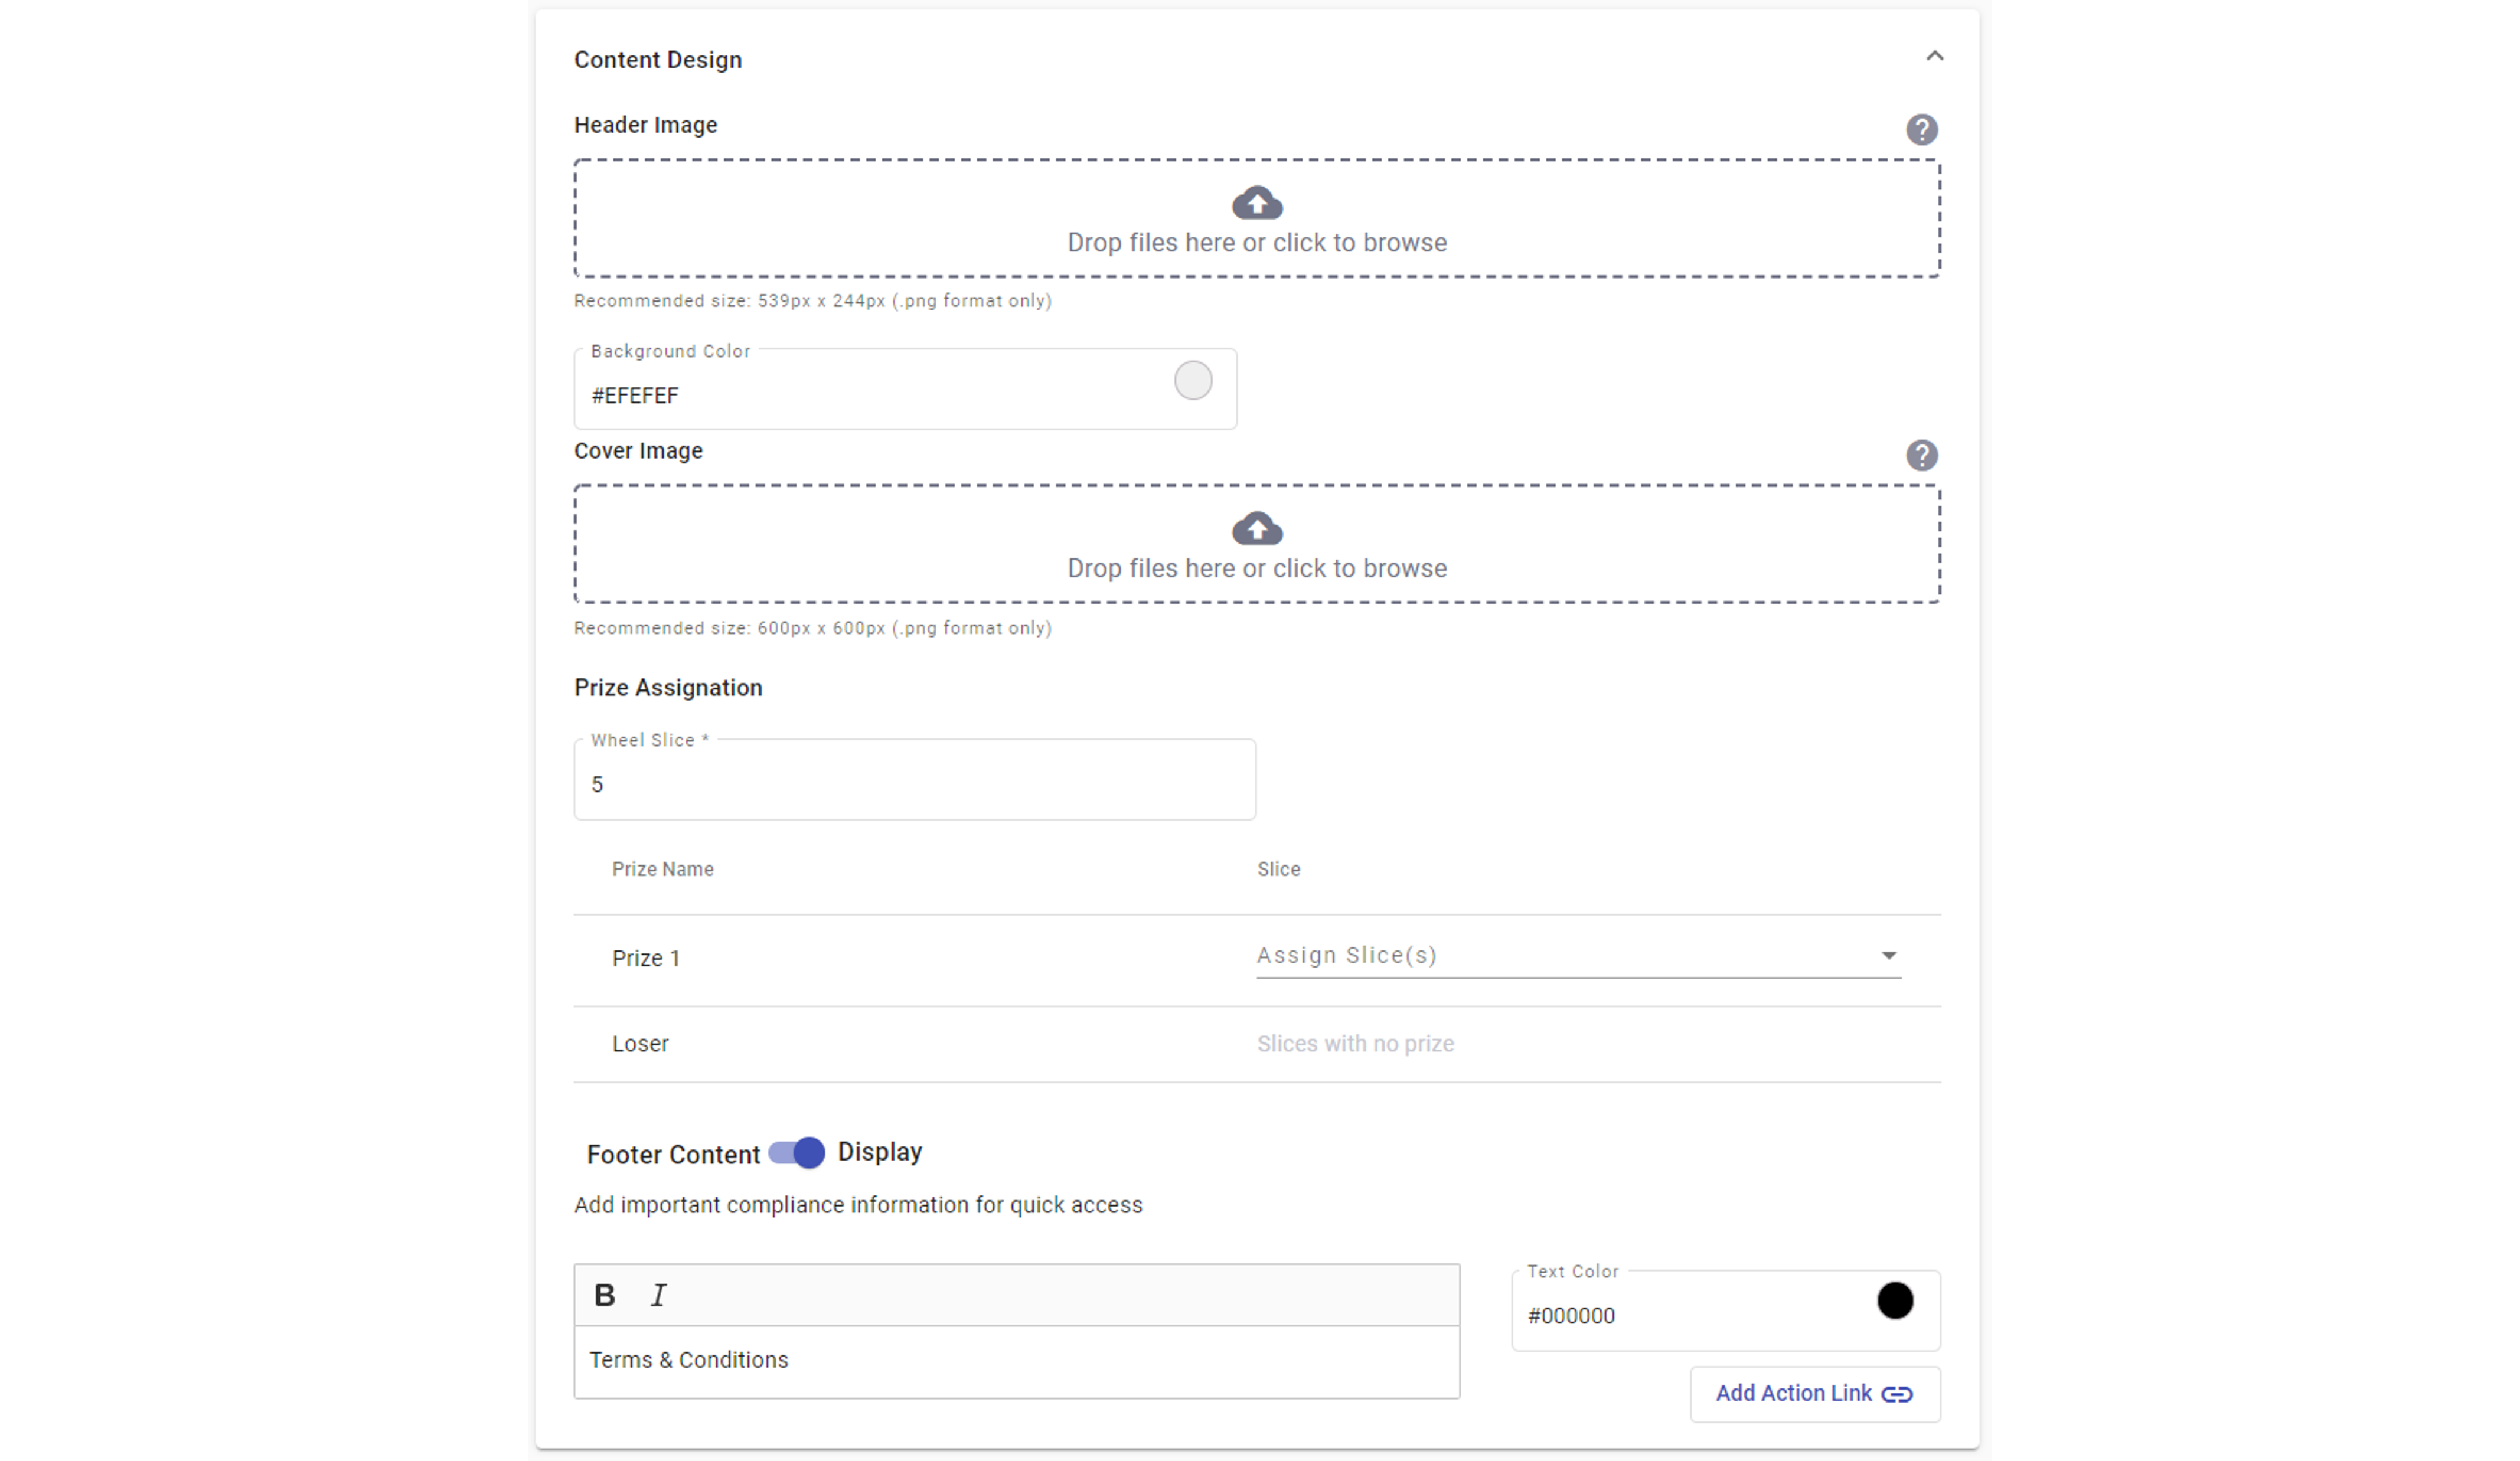
In Content Design is where the initial interaction content is loaded onto the template. The steps are straight forward:
• Insert a Header image. Identifies the brand or event being promoted.
• Insert a Cover image. Corresponds to the Wheel image.
• Define the Prize Assignation, where the paring of prizes to slices is done. The prizes that were defined in the Prizes section, is replicated in the Content Design section in a table format as shown, each with a corresponding slice assignment drop down field that when clicked will expand to expose all the wheel slices, allowing to select which slice corresponds to which prize. The figure below shows an example of a progression between unpaired to paired Prizes and Slices for a 5 slice wheel.

• Define the Footer content. Can be optionally switched off, or left active, and if active, could have an associated action link.
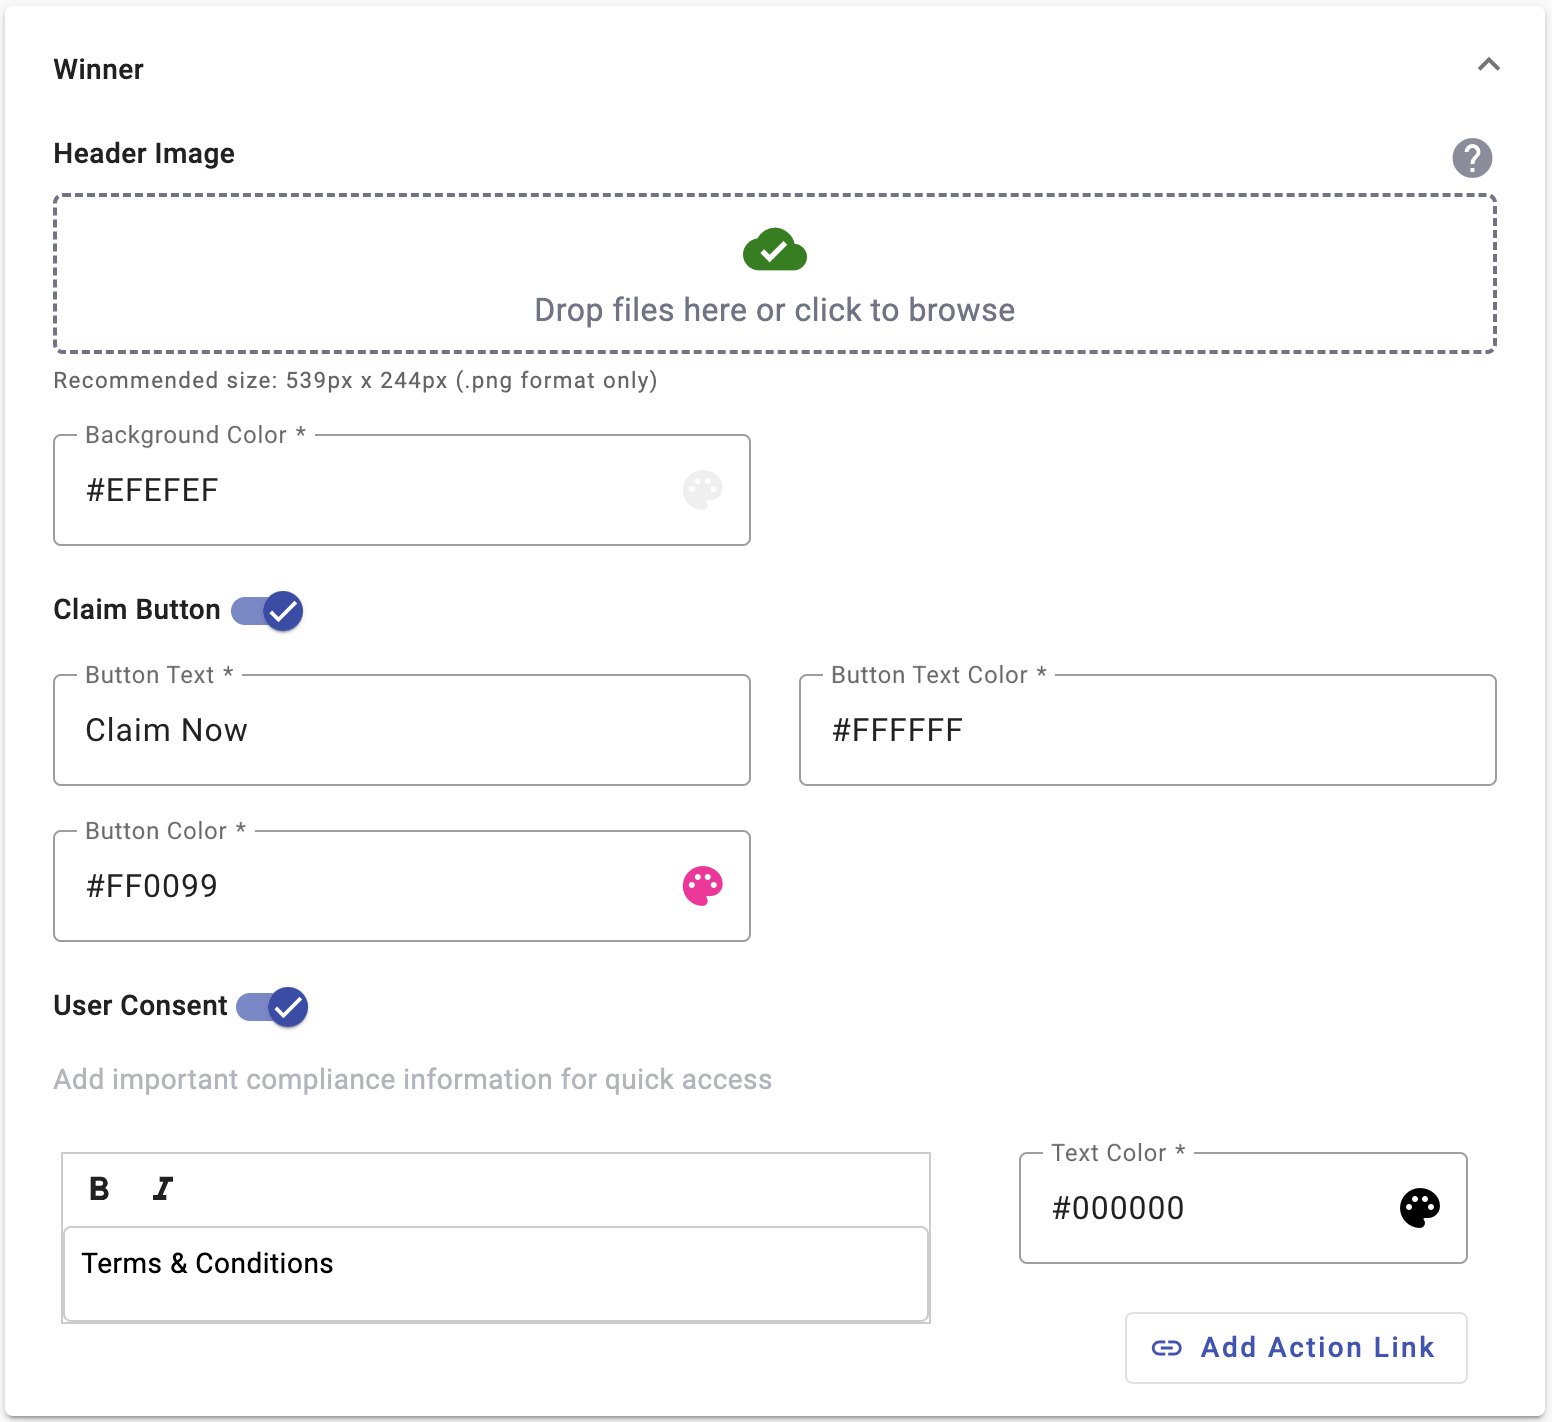
The Winner section deals with the appearance of the award page of the template, except for the awarded prize image, that was already defined in the Prizes section above. The steps are:
-
Drag & Drop the Header image to the specified area on the screen or click the Browse Files button to select the image from the computer. This image will be displayed at the top on the winner’s screen.
-
Set the background color of the winner screen.
-
Click on the the Claim Button toggle to display a button designed to claim the prize. Here, you can define the button text, button text color, and button color.
-
From the User Consent Checkbox toggle, you have the option to add Terms and Conditions that Users must accept in order to claim the prize.
Enter the Terms and Conditions by selecting the Add Action Link button.
In the Loser section you define the following:
• Header image
• Loser Message or Image, and optionally
• A time dependent Redirect to an URL of your choosing relevant to the outcome.
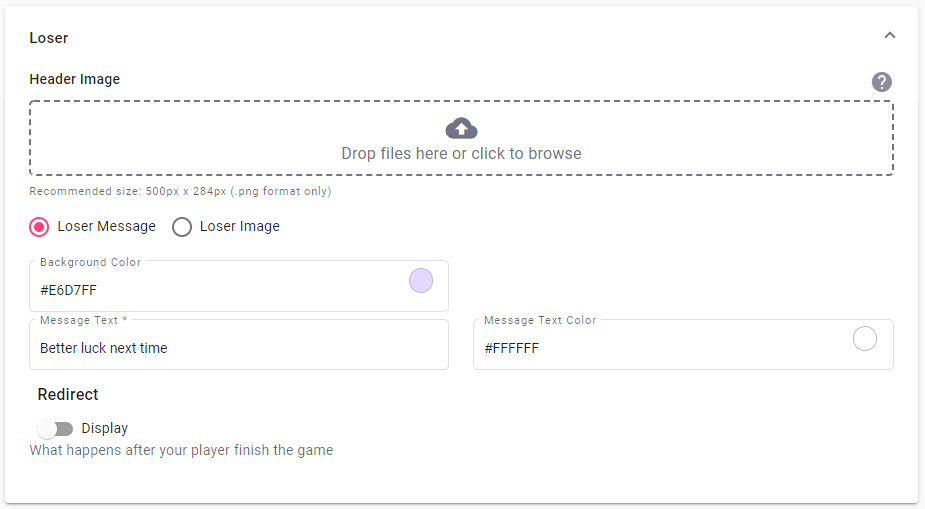
At this point, go the preview screen and check the appearance of the content that was introduced. You can change any aspect of the template or you can Save it and conclude the process. The template will be added to the overall template screen in its corresponding group: Scratch Card, Peel It, or Crack The Ice.
Reveal Content without Prizes
In the Reveal Content without Prizes there are two sections to configure:
- Content Design, and
- Reveal Design
The Content Design in this case is identical to the Content Design with the Prize Configuration enabled, which in turn, requires the same steps:
• Insert a Header image. Identifies the brand or event being promoted.
• Insert a Cover image. Corresponds to the image that blocks the view of the prize.
• Define the Footer content. Can be optionally switched off, or left active, and if active, could have an associated action link.
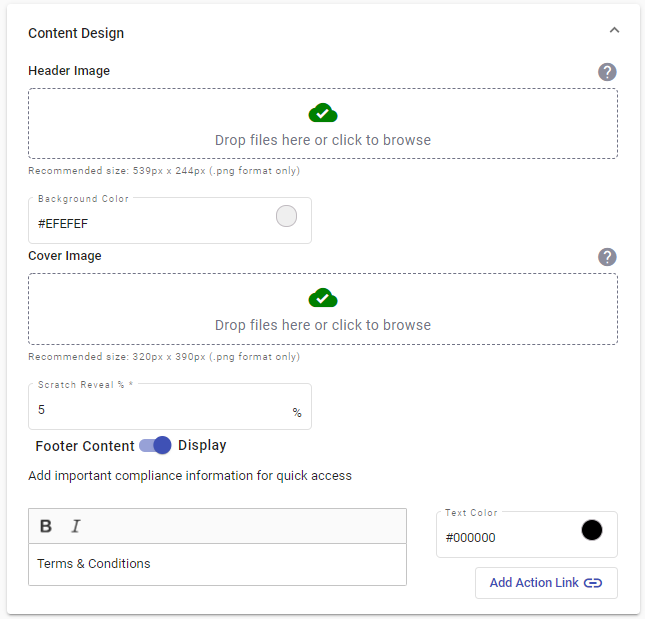
The Reveal Design represents a subset of the required elements that would yield a completely functioning template. Its scope is to define the elements associated with the hidden image of a winning outcome, the image to be revealed after a participant won.
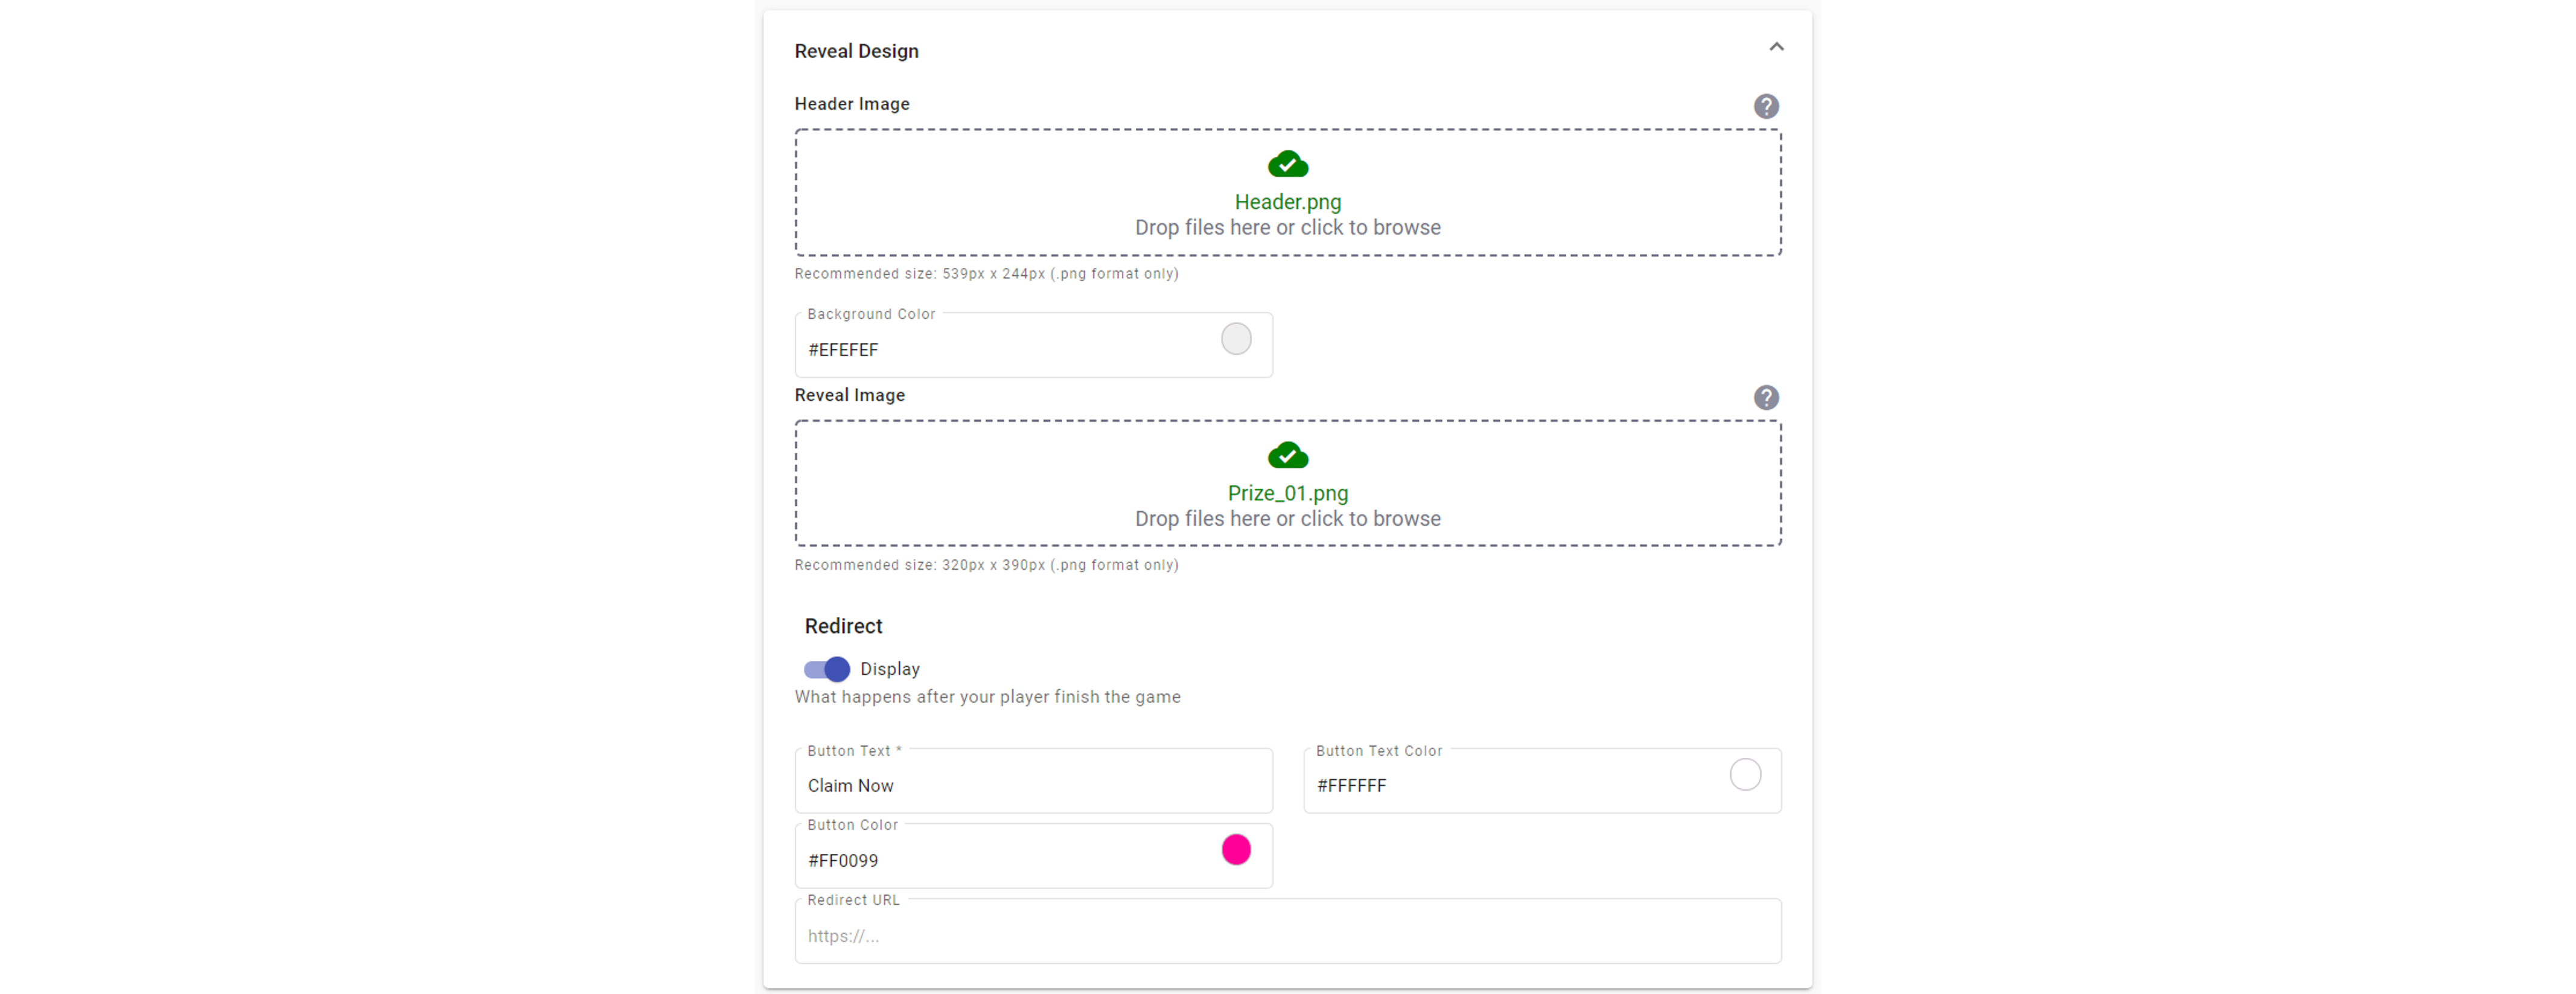
There are three elements that can be defined. Follow these steps:
- Insert a Header image. Identifies the brand or event being promoted.
- Insert a Reveal image. Corresponds to the image that is hidden and related to the prize.
- Set a Redirect action, which is by default disabled and this step can be omitted, or select the Redirect slider button to set the some type of follow up action, such as claiming the prize, by the inclusion of a button and an associated redirect URL, once the button is acted upon.
At this point, go the preview screen and check the appearance of the content that was introduced using the scroll arrows at the bottom to review all content. You can change any aspect of the template or you can Save it and conclude the process. The template will be added to the overall template screen in the array that corresponds to Slot Machine Templates
Updated about 1 year ago
