Adding your Subscribers
To add New Subscribers to the platform, select Add Subscribers located under the Subscribers tab.

Consent Dialog
Anytime you initiate an action to add subscribers, a Consent Dialog box will pop-up with a confirmation request of adherence to the basic tenets for message delivery, as shown below. Read the terms carefully as they are important, and ensure that you are in compliance with all of them.
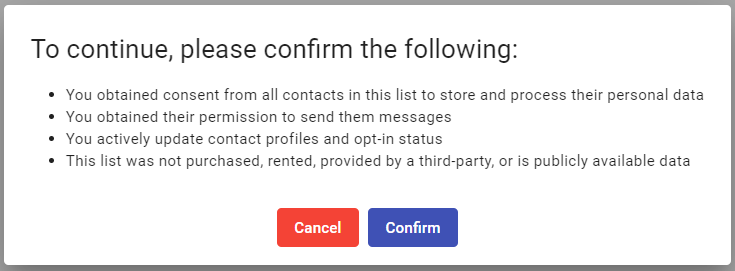
ON THE CONSENT DIALOG BOXIf the Consent Dialog is not confirmed, you will not be able to upload subscribers to the platform, since it is an essential part of the Terms of Service.
Once the Consent Dialog has been confirmed, the following options to add subscribers will be available:
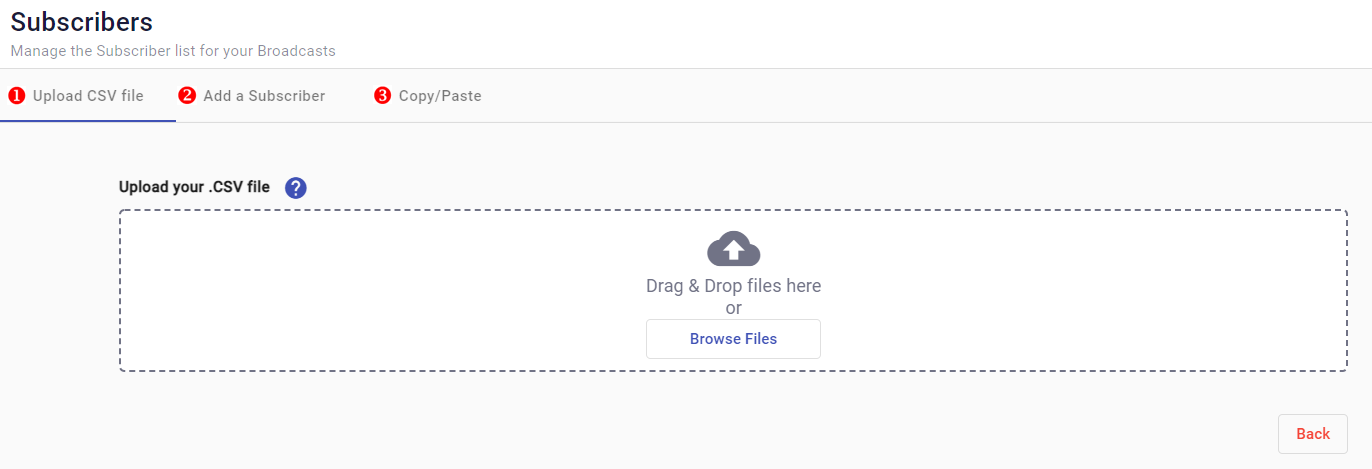
- Upload CSV file (Multiple Subscribers)
- Add a single Subscriber (Single Subscriber)
- Copy/Paste (Copy Subscribers)
Upload CSV file
(Multiple Subscribers)
To add multiple subscribers,
- Select the Upload CSV file tab
- Insert the CSV file in the Drag & Drop area on the screen or click Browse Files to select the file from where it is stored.
ON CSV FILES REQUIREMENTSOnly comma-separated value (.CSV) formatted files can be uploaded to the platform. Make sure that the uploaded file is a comma-separated value file that allows you to save data in tabular format. It is mandatory to have a row of headers on the first row of the file including a ‘mobile’ type header to facilitate the validation process of the file by the platform.
Once you have uploaded the CSV file, you are taken to the Field Mapping screen. In it, there will be a table with,
- The column headers of the CSV file under Column Header from File,
- The content of the first record of the CSV file under Preview Information,
- Three headers identified as Valid, Invalid and Empty which establish the state of the attributes of the file that have been matched, and
- A Field Name column that presents in each of its rows a drop down menu, Skip, which is where the actual matching between the CSV file record attributes and the platform fields takes place.
Let us use an example of how the field matching is done. The CSV file to be uploaded looks as follows. Note that although it looks a spreadsheet, it is in fact an Excel file saved with the .csv extension.

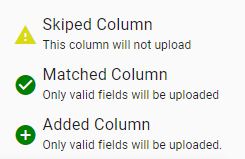
The resulting uploaded file would yield the following matching table in the Field Mapping screen. The salient points in this table are, all of the entries under the Column Match header of the table are set to the icon that represents Skipped Column as shown in the legend guide in the top right corner that displays all of the possible matching states of any given entry.
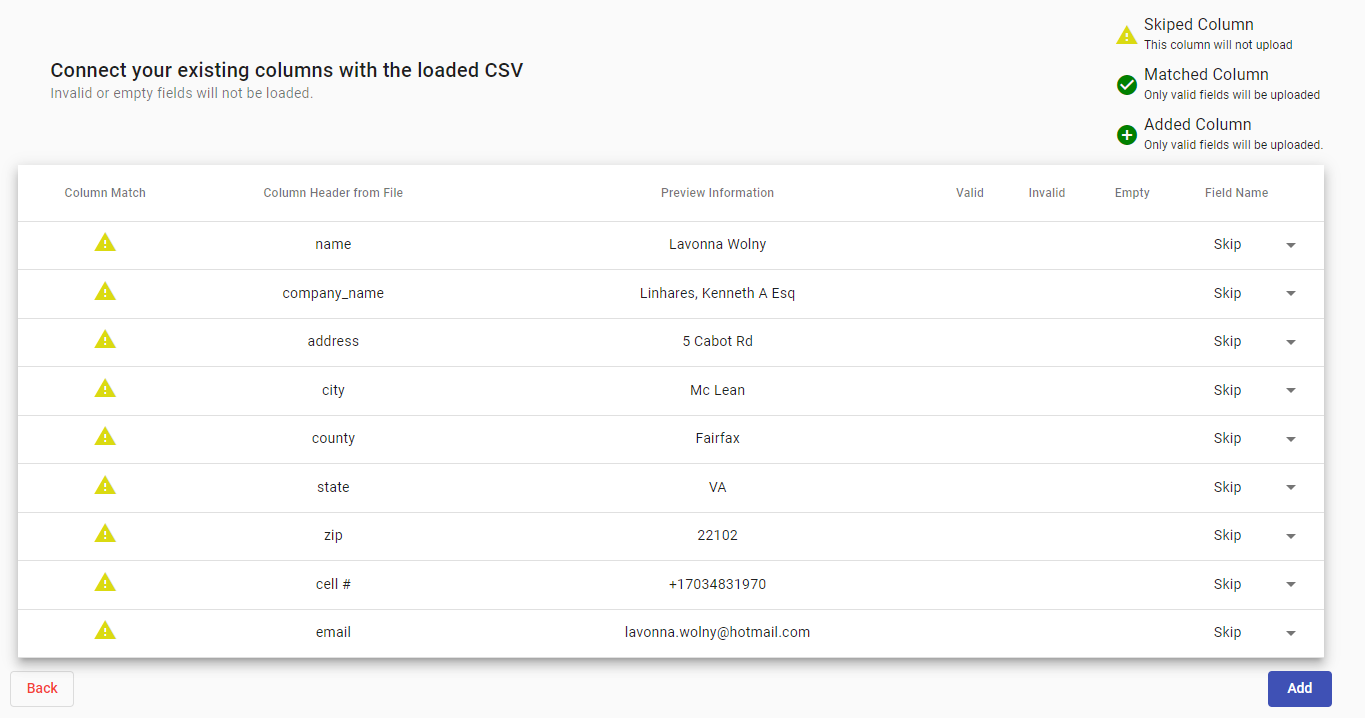
This is the de facto state of the loaded attributes of the CSV file which means that if left as is, they will not be uploaded as part of the subscriber's entry.
Under the next header in the table, you will find all of the headers of the CSV file, transposed, in the order that they are arranged in it, and represent the individual attributes that correspond to each record entry of the subscribers to be uploaded. Comparing to the sample file header row,

we can see that it follows the same sequence except that it is displayed vertically.
The next header, Preview Information, displays the first subscriber record of the CSV file with its corresponding values.
Ensure that the phone number format in the CSV file adheres to the ITU E.164 recommendation which essential consists of a maximum of 15 digits that include the Country Code , 1 to 3 digits, and the variant adopted within each country to reach a subscriber, with up to 12 digits.
The columns for headers Valid, Invalid, _Empty _are empty, as they are used in the matching process to detect the status of each field once the matching progresses. These columns will be populated to reflect the number of record attributes that conform with expected data format of each platform field.
As the platform requires some basic information to be able to engage subscribers, such as mobile phone number and email addresses, these are the easiest attributes to begin the matching with.
Inspecting the table, we can see that under the Column Header from File , the mobile phone number is identified as cell #, the eighth entry in the table, and the email address by email, which is the last entry.
The other seven attributes, such as name, company_name, address, city, etc. may or may not apply for your purposes, depending on how you intend to drive your engagements with your audiences.
So, to match the cell # field in the CSV file with the platform's mobile field, under the Field Name column,
- Select Skip in the row of the cell # entry. This will display a dropdown menu, with two sections with a set of options in each of them:
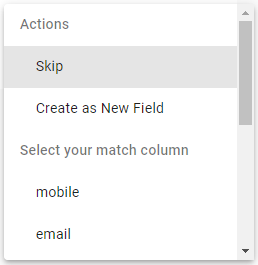
Actions, with Skip and Create as New Field options. The Skip option is the default state for all fields of a subscriber record. The uploaded CSV file may contain multiple fields that may or may not be applicable for your messaging campaigns but are relevant to other processes of your organization. The Create as New Field option allows adding new fields to the platform, so that elements of the CSV file that are relevant to your campaign practices can too become part of the platform fields and subject to the matching process. For example, you may be targeting fans of different sports teams, (soccer, cricket, basketball). And in consequence, you could add, for example, a sport field to the platform as you have this attribute registered in your subscriber's records.
Select your match column represents the list of all current platform fields to be matched against which could be the default fields or ones that you have added to the platform. Other headers that have correspondence with platform fields can be selected through the Skip dropdown menu to include those in the Subscribers List of the platform.
- In the Select your match column section choose mobile from the menu, since cell# corresponds to the mobile number of the subscriber. This action changes the appearance of this particular entry in the matching table to the following,

The Skipped_icon changes to _Matched, the Valid, Invalid, and Empty columns change from being empty to reflect the platform's validation of the data present in the uploaded file, In this case, there are seven (7) valid, one (1)
invalid, and two (2) empty record elements for the cell # and mobile matches.
- Repeat the process for the email entry in the table. This is, in the last row under the Field Name column, select Skip . In it, locate the email field and select it. As before, the entry in the table will be modified to reflect the platform detection of the record elements.

Any attribute of the file records that has a counterpart in the platform fields is added through this procedure.
Furthermore, if in the uploaded CSV file there is an attribute that does not have a platform field that it can be matched against and it needs to be added, you have option of creating it. In the Field Name menu,
- Select the Create as New Field option on the row of the CSV entry that needs to be added to the platform fields, for example the zip entry. The platform will display the following,

The Skipped_icon changes to _Added, the Valid, Invalid, and Empty columns change from being empty to reflect the platform's validation of the data present in the uploaded file, In this case, there are seven (7) valid, zero (0)
invalid, and three (3) empty record elements for the zip and mobile matches. The platform will inherit the name of the entry as the platform field name, the Type box will allow you to select the appropriate format for the data, and establish its Default Value. (See below)
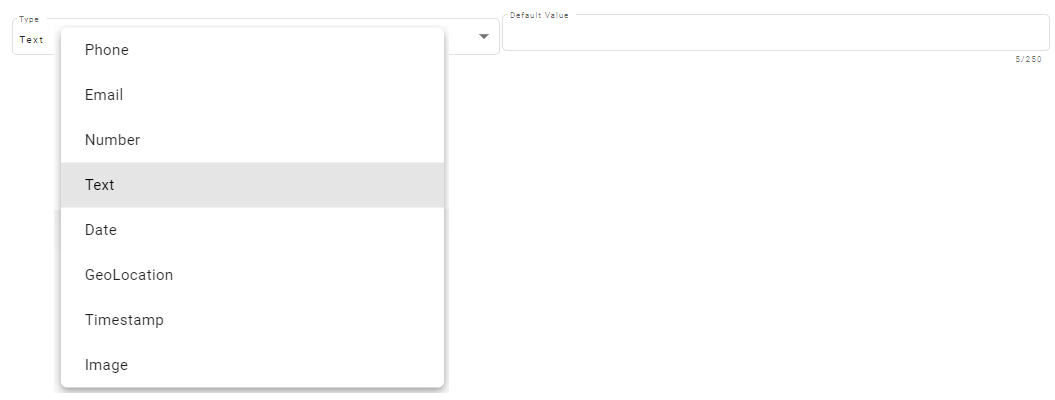
The resulting table after the matching process has been completed will look as show in the following figure.
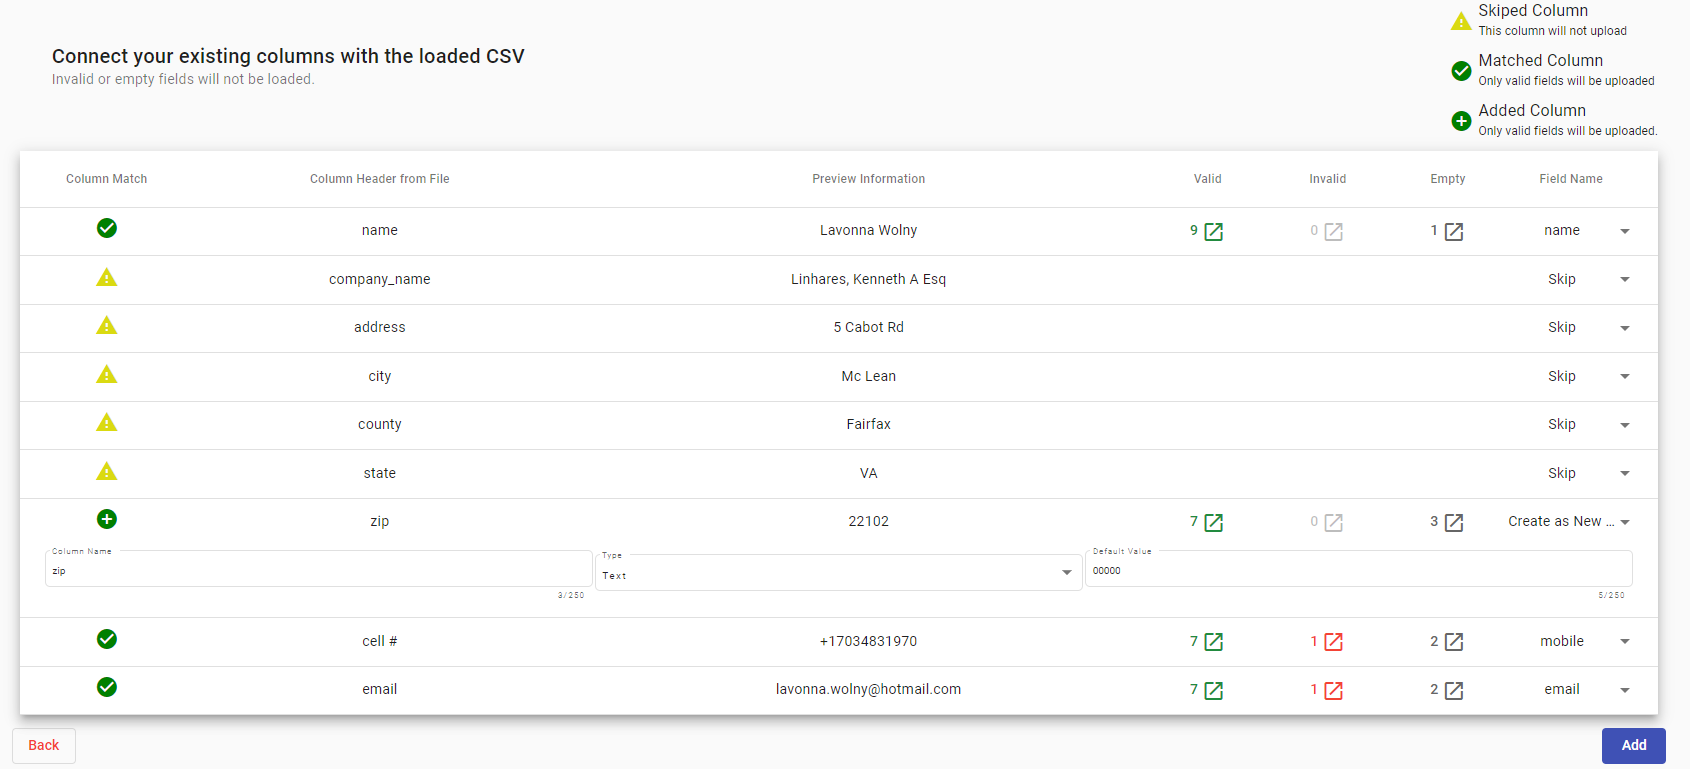
Reviewing the results of the matching process, we see that there are two invalid entries, one under cell # and one under email. By clicking on either one of them, you can review the entries that the platform has tagged as invalid and identify the reason for not being accepted by the platform. This is shown in the figure below for the cell # case, where the platform has identified an invalid cell#/mobile number entry.
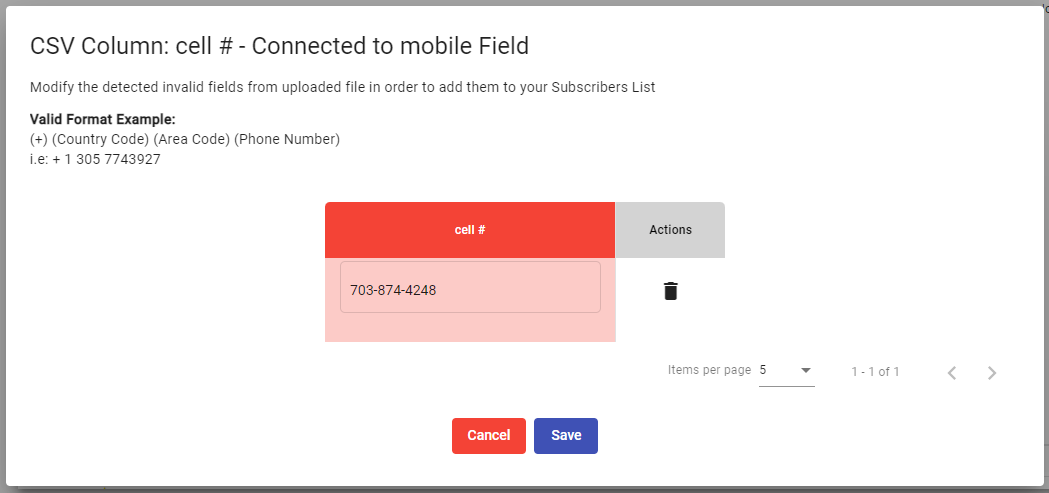
For this scenario, the number is invalid because of the hyphens used in separating the different portions of the number, in addition of excluding the Country Code. At this point you have two options, either delete the entry through the trashcan icon under Actions, or correct the number if you have the right number at hand, by editing it in the text box holding it.
Be aware that there are multiple reasons why a number could be wrong, incorrect number of digits, incorrect configuration of the number for the country, leaving country prefixes that do not conform to the E.164 recommendation, to name a few.
If do not take any corrective action the platform will ignore all those fields that were tagged as invalid and will not form part of the subscriber record loaded onto the platform. These fields will be left blank.
After completing the matching,
-
Click Add. The Creation in Progress popup window will be displayed to confirm the total number of new subscribers, updated subscribers and detected field errors.
-
Select Ok.
Once Ok is selected, only the mobile numbers will be displayed in the subscribers list.
Single Subscriber
To add a single subscriber to the platform, select the Add a Subscriber tab which displays the Add New Subscriber form with the existing platform Fields in the Subscribers List and fill it out with information being requested.
-
Select the country your subscriber belongs to from the Country dropdown.
-
Enter the Subscriber's mobile number or his email address or both since you need one or the other to creates a Subscriber in the platform.
-
Select Add to complete the task.

Notice in the form image above, that both the mobile and email boxes have a green checkmark at their far right which lets you know that the data that was entered is in the correct format.
Copy Subscribers
In the Copy/Paste tab, you are going to create what would be equivalent to the contents of a .CSV file, following the hinted format that is shown in the text entry box provided.
Noticed the format of the sample entries show only a couple of possible scenarios but you can enter data according to the design of your campaign, for segmentation, personalization or any aspect that fits your purposes.
MAXIMUM NUMBER OF LINESUp to a maximum of 5,000 lines can be entered. Make sure that you are following the CSV format.
Once you have entered the information into the text box, click Add. As before you will be taken to a Field matching screen, were you match the information just entered with the platform fields.
Updated 21 days ago
