Web Polls & Surveys
The Web Polls & Surveys campaign allows you to collect feedback from your audience through interactive, web-based questionnaires. This is useful for understanding customer behavior, preferences, and trends.
After selecting New Campaign, entering the Campaign Name, and selecting Web Polls & Surveys from the campaign options, you are brought to the Web Polls & Surveys campaign creation section, which has the following steps:

- Delivery
- Cover
- Contents
- Closure
- Message
- Summary
Delivery
You define the Delivery Channel and the campaign Recipients.
Currently, three delivery channels are available for Web Polls & Surveys campaigns:
For more information on selecting the desired delivery channel, go to the Delivery section.
For information on selecting the desired Recipients, go to Define Recipients in the Campaign Elements section.
Cover
The Cover step lets you customize what participants will first see when they open your poll or survey. It’s your chance to create a strong first impression and provide any important information before the participant begins.
The Cover step is divided into two main parts:
-
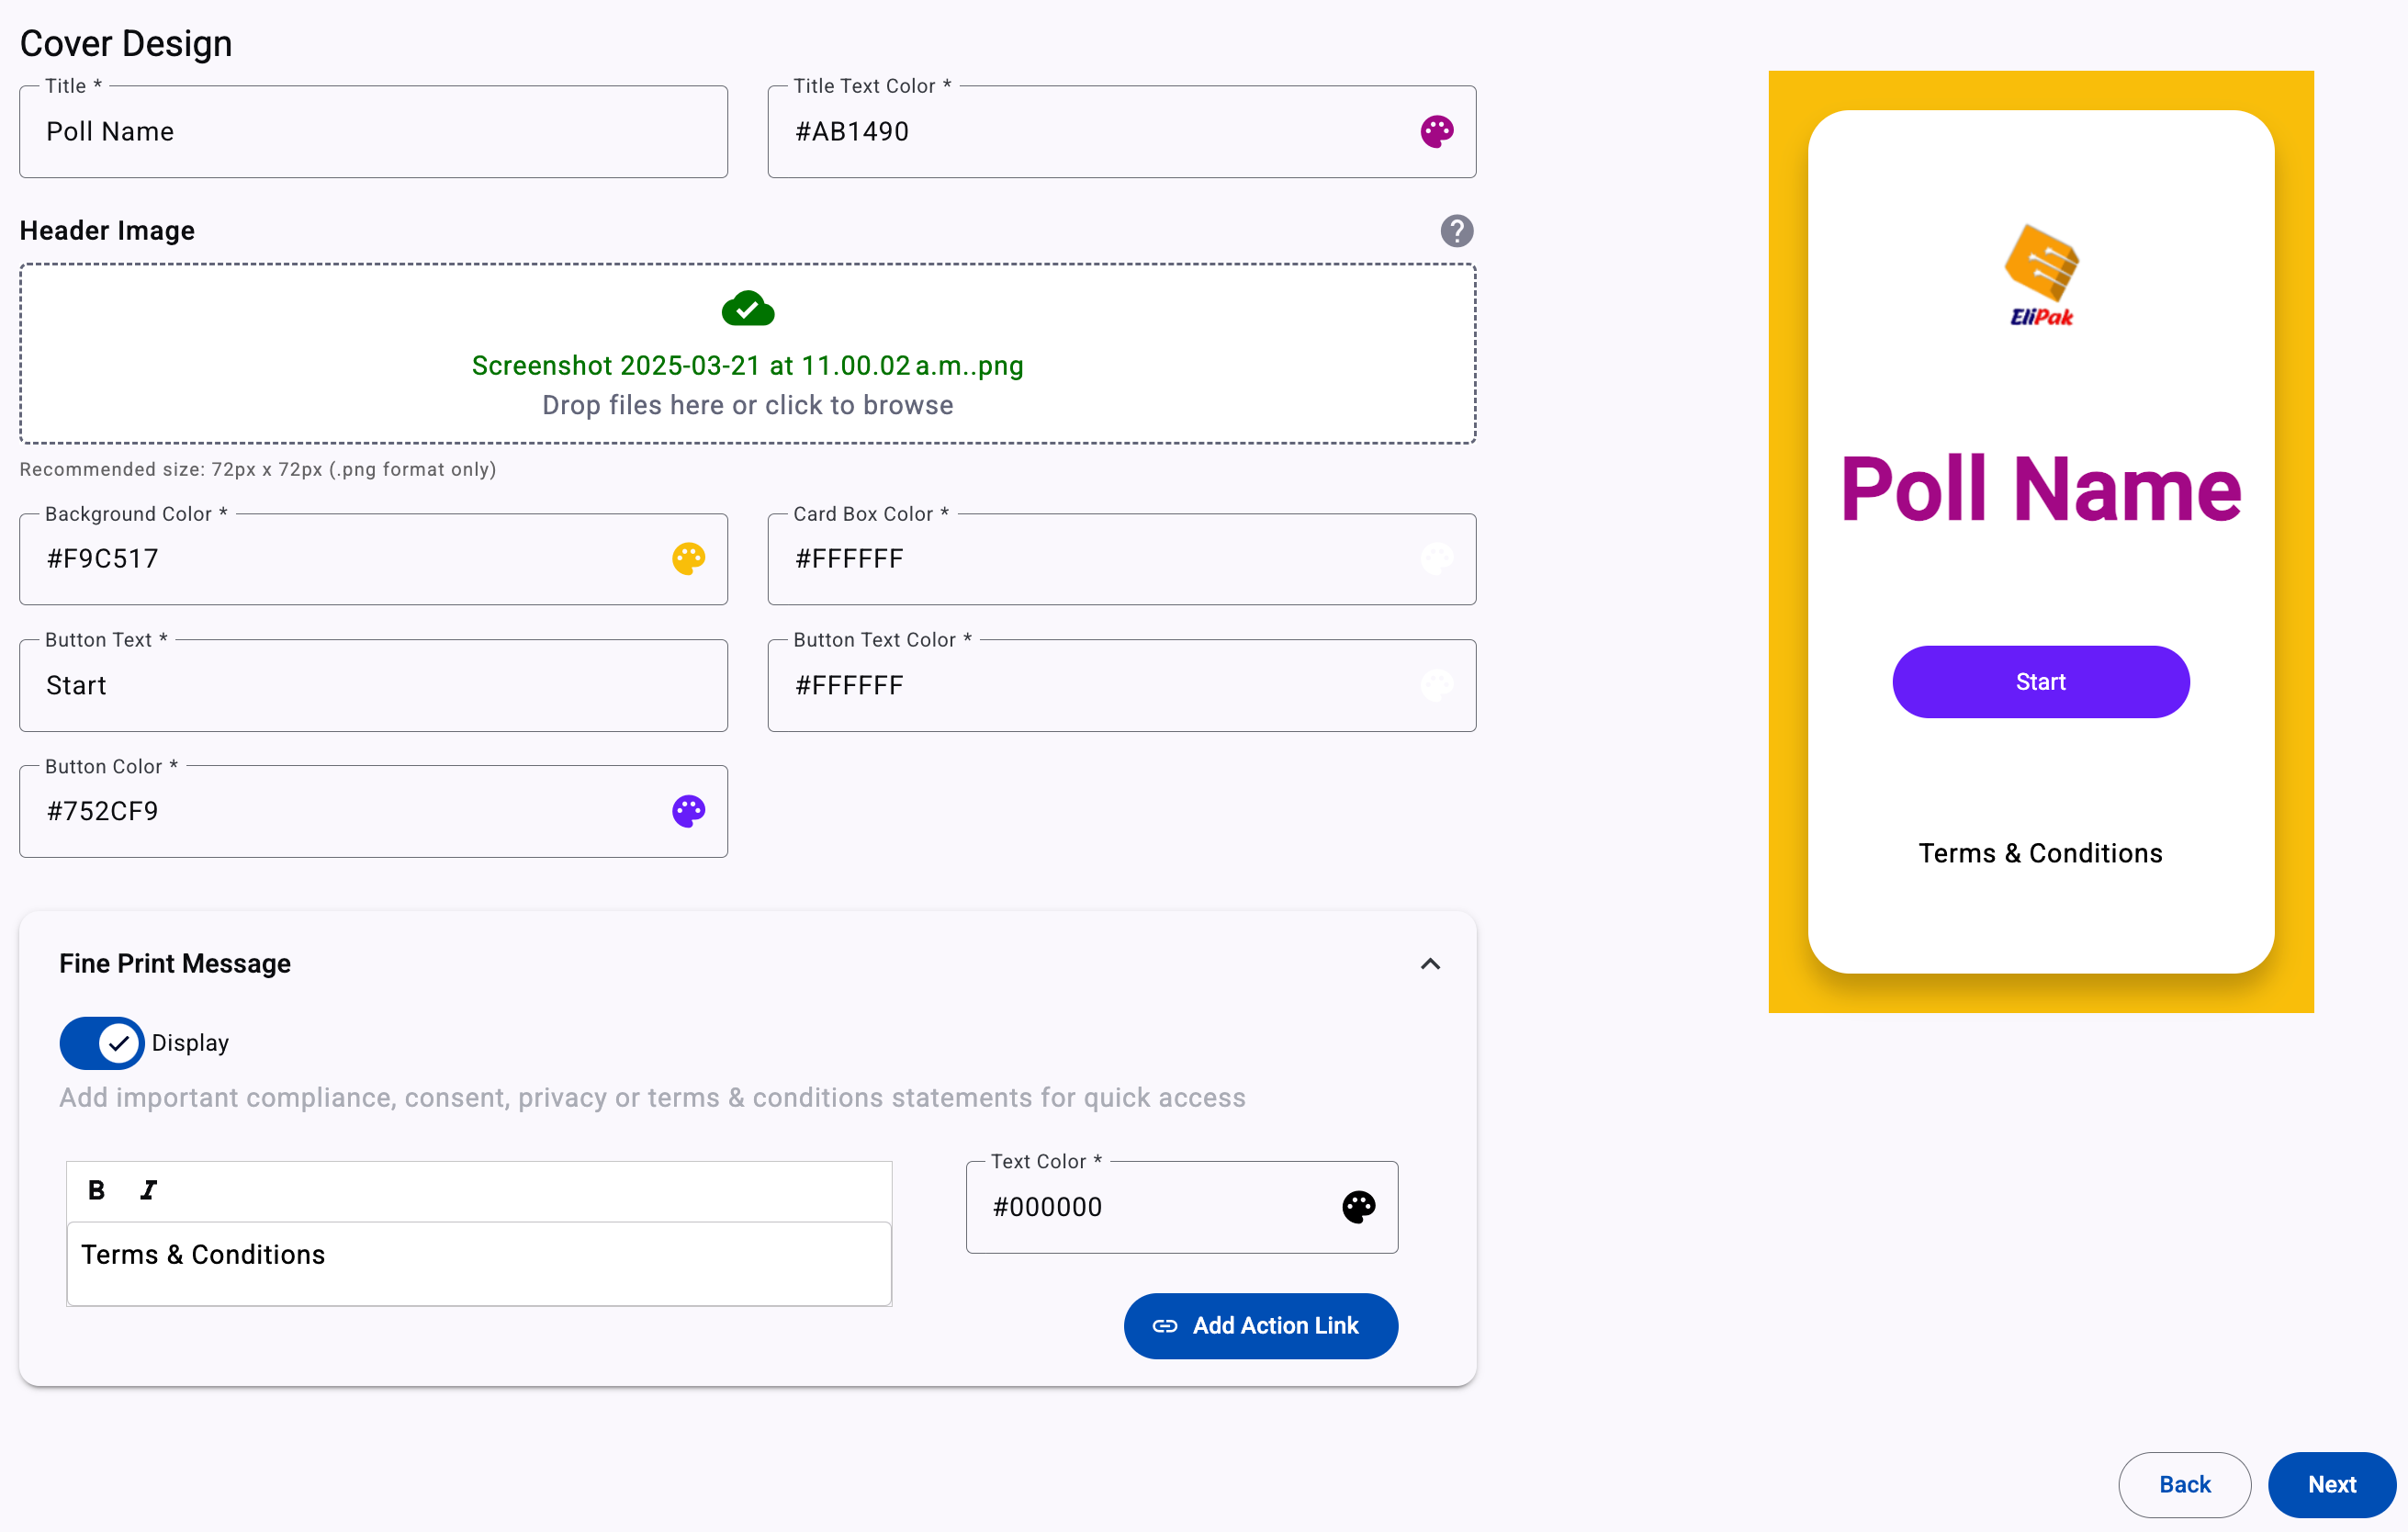
Cover Design - This section defines the visual layout of the poll’s welcome screen. You can customize the following elements:
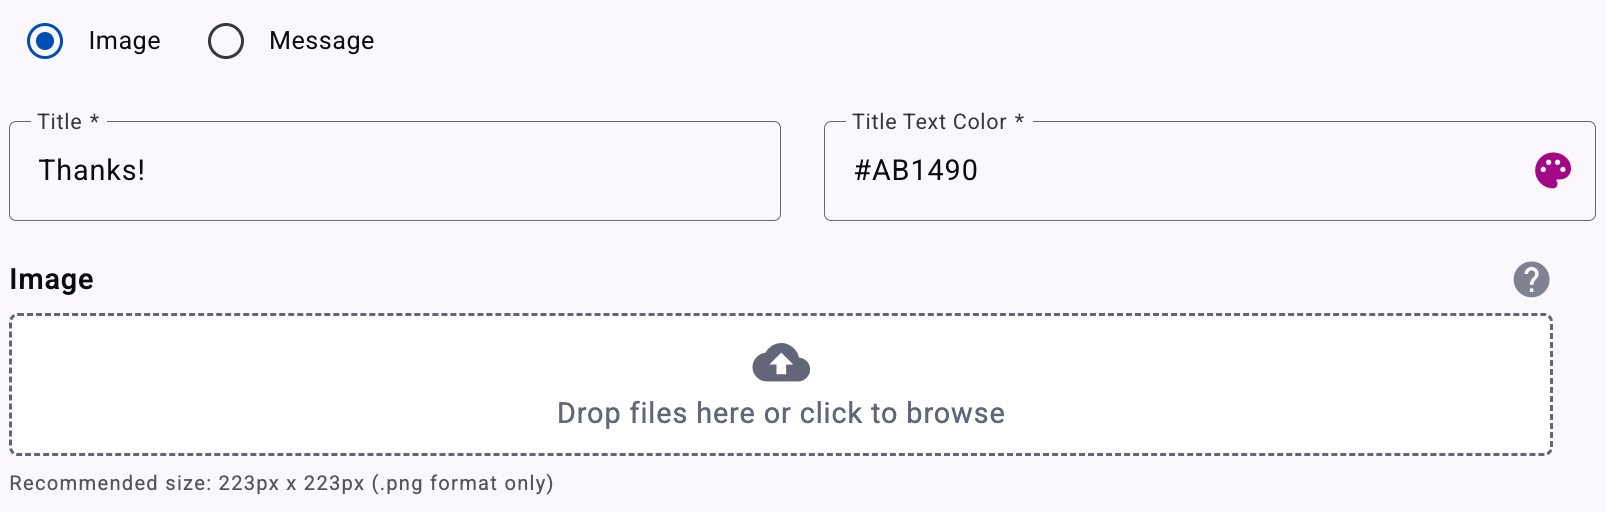
- Title: Enter a short title for your poll or survey (max. 21 characters). This is the main heading and will be visible at the top of the screen on the participant’s device.
- Title Text Color: Select the text color of the title from the color palette.
- Header Image: Upload an image that visually represents your campaign (e.g., a logo or themed graphic). Make sure to follow the recommended size (72 px x 72px) and format (.png) for best results.
- Color Scheme: Choose custom colors for the background, text, buttons, and card areas using the provided color palette. This helps match the poll’s design with your brand.
-
Fine Print Message - This section allows you to add a disclaimer or legal note (e.g., "Terms & Conditions"). If you want your Fine Print Message to link to an action, click Add Action Link. This turns part of your message into a clickable link.

- Enter a Content Name (e.g., "Learn More" or "Visit Store") and select the desired action link by selecting the dropdown.
- Click Add Action Link dropdown and choose one of the following options:
- URL - Redirects users to a website Link to a website (e.g., terms & conditions page). Select the URL option and enter. Once selected, enter the URL in the text field.
- Email - Invokes the default email client of the device from which the participation is taking place, and gives email address options that have been previously defined within the platform. Once a participant selects the hyperlink, an email will be set up to the email address selected.
- Call : Invokes the device’s capabilities to place a call to a number specified for that purpose. For example, this could be used in flash polls scenarios driven by a radio program.
- Navigator Address: Enter a location that will be turned into a hyperlink of the text in Content Name that will take the participant to a location in Google Maps.
You can personalize the content by selecting the Bold and Cursive format or change the Text Color by clicking on the Color Picker.
To change the action link, delete the Content Name from the Fint Print Message Editor. Then select the Add Action Link.
Once you are finished with the cover design, select Next
Contents
This section is where you configure the poll's questions that will be sent to participants.
The Question Type selected determines how the response options are structured. The platform dynamically adjusts the interface based on the question type (Yes/No, Keyword Response, Multiple Choice) chosen.
Yes/No Questions
This question type requires a binary response, where users can only reply with "Yes" or "No"
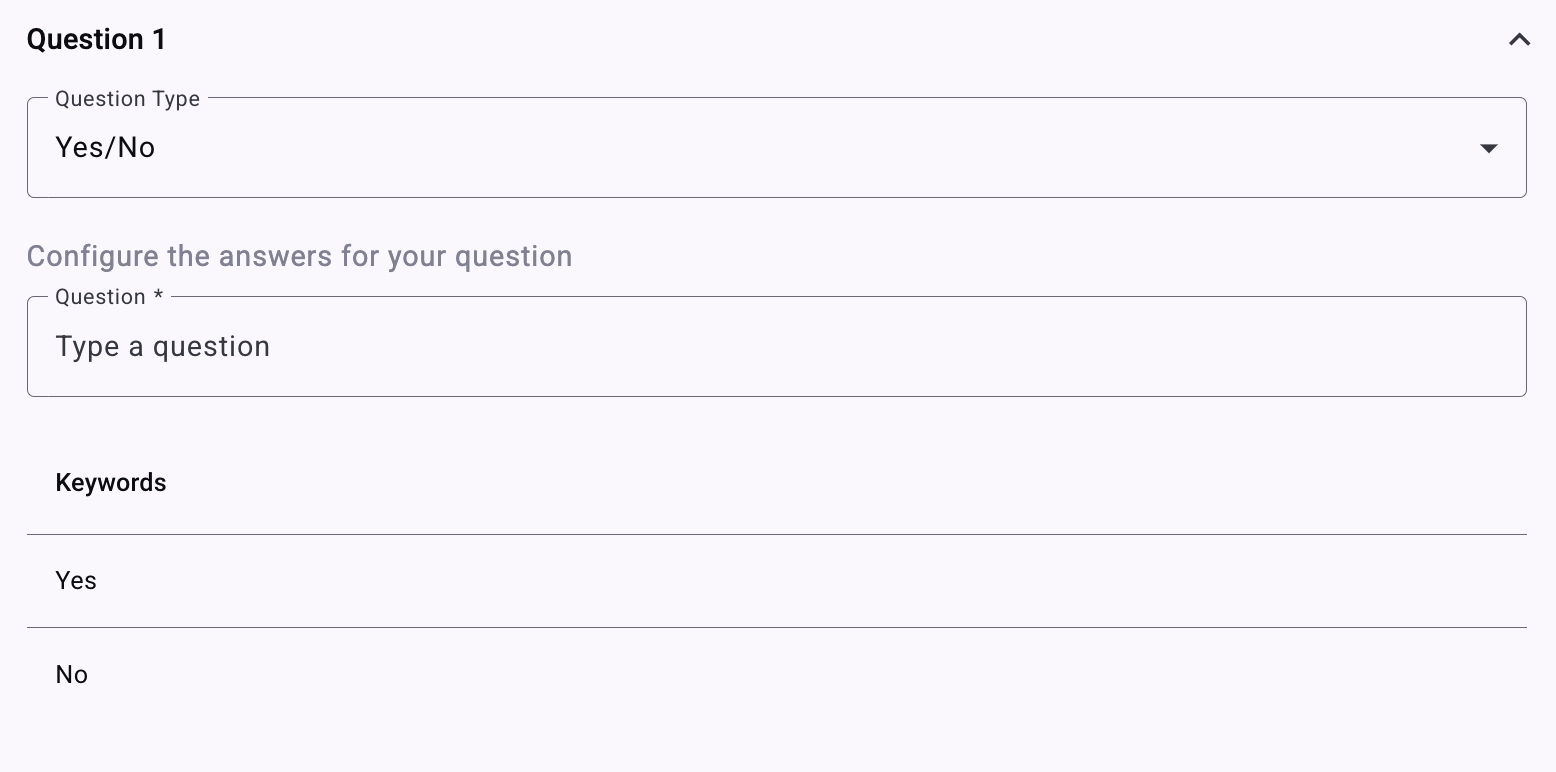
- The Question textbox allows you to input the question that will be sent to subscribers.
- Below the message box, the system automatically assigns the keywords Yes and No as response options. That is, predefined keywords Yes and No appear automatically.
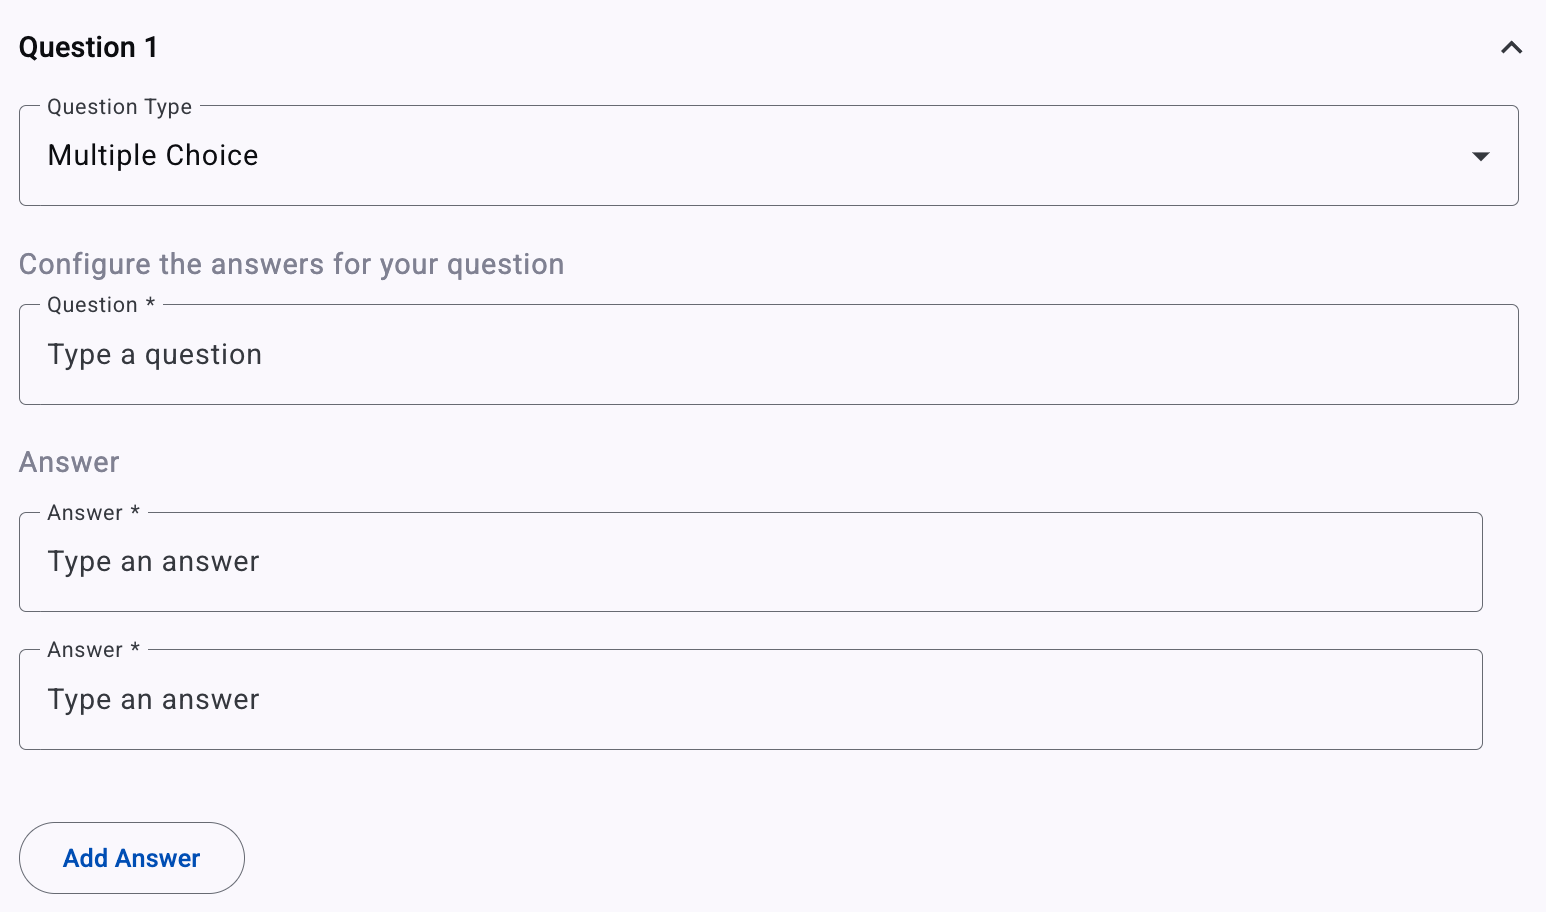
Multiple Choice
This question type allows respondents to choose from multiple predefined answer choices.
-
The Question textbox allows you to input the question that will be sent to subscribers.
-
From the Answer textbox, define answer choices (each limited to 30 characters).
-
There can be between 2 and 4 answers, the default value being 2. In the following screenshot, a configuration with 3 answers is shown. At the far right of the 3rd answer, there is a trash can icon that allows you to remove it.

-
To include more answers to the question, select the Add Answer button.
Closure
The Closure step is where you design the last screen participants will see after completing the poll or survey. It's an important moment to thank users, provide final messaging, or redirect them to another location for further engagement.
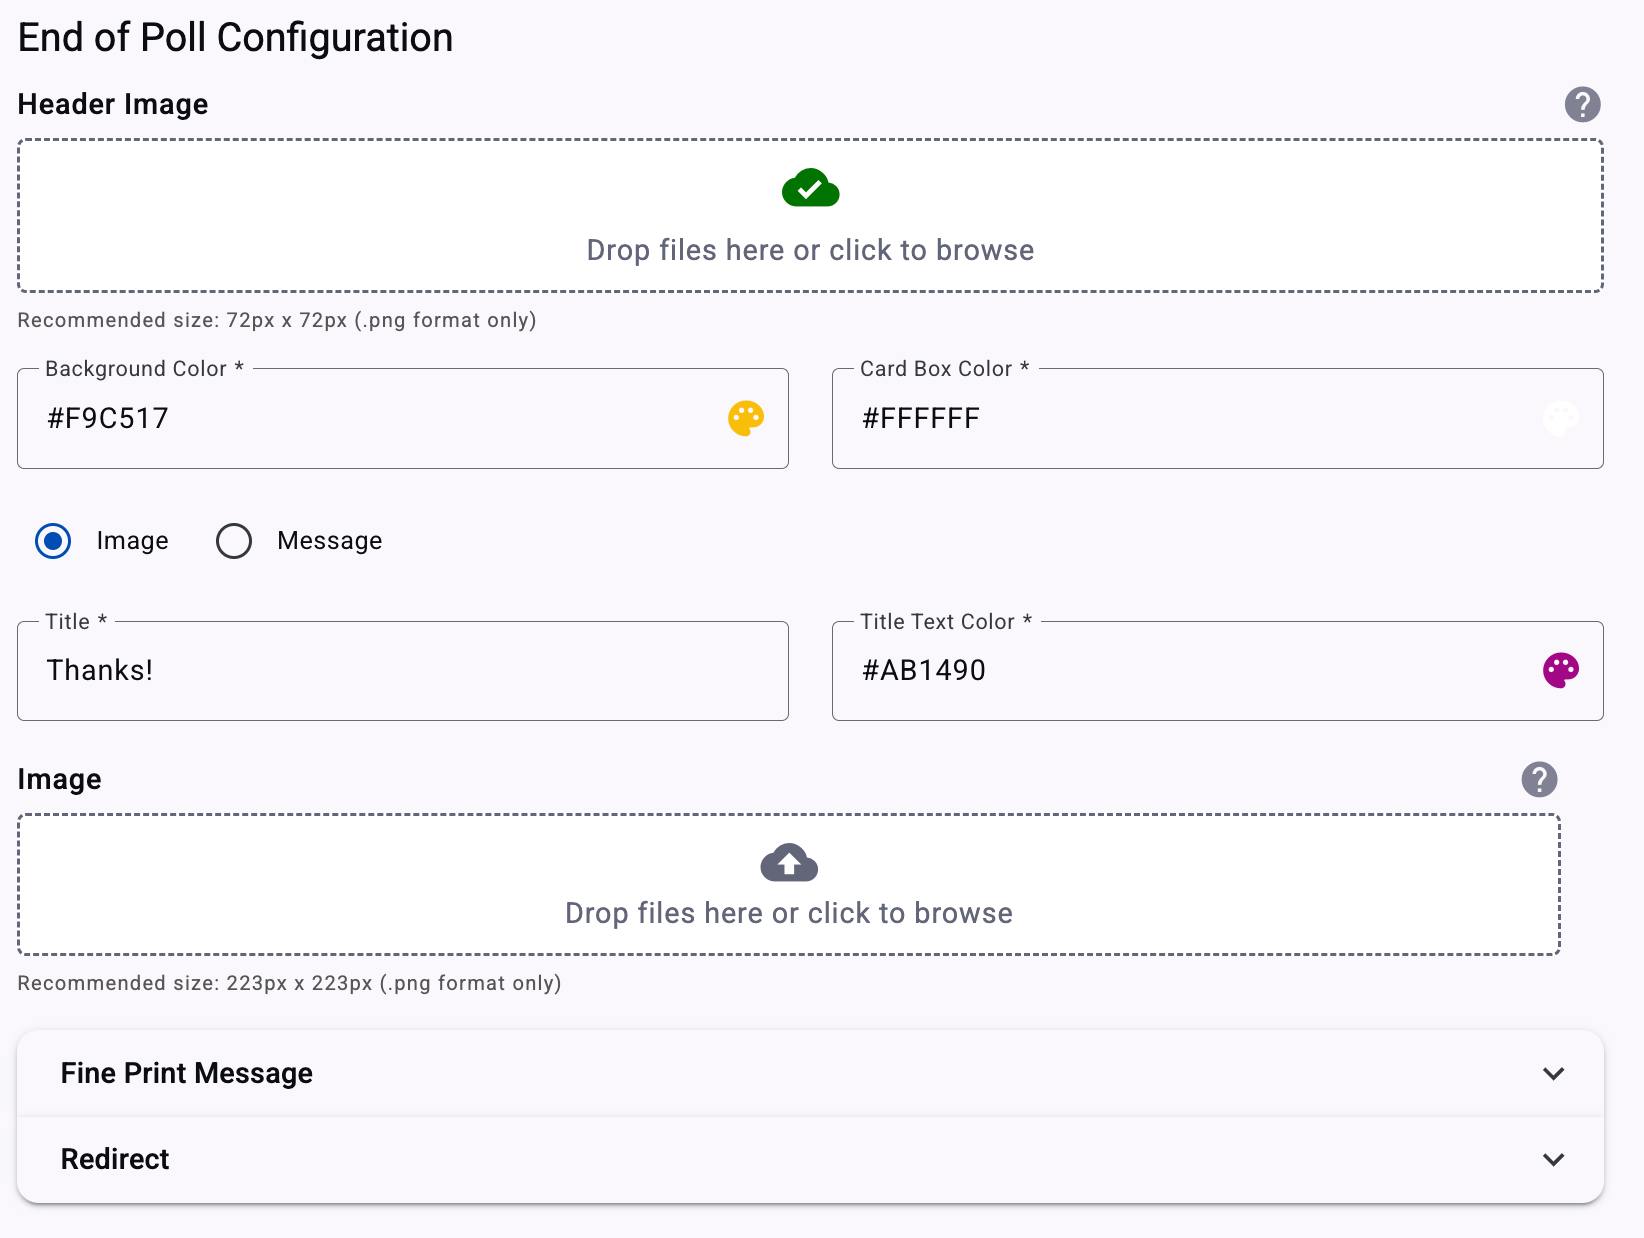
End of Poll Configuration
This section lets you choose how the end screen should look. You have two display options:
-
Header Image: Upload an image that visually represents your campaign (e.g., a logo or themed graphic) once the user has finished the poll. Make sure to follow the recommended size (72 px x 72px) and format (.png)
-
Personalize the look and feel of this final screen by setting the background color and card box color.
-
Choose one of the two different look and feel options. One is to close strictly with a message, and the other is to close the campaign with an image.
-
Image - End the poll with a custom image instead of a text message.
-
Message - Show a closing text message to thank or acknowledge the participant.

Fine Print Message
This section allows you to add a disclaimer or legal note (e.g., "Terms & Conditions").
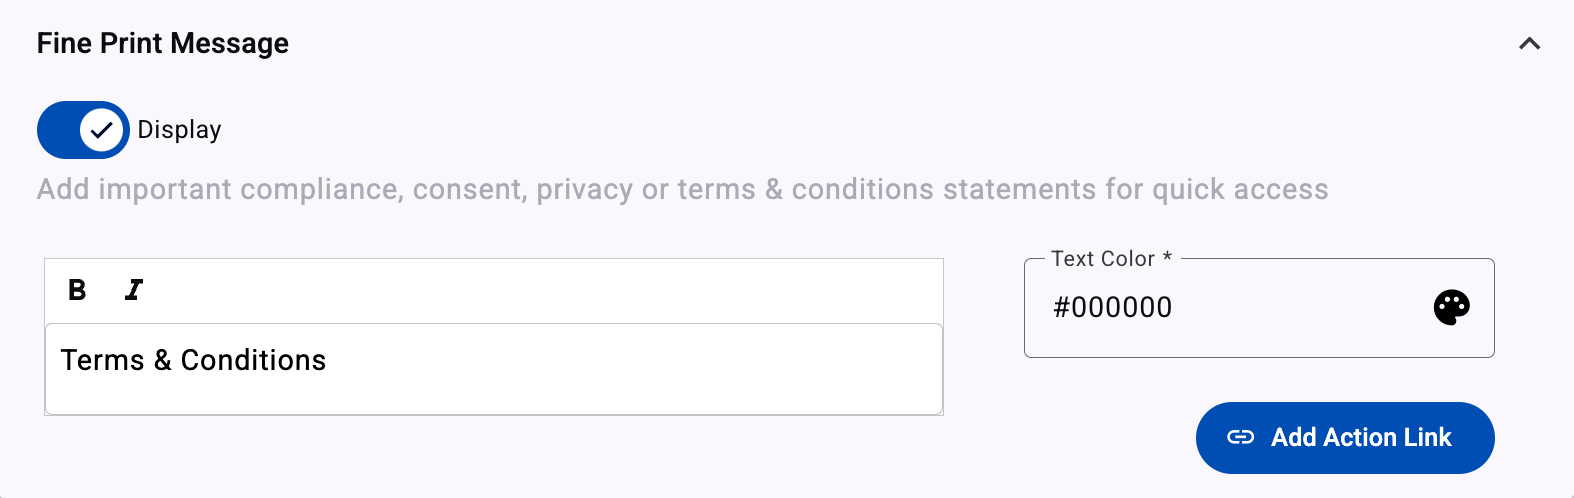
If you want your Fine Print Message to link to an action, click Add Action Link. This turns part of your message into a clickable link.
-
Enter a Content Name (e.g., "Learn More" or "Visit Store") and select the desired action link by selecting the dropdown.
-
Click Add Action Link dropdown and choose the following option:
- URL - Redirects users to a website Link to a website (e.g., terms & conditions page). Select the URL option and enter. Once selected, enter the URL in the text field.
You can personalize the content by selecting the Bold and Cursive format or change the Text Color by clicking on the Color Picker.
To change the action link, delete the Content Name from the Fint Print Message Editor. Then select the Add Action Link.
Redirect
The Redirect section allows you to add a button that links to an external webpage.
This can be useful if you want participants to: Visit your website, Claim a reward, View more content, etc.
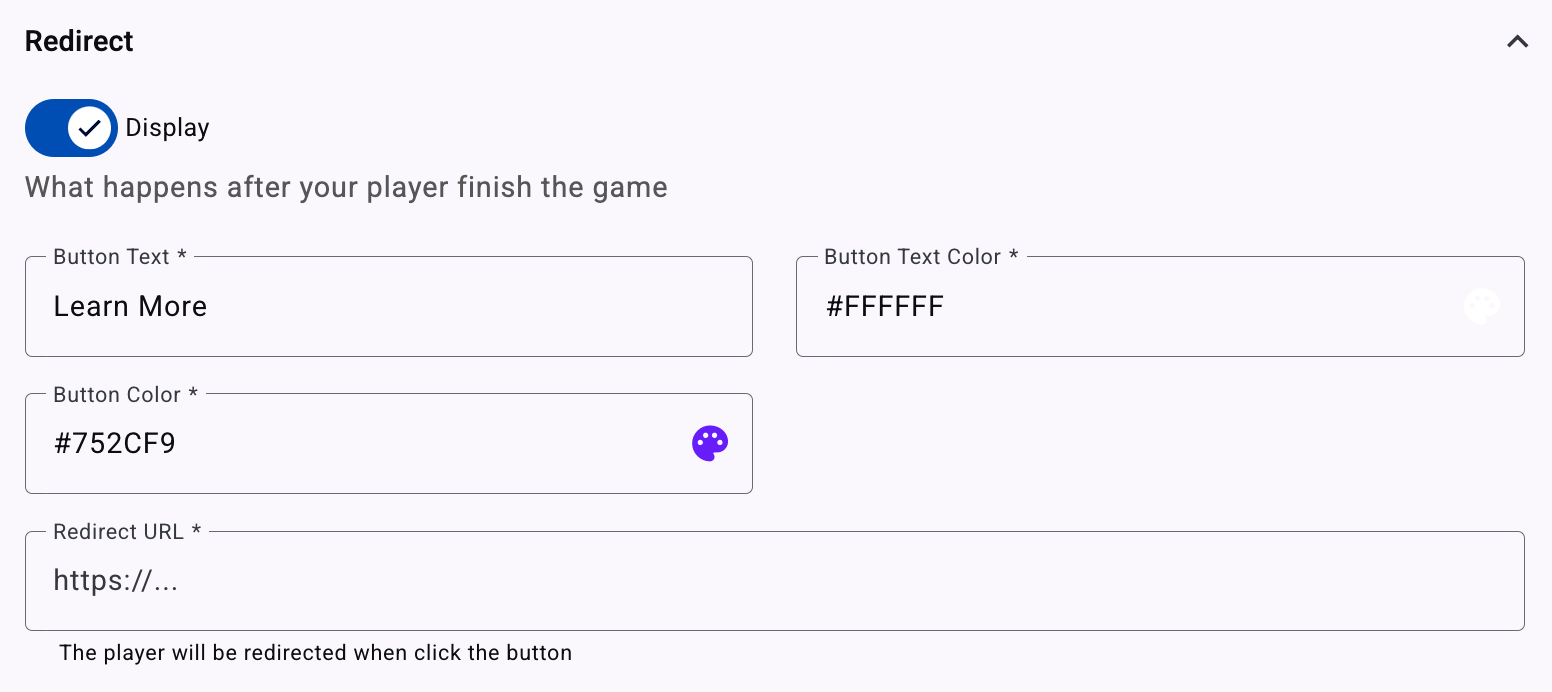
If enabled, a button will appear on the final screen of the survey, allowing users to click and be redirected to a specified URL.
The key configuration options available in this section include:
- Display Toggle: ON (Enabled) → The redirect button will be shown to participants after they complete the poll.
OFF (Disabled) → No button will be displayed, and the participant will only see the closure message. - Button Text: This field defines the text displayed on the button. Keep the text short and action-oriented to encourage engagement.
- Button Text Color: Defines the color of the button text by selecting the color palette.
- Button Color: Defines the background color of the button by selecting the color palette.
- Redirect URL: Enter the destination URL where users will be redirected when they click the button. Ensure the link is active and relevant to your campaign’s goal.ipant will be redirected upon selecting the button.
Upon completing all the steps above, select Next.
Message
In this step, the message that will be used to deliver the Campaign is defined. It is closely tied to how the campaign participation invitation was delivered. Given the delivery methods, the way the campaign participation is promoted will vary accordingly.

For more information about the message's Content and personalized fields configuration, go to the Message Content and Message Personalization section.
Once all the message details have been addressed, move on to Summary by clicking on Next.
Promoted through a Subscription Form
In the case of campaign promotion through a Subscription Form, there is no message to be sent given the nature of the entry point to the campaign. The campaign will be invoked through the Submit button of the Subscription Form after having completed it.
In consequence, the platform will deliver the following message, taking you directly to the _Summary _step.

Summary
The _Summary _step is where you take the final actions on your Web Polls & Surveys campaign, and have a chance to review some of the salient aspects.

You can view the following elements of the campaign configuration:
- Blocks Used: in this case, given the campaign, it shows Web Poll Builder
- Sender: the entity of the platform used to deliver the campaign
- Recipients: the recipients targeted in the campaign based on the selection at the initial definition
- Applied Filter: Any filter or segment that was applied to the campaign
The three areas that require configuration in the Summary step are:
- Campaign Expiration,
- Campaign Activation, and
- Throttle Configuration
For more information about the Summary step settings, go to Summary in the Campaign Elements section.
To view the report elements of a Web Polls & Surveys campaign go to the Interactive Campaign Reports section of this User Guide.
Updated 3 months ago