Managing Contacts
Access the following actions from the main Contacts section:
-
Edit contacts and view their platform activities
-
Delete contacts
-
Search contacts
-
Contacts Source
-
Create or delete filters
-
Create, edit, or delete segments
-
Create, edit, or delete fields

Editing Contacts and Interactions
To edit a contact data field, you click the Edit icon under the Actions column. The platform expands the contact entry and exposes all fields for modification.

You enter new data in the fields that need modification and select Save. A message appears confirming the contact information has been updated. The modification appears in the historical data stored for the contact.
A section at the bottom of the expanded contact fields displays the last activity — management, broadcast, or automation-related. You view a history of contact-related activities by selecting View more interactions.

Delete Contacts
If you select the Delete icon, a confirmation dialog appears. After you click Delete, a confirmation message appears.

To edit or delete more than one contact at a time, you select the checkboxes for each contact. After you select the contacts, the following options appear at the top of the Contact List:

Edit:
To edit the selected contacts, you click the Edit icon. A dialog box appears.
You edit bulk contacts using the following steps:
- Select the Contact Field you want to modify for the selected Contacts from the Field dropdown.
- Enter the value to be set for that selected List Field and
- Select Save.

Delete — To delete the selected contacts, you click the Delete icon. After you select Delete, a dialog box appears.
You delete bulk contacts using the following steps:
- Enter the number of Contacts you have selected to delete.
- Select Delete.

After you select Delete, a confirmation message appears at the bottom of the screen. After the message disappears, the Total Number of Contacts is updated in the Contact List.
Clear Selection — You click the Clear Selection icon to uncheck each selected contact.
Search Contacts
You search for a contact by field using the Search bar. The search options are conditioned by the field shown in the Search by box.

Search by is a field dropdown menu that displays platform and user-defined fields. When a field is selected, it restricts the contact search to the data type associated with that field.
For example, if mobile is selected, the search is restricted to partial or complete mobile phone numbers. If a field has a text data type — such as a name — alphanumeric characters apply. The image below shows the current default Search by menu.

The last updated and member since fields have a date data type. The platform replaces the Search bar with a simplified Show Date Range Filter for date entry.

Selecting any of the date options narrows the contacts displayed to the selected date for either last updated or member since. You define a date data type field that suits your requirements to use this option.
Successful searches result in the corresponding output being displayed.

Unsuccessful searches result in a blank screen. To return the global list, you select the clear search icon to the right of the Search box.

To return to the Contacts list, you click the Clear icon on the right side of the Search Contact bar.
Contacts Source
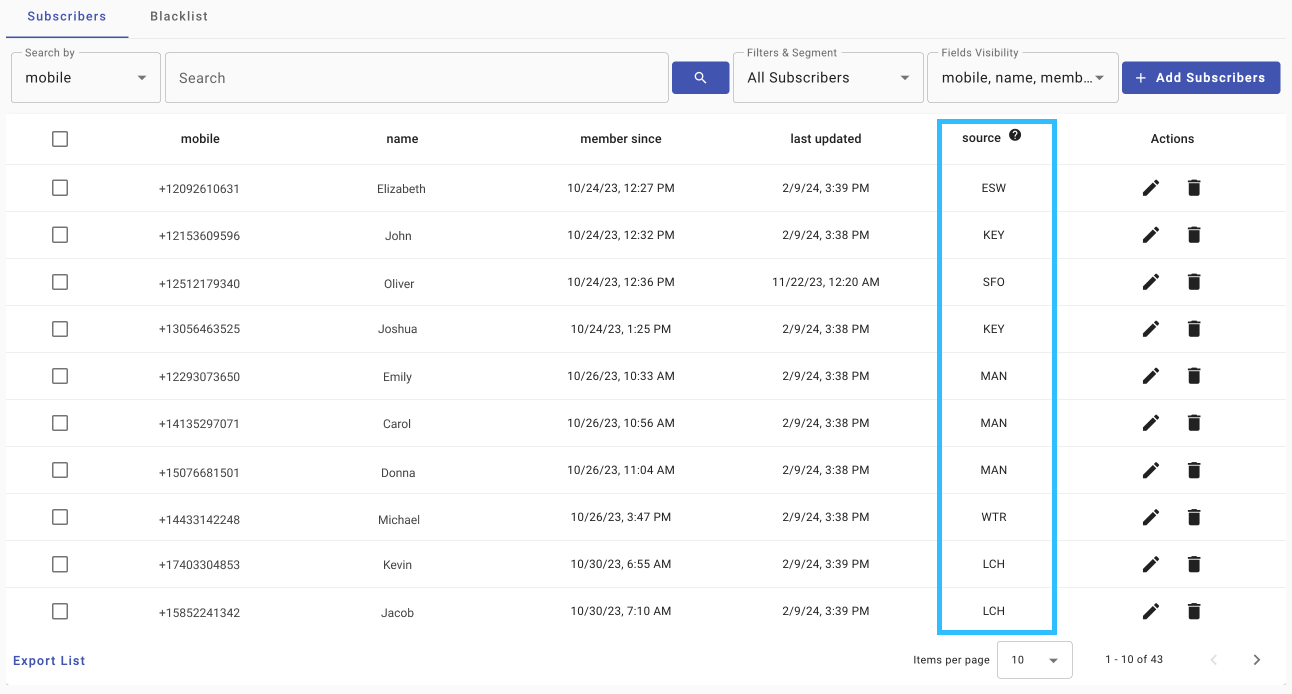
The Source column shows how the contact was added to the contact list — by broadcast, automation, CSV, or manual entry.
| Source Abbreviation | Source Name |
|---|---|
| CHA | Chatbot |
| CSV | Upload.csv |
| EMA | |
| KEY | Keyword |
| KWC | Keyword |
| LCH | Live Chat |
| MAN | Manual |
| PAS | Polls and Surveys |
| SFO | Subscription Form |
| SKC | SMS Keyword |
| SPS | Polls and Surveys |
Export Contacts
The Export feature downloads a contact list with all respective field information. This information includes each field added to the platform. The list exports as a CSV file that opens in Microsoft Excel for charts, pivots, and other analysis.
To export a Contact list:
- Select Export List.

- A dialog appears to export the contacts list as a .csv file and send it to the email of the current session.
.png")
Pagination
The Contact List includes pagination to control the number of contacts displayed. You display either 5, 10, 25, or 100 contacts per page and view the total contact count.
From the Contacts section, you click Items per page in the lower-right corner of the list. The total number of contacts appears next to the items per page selector.

When you select Items per page, a dropdown will open with the following options:

Each option corresponds to the number of Contacts that will be displayed in the Contact List.
Filters
Filters segment contacts based on rules applied to Contact List Fields. Filters narrow broadcasts and automations to a tailored set of recipients based on contact information. By default, the Contact Table will be set to display All Contacts without an added Filter.
From the main Contacts section, you click the Filters & Segment dropdown. You select the desired Filter. After you select a Filter, the Contact List displays the contacts belonging to that Filter.

Create a new Filter
To create a new Filter, you click the Manage Segments or Filters option in the Filters & Segment dropdown. In this section, you create, review, and edit your list segmentation filters.

From the Manage Filters section, you select the New Filter + button. A Dialog will open to start the Filter creation process.


You create a new Filter using the following steps:
-
Enter the Filter's Name.
-
Add Filter Rules by clicking on the Create ( + ) button. It will display the following columns:
- List Field: Select the Contact List Field to apply the Filter Rule on

- Operation: Conditional Rule to be applied on the selected Column List Field.

- Value: Enter the value that will determine what the Filter Conditional Rule applies to.
- Once you have set the Filter Rules, click the Save button to finish creating the new Filter.

NOTEYou may apply more than one Rule per Filter.
From the Manage Filters section, you edit or delete an existing Filter using the Edit or Delete icons in the Filter's row.

After you make changes, you click Save.
To delete an existing Filter, you click the Delete icon in the Actions column. A dialog appears to confirm the deletion. You click Delete to remove the filter.

Once Delete is clicked, the filter is removed from the Manage Filters section.
Example
The following example creates a Filter for contacts who became members after February 1, 2020. The Filter applies in a Broadcast to deliver a 'Welcome' SMS message to new members.

In the Filter Rules section, under List Field, you select member since to filter by the date the contact became a member. In the Operation column, you select Greater than equal to for contacts who became members on or after February 1, 2020. In the Value column, you select February 1, 2020 from the date picker.
Segments
Segments organize contacts by list. You create a segmentation list that groups contacts. By default, the Contact Table will be set to display All Contacts without an added Segment.
From the main Contacts section, you click the Filters & Segment dropdown. You select the desired Segment.

After you select a Segment, the Contact List displays the contacts belonging to that Segment.
Create a new Segment
To create a new Segment, you click the Manage Segments or Filters option next to the Filters & Segment dropdown. In this section, you create, review, and edit your Segmentation List.

From the Manage Segments section, you select the New Segment + button.

A Dialog will open to start the Segment creation process.

You create a new Segment using the following steps:
-
Enter the Segment's Name.
-
Upload a CSV File containing a list of contacts in a segment by selecting the Browse Files button.
After uploading the CSV file, you define the column containing the contact's mobile number, email, or name. It will display the following columns:
- Uploaded List Field: Select the Contact List Field to apply the Segment Rule on

-
Key Field: Select the key field that will allow you to segment the contacts list depending on the selected key field (mobile, email, or name).
After you select the key field, the platform automatically detects the following information:
Number of Rows that have a valid Key Field (mobile, email, or name) (Green-Box).
Number of Rows that have an invalid Key Field (mobile, email, or name) (Red-Box).
Number of Rows that have an empty Key Field (mobile, email, or name) (Gray-Box).

- Click on the Save button to finish creating the new Segment.

From the Manage Segments section, you edit or delete an existing Segment using the Edit or Delete icons in the Segment's row.

After you make changes, you click Save.
To delete an existing Segment, you click the Delete icon in the Actions column. A dialog appears to confirm the deletion. You click Delete to remove the Segment.

Once Delete is clicked, the segment is removed from the Manage Segments section.
Fields
The Contacts table consists of individual contact records containing each contact's platform information. 'Out of the box', the platform has no contacts. You have not yet added any contacts.
The platform includes a predefined minimal contact configuration with the following elements:
- mobile: a valid phone number conforming to E.164, essentially consisting of
country code + area code + phone number. (user-defined) - email: a valid email address (user-defined)
- devices: identifies the device type associated with the contact (platform defined)
- member since: date when the contact was added to the platform (platform defined)
last updated: date of the last modification done to the contact (platform defined) - source: how the contact got added to the platform (platform-defined)
Contact fields or Fields form the default contact configuration. The image below shows the basic platform contact configuration.
.jpg")
Field management options are also available:
-
Select the Fields Visibility
-
Manage Fields - add, edit, or delete a Field
-
Edit or Delete List Fields
To configure which fields appear on the Contact table, you click the Fields Visibility dropdown.

After you open it, you check the fields to display in the Contact table.

The Source field shows how the contact was added to the platform. When displayed, the field shows a tooltip identifying the contact addition method.
The abbreviations used are:
- SFO – Subscription Form
- KEY – Keyword
- CSV – Upload CSV
- MAN – Manual
- SKC – SMS Keyword
- SPS – Polls and Surveys
- EMA – Email
The table below shows an example.

The first two entries came from a CSV file named us-500 Name phone email.csv. The third entry shows MAN, indicating manual entry.
To manage the Contact Fields, you select the Fields Visibility dropdown. You click Manage Fields.
The platform takes you to the Field Management section. There you review, add, edit, and delete fields for each contact record.

Add a new Field
From the Field Management screen, you select Add field + to add a new field. A new row appears in the table with the following fields:

-
Column - n: a placeholder for introducing the Field name that will be displayed.
-
Field Type: select an option from the dropdown to define the data type the new Field will contain.
-
Default Value: enter what the Field will contain as default.
-
Remove Field: Delete an existing field.
From the Field Management screen, you edit an existing field's name, type, or default value.

After you make the desired changes, you click Save.
To delete an existing field, you select the Delete icon in the field's row.

After you click the Delete icon, you click Save to apply the change.
Updated 21 days ago