Add your Wallet Certificate
The platform allows users to use their own Apple and/or Google Wallet Certificates for the distribution and creation of Wallet Passes. That is, users will be able to configure their own mobile wallet certificates for their brands.
From the Wallet tab, click +New Certificate to add a New Certificate to the platform.

A dialog will appear where you enter the name of the Certificate and select the Wallet OS Certificate type you want to add, either Apple Wallet or Google Pay.
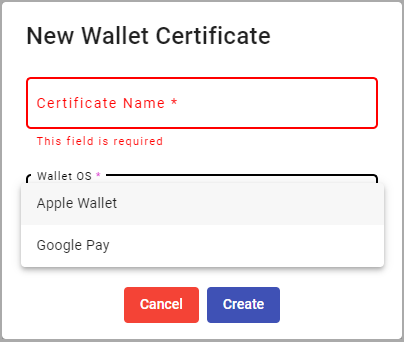
If you select the Apple Wallet option from the Wallet OS dropdown menu, the following dialog will be displayed where you can enter the certificate information and upload it:
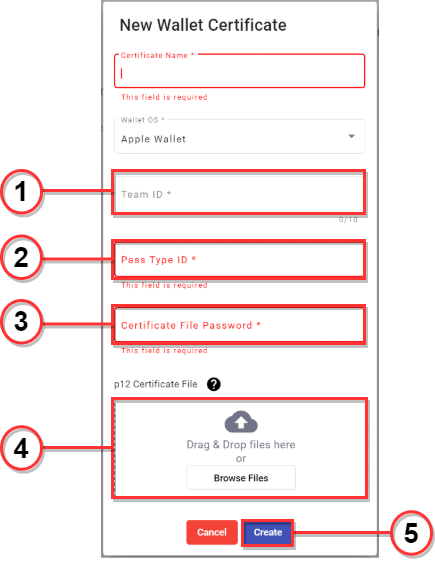
The steps to add a Apple Wallet Certificate are the following:
-
Enter the Team ID of the certificate.
The team identifier is a series of letters and numbers issued to you by Apple. The value for the teamIdentifier key in the pass specifies the team identifier. It must match the Team ID of the certificate used to sign the pass. You can find your Team ID in the Member Center, or you can find it in Keychain Access by looking at the Organizational Unit field of your certificate.
-
Enter the Pass Type ID of the certificate.
The pass type identifier is conceptually similar to a bundle identifier or a class name. The value for the passTypeIdentifier key specifies the pass type identifier. It is a string you choose to define a class or category of passes. It always begins with pass. and uses reverse DNS style—for example, pass.com.example.membership-card. Use the Certificates, Identifiers & Profiles area of Member Center to register a pass type identifier. The pass type identifier must match the certificate used to sign the pass.
-
To upload and unlock the certificate, you need to enter the password of your certificate.
Each Apple Certificate contains a p12 file that is protected by a password.
-
Drag and Drop or click Browse Files to upload the p12 Certificate file in the displayed box.
A .p12 file is a specially-formatted and encrypted file that contains your distribution certificate.
-
Select the Create button, to add the certificate to the main Wallet Certificates table.
Once you have uploaded the p12 Certificate file, the certificate will be visible in the main Wallet Certificates table to manage each Apple Wallet you add to the platform.
To configure and make an Apple Pass Type Certificate for Mobile Wallet go to Create iOS Certificate section.
If you select the Google Pay option from the Wallet OS dropdown menu, the following dialog will be displayed where you can enter the certificate information and upload it:
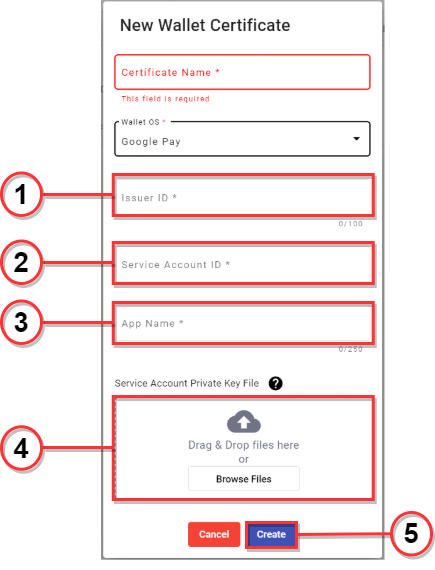
The steps to add a Google Wallet Certificate are the following:
-
Enter the Issuer ID of a Google Pay API for Passes.
An Issuer ID is a unique identifier of a Google Wallet Issuer account. It is necessary to create and distribute passes for Google Wallet. You can sign up using the Google Pay & Wallet Console.
An issuer account can represent a merchant such as a restaurant, an offer provider, or a terminal manufacturer. When Pass classes and objects are developed, they're contained under the issuer ID. An issuer ID can have as many class IDs as needed.
- Open the Google Pay & Wallet Console
- Follow the on-screen instructions to create an Issuer account.
- Select Google Wallet API.
- Confirm you understand the terms of service and privacy policy
- Copy the Issuer ID value.
-
Enter the Service Account ID.
The next step is creating a service account in the Google Cloud Console. This service account will be linked to your Google Pay API for Passes Merchant Center account to start calling to the Google Pay API for Passes. Follow these instructions to create your service account.
-
Enter the name of the application you registered in Google Pay.
-
Drag and Drop or click Browse Files to upload the .json Service Account Private Key file in the displayed box.
To use a service account from outside of Google Cloud, such as on our platform or on-premises, you must first establish the identity of the service account. Public/private key pairs provide a secure way of accomplishing this goal. When you create a service account key, the public portion is stored on Google Cloud, while the private portion is available only to you.
- Select the Create button to add the certificate to the main Wallet Certificates table.
Once you have uploaded the .json Service Account Key file, the certificate will be visible in the main Wallet Certificates table to manage each Google Pay Wallet you add to the platform.
To configure and make a Google Pay Service Account for Passes go to Create Google Pay Service Account Key section.
Create iOS Certificate
You will need an Apple Developer account to successfully make an Apple Pass Type Certificate.
To use your own certificate for sending Apple Passes using our platform, you will first need to create and upload your own Apple Pass Type certificate to the Wallet dashboard.
The steps to register a pass type identifier, create and upload your own Apple Pass Type certificate are the following:
- Log into your Apple Developer Console and select Certificates, Identifiers & Profiles.
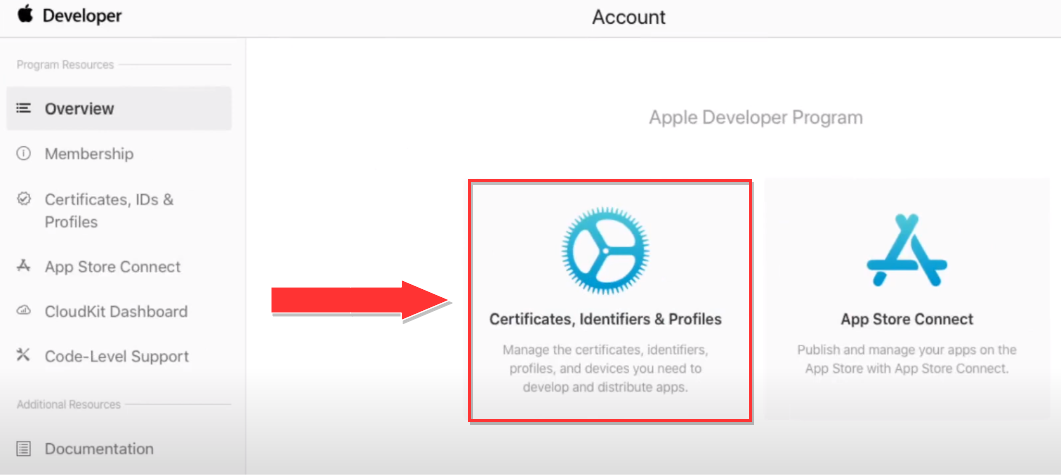
- In Certificates, Identifiers & Profiles, select Identifiers from the menu on the left and click the plus (+) button.
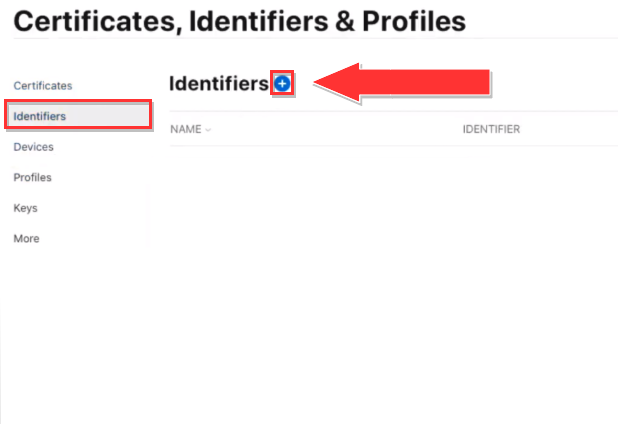
- Once selected Identifiers, select the Pass Type ID option to register a new identifier and click on the Continue button.
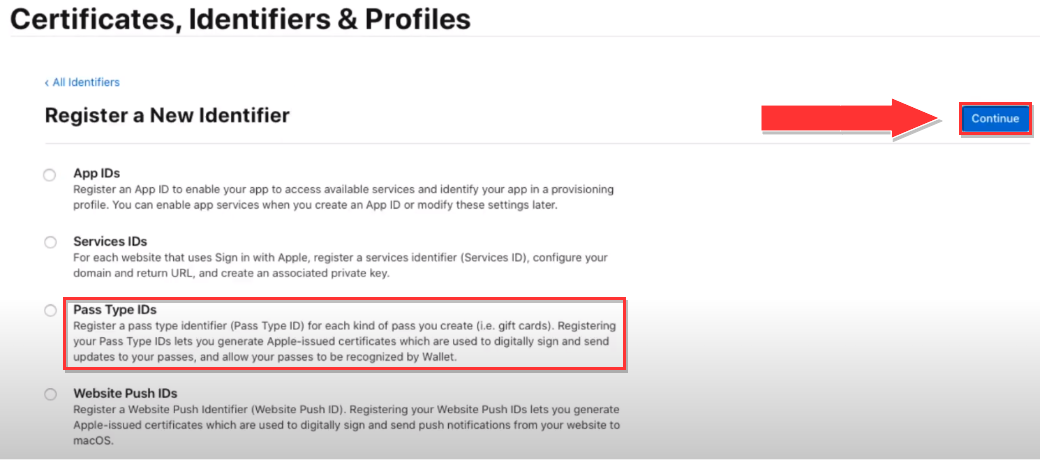
- Enter the description and your Pass Type Identifier, and click on the Continue button.

- Verify your name and identifier then register your Pass Type ID.

- Click on the newly created Pass Type ID then click “Edit” to start configuring a Client SSL Certificate for this iOS Pass Type ID. Under the Production Certificates section click on the Create Certificate button.

- To create a certificate signing request, Launch Keychain Access located in /Applications/Utilities.
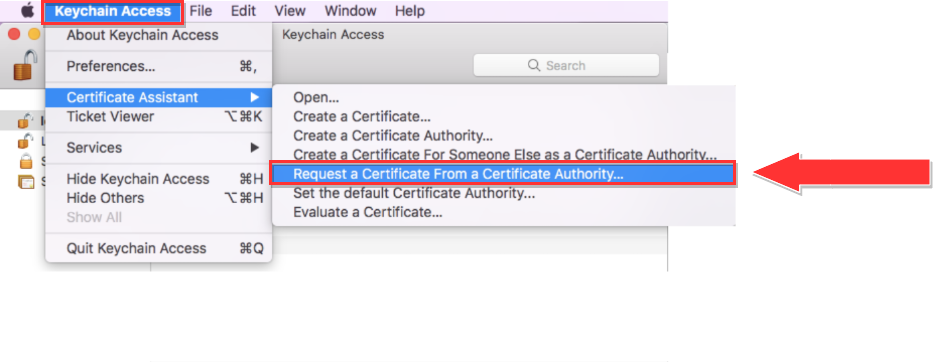
- Click on the Keychain Access tab in the top left corner of your screen. From there, Choose Keychain Access > Certificate Assistant > Request a Certificate from a Certificate Authority.
-
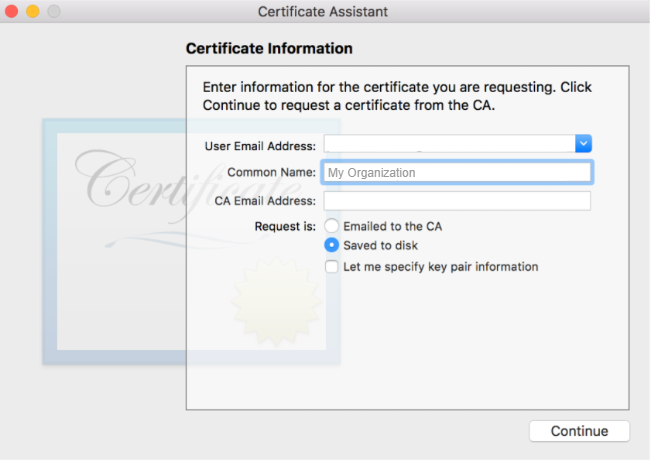
After clicking on the Request a Certificate From a Certificate Authority option a dialog called Certificate Assistant will display.
In the Certificate Assistant dialog, enter an email address in the User Email Address field and enter a name for the key In the Common Name field.We suggest that you use your Apple ID for the “User Email Address” . Leave the CA Email Address field empty. For the “Request is” option, select Saved to disk. Click on the Continue button, and choose where you would like to save the certificate file and click on the Save button.
- Switch back to your browser and click on Continue on the ‘Create a New Certificate’ page. Under Upload a Certificate Signing Request, click on the Choose File button to upload the certificate and select the .certSigningRequest file that you just saved to your Mac earlier and click on the Continue button.

- Select the Download button to download the certificate to your MacOs. Double click to add this certificate to your Keychain. Right-click your certificate inside Keychain Access to export to a .p12 file.

- Right click on the desired certificate, select “Export Pass Type ID:....” and set a password for the certificate file. You will need to remember this password when you upload the .p12 file to the Wallet Preferences section.
Now you should be able to take this .p12 certificate file and upload it in the main Wallet Certificates table.
Create Google Pay Service Account Key
Once you have signed up for a Google Wallet Issuer account (Issuer ID). The next step is enable the Google Wallet API and create a Service Account and Key.
Enable Google API
- Sign into the Google Cloud console
- If you don't already have a Google Cloud project, create one.
- Enable the Google Wallet API (also referred to as Google Pay for Passes API) for your project.
Create a service account and key
A service account and a service account key are necessary to call the Google Wallet API. The service account is the identity that calls the Google Wallet API. The service account key contains a private key that identifies your application as the service account. This key is sensitive, so keep it confidential.
Create a service account
- In the Google Cloud console, open Service Accounts.
- Enter a name, ID, and description for your service account.
- Select CREATE AND CONTINUE.
- Select DONE.
Create a service account key
- Select your service account.
- Select the KEYS menu.
- Select ADD KEY, then Create new key.
- Select the JSON key type.
- Select CREATE.
You will be prompted to save the key file to your local workstation. Make sure to remember its location.
Manage Wallet Certificates
From the Wallet Certificates table, you are able to display each certificate (Apple Wallet, Google Pay) you add to the platform, edit and delete certificates.
To Edit a data Field for an existing Certificate, click on the Edit icon located in the Actions column, next to the Certificate that you want to Edit.
To Delete an existing Certificate, click on the Delete icon located in the Actions column, next to the Certificate you want to delete.
Updated 30 days ago
