Embedded Signup (WhatsApp)
Create or Link an Existing WABA through Embedded Sign-Up
- What It Is: If you already have a WhatsApp Business Account, you can link it directly to our platform using the embedded sign-up process provided by our Business Solutions Provider (BSP) integration.
- How It Works: Through our platform, you’ll be guided to link your existing WABA seamlessly. This process is straightforward and allows you to maintain control over your existing account while leveraging the features and tools available on our platform.
- Who It’s For: This option is perfect for businesses that already have an established WhatsApp presence and want to integrate their existing WABA with our platform without creating a new account. Even though your business doesn't have a WABA created, you can create a new one by yourself easily from our platform.
In this section, we are going to provide a detailed explanation of the embedded signup process, including its key features, and outline the steps required to link your WABA account to our platform.
What is Embedded Sign-Up?
Embedded Signup is a way for Solution Partners to let businesses onboard to the WhatsApp Business API directly from our platform. Therefore, the embedded sign-up process is a seamless and efficient method that allows you to link your existing WhatsApp Business Account (WABA) directly to our platform. This process is designed to simplify the integration by guiding you through each step without requiring extensive technical knowledge.
Key features of Embedded Sign-Up:
- Streamlined Integration: The embedded sign-up is fully integrated into our platform, meaning you don’t have to leave our system or navigate multiple interfaces. Everything is handled in one place, making the process quick and user-friendly.
- Maintains Account Control: By using the embedded sign-up, you retain full control over your existing WABA. This ensures that you can continue to manage your WhatsApp communications as usual, while also taking advantage of the additional features and tools offered by our platform.
- Guided Process: Our platform provides clear, step-by-step instructions throughout the embedded sign-up, ensuring that you understand each stage of the integration. This helps to minimize any potential errors and speeds up the overall setup time.
- Self-Service Option: Even if you don’t already have a WABA, the embedded sign-up process allows you to easily create a new one directly from our platform. This flexibility ensures that all businesses, whether new to WhatsApp or already established, can efficiently set up their accounts.
Before starting the embedded sign-up configuration, please consider the following :
- A WhatsApp Business Account (WABA) can have multiple phone numbers (senders).
- A single WhatsApp Business Account (WABA) can be shared across different Workspaces.
- Once a sender is linked to a specific WABA and Workspace, it cannot be shared with other Workspaces.
- Only one WABA can be assigned per Workspace.
For example, suppose you manage a company called “TechWorld” that operates in multiple regions, each with its own customer support team. You decide to use WhatsApp Business for customer communication.
- Multiple Senders: "TechWorld” creates a WhatsApp Business Account (WABA). Under this WABA, you assign different phone numbers as senders for each region. For example, you have one sender (phone number) for the North American region, another for Europe, and a third for Asia. This means your single WABA can manage multiple senders, each designated to handle communications for a specific region.
- Sharing WABA Across Workspaces: Your company uses different Workspaces within your communication platform to manage operations in each region. You decide to share the same WABA across these different Workspaces, allowing your North American, European, and Asian teams to access and use the WABA for their respective regional communications.
- Sender Linking Restrictions: Once you link the North American sender (phone number) to the WABA within the North American Workspace, this specific sender cannot be linked to another Workspace, such as the European or Asian Workspace. Each sender is exclusively tied to the Workspace it was initially linked with, ensuring that customer communications are organized and region-specific.
- Embedded Signup restriction: If you have previously requested the support team to create a WABA, and the sender is currently active on our platform, you won’t be able to link an existing WABA from your business or set up a new WABA using the embedded signup feature. To enable this feature, you’ll need to request the support team to remove the WABA currently on the platform.
WABA Approval TimeThe approval timeline for a WhatsApp Business Account (WABA) is subject to Meta’s verification procedures and the validation of submitted documentation.
Both the account status and the business verification must be approved before the WABA is considered fully active.
While approval is typically granted within 2 to 7 business days, cases requiring manual review by Meta may extend the process to up to 14 days (2 weeks).
Until the business verification is approved, the WABA will not have full capabilities:
- You will be able to send messages only with the initial limitations (250 conversations per 24 hours, without newly approved message templates).
- You will not have access to large-scale messaging or advanced features until both statuses are approved.
Setup Embedded Signup
Follow these steps to link your existing WhatsApp Business Account (WABA) to our platform through the embedded signup process:
-
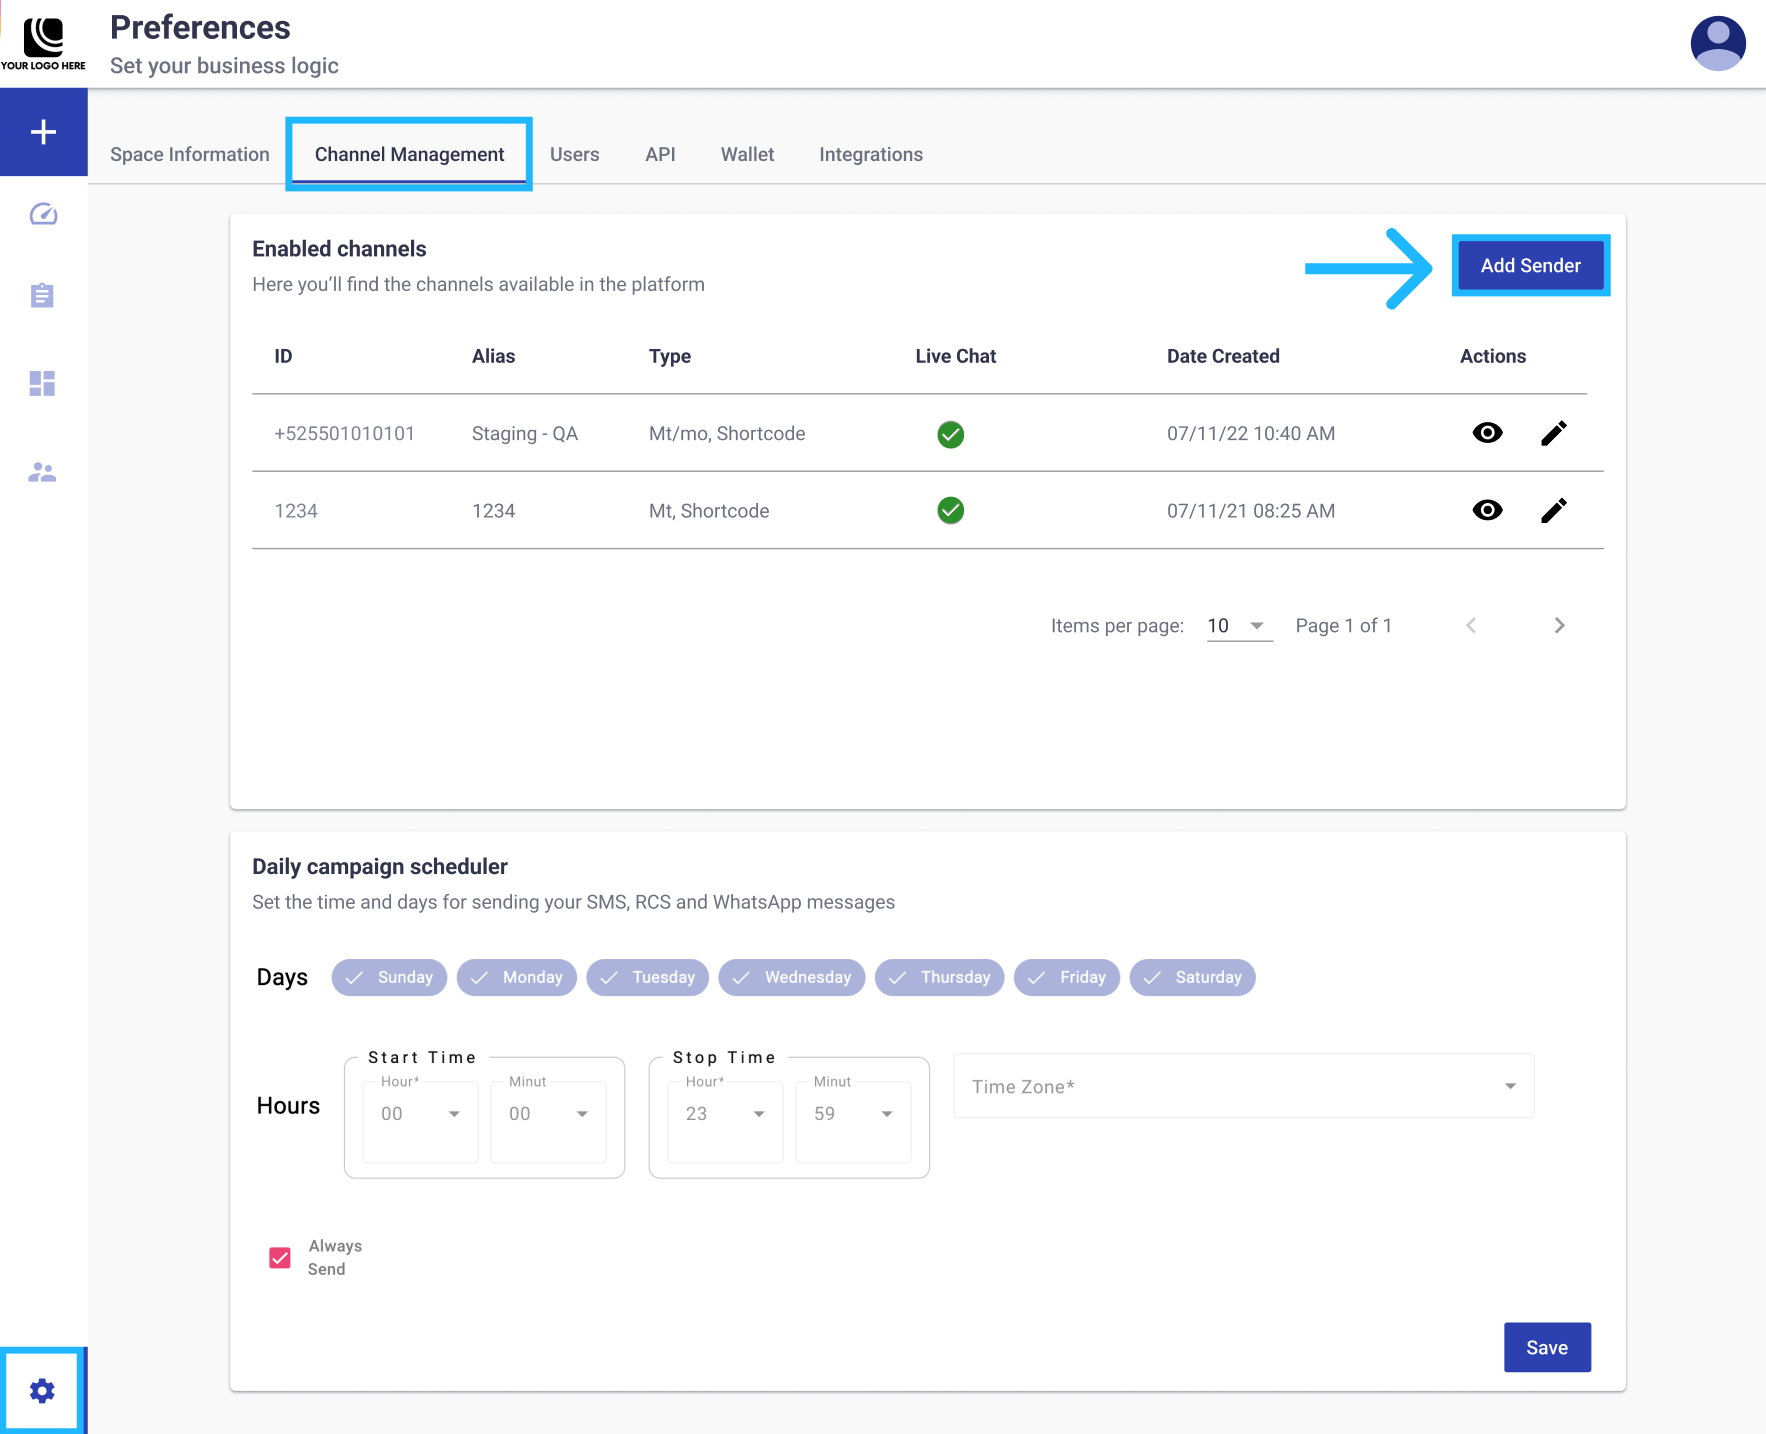
Add sender: Start by accessing the “Preferences” section and click on the “Channel Management” tab. This tab displays a list of all enabled channels currently available on the platform.
In this section, click on the "Add Sender" button.
-
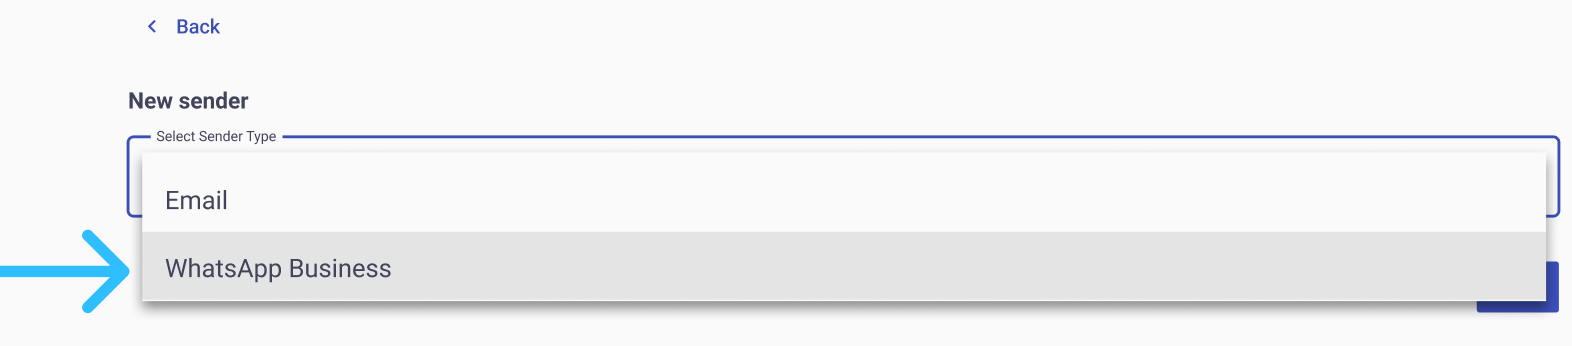
Start the Embedded Signup Process: Here, click on the Sender Type dropdown menu and select the Embedded Signup (WhatsApp) option. Once selected, click on the "Add" button to start the embedded signup process. This will redirect you to Meta’s interface for managing your WhatsApp Business Account.
-
Authenticate with Facebook Business Manager: Log in with your Facebook Business Manager account credentials. This account should have access to the WABA you want to link.
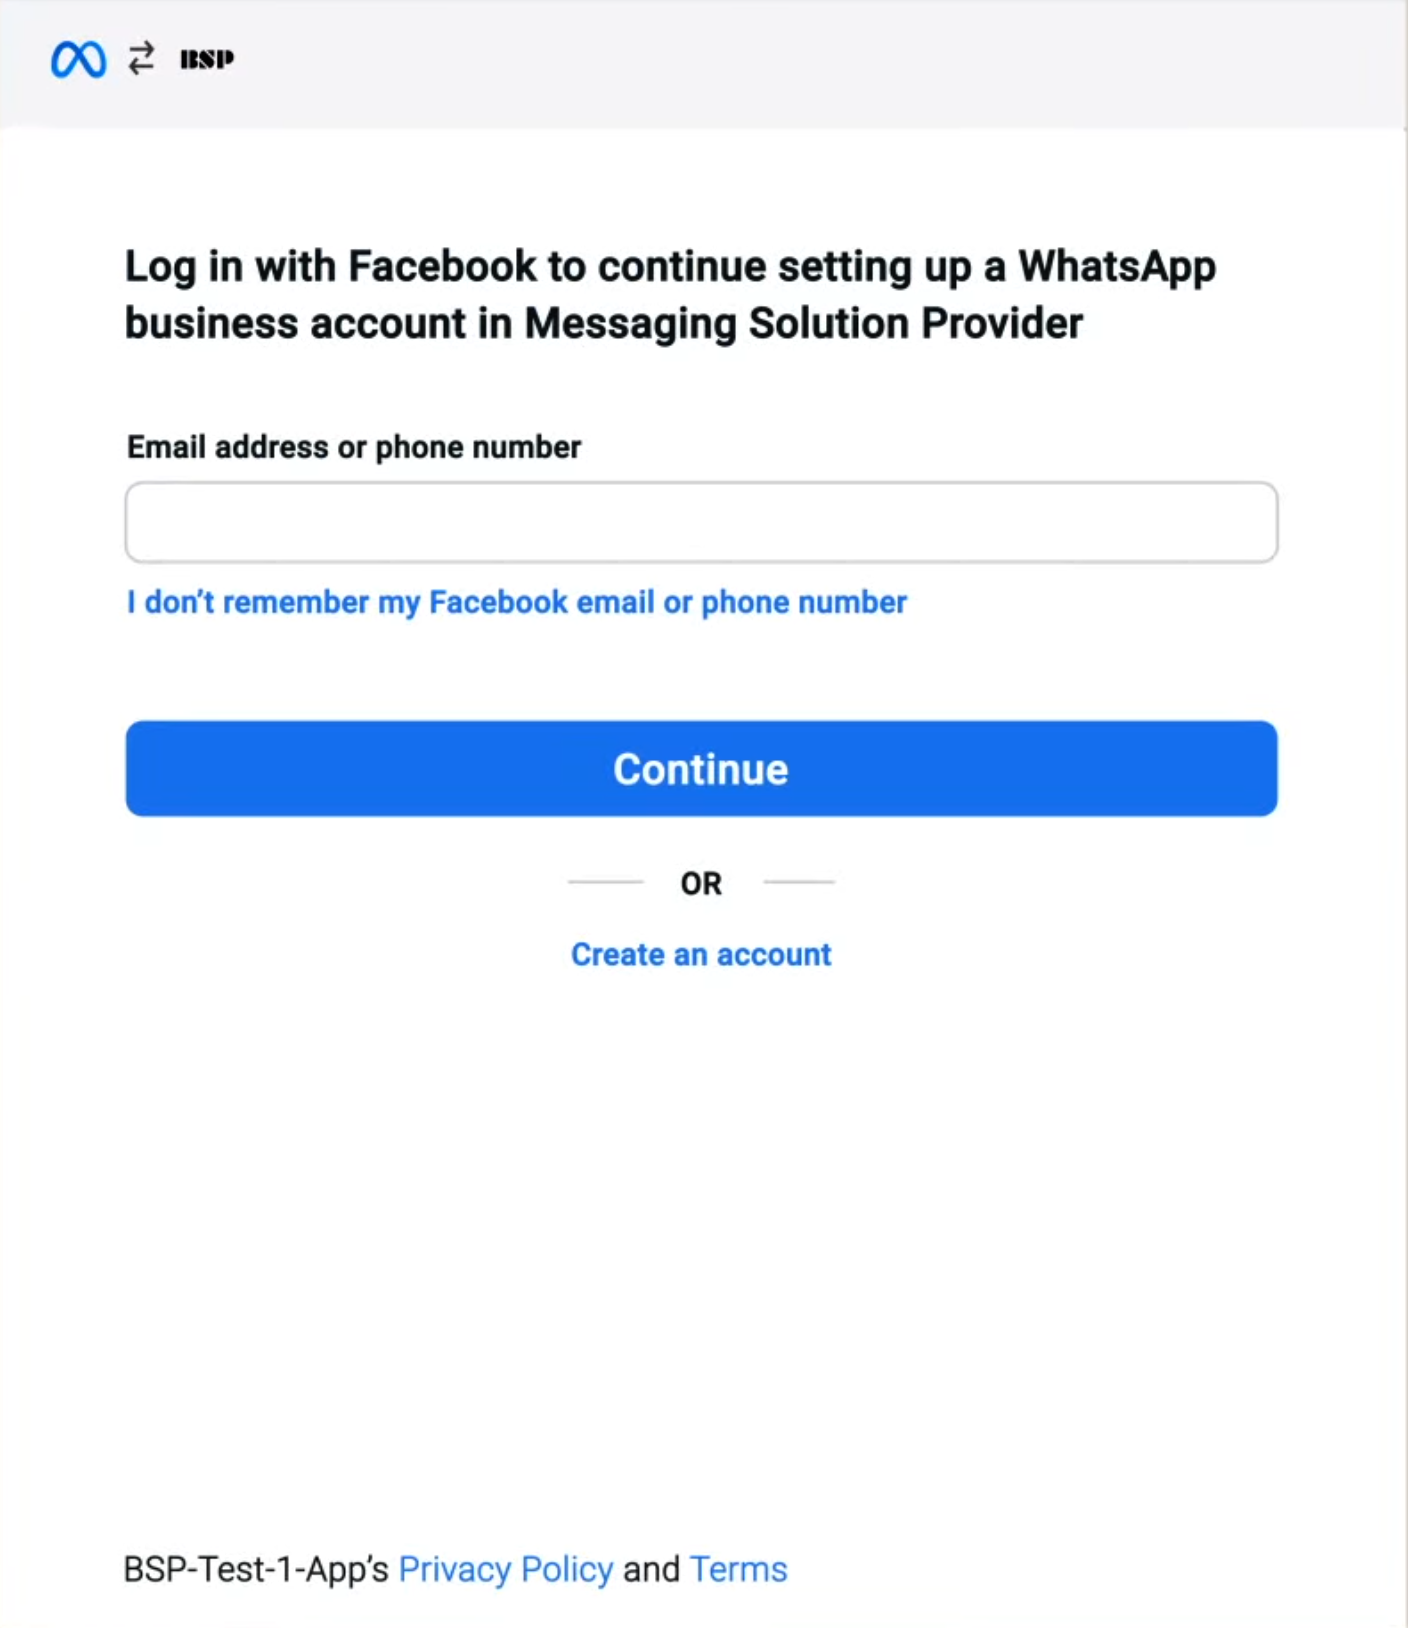
NOTEIf you don’t have a Facebook Business Manager account, you’ll need to create one before proceeding.
To continue with the Facebook Authentication, accept that the messaging solution provider (BSP) will receive basic information like the user’s name and profile picture, but this does not allow the provider to post on Facebook without the user’s permission.
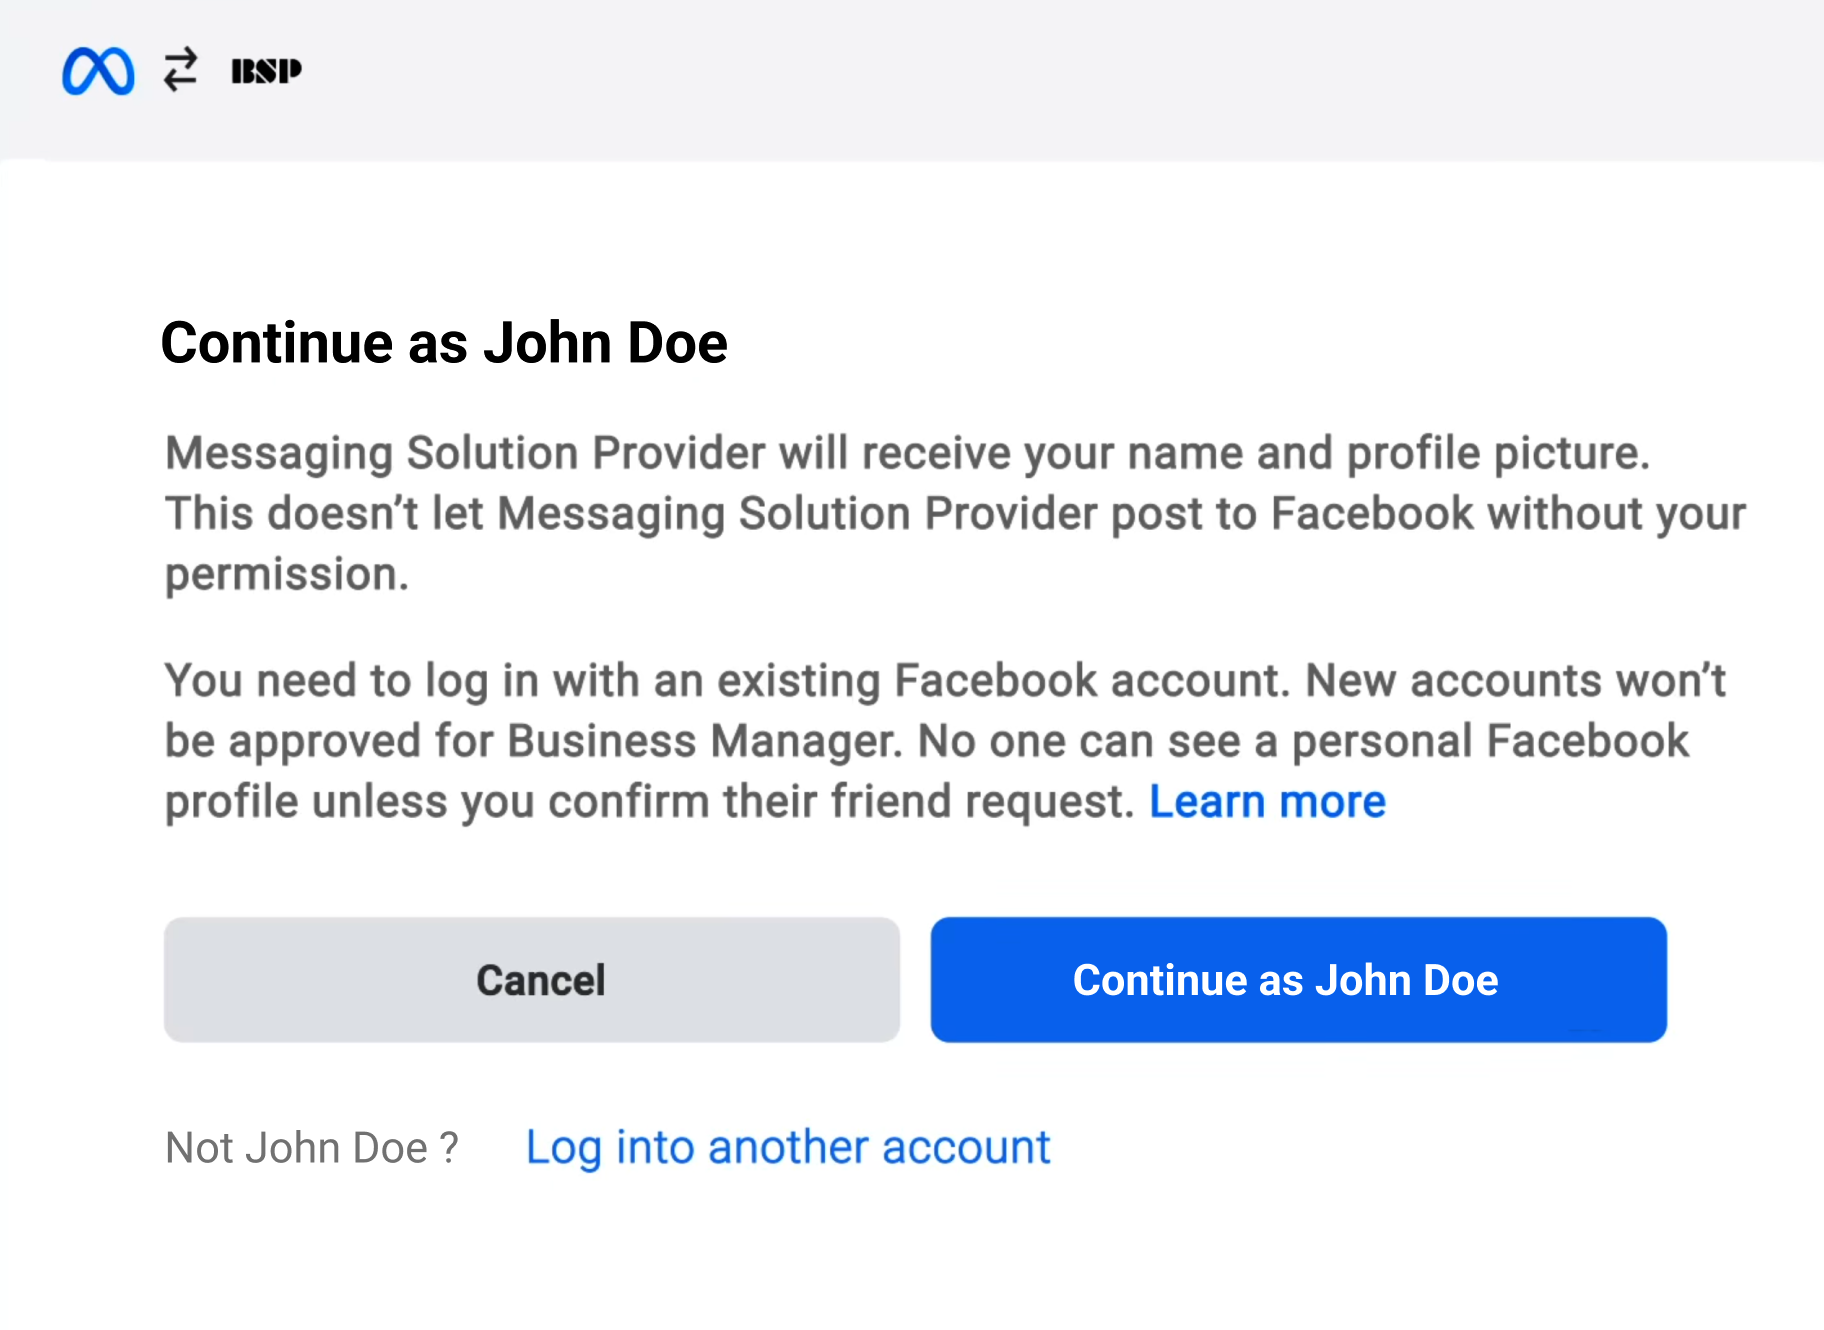
The user needs to click on the
“Continue as [Name]”button to proceed. If the user is not the person shown, they can choose to log in with another account.This step ensures that the correct Facebook account is linked to the WABA and that the user authorizes the necessary permissions for the integration.
-
Authorize the Integration with Meta: After successfully authenticating with your Facebook Business Manager account, Meta will display a confirmation view explaining that you are about to connect your business assets to your WhatsApp Business Solution Provider (BSP).
By selecting Continue, you agree to the Meta Hosting Terms for Cloud API and the Meta Terms for WhatsApp Business. These agreements are required before Meta can grant the BSP access to your business assets. At this stage, no Business Portfolio, WhatsApp Business Account, or phone number has been created or linked. You are only authorizing Meta to proceed with the asset selection and configuration process.

Once clicked, you will be guided through each of the following steps:
- First, you will either create a new Business portfolio and WhatsApp Business Account or select existing ones.
- Next, you will verify the phone number associated with your WhatsApp Business Account. This involves receiving a verification code via SMS or phone call.
-
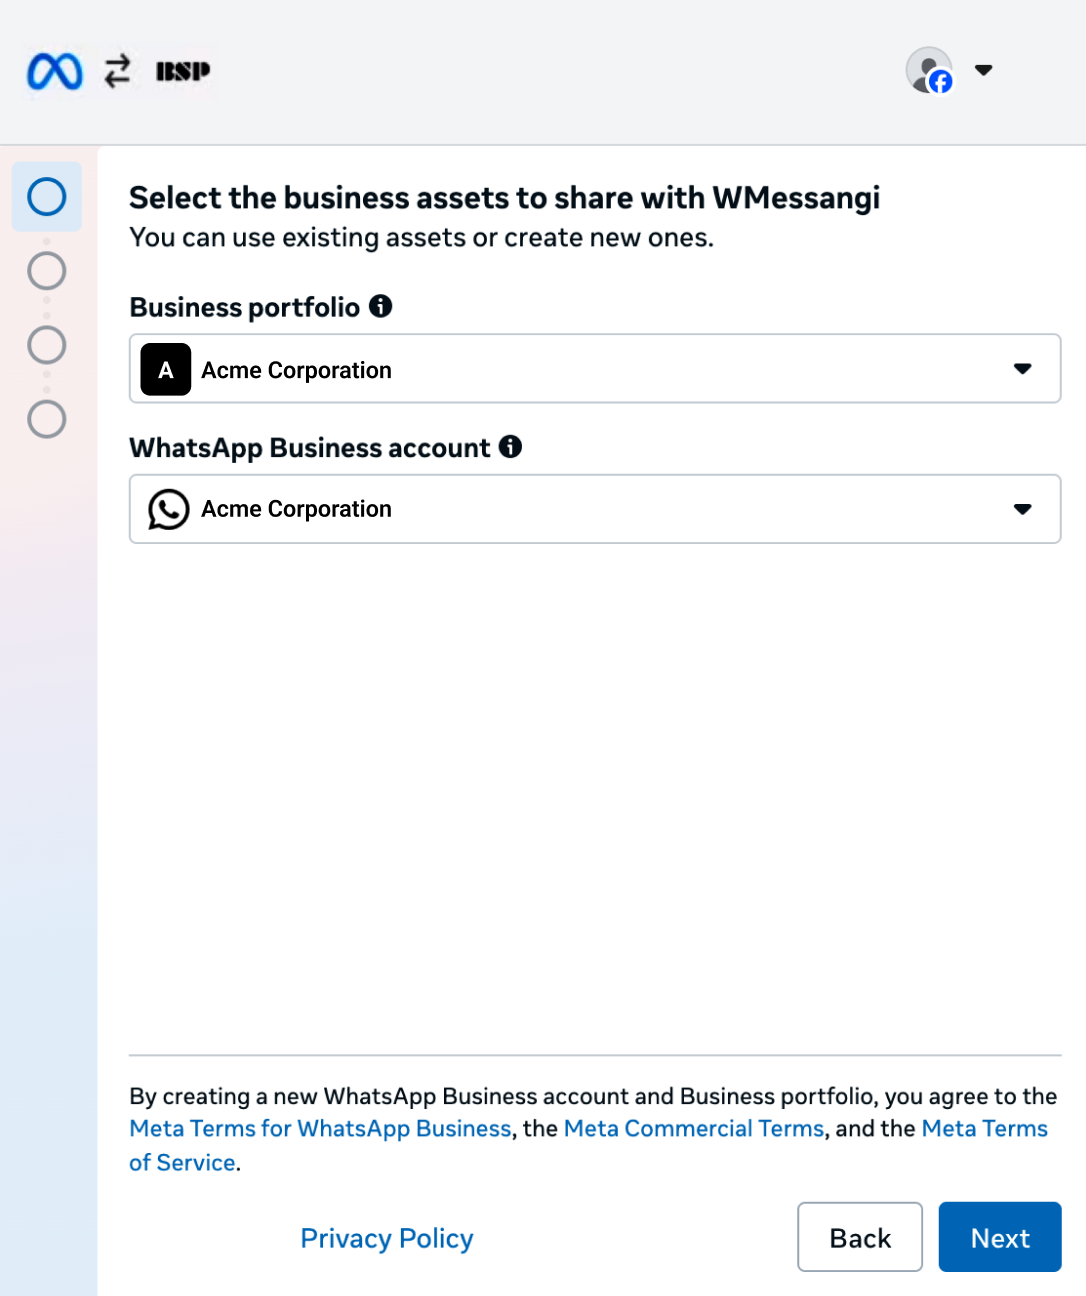
Create or Select a Business Portfolio & WhatsApp Business Account: In this step, you must define which Meta business assets will be connected to the WhatsApp Business Solution Provider (BSP).
You have two possible paths, depending on your current configuration in Meta:
-
Create a new Business Portfolio and a new WhatsApp Business Account
-
Select an existing Business Portfolio and an existing WhatsApp Business Account
-
Create a New Business Portfolio and a New WABA: If you do not yet have a Business Portfolio and a WhatsApp Business Account configured in Meta, select Create a Business Portfolio and Create a WhatsApp Business Account. Then click Next. At this point, Meta will move you to the business information screen where the new assets are defined.

After clicking Next, the system displays a form where you must provide the details required to create the new Business Portfolio and WhatsApp Business Account. These details define how your business will be registered inside Meta Business Manager.
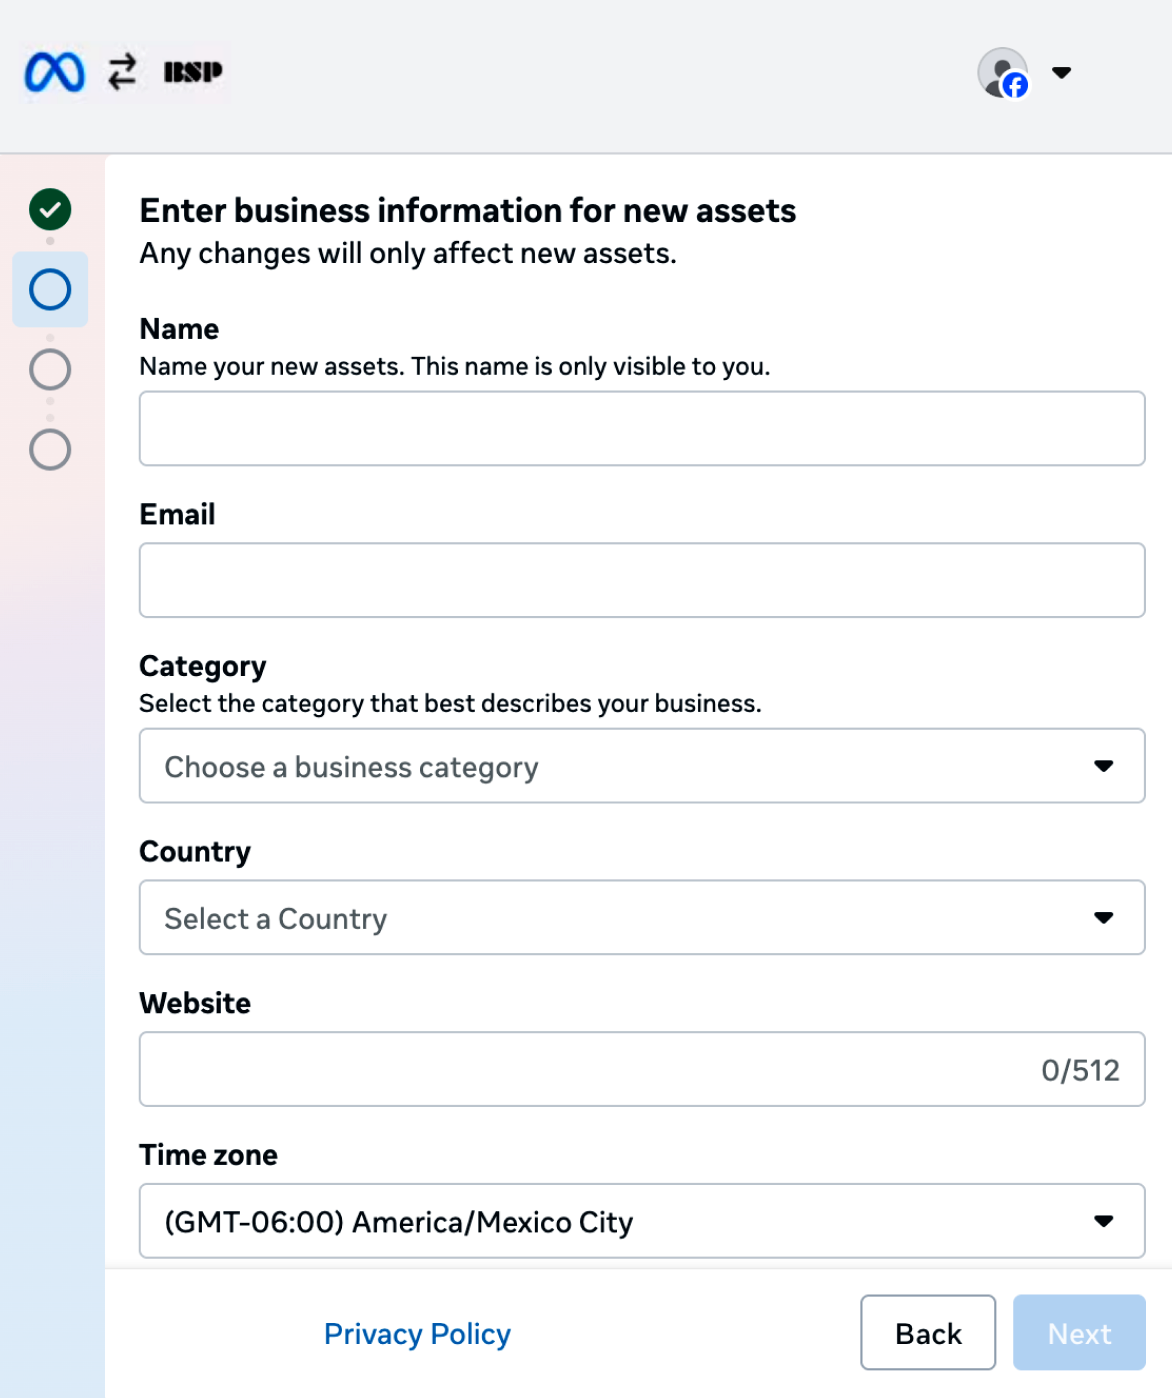
You must complete the following fields:
- Name: Enter the internal name for the new assets. It identifies the Business Portfolio inside Meta and is visible only within your Meta Business Manager. As a recommendation, use your legal company name or a clear business identifier.
- Email: Business contact email associated with the new Business Portfolio. It should belong to the business domain.
- Category: Select the category that best describes your business activity.
- Country: Select the country where your business is legally registered. This selection is important for regional settings and compliance with local regulations.
- Website: Enter your company’s official website.
- Timezone: Choose the time zone where your business primarily operates. This setting is important for scheduling messages and managing your business hours accurately.
- Description (Optional): You may include a brief explanation of your business activity. This field is not required to continue.
Click Next to proceed with the creation of your Business Portfolio and WhatsApp Business Account.
-
Select an existing Business Portfolio and a WABA: If you already have an existing Business Portfolio and a WABA. Click Next. At this point, Meta will validate your selections and proceed to display the details and summary of the chosen assets.
-
-
Verify the Business Phone Number: Once you have selected or created a Business Portfolio and a WhatsApp Business Account, the onboarding process continues with phone number verification and linking.

In this step, you are required to add a phone number that will be associated with your WhatsApp Business Account. This is the number that customers will see and use to contact your business on WhatsApp.
- Enter the Phone Number: Enter the phone number you wish to use for your WhatsApp Business Account in the provided field. Ensure that the country code is correct (e.g., MX +52).
- Choose Verification Method: You must verify the phone number by receiving a verification code. Choose how you would like to receive this code: by Text Message (select this option to receive the verification code via SMS), or by Phone Call (select this option to receive the verification code via a voice call).
After selecting your preferred verification method, click the Next button to initiate the verification process. You will receive a verification code based on the method you selected.
Enter this code in the subsequent step to confirm ownership of the phone number, and click Next.

-
Finalizing the Process: After verifying your phone number, Meta displays a confirmation screen indicating that your account has been successfully connected to the WhatsApp Business Solution Provider. Your business will be reviewed to ensure compliance with WhatsApp’s Commerce Policy. If there are any issues, they will reach out within 24 hours.
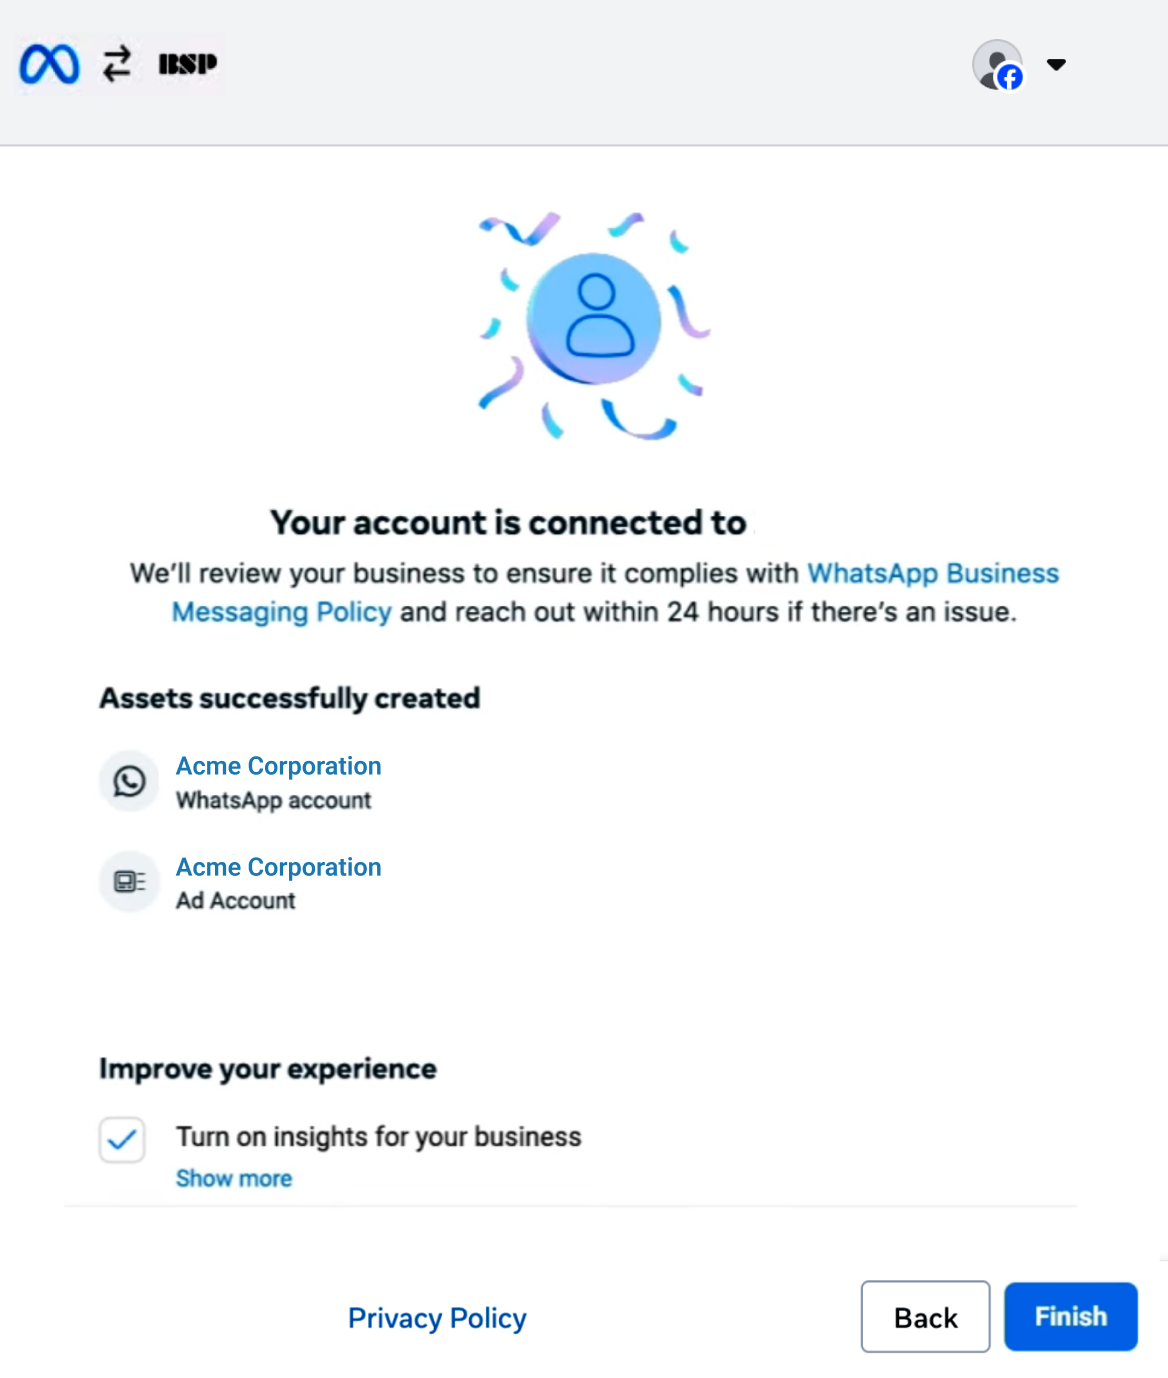
Click the Finish button at the bottom right to complete the setup-embedded signup process.
Initial Messaging Limits for New WhatsApp Business Accounts
You can start with:
- 250 Business-Initiated Conversations: You are allowed up to 250 business-initiated conversations per phone number within a rolling 24-hour period. This allows you to proactively reach out to customers.
- Unlimited Customer-Initiated Conversations: There is no limit to the number of conversations that can be initiated by customers. This means customers can contact your business freely without restrictions.
- Up to 2 Phone Numbers: You can associate up to two phone numbers with your WhatsApp Business Account if the WABA is not yet verified, enabling you to manage communications through multiple lines.
Once your WABA is verified, you can add up to 25 phone numbers.
Verify WABA added to Workspace
Once you complete the Embedded Signup process, you will be automatically redirected to the Preferences section under the Channel Management tab. At this point, a snackbar notification will appear at the bottom of the screen confirming that the sender was successfully registered to the Workspace.
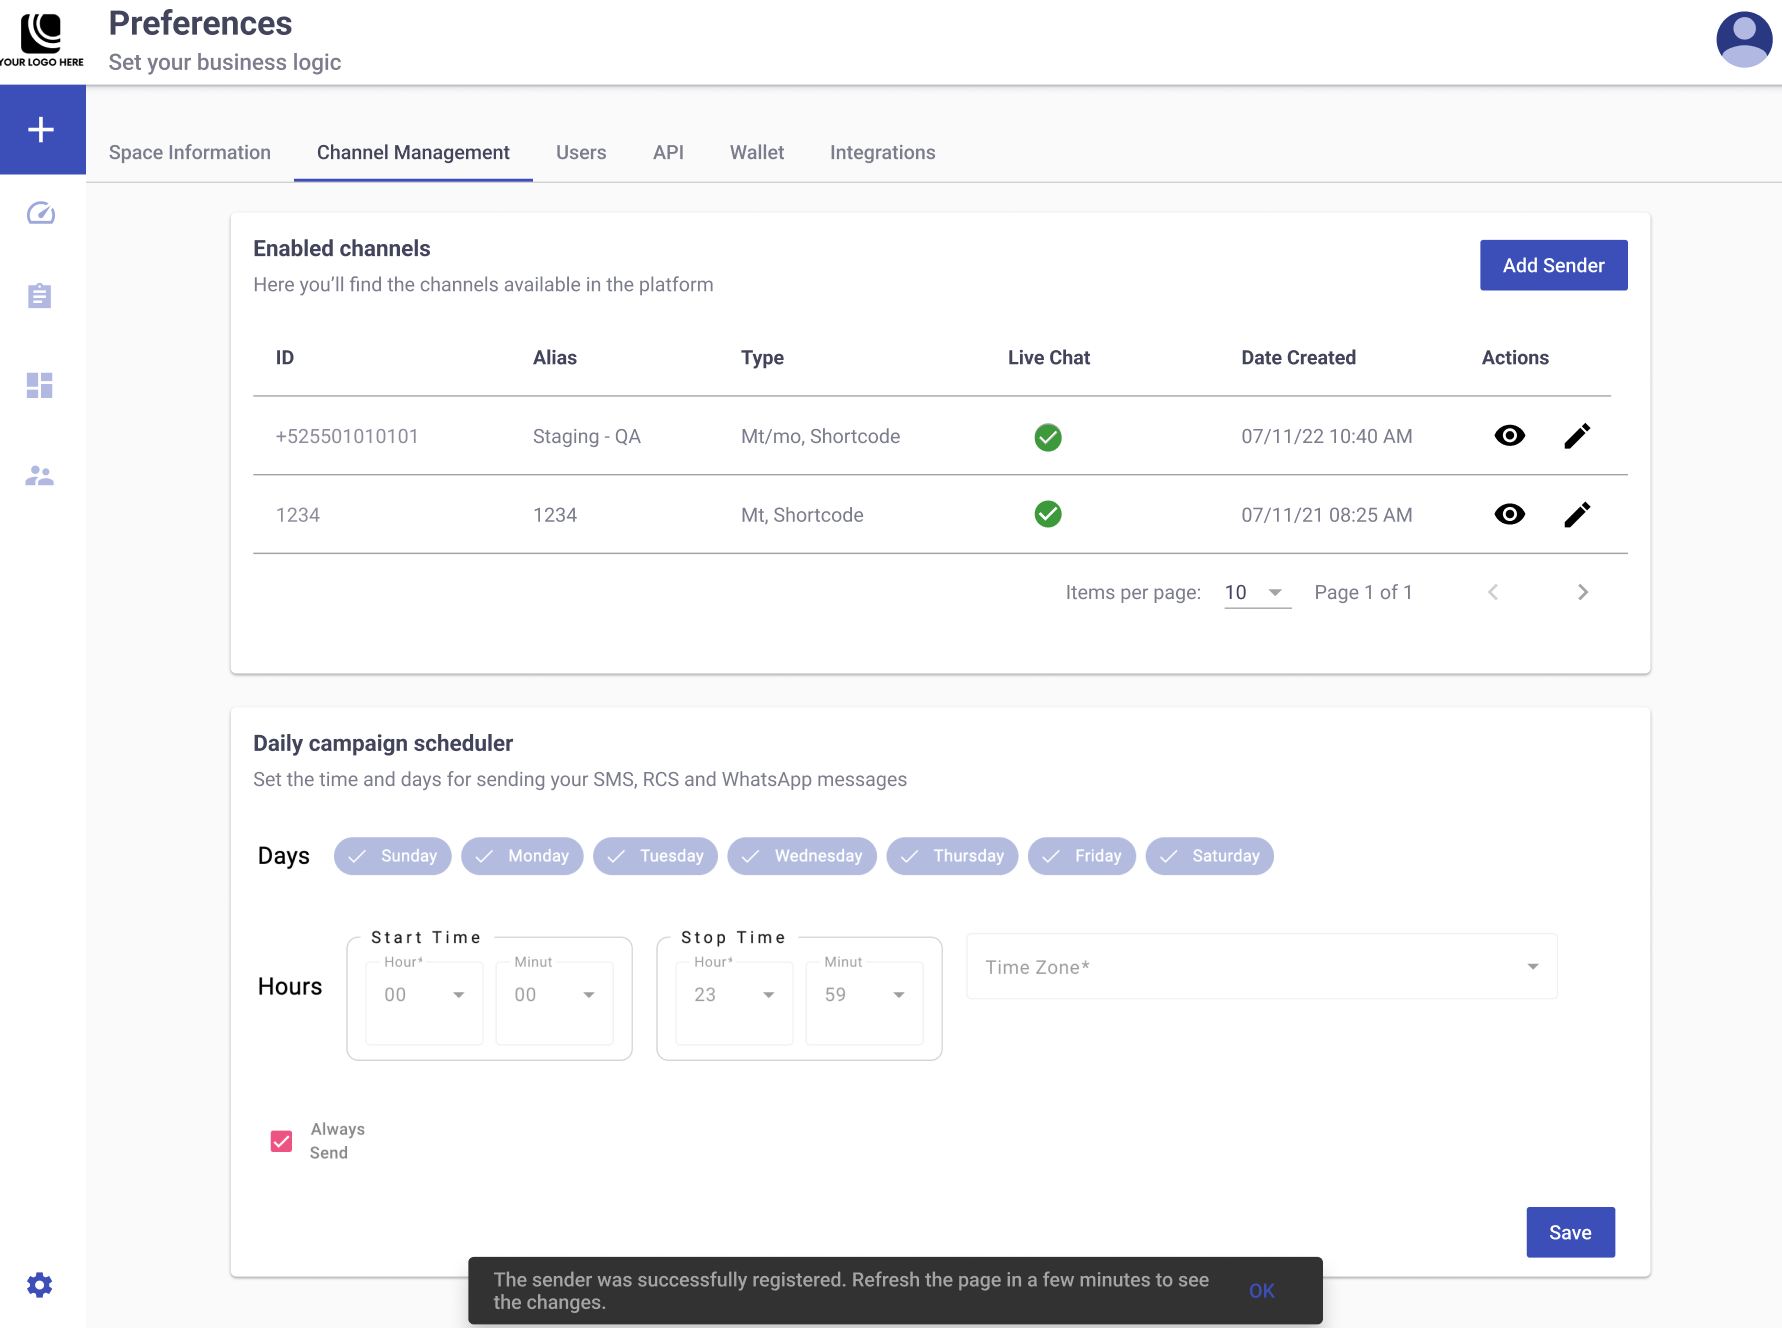
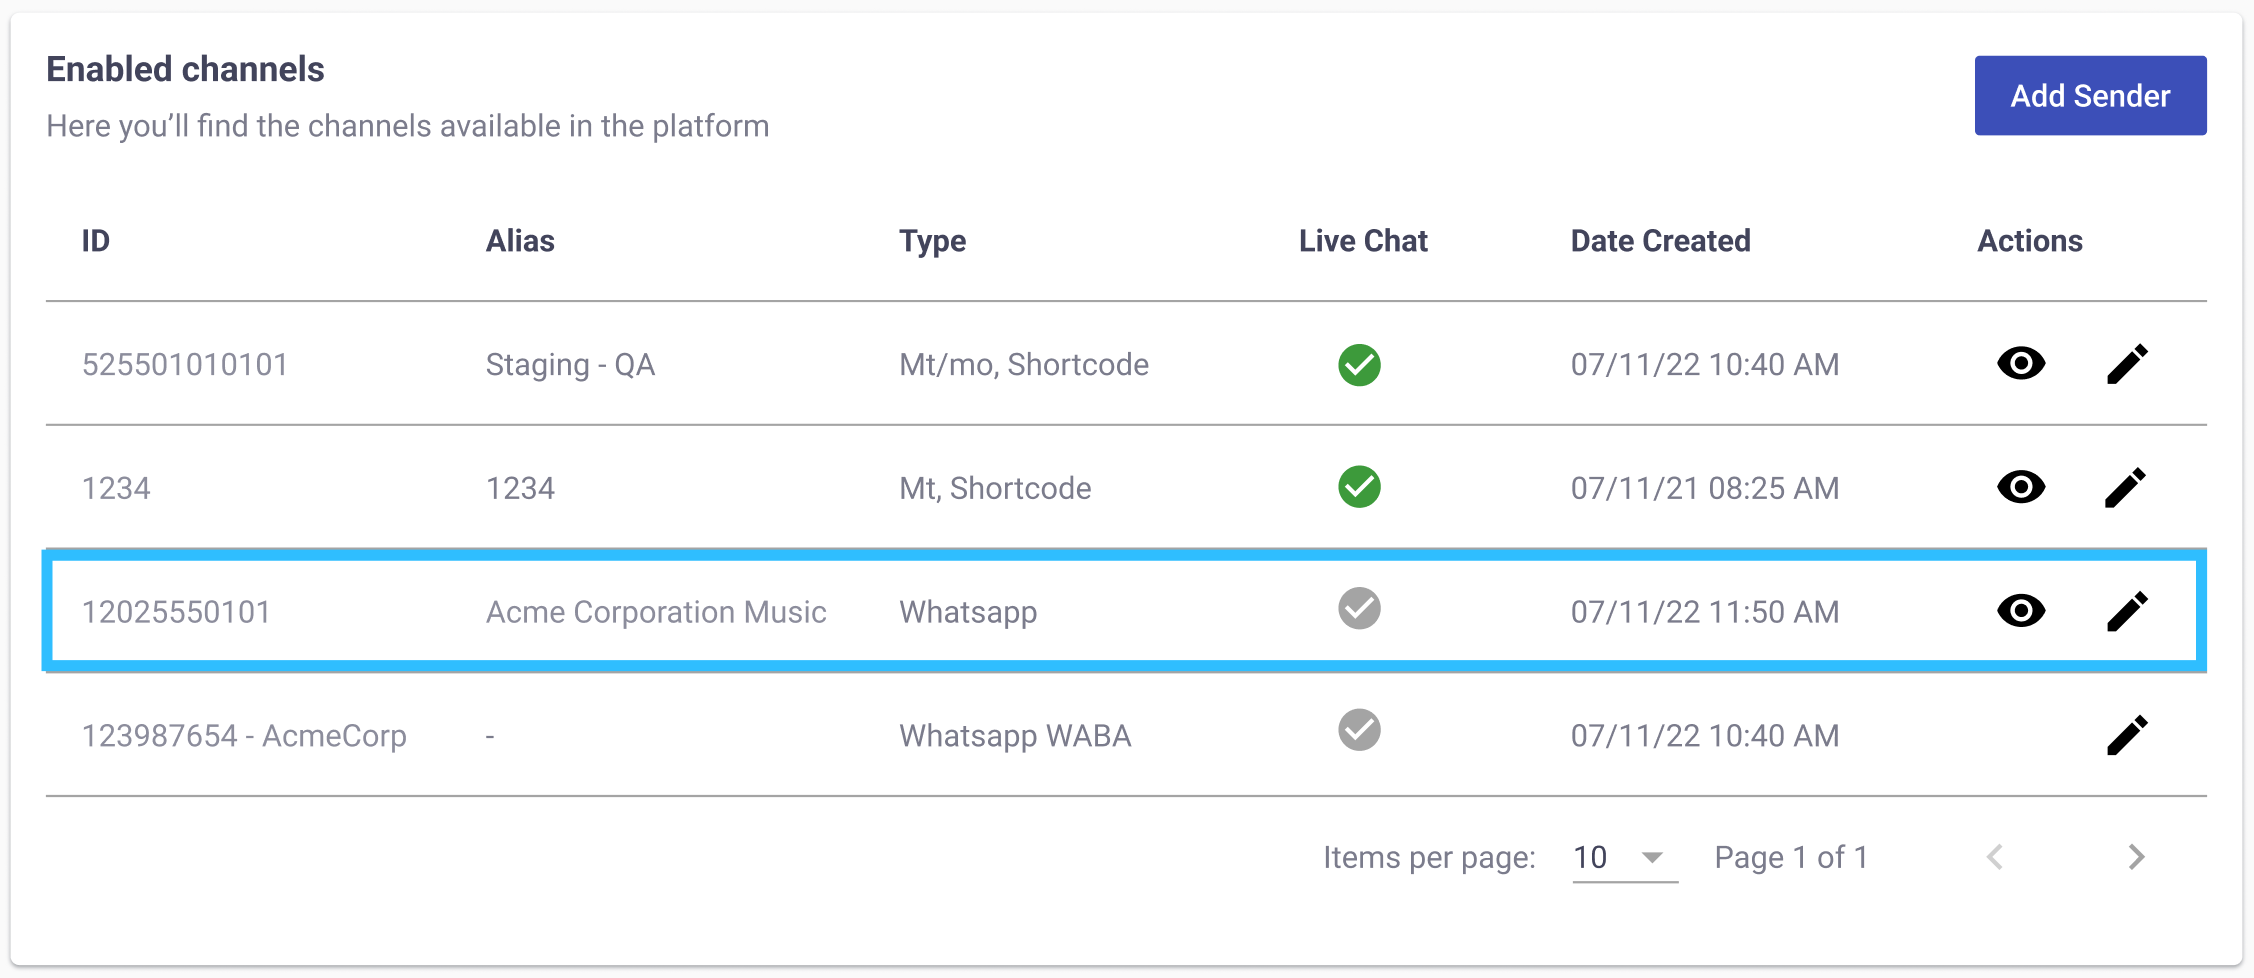
After refreshing the page, your newly linked WhatsApp Business Account (WABA) will automatically appear in the Enabled Channels table with the following details:
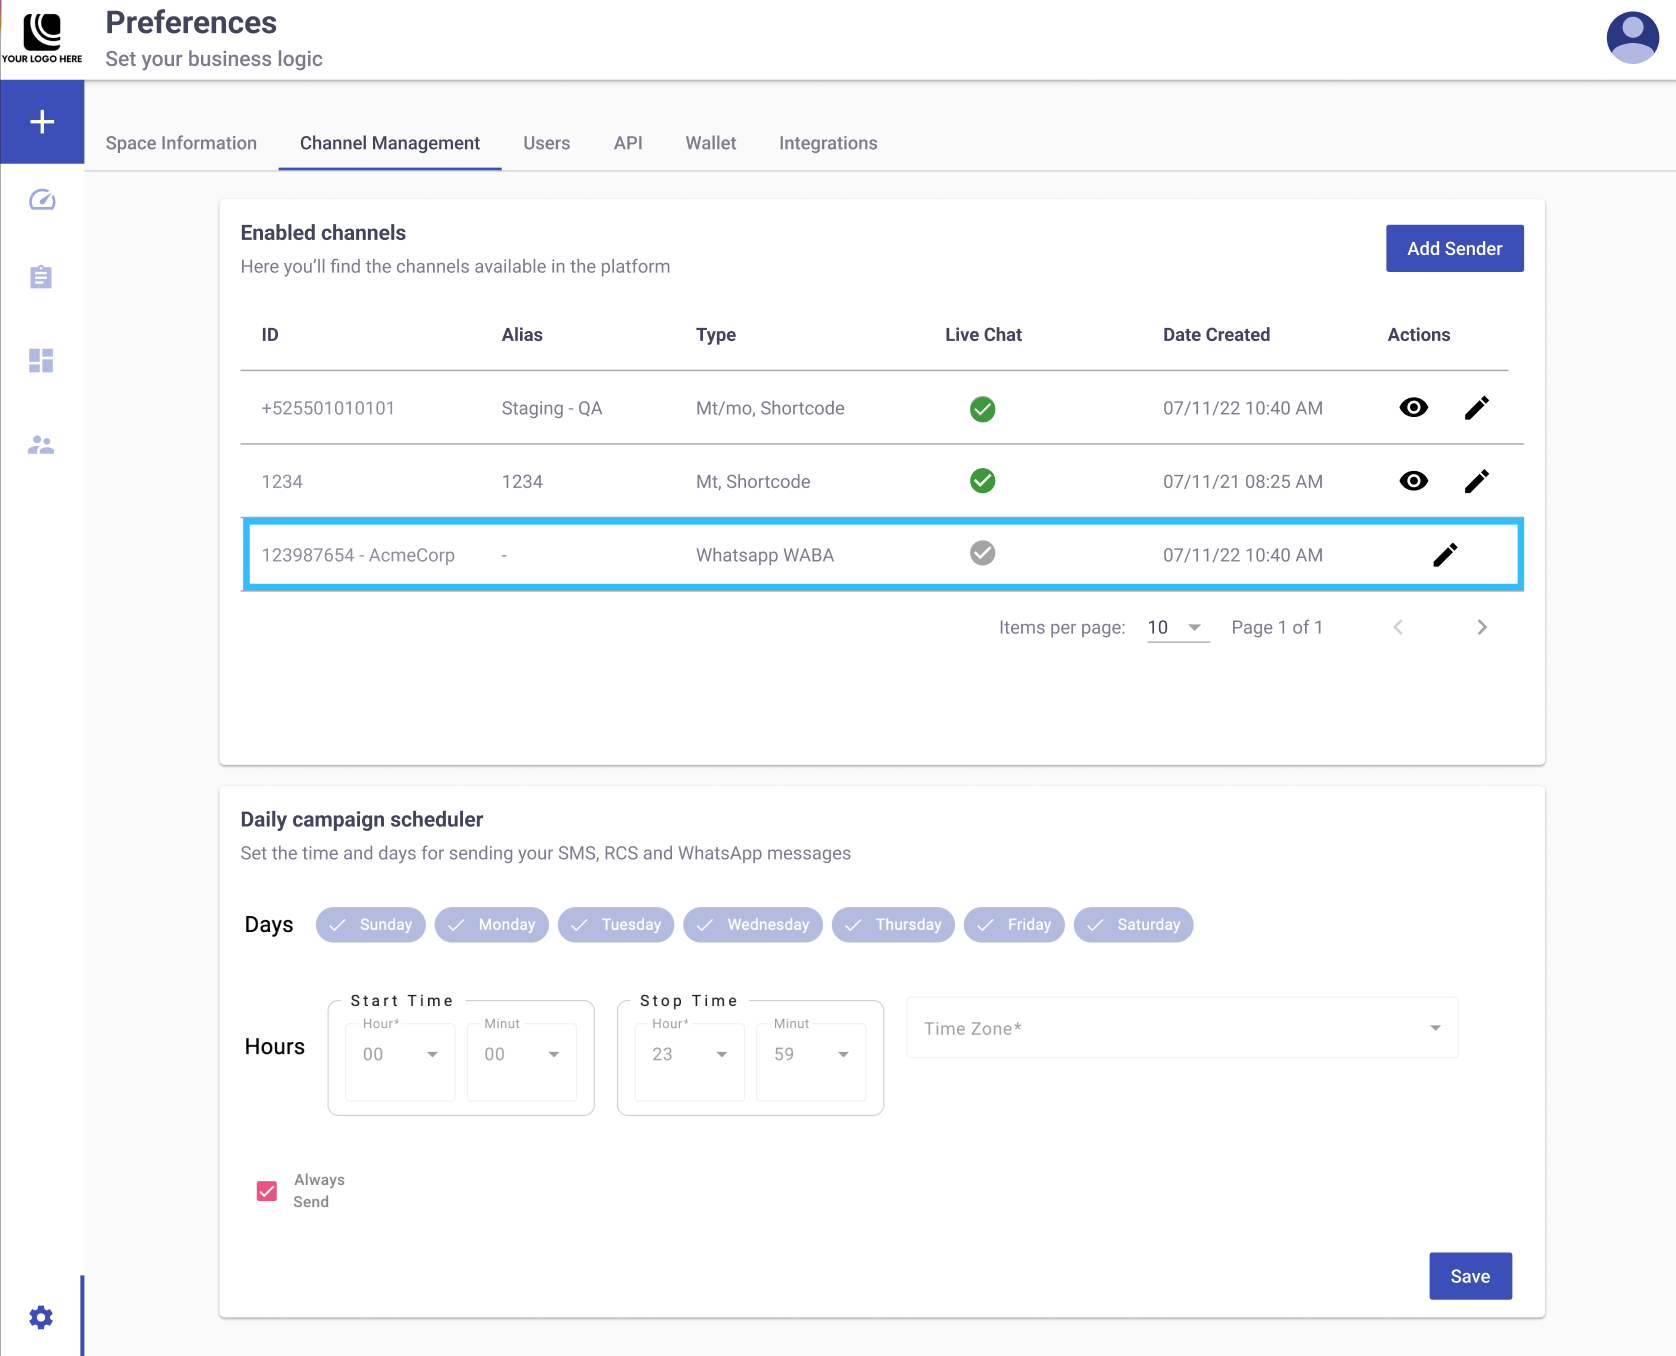
-
ID: The unique identifier of your WABA.
-
Alias: The name assigned to your WABA during the Embedded Signup process.
-
Type: Displays the channel type associated with the sender.
For WhatsApp, this column helps distinguish between the main account (WABA) and the individual phone numbers (senders) used to send messages associated with the WABA listed in this table.
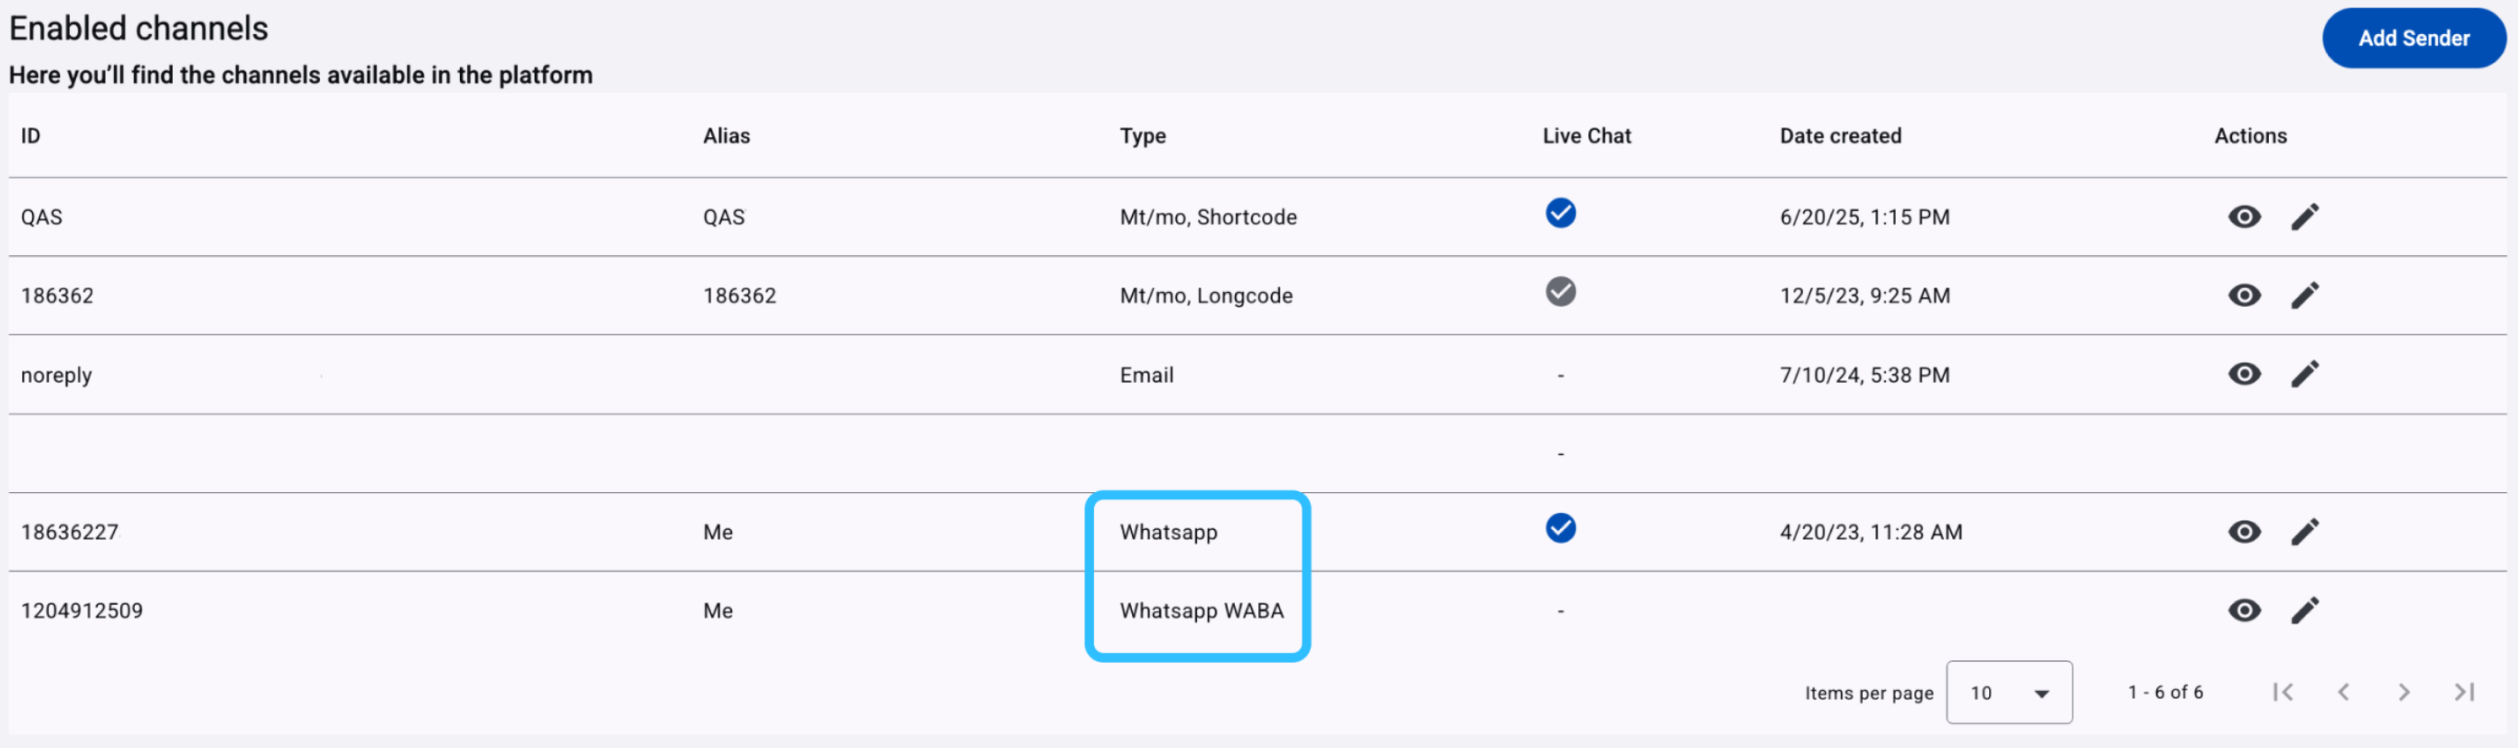
The possible values you may see in the Type column for WhatsApp are the following:
-
WhatsApp: This label appears for senders, referring to individual phone numbers linked to your WhatsApp Business Account (WABA). These numbers are used to send and receive messages on behalf of your business. Each phone number listed with this label operates under the WABA assigned to the Workspace.
Multiple senders can be linked to the same WABA, but each sender can be assigned to only one Workspace at a time.
-
WhatsApp WABA: This label represents the WhatsApp Business Account (WABA) itself. It acts as the parent container that holds all related phone numbers (senders), message templates, and business profile settings.
Only one WABA can be assigned to a Workspace at a time.
IMPORTANTIf a warning icon (⚠️) is displayed in the Actions column, and the following message is displayed:
“Meta access has been revoked. Please contact support.”It means that the platform no longer has permission to access your WhatsApp Business Account in Meta.
In this scenerario, the selected sender may still appear in the list, but its connection is no longer active.
As a result, the platform cannot validate the sender’s connectivity or allow message delivery.
This situation occurs when access to your WhatsApp account has been removed or modified in your Meta Business Manager.
To resolve this issue, please contact your Account Manager to restore access to your WhatsApp Business account.
-
-
Live Chat: The Live Chat column indicates whether the sender (phone number) is configured for exclusive use with the Live Chat platform. This field applies only to individual WhatsApp phone numbers (WhatsApp type). This field does not apply and remains empty when the channel type is
WhatsApp WABA. -
Date created: Date when the WABA was configured in the Workspace.
-
Actions: The "Actions" column displays the editing tool used to add, verify, and assign phone numbers to a WhatsApp Business Account. This tool is available only for entries with the "WhatsApp WABA" type.
Assign phone number (sender) to the Workspace
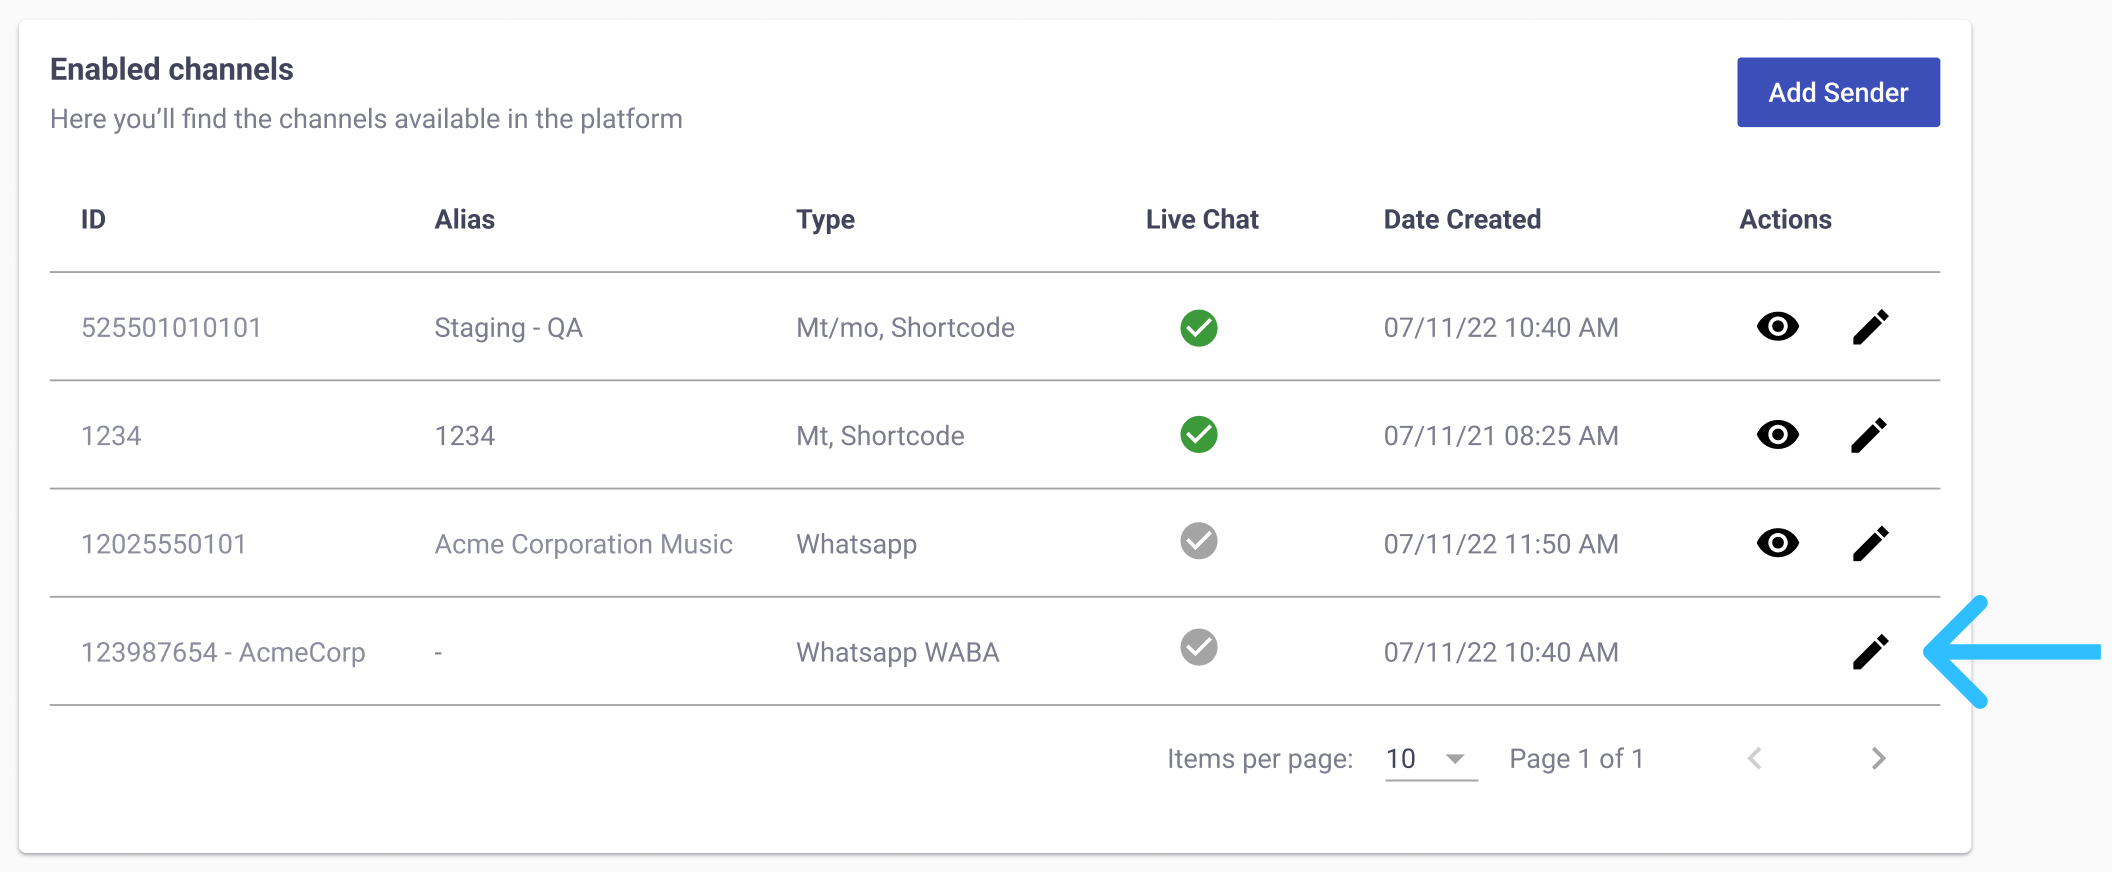
Once the WABA appears in the Enabled Channels table regardless of its verification status, you can proceed to assign a phone number (sender) to the current Workspace.
From the Enabled Channels table, locate the WABA entry under the Type column, identified as WhatsApp WABA. Click the Edit icon next to it to open its configuration options. This action will open the configuration options for the selected WABA.
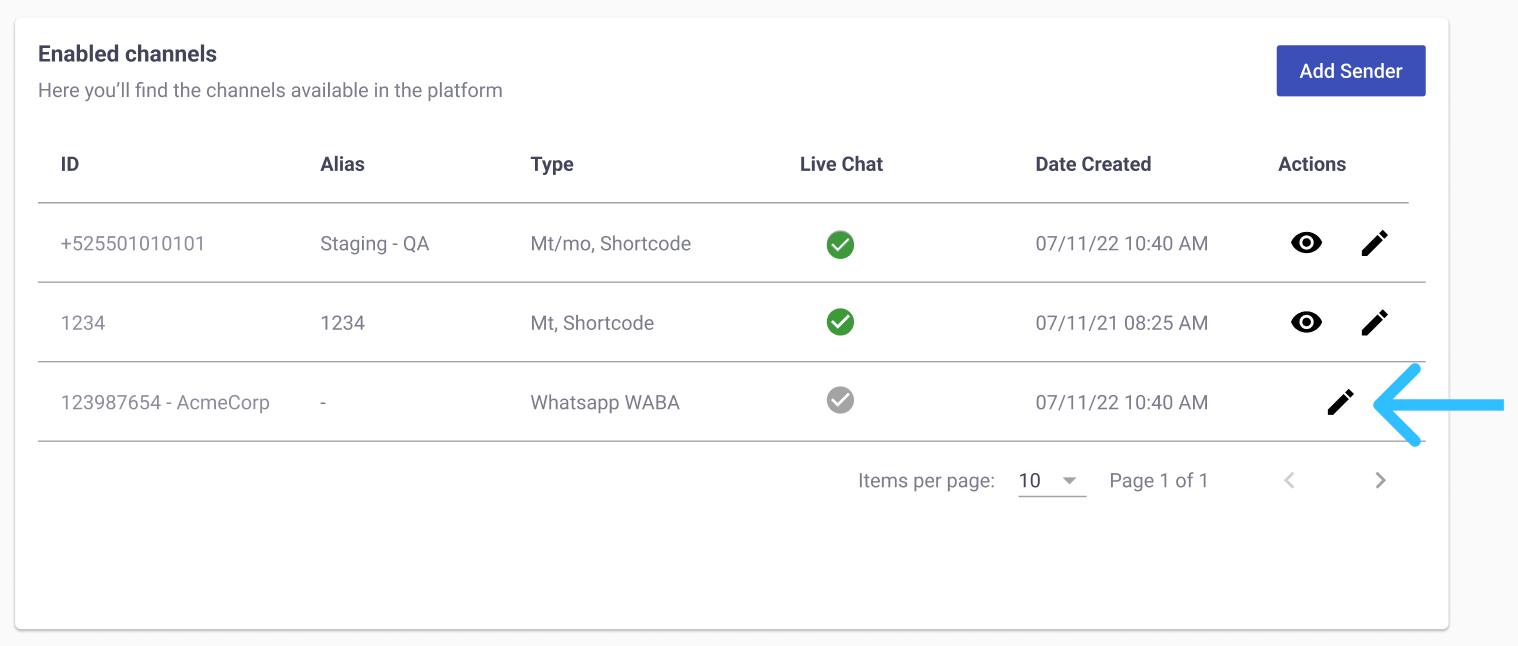
This table displays the key details and configuration of your newly linked WhatsApp Business Account (WABA), including all phone numbers associated with it.
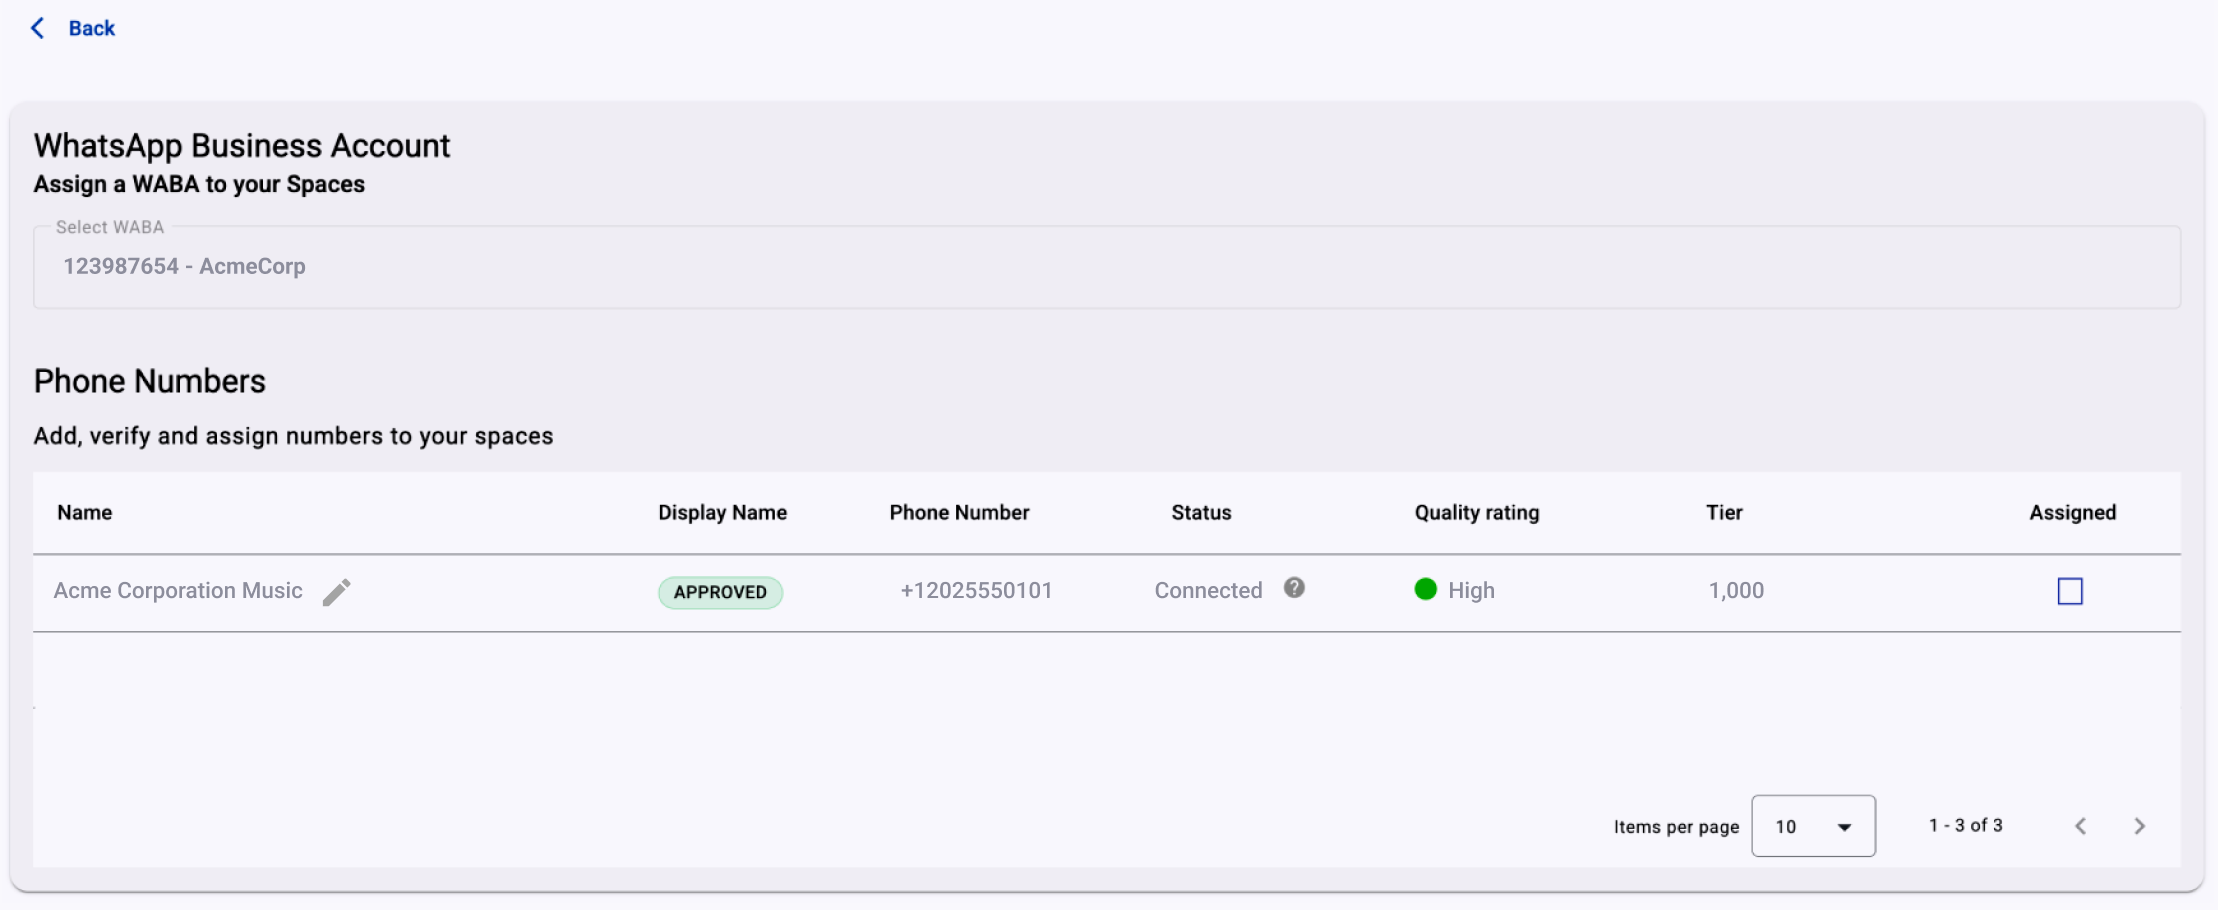
Here’s what each column of the table represents:
-
Name: Shows the display name registered with Meta for the phone number (sender). This is the business name customers see in your WhatsApp profile and conversations. This name helps identify the sender within the platform and can be updated by clicking the edit (pencil) icon.
-
Display Name: The badge indicates the current review status of the display name (for example, Approved).
-
Phone Number: The actual phone number associated with your WhatsApp Business Account is listed here. This is the number (sender) that customers will use to contact your business via WhatsApp.
-
Status: Indicates the current connectivity state of the phone number (sender) with the platform. A status of CONNECTED means the phone number is actively linked and can send and receive messages.
-
Quality Rating: Reflects the performance level of the phone number (sender), based on user engagement and message quality as determined by Meta. A High rating suggests good message delivery performance and user experience.
-
Tier: Displays the messaging tier level assigned to the phone number (sender), which determines the maximum number of business-initiated conversations allowed per day. For example, a Tier value of 1,000 allows up to 1,000 customer-initiated conversations daily using approved message templates.
-
Verify: Indicates whether the phone number has completed the verification process. If verification is still pending, this column displays the Verify button, allowing you to complete the OTP verification by SMS or voice call. For more information about verifying a WABA phone number, go to the Verify WABA Phone Number via OTP Authentication section.
NOTEIf the phone number (sender) is already assigned to another Workspace, the "Verify" button will be disabled.
The "Verify" button is available only after the phone number has been assigned to the current Workspace. To assign the phone number, select the "Assigned" checkbox for the corresponding phone number.
-
Assigned: To assign the phone number (sender) to the current Workspace, select the checkbox.
NOTEIf the phone number (sender) is already assigned to another Workspace, the "Assigned" checkbox will be disabled.
To assign the desired phone number (sender) to the current Workspace, click the "Assigned" checkbox. Once selected, it will display the following pop-up window. Click on the "Confirm" icon.
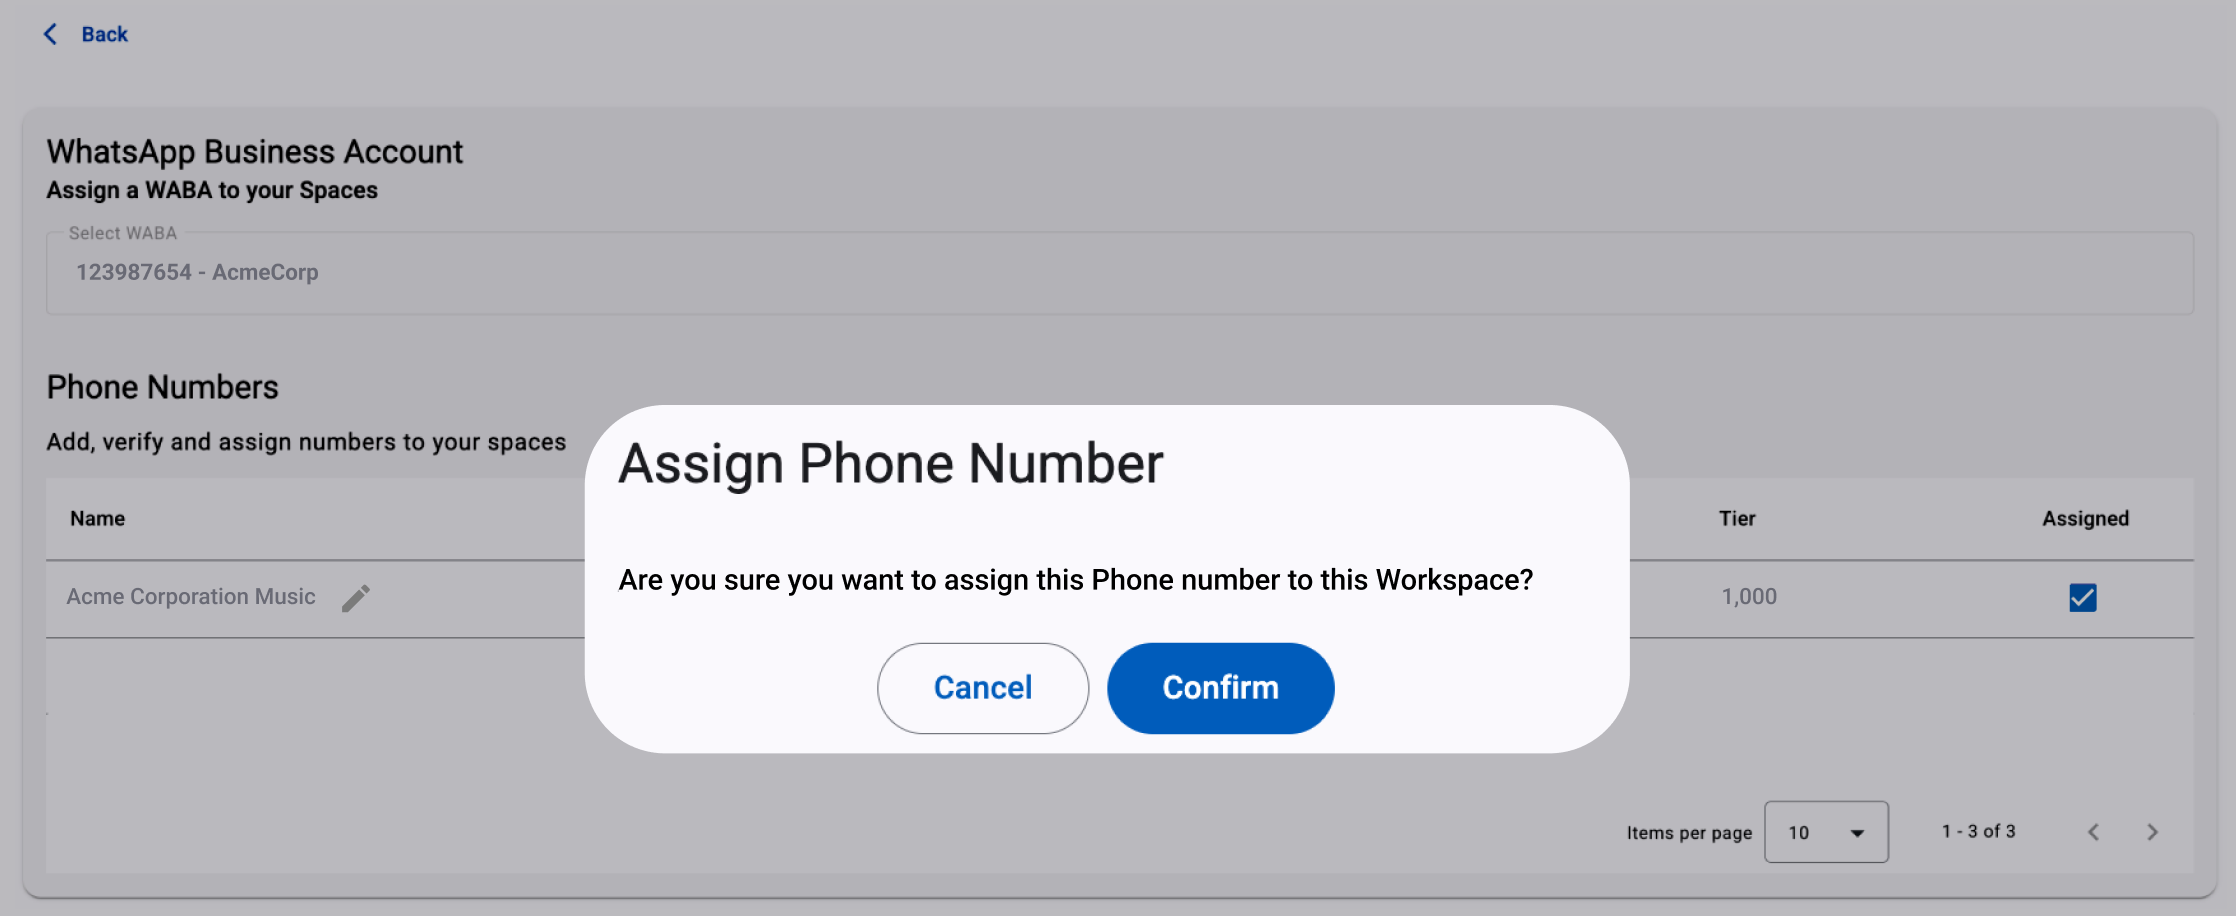
NOTERemember,
- Only you are able to add a single WABA for each Workspace.
- Phone Numbers with the checkbox disabled are currently assigned to another Workspace.
After assigning the phone number to the Workspace, it will appear in the “Enabled channels” list as a WhatsApp type.
Unassign Phone Number
If you want to unassign a phone number from the current Workspace, the steps are the following:
-
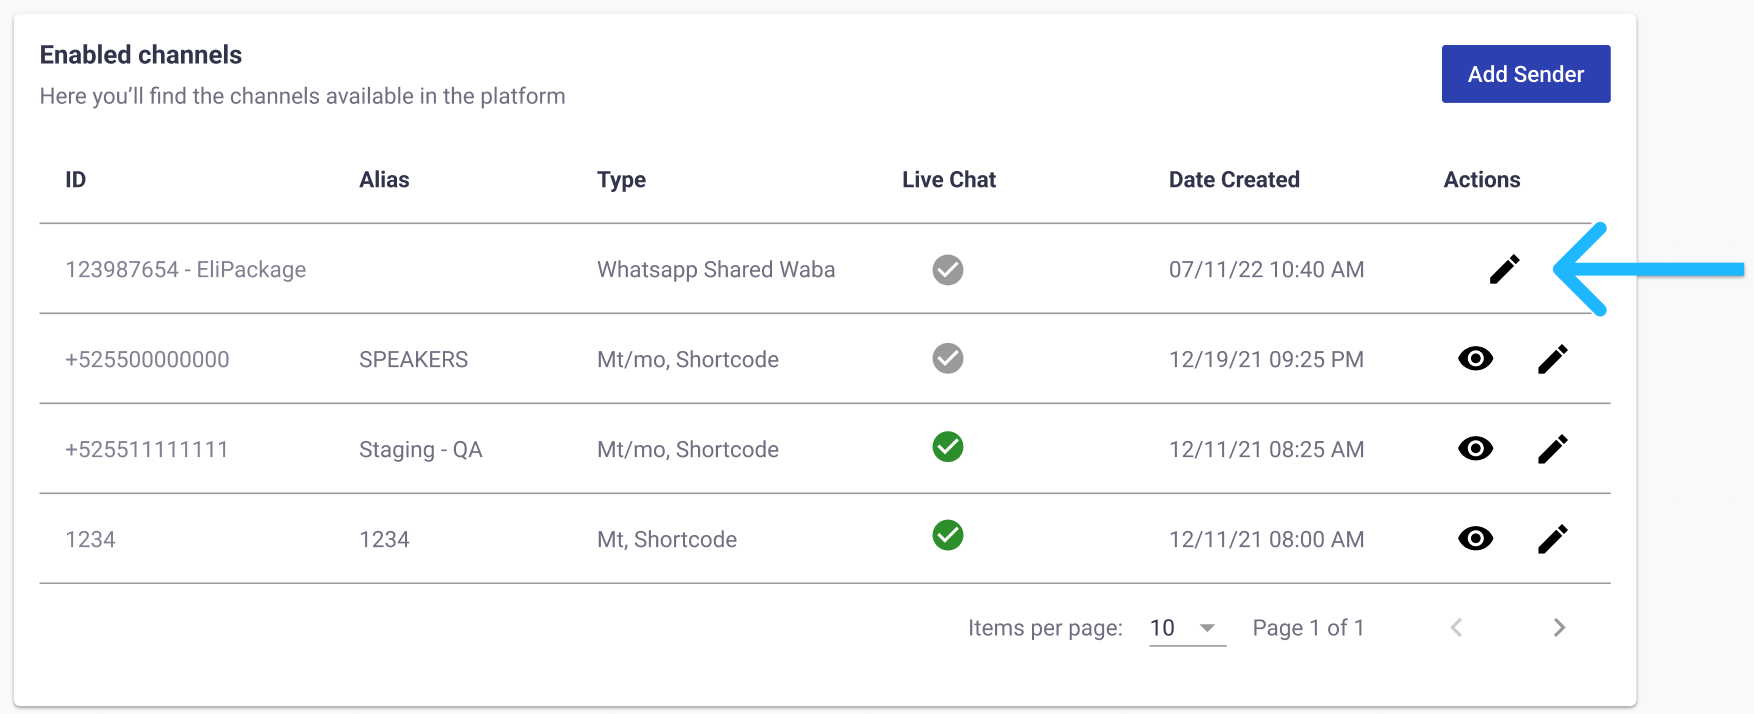
Next to the WABA, click on the "Edit" icon. This action will open the configuration options for the selected WABA.
-
To unassign a phone number (sender) associated with the Workspace, click on the uncheck the "Assigned" checkbox. Once clicked, a confirmation pop-up window appears.
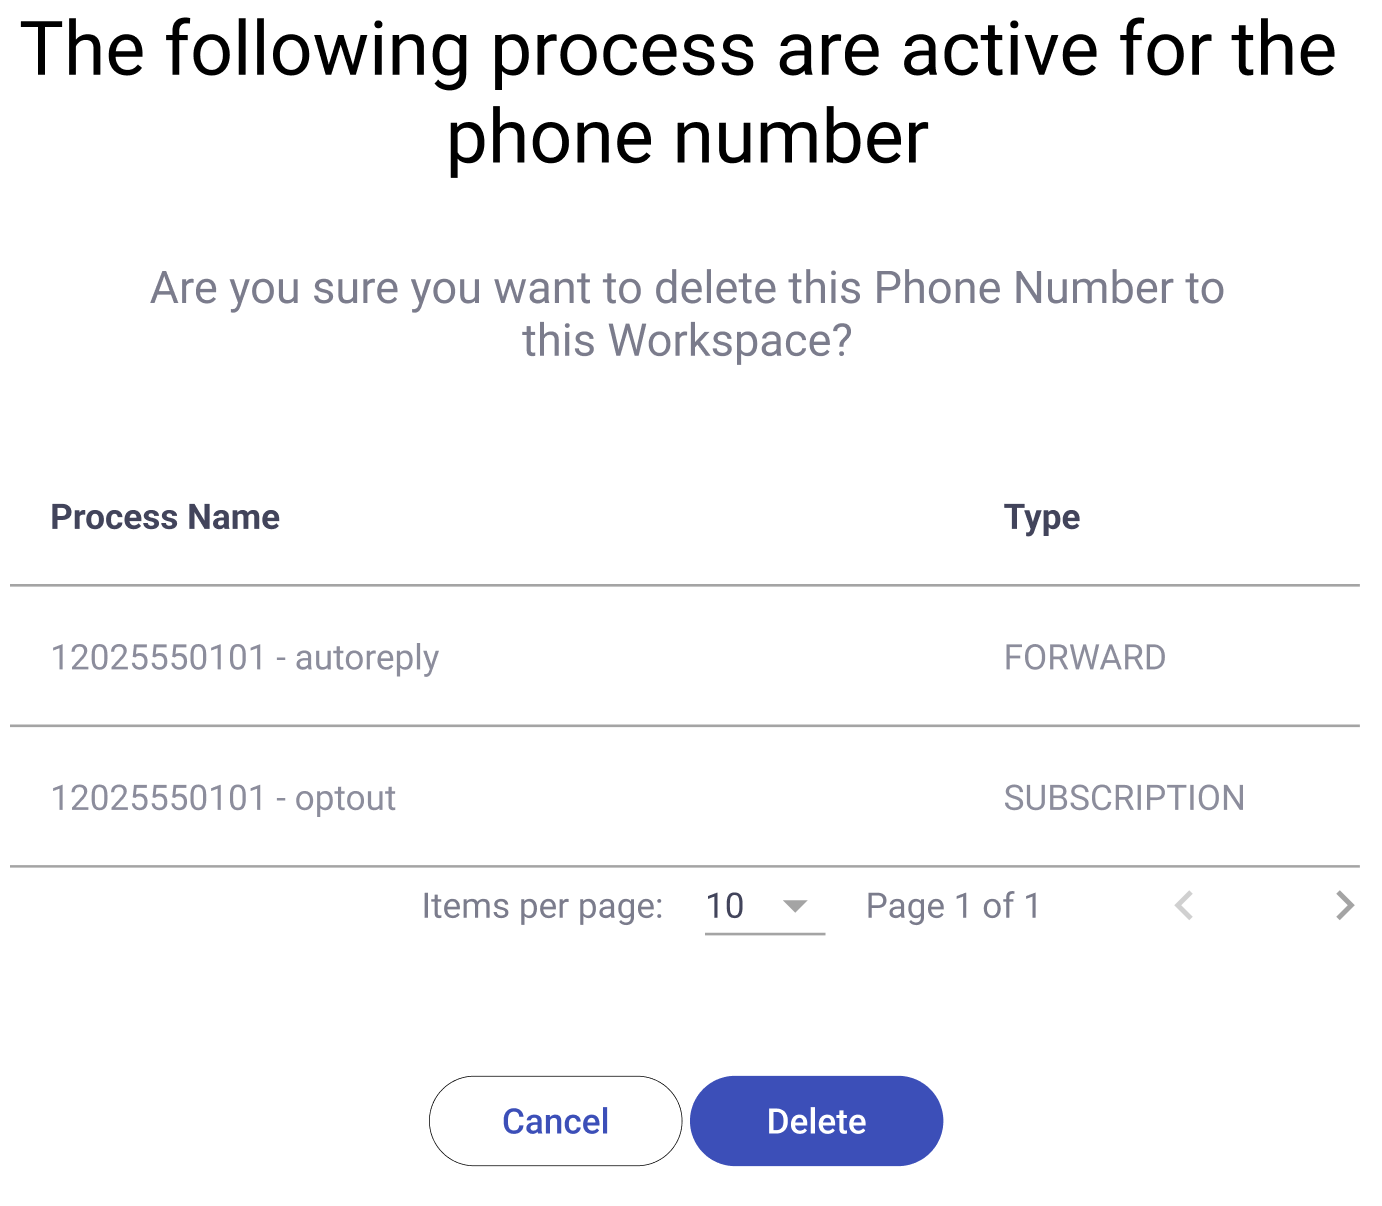
The pop-up lists the active processes associated with the phone number. The details provided include:
- Process Name: The specific name of each process (consent management, broadcast, automation) that is currently using this phone number.
- Type: The type of process.
An alternative method for creating a new WhatsApp Business Account (WABA) is through the Partner-Initiated Process, in which you can request assistance from our support team to initiate the creation of a new WABA.
- How It Works: Our team will handle the entire setup process, including creating the WABA and configuring the sender (the phone number that will be used for messaging).
- Who It’s For: This option is ideal if you’re starting from scratch and want a hassle-free setup. Our support team ensures that everything is configured correctly, so you can focus on your business without worrying about the technical details.
Updated about 1 month ago