Chatbot Setup Example
As we mentioned earlier, the chatbot is a menu-based decision tree hierarchical structure, which is a set of fancy words for something that you use every day and run into all the time, whether you realize it or not, but they are all over the place.
Every time you unlock your phone, you run through the steps of some sort of hierarchical tree structure to get to unlock it. So that is what we are going to go over how to define the steps of a process that is based on a set of possible stimuli to obtain desired outcomes. For this, we are going to break down selected parts of the figure that is shown below.
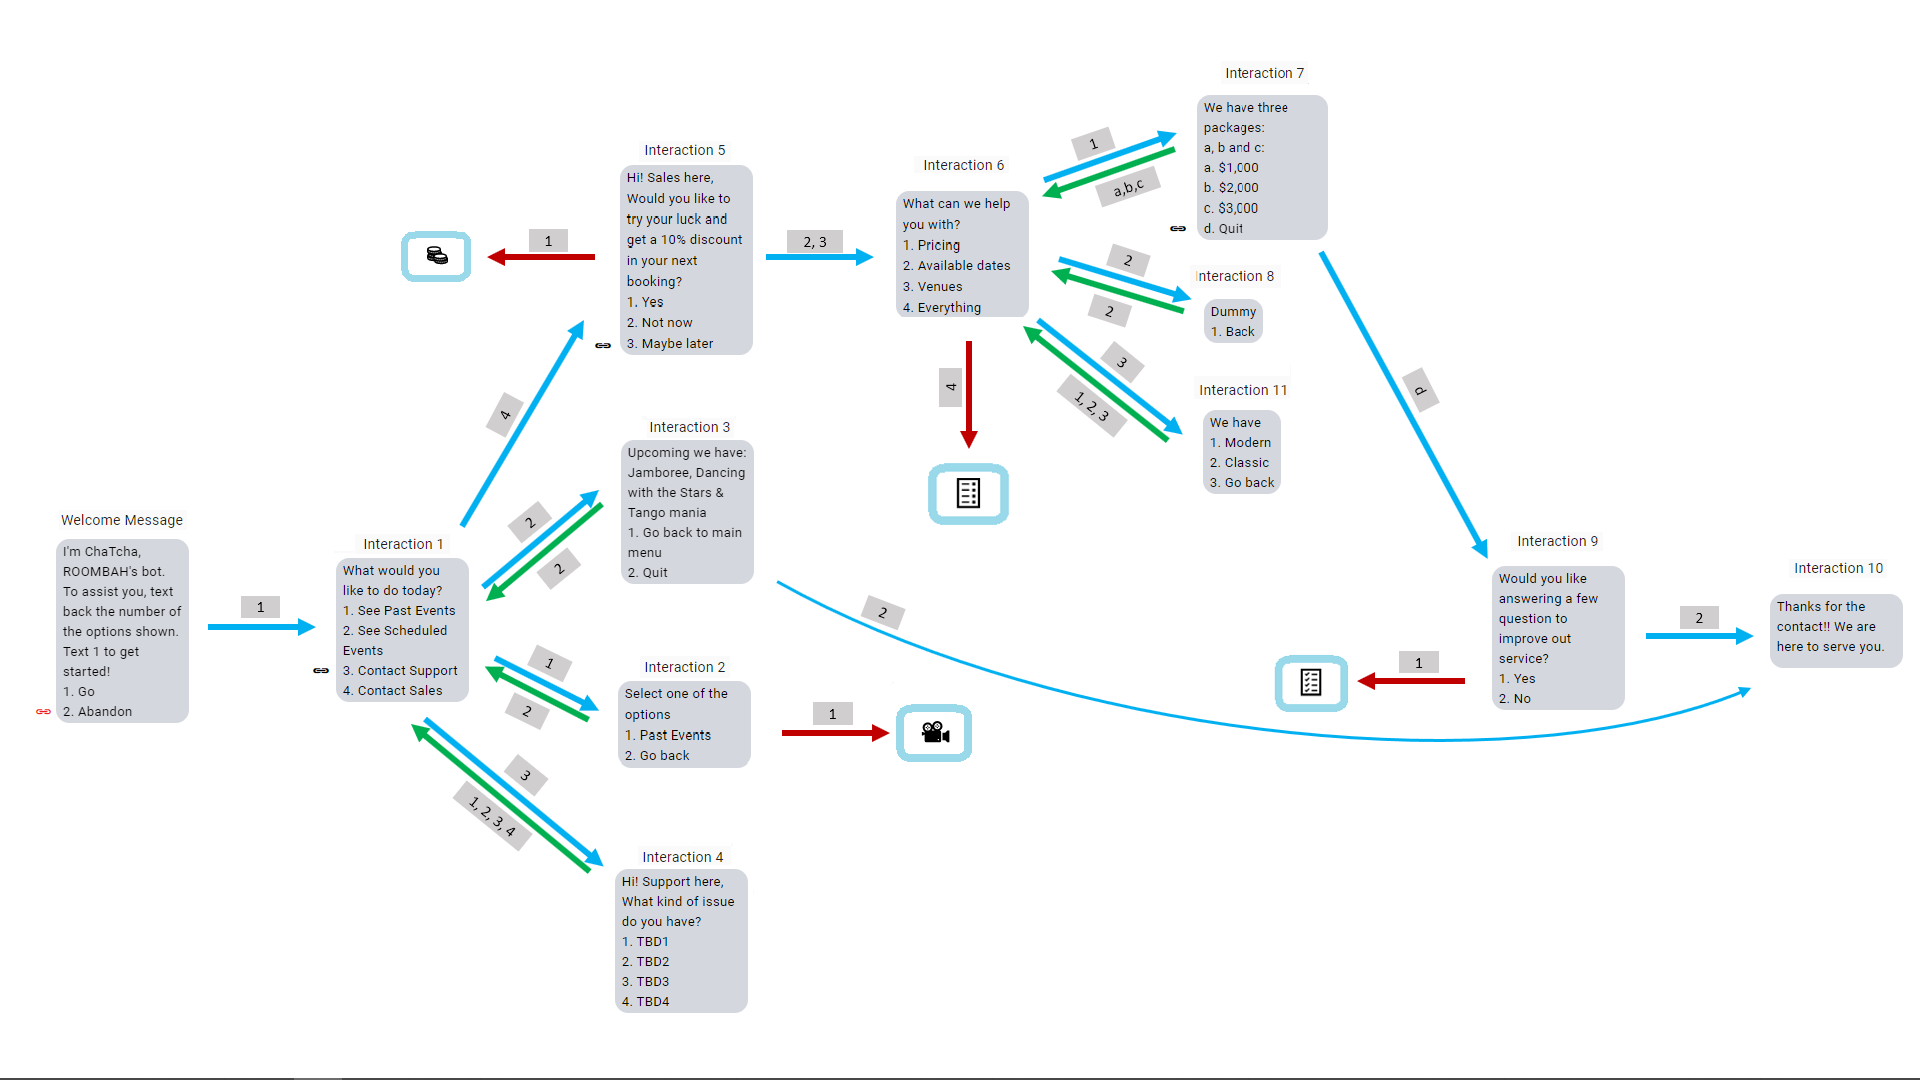
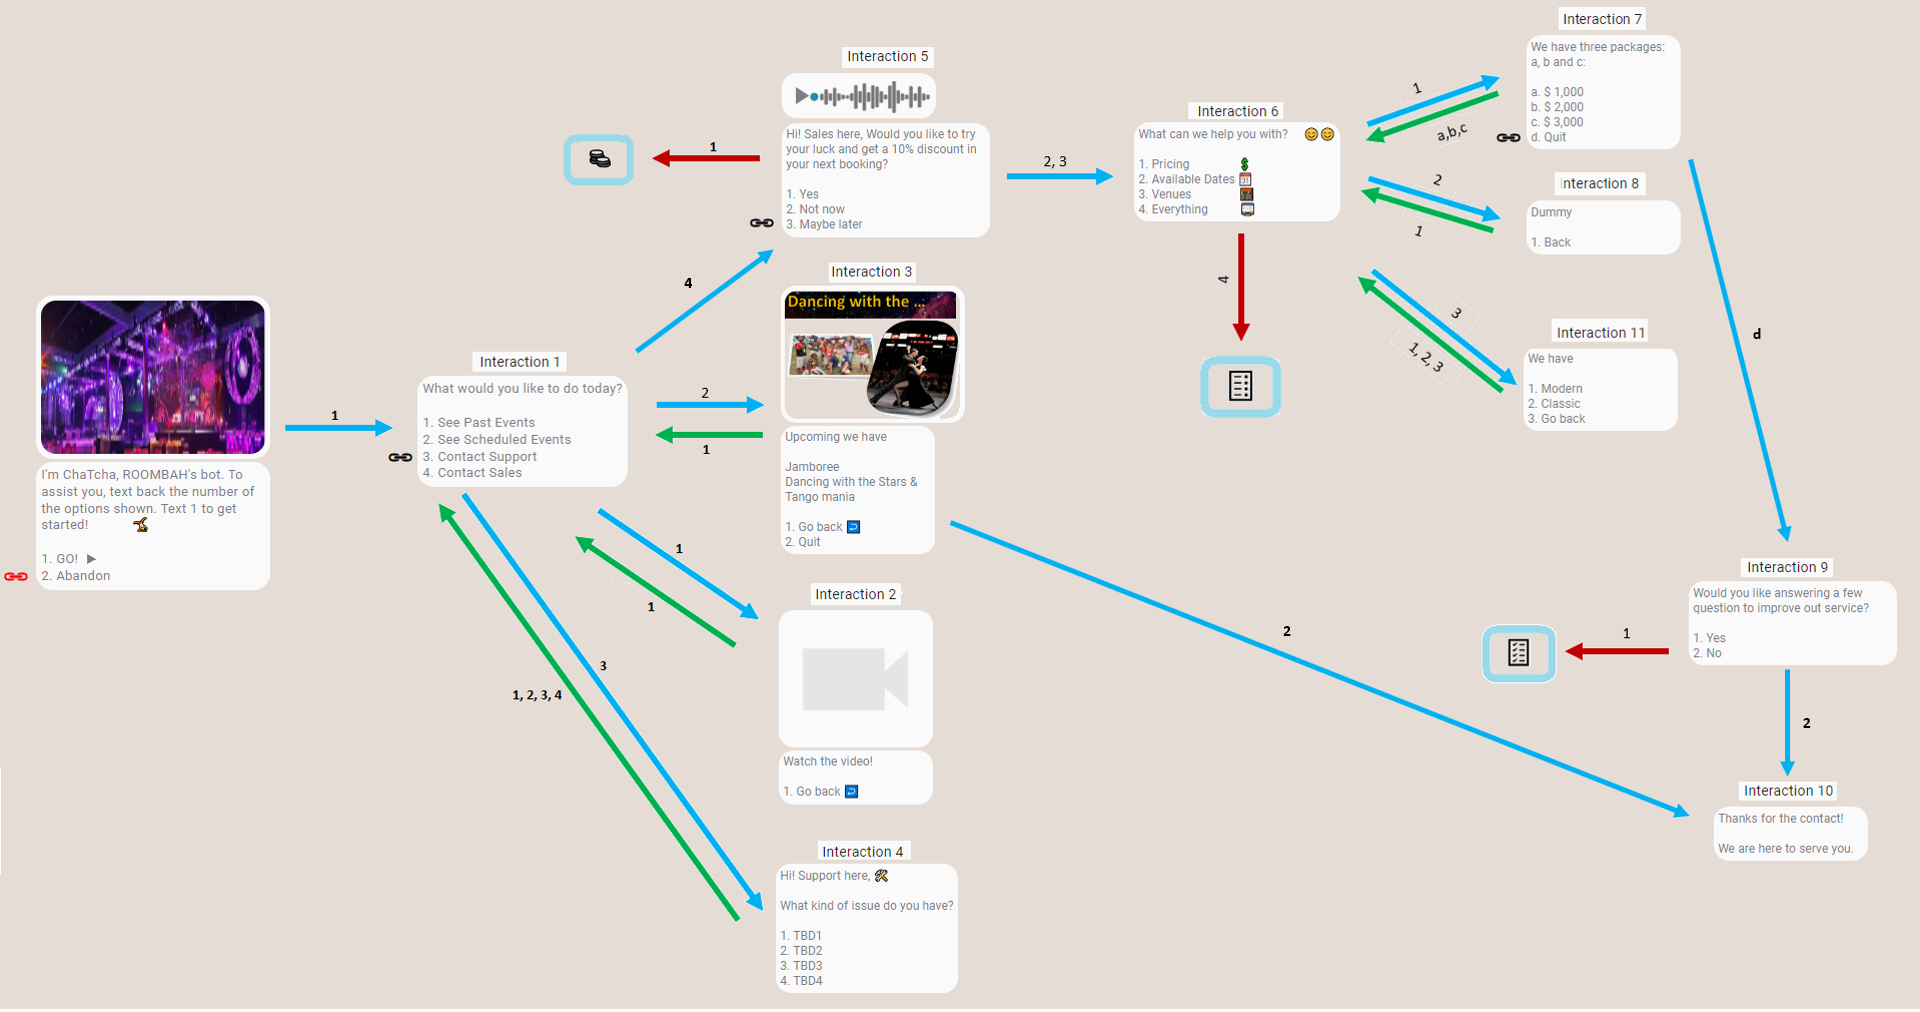
Both figures represent essentially the same hypothetical chatbot implementation of an outfit that offers rental ballroom services to set up events for the general public, called ROOMBAH, and it created a chatbot called ChatCha.
Users invoke ROOMBAH’s chatbot by sending ChatCha to its service number to get the process started.
This action takes the user to the entry point of the chatbots, the Welcome Message, shown in the leftmost position of the figures.
As users interact with the chatbot, they will be presented with some of the options that were configured for the process, and some not. Eventually, through the choices they made, some will arrive at the far right of the figure where no more actions are processed by the chatbot in Interaction 10.
So, the chatbot has an entry point in the Welcome Message and an exit point as an interaction that you will define. It could also be the case where you need to configure more than one exit point to end the session. Remember that the chatbot session will also end if the next step in the flow is not an interaction.
The ChatCha script can be created using an Excel sheet such as the one shown below.
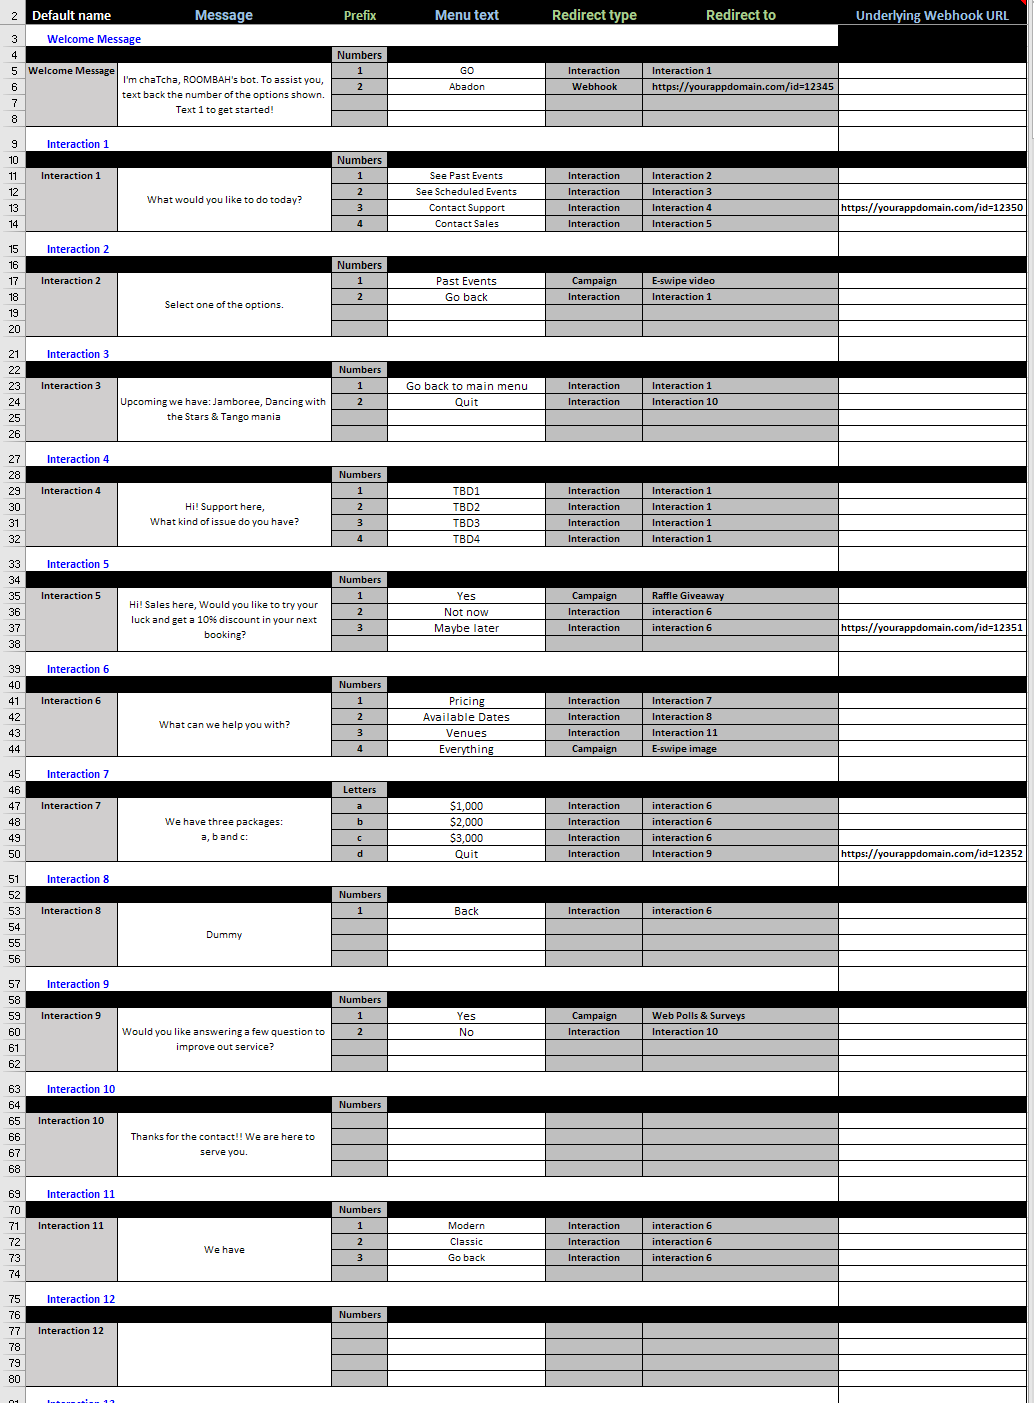
Notice that in the Excel sheet, the column headers are such that they follow the platform's input and configuration requirements. This way, the process ends up being copying and pasting each interaction element into the corresponding sections of the configuration and picking the correct settings.
Adding interaction steps
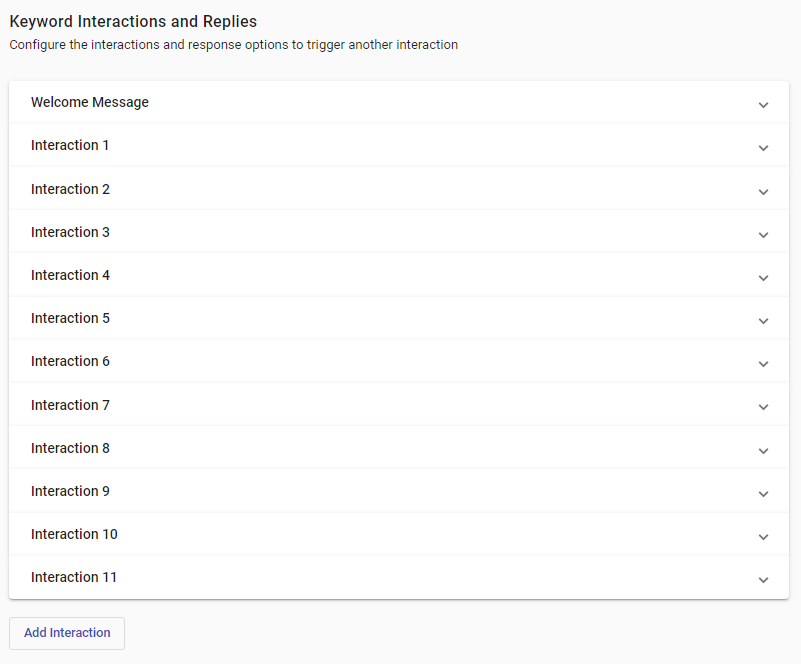
At first, it is good practice in the interactions step of the configuration, to add the total number of interactions of the script. This way, at the time of configuring an interaction, you will have the appropriate one to select from in the Redirect to pulldown menu.
For the ChatCha example, there are a total of 11 interactions that make up the chatbot. If you are configuring the chatbot for SMS, you will need to add 8 interactions and if you are using WhatsApp, you will need to add 6.
Select Add Interaction as many times as needed to reach the number of interactions in the chatbot script. In this case eleven (11).
Welcome Message configuration
As has been mentioned throughout, the Welcome Message is the entry point to the chatbot. These are the detailed steps to configure it:
-
Expand the Welcome Message section.
-
Copy/paste the SMS Message, or WhatsApp Message. The main difference between the two is the different options that each channel type offers. In our example, all text portions are the same. The differences are in the added capabilities present in the WhatsApp implementation.
Referring to the script above, where the contents for the Welcome Message are,

all the elements appearing in the script can be accommodated for both the SMS and the WhatsApp channels.
For an SMS chatbot it would be:
- Enter the contents of the message. The results are displayed on the emulated device screen.
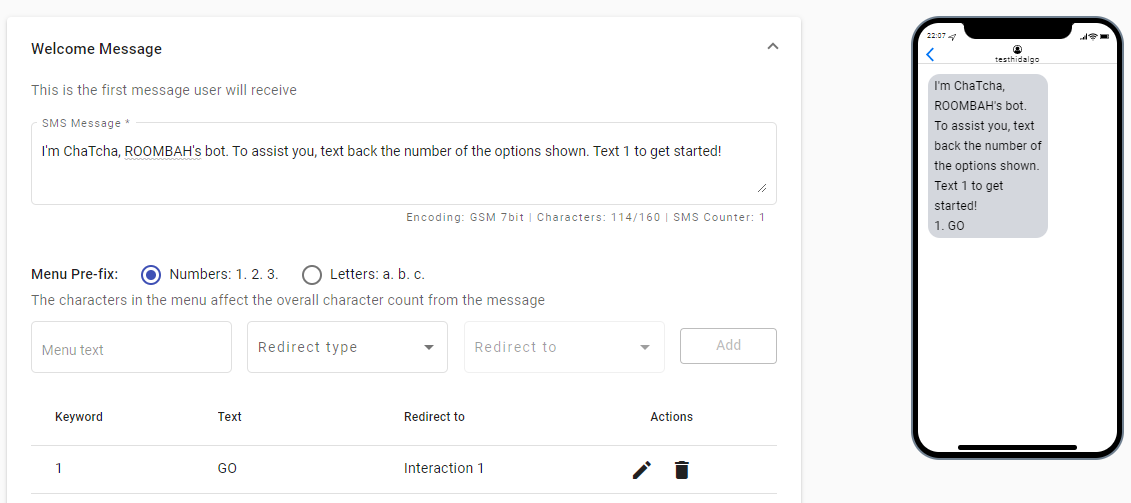
Notice the legend under the SMS message box, reflecting the number of characters (Characters:108/160) still within the maximum number to limit the number of SMS messages needed for a single message. This is one of the considerations that needs to be taken into account when building an SMS-based chatbot.
- Select the Menu Pre-fix scheme

Ensure that the prefix type to be used in the menu is number-based, as it is what is called for in the script, the default value for all interactions.
- Enter the Menu option with its attributes as shown in the sequence in the image below.
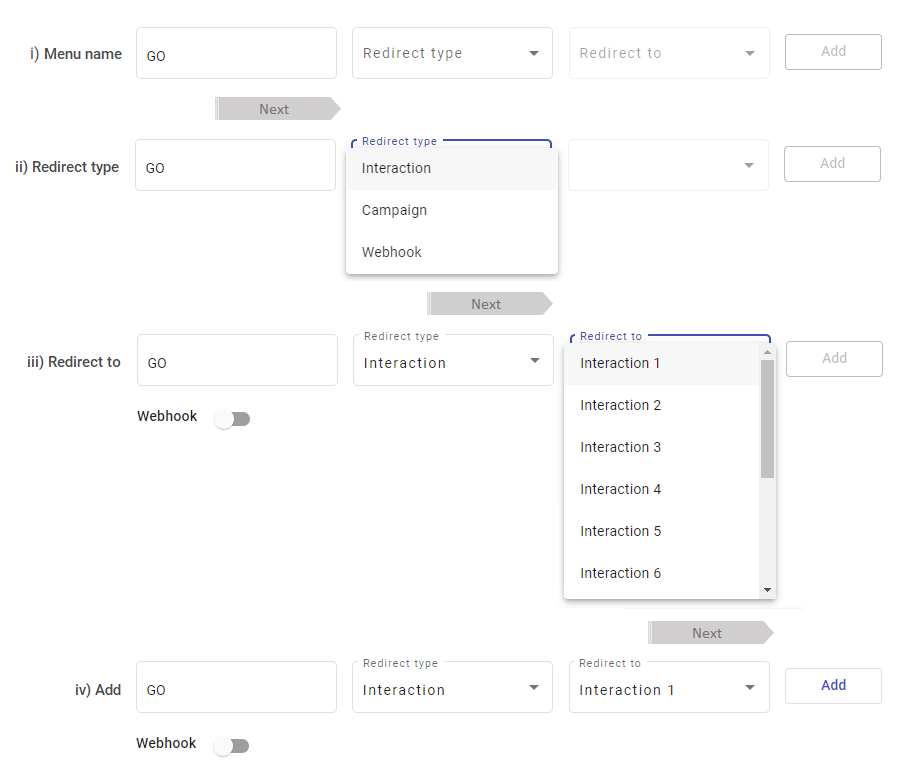
You enter the Menu name, select the Redirect type, select the Redirect to and now the platform presents the opportunity to add the menu option by enabling the Add button. Immediately after you enter the Redirect type, the platform presents a webhook option. This is an underlying webhook option different from the Redirect type webhook option that appears in the dropdown menu. More on this later.
You select Add and the menu option appears in the Menu table and the emulated device screen, as shown below.
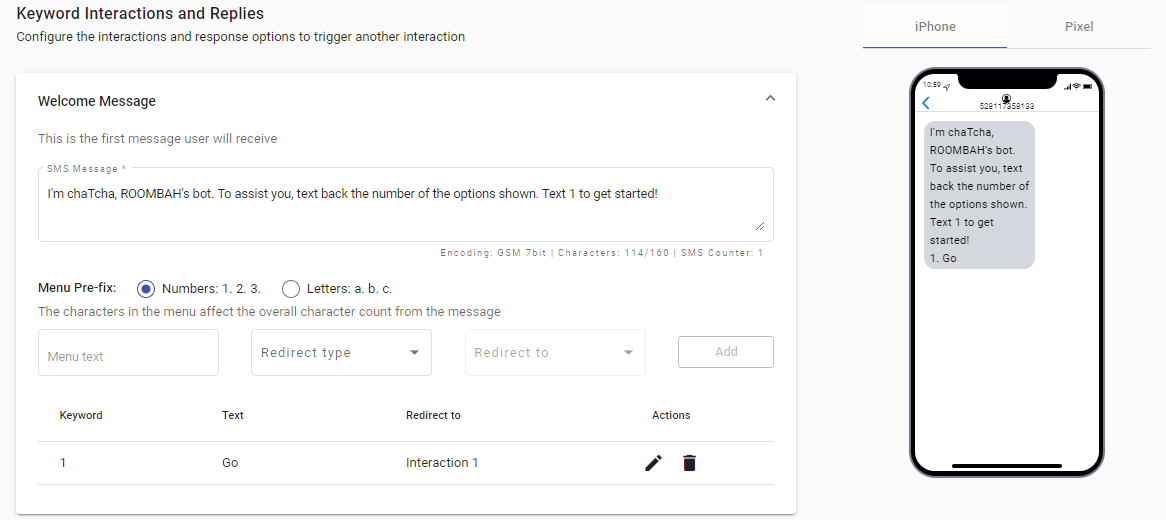
A similar process is done to enter the second item in the script.
- Enter the second Menu option with its attributes as shown in the sequence in the image below.
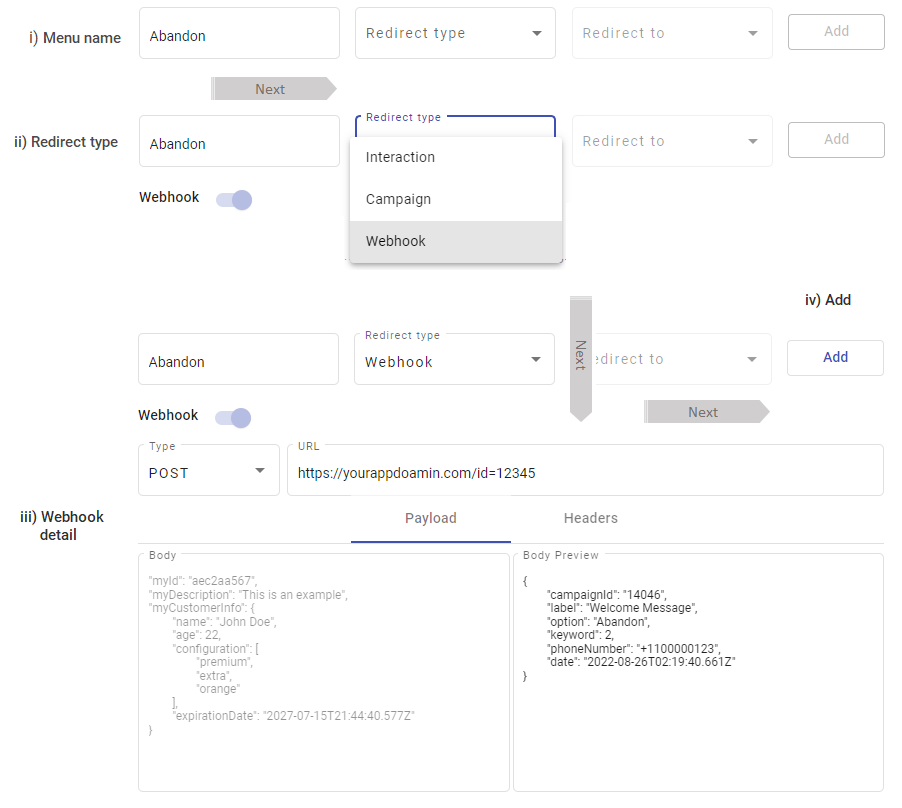
After you enter the Menu name and select the Webhook option as called in the script under the Redirect type, the window expands to show the webhook elements that need to be configured, step (iii) in the sequence above.
Enter the URL the webhook is pointing to in your application. In the Payload tab, it shows the Body Preview box with the default payload contents and the Body box where you can customize the contents of the payload to suit your requirements. Under the Headers tab, you can also define Key/value pairs that describe something about the request (such as the type of data or authentication), and you can create custom headers for almost any purpose. This information is not shown in the script, as the default configuration is used.
Notice the information that is present in the default payload configuration in the figure below.
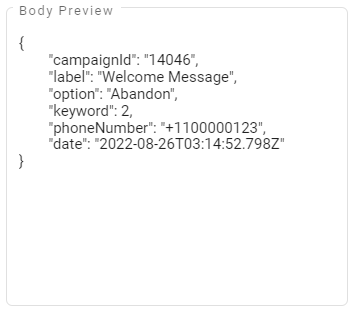
It shows the platform’s campaign ID, in this case, 14046, the interaction label, in this case, the Welcome Message, the option within the interaction to which the webhook was associated in two formats as the menu name or the keyword option, the user mobile phone number involved in the chatbot session, and a timestamp of when the event took place.
All webhooks will provide this type of information by default. If you need to include any additional payload information it would need to be programmed into the Body box.
When this menu option is selected by the user (the explicit webhook configuration into the chatbot flow under Redirect type), will result in ending the chatbot session as no other interaction in the flow is or can be defined.
For a WhatsApp chatbot, the procedure is essentially the same, but with capabilities that it expand the content delivered over the chatbot to include the added features inherent to WhatsApp:
• It can deliver up to 1024 characters per message
• It can include multimedia content in the form of images documents, audio, and video within the flow
• It offers up to 9 response options instead
• Interaction messages and response options can include emojis
The following screenshot illustrates these aspects.
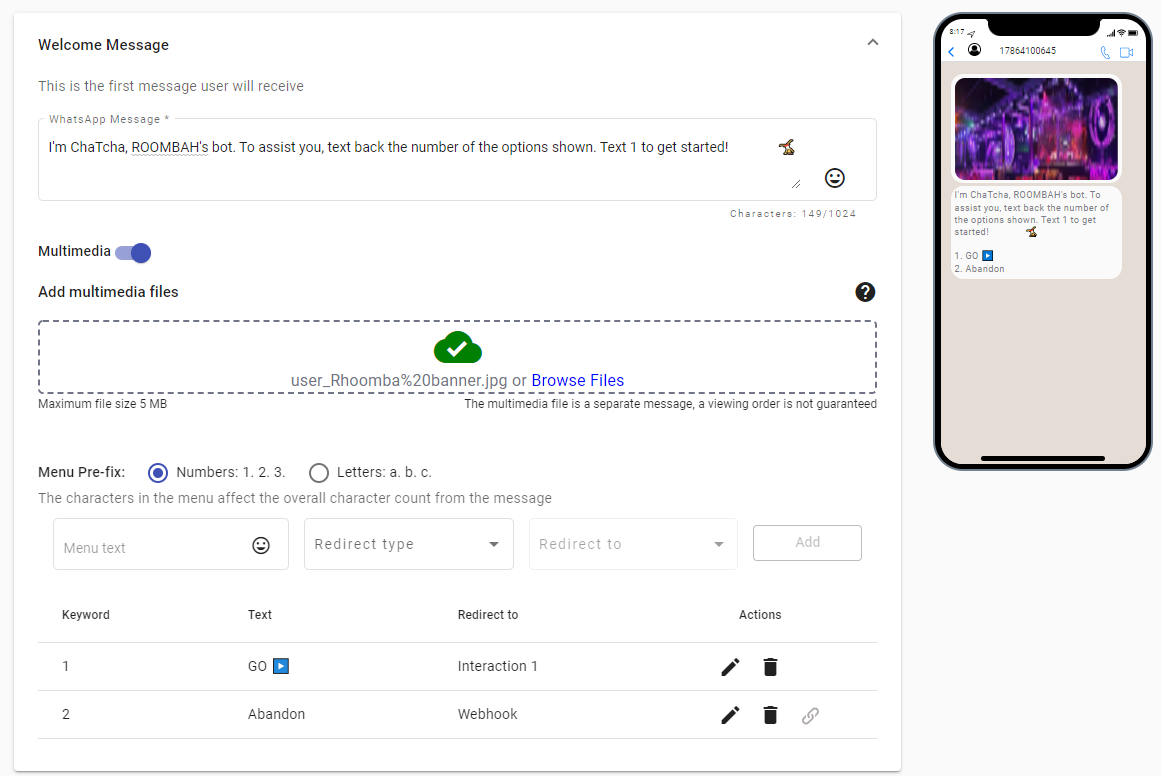
Both the message and the menu items include emojis, with each emoji adding 6 characters to the message character count as it is represented by a string of 6 numbers in UTF-8 encoding.
The banner image is added through the multimedia toggle switch.
In graphical form, SMS would be
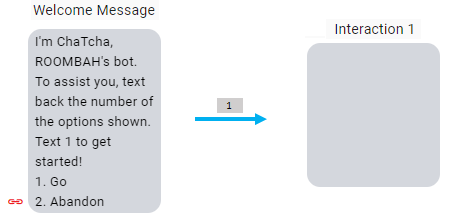
where the 1 on top of the arrow, represents the keyword chosen by the user to move from the Welcome Message to Interaction 1, the next step in the flow. The small red chain link represents the underlying webhook associated with option 2.
Graphically WhatsApp would be,
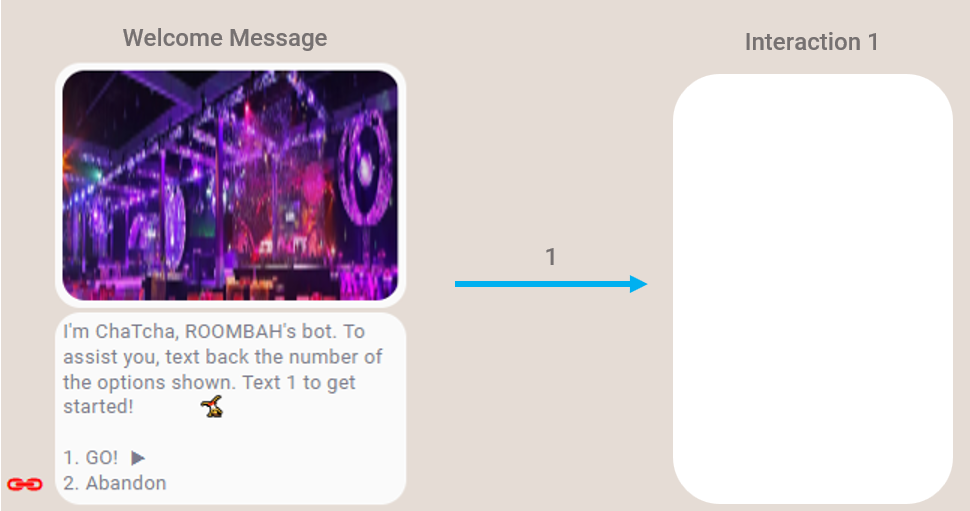
The differences are the multimedia and emojis added versus the SMS scenario.
Since in neither case Interaction 1 has not been defined, it is depicted as an empty box.
As the additional components provided by WhatsApp should be clear by now, we will forgo expanding upon the in the following descriptions except for the cases in which it adds capabilities not present in SMS.
Configuring Interaction 1
Configuring Interaction 1 involves the same procedure, and it is essentially the same for both SMS and WhatsApp
- Expand Interaction 1
- Copy/paste the SMS/WhatsApp Message text from the script
- Ensure that the prefix type to be used is correct
According to the script, the following steps need to be repeated 4 times since the script includes 4 menu items, each time following the sequence in the script.
- Copy/paste the Menu text from the script
- In the Redirect type dropdown menu, select Interaction
- Select the Redirect to dropdown menu. Select the interaction that corresponds to the Menu option you are entering.
- Select Add
Like before, you will go from this,

to this,

As you can see from the picture, at this point the tree begins to branch out, as the number of options given to the user has gone to 4. Menu item 1 (See Past Events) points to Interaction 2, item 2 (See Scheduled Events) points to Interaction 3, and so forth. In the graphic, each option that the menu has represents a branch in the chatbot flow. Also, notice that for Menu item 3 (Contact Support), the graphic shows a black link icon that represents an underlying webhook associated with it.
For every interaction that is added, a similar effect will take place, however, there are instances in which you see an interaction return to the interaction that preceded it. Let us look into Interaction 2.
Configuring Interaction 2
Interaction 2 is defined in the script as follows,

and its platform configuration will look like,
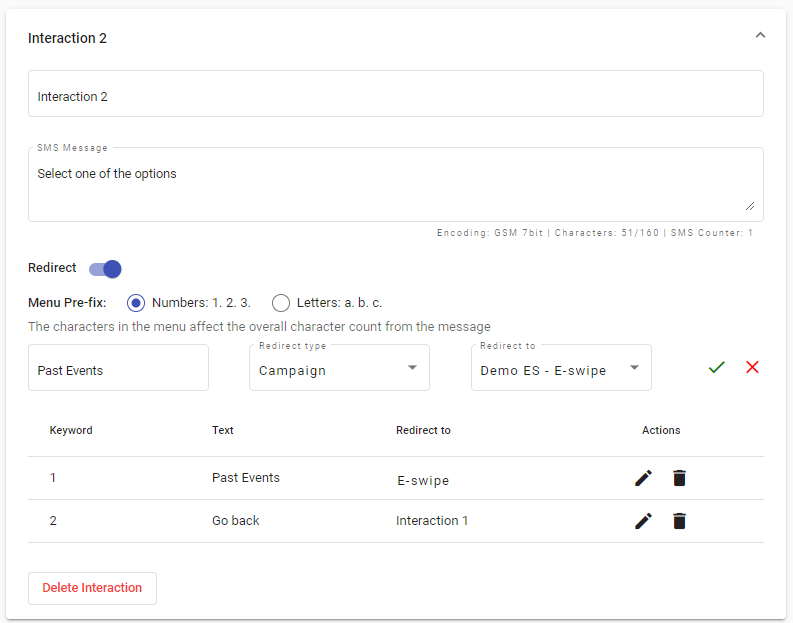
Which results in the following graphical representation.

There are two important aspects that are shown here:
a. It is possible to go to any interaction regardless of where it occurs in the flow either down or upstream, as it is shown here and in interactions 3, 4, 7, 8, and 11.
b. Within the chatbot flow, is possible to use a platform-defined campaign as one of its steps, that, for the ChatCha example, occurs here in Interaction 2 redirecting to an E-swipe video, in Interaction 5 redirecting to a Raffle Giveaway campaign, Interaction 6 to an E-swipe image, and Interaction 9 to a Web Polls & Surveys campaign.
However, for the WhatsApp case, given its capabilities, you can include the video component directly into the interaction step through its multimedia capabilities, and it would be done as follows,
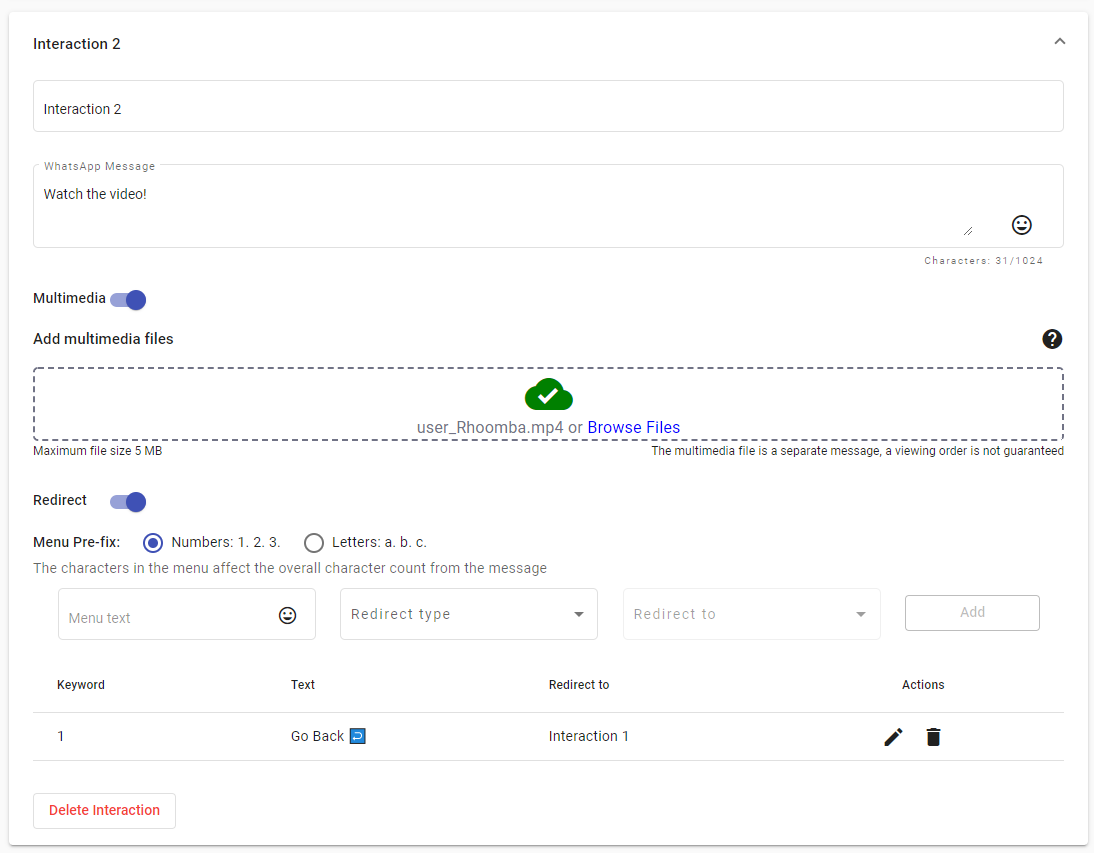
Which is graphically contrasted as shown below.

Summarizing what has been done up to this point, there is the Welcome Message, where the chatbot process begins, there are interaction steps that take through multiple paths to address different topics handled in the chatbot, the interaction steps that can take you back in the flow, and there are platform campaigns that can be added on to the chatbot.
Repeat the process described above for the remaining interactions in the script.
What is left at this point is to address how to finish or close a chatbot session.
Session ending interaction
In Chatcha, Interaction 10 is where the step that closes the chatbot session is configured.
According to our Chatcha script, we have,

Notice that the only information that is present in this interaction is the Message text, and all the other elements are empty. The configuration for this case is,
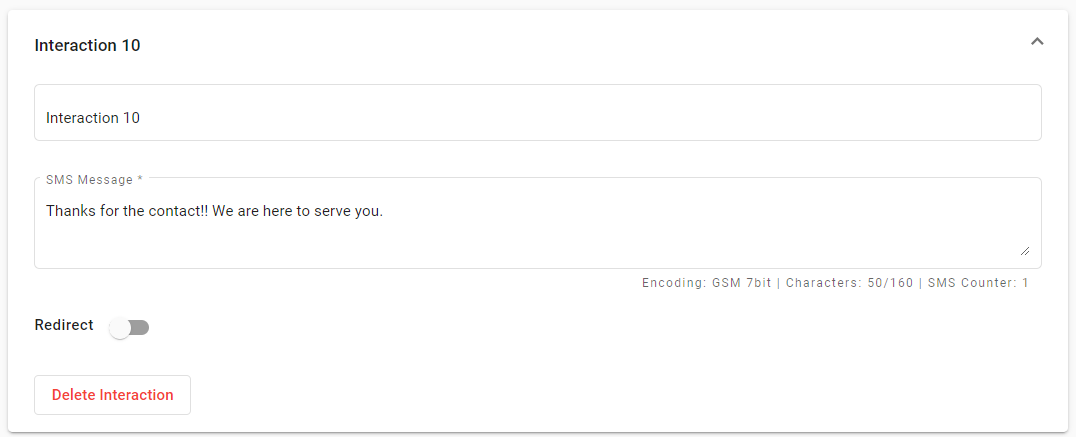
In the screenshot above, the Redirect being in the disabled state eliminates all the other elements of an Interaction, which includes a Redirect to destination. There is no other action the chatbot will take the user to after it reaches an interaction with the Redirect toggle switch disabled, which is why it is used for ending a chatbot session.
Other considerations of the example
In the script configuration, notice that although Interaction 10 represents the end of the chatbot session, you can go beyond the session-ending interaction, as this example shows with Interaction 11. As a matter of fact, you can define any interaction as the session-ending interaction of the chatbot.
On Deleting Interactions
You may find yourself in a situation where you need to deliberately delete an interaction in the middle of the flow to modify it and introduce a change to it.
In doing so, the new interaction, even though the platform allows you to give it the same name as before, will not be placed in the same location on the interaction stack, nor will it be considered the same interaction as the one that was deleted. It is a brand-new interaction.
But knowing that an interaction does not have to be in a particular position in the stack to function properly, as was shown with the Interaction 11 case, solves this particular scenario only impacting where it is shown in the interaction stack.
To illustrate this, you decide that Interaction 1 needs to be modified.
You expand Interaction 1 and instead of modifying it, you go ahead and select Delete interaction since you plan to configure a replacement for it. The platform will return a warning message with the impact this will have on the chatbot flow with a message similar to the one in the following image.
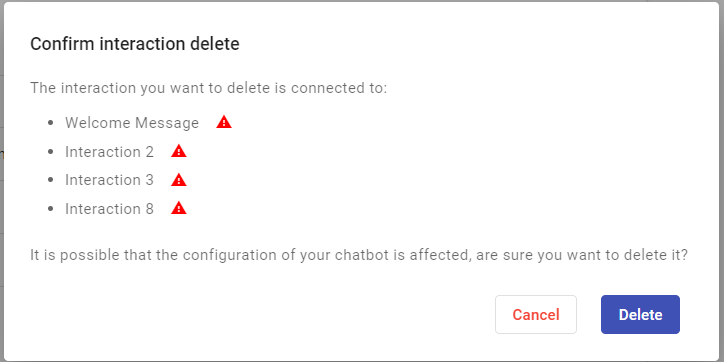
You select Delete, and the interaction is removed from the Interaction stack.
You proceed to select Add Interaction. The platform will add a new interaction at the bottom of the stack with the next available number in the sequence of interactions. This is shown in the screenshot below.
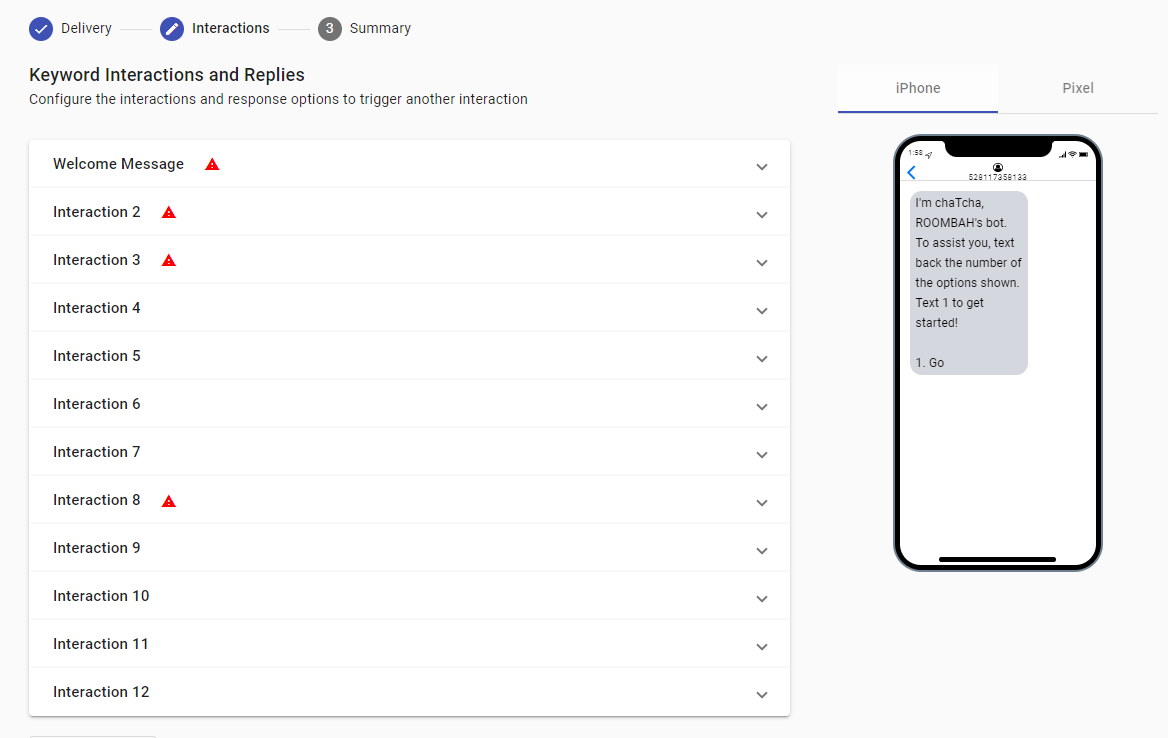
At the bottom of the interaction stack, you see that an Interaction 12 has been added. Also notice the warnings on those interactions that were affected by the deletion of Interaction 1, given that their connections with Interaction 1 no longer exist as part of the flow.
Once you configure the elements in the newly created Interaction 12, reestablish the connections, and save the campaign as a Draft, the warnings will be removed.
Updated 5 months ago
