Your Inbox
To access your centralized hub for managing conversations that were assigned to you, click the Inbox icon from the Navigation sidebar menu and select Your Inbox.
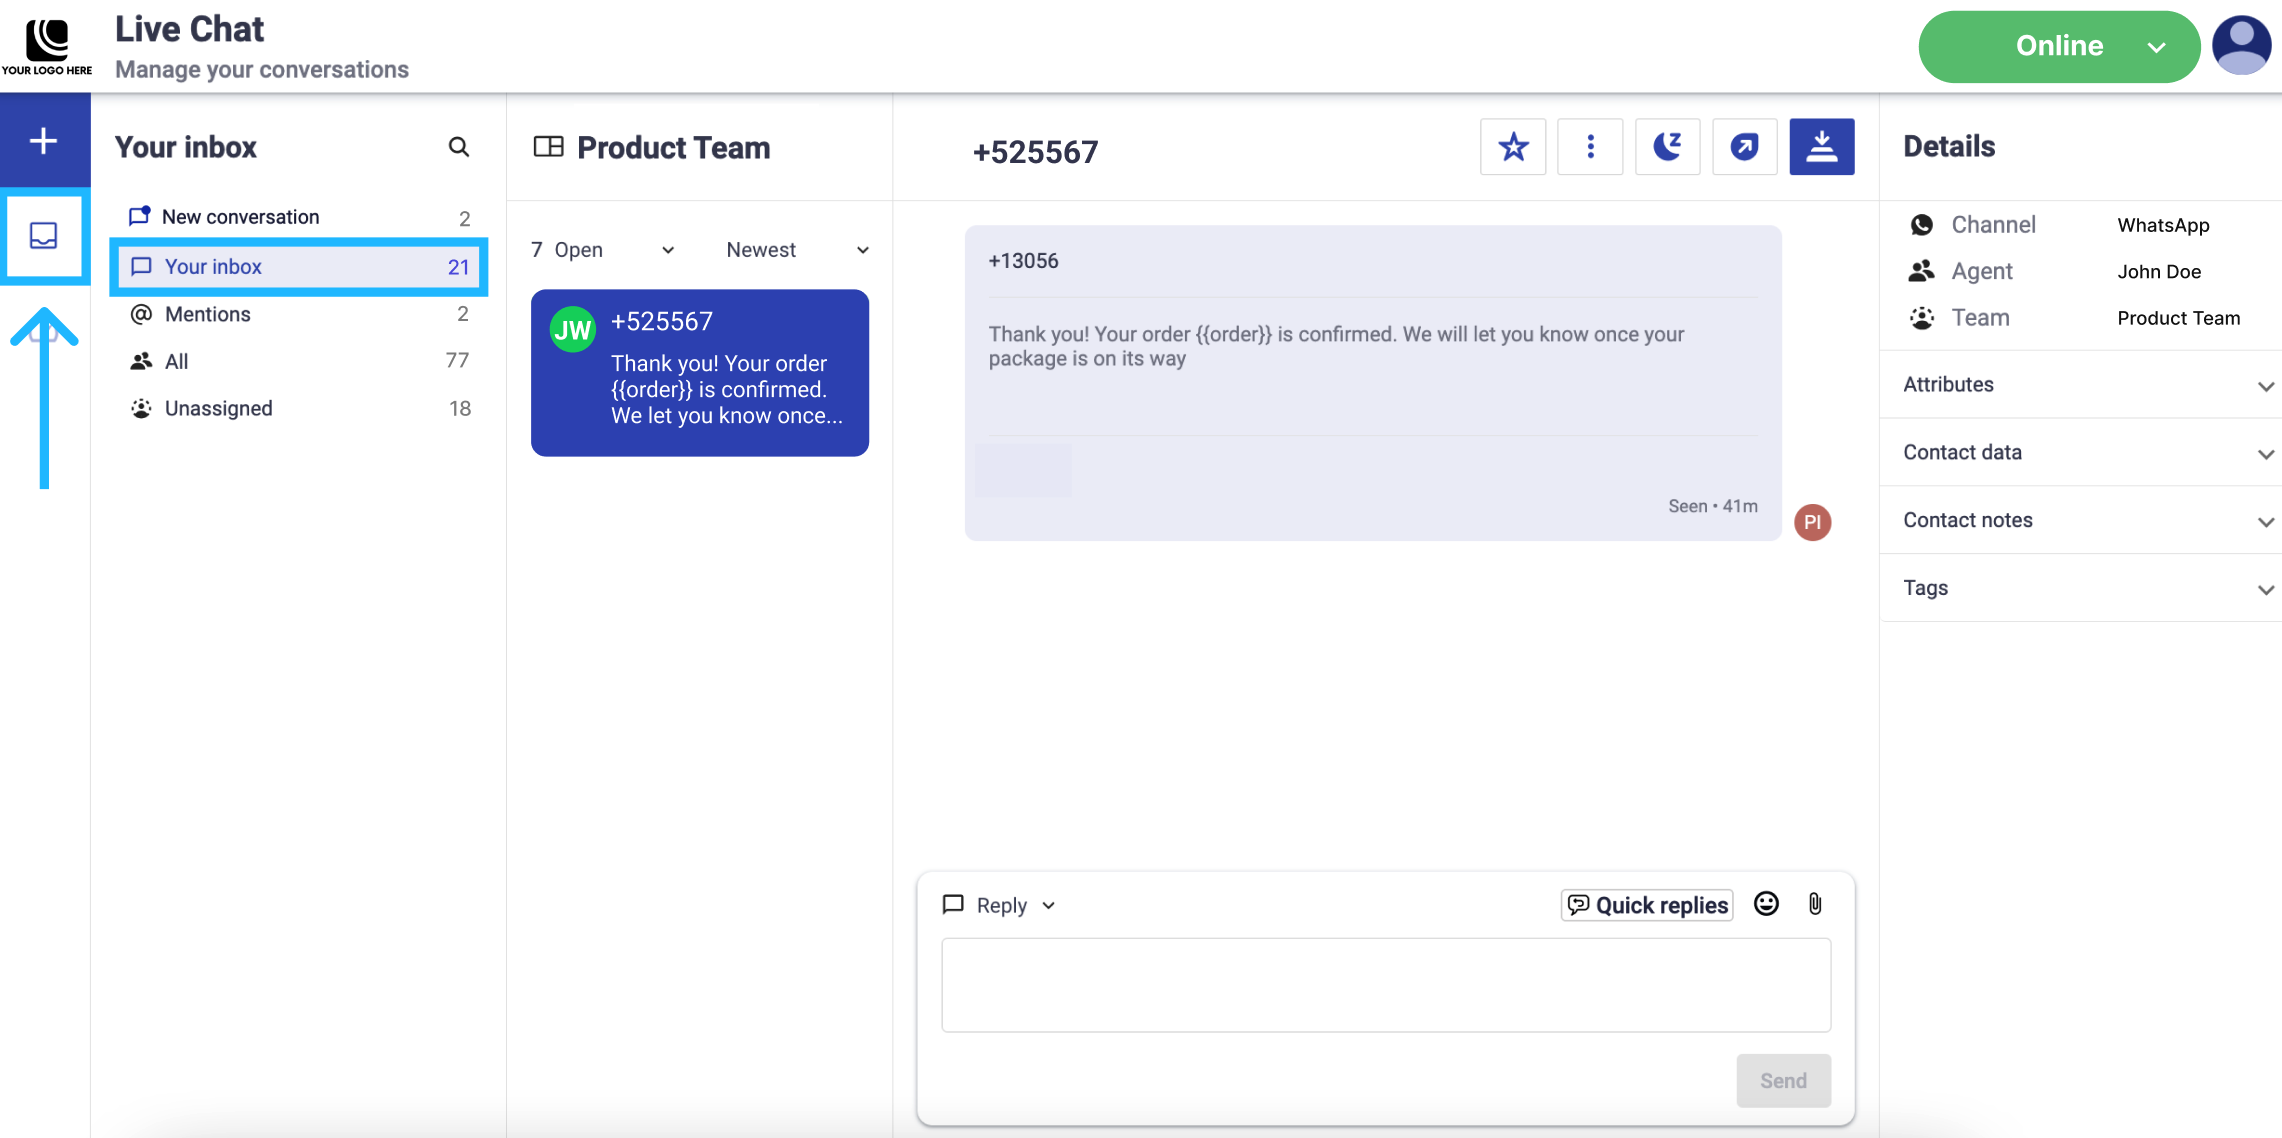
In this section, we are going to focus on the conversation section. In particular, in the top bar, the conversation thread, and the message composer.
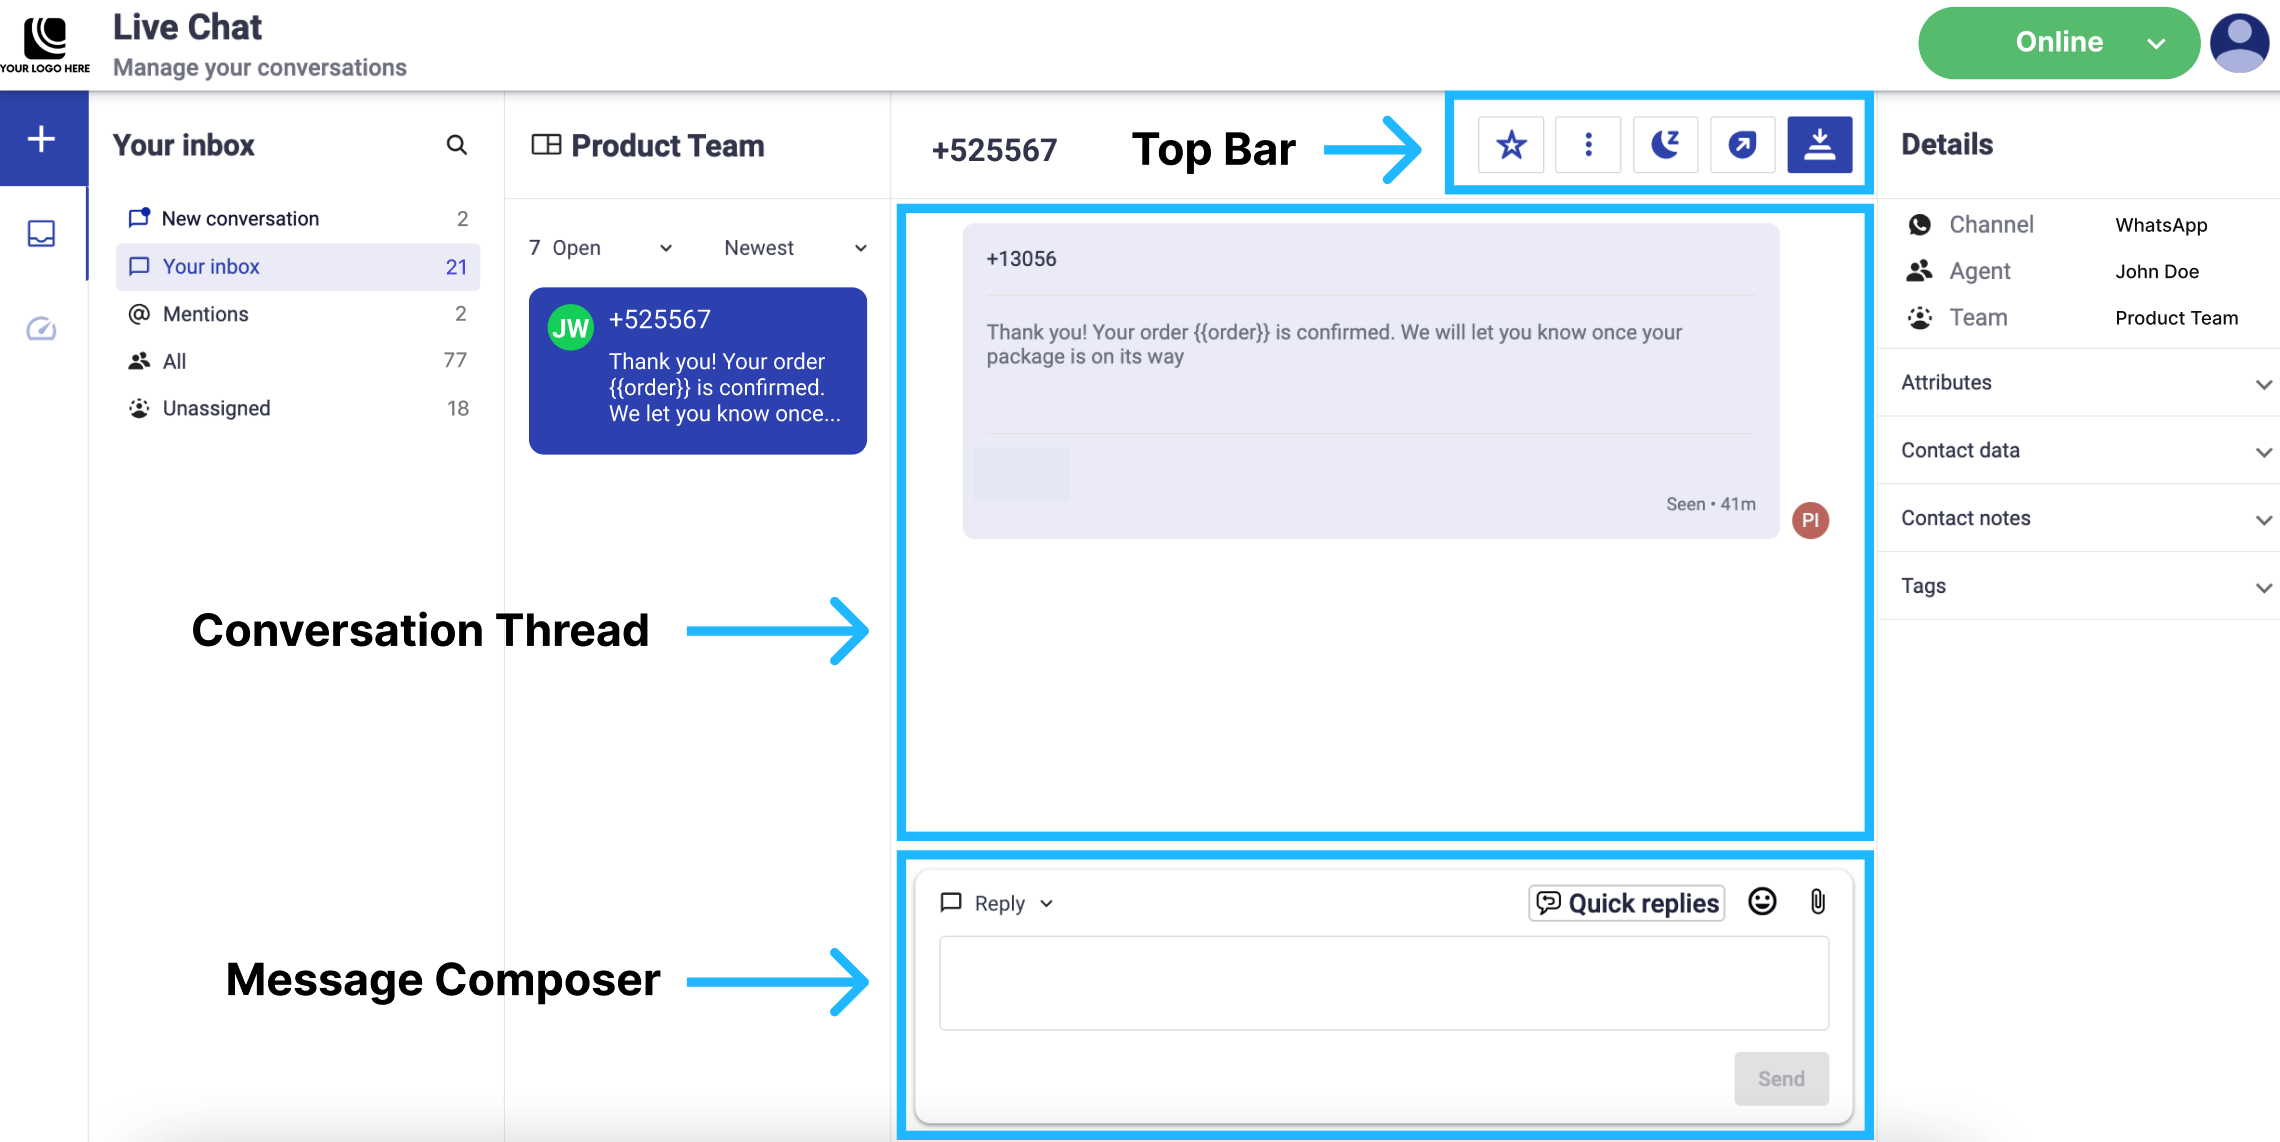
Top Bar
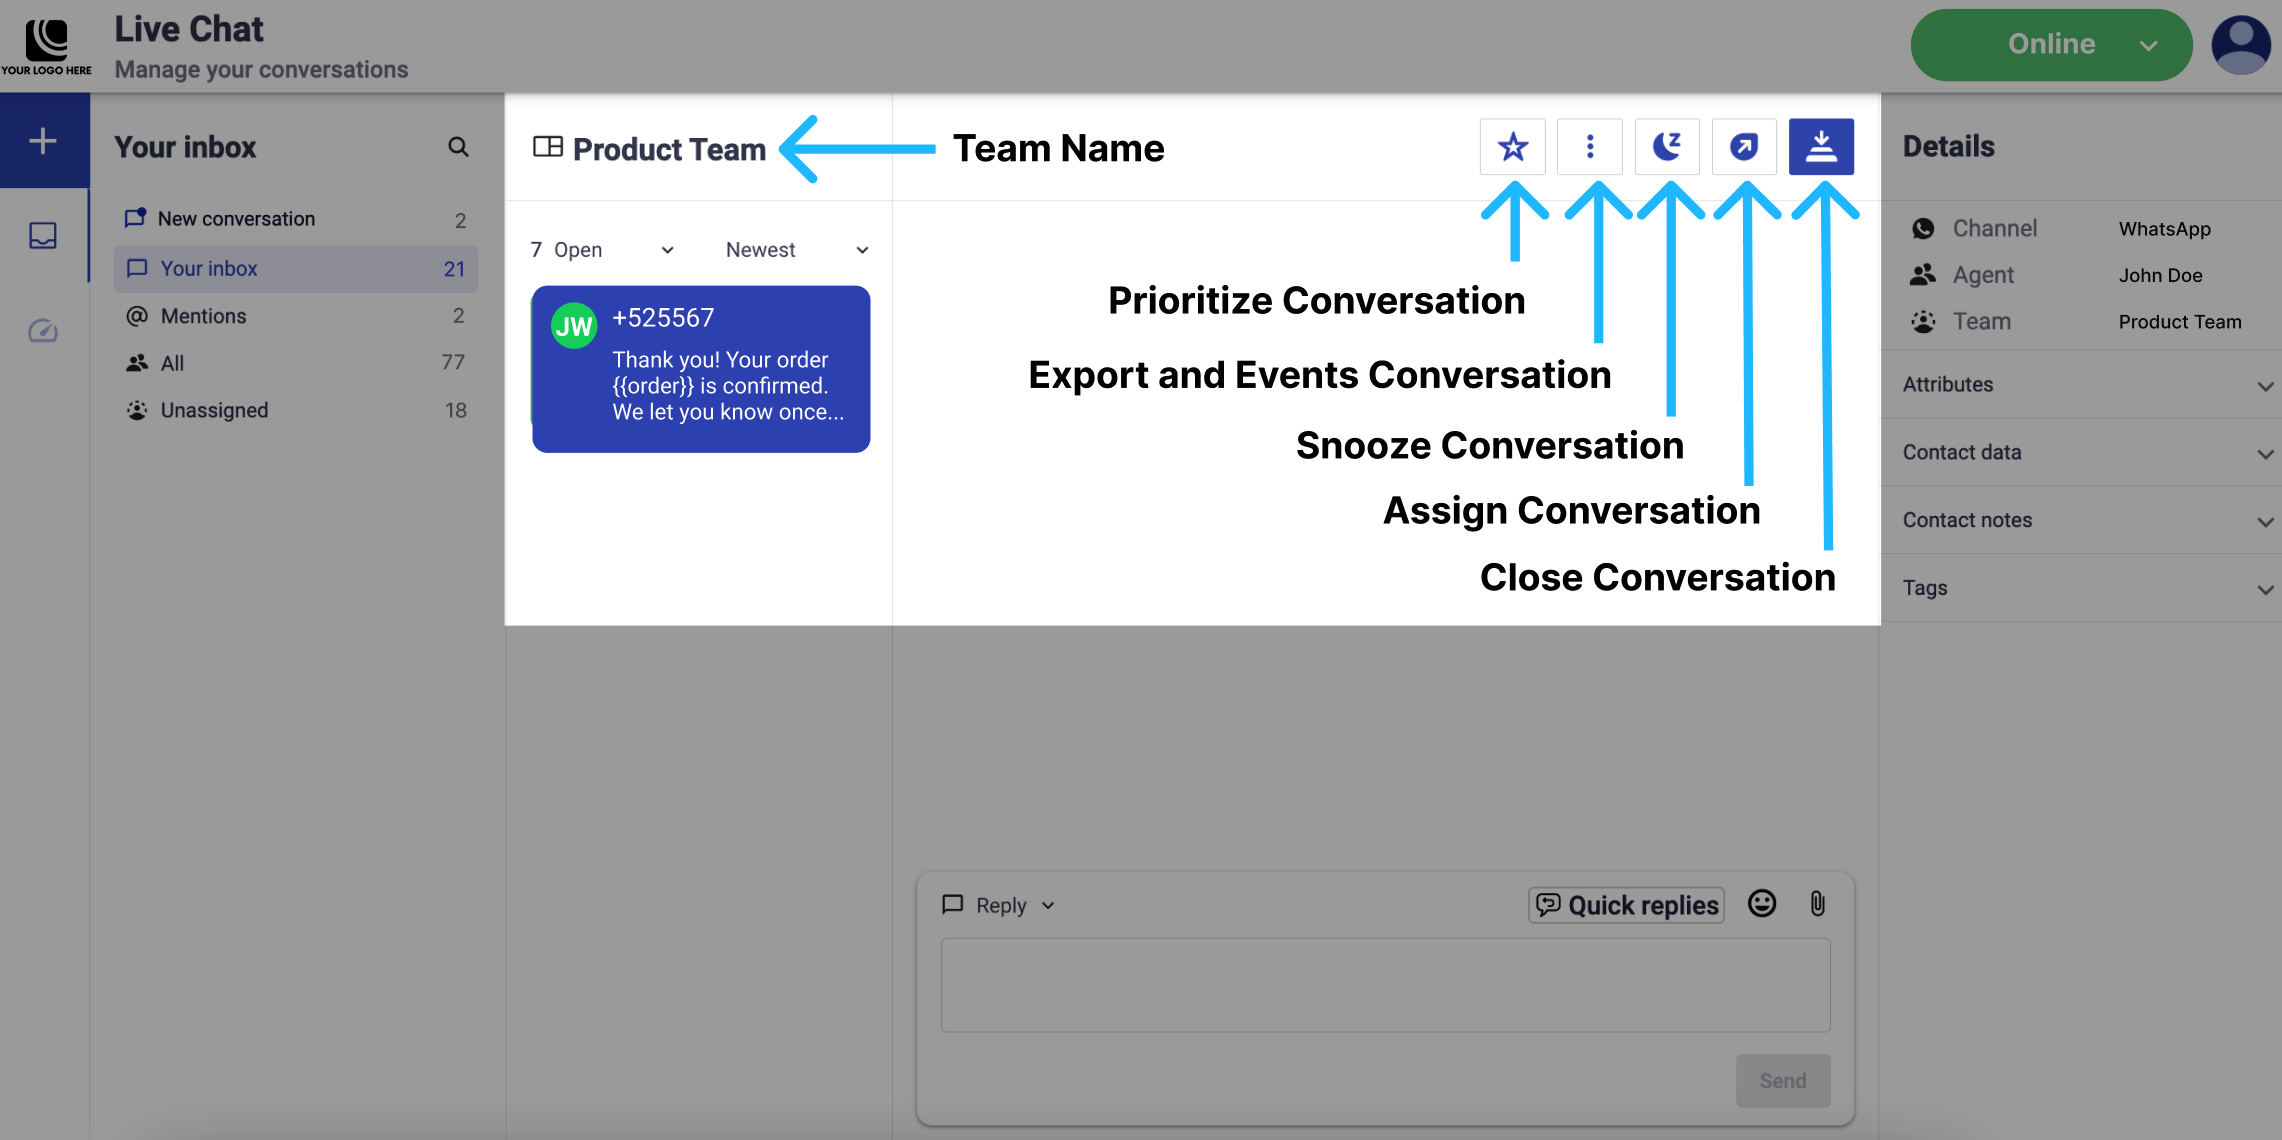
At the top, you'll find the phone number of the customer or lead you're currently interacting with, along with five intuitive action buttons designed to streamline your conversation management.
-
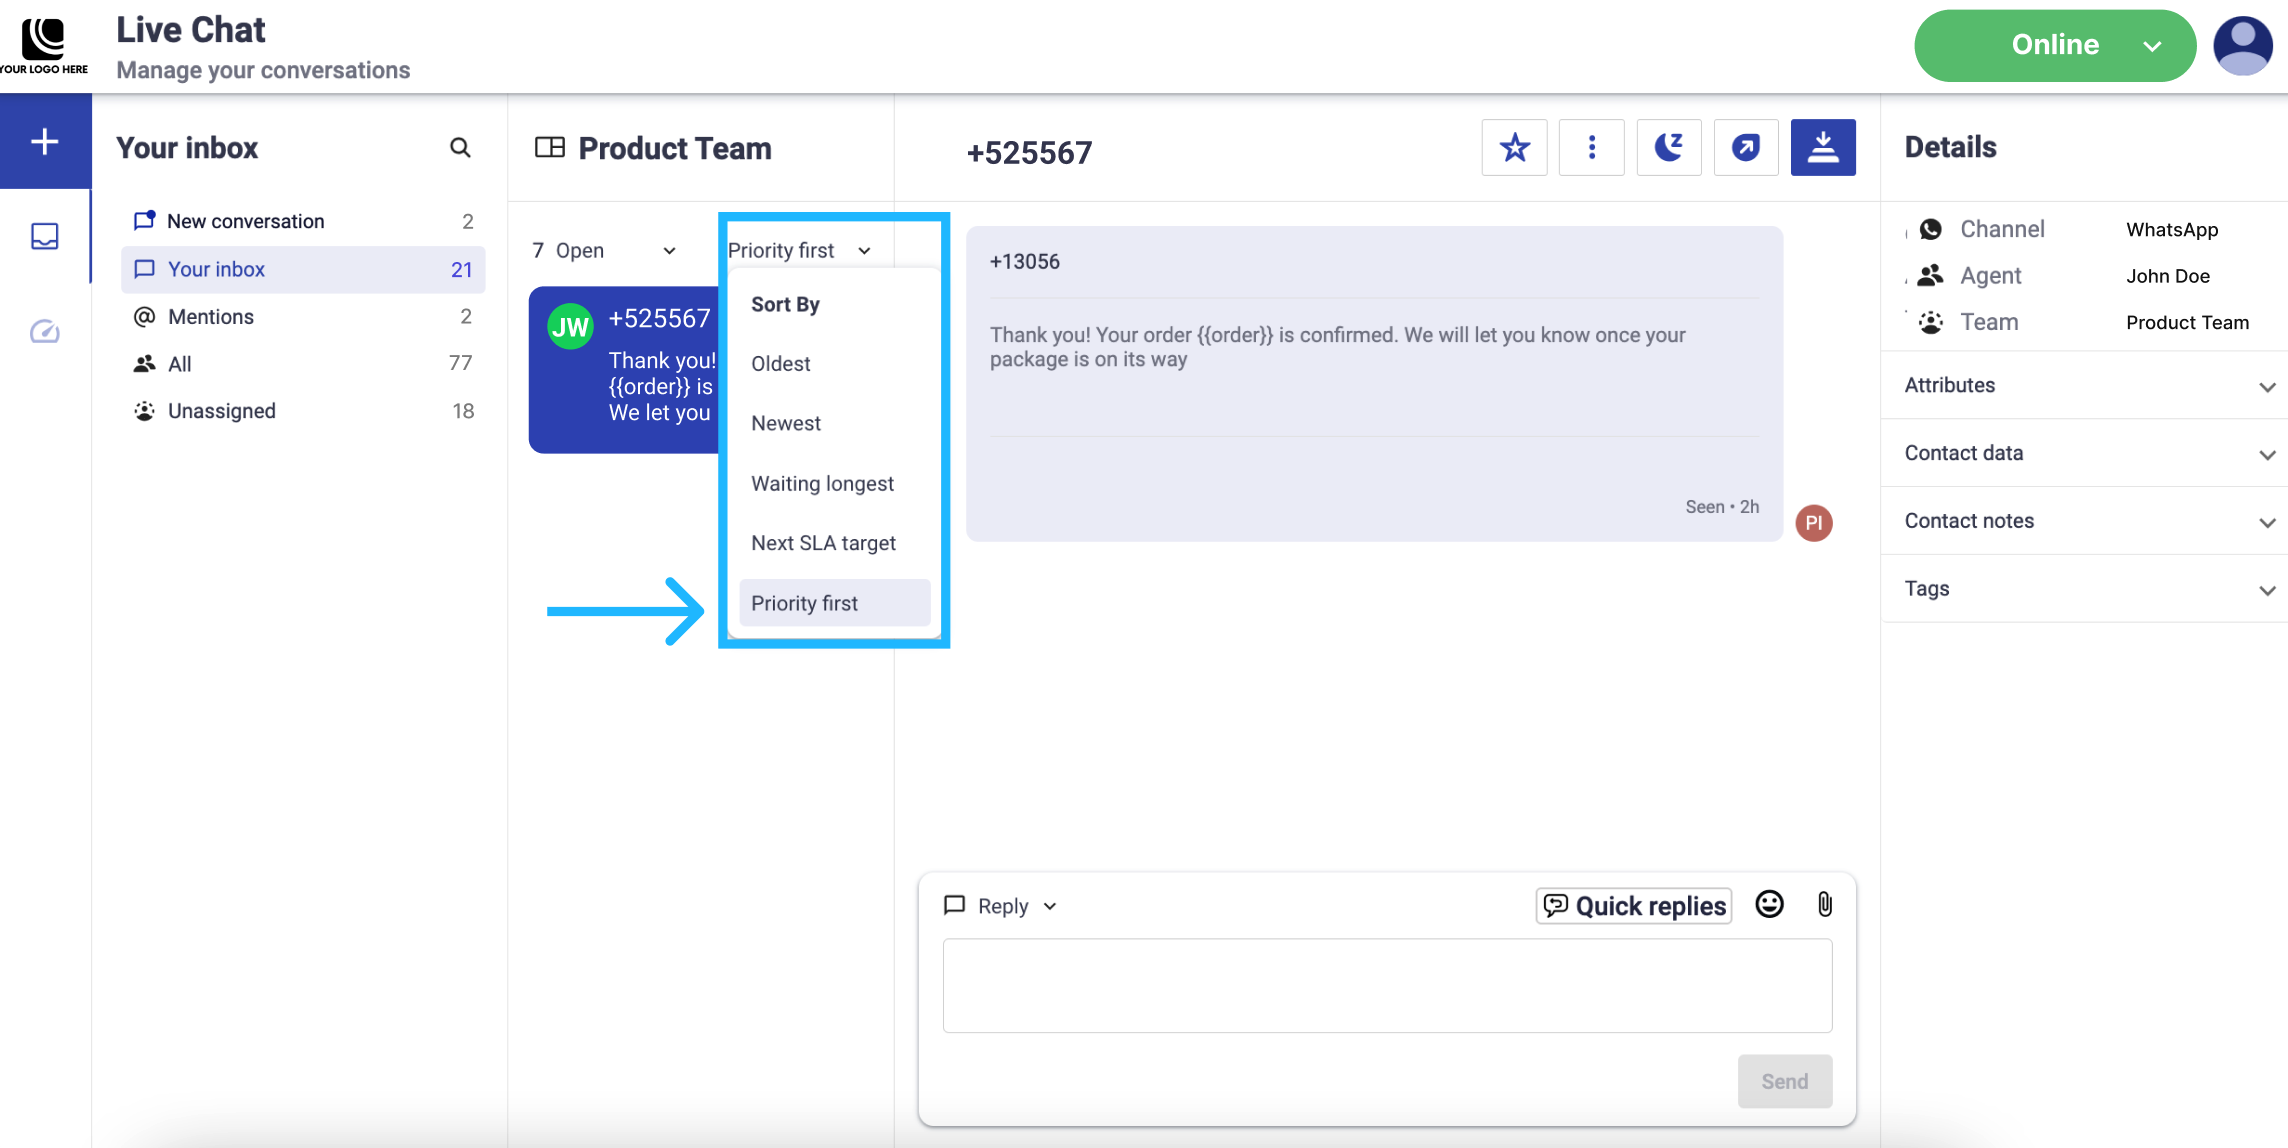
Prioritize: The Star button lets you manually mark conversations as a priority.
You can easily find all priority conversations by using the Sort By menu located below of the customer phone number you're engaging with.
-
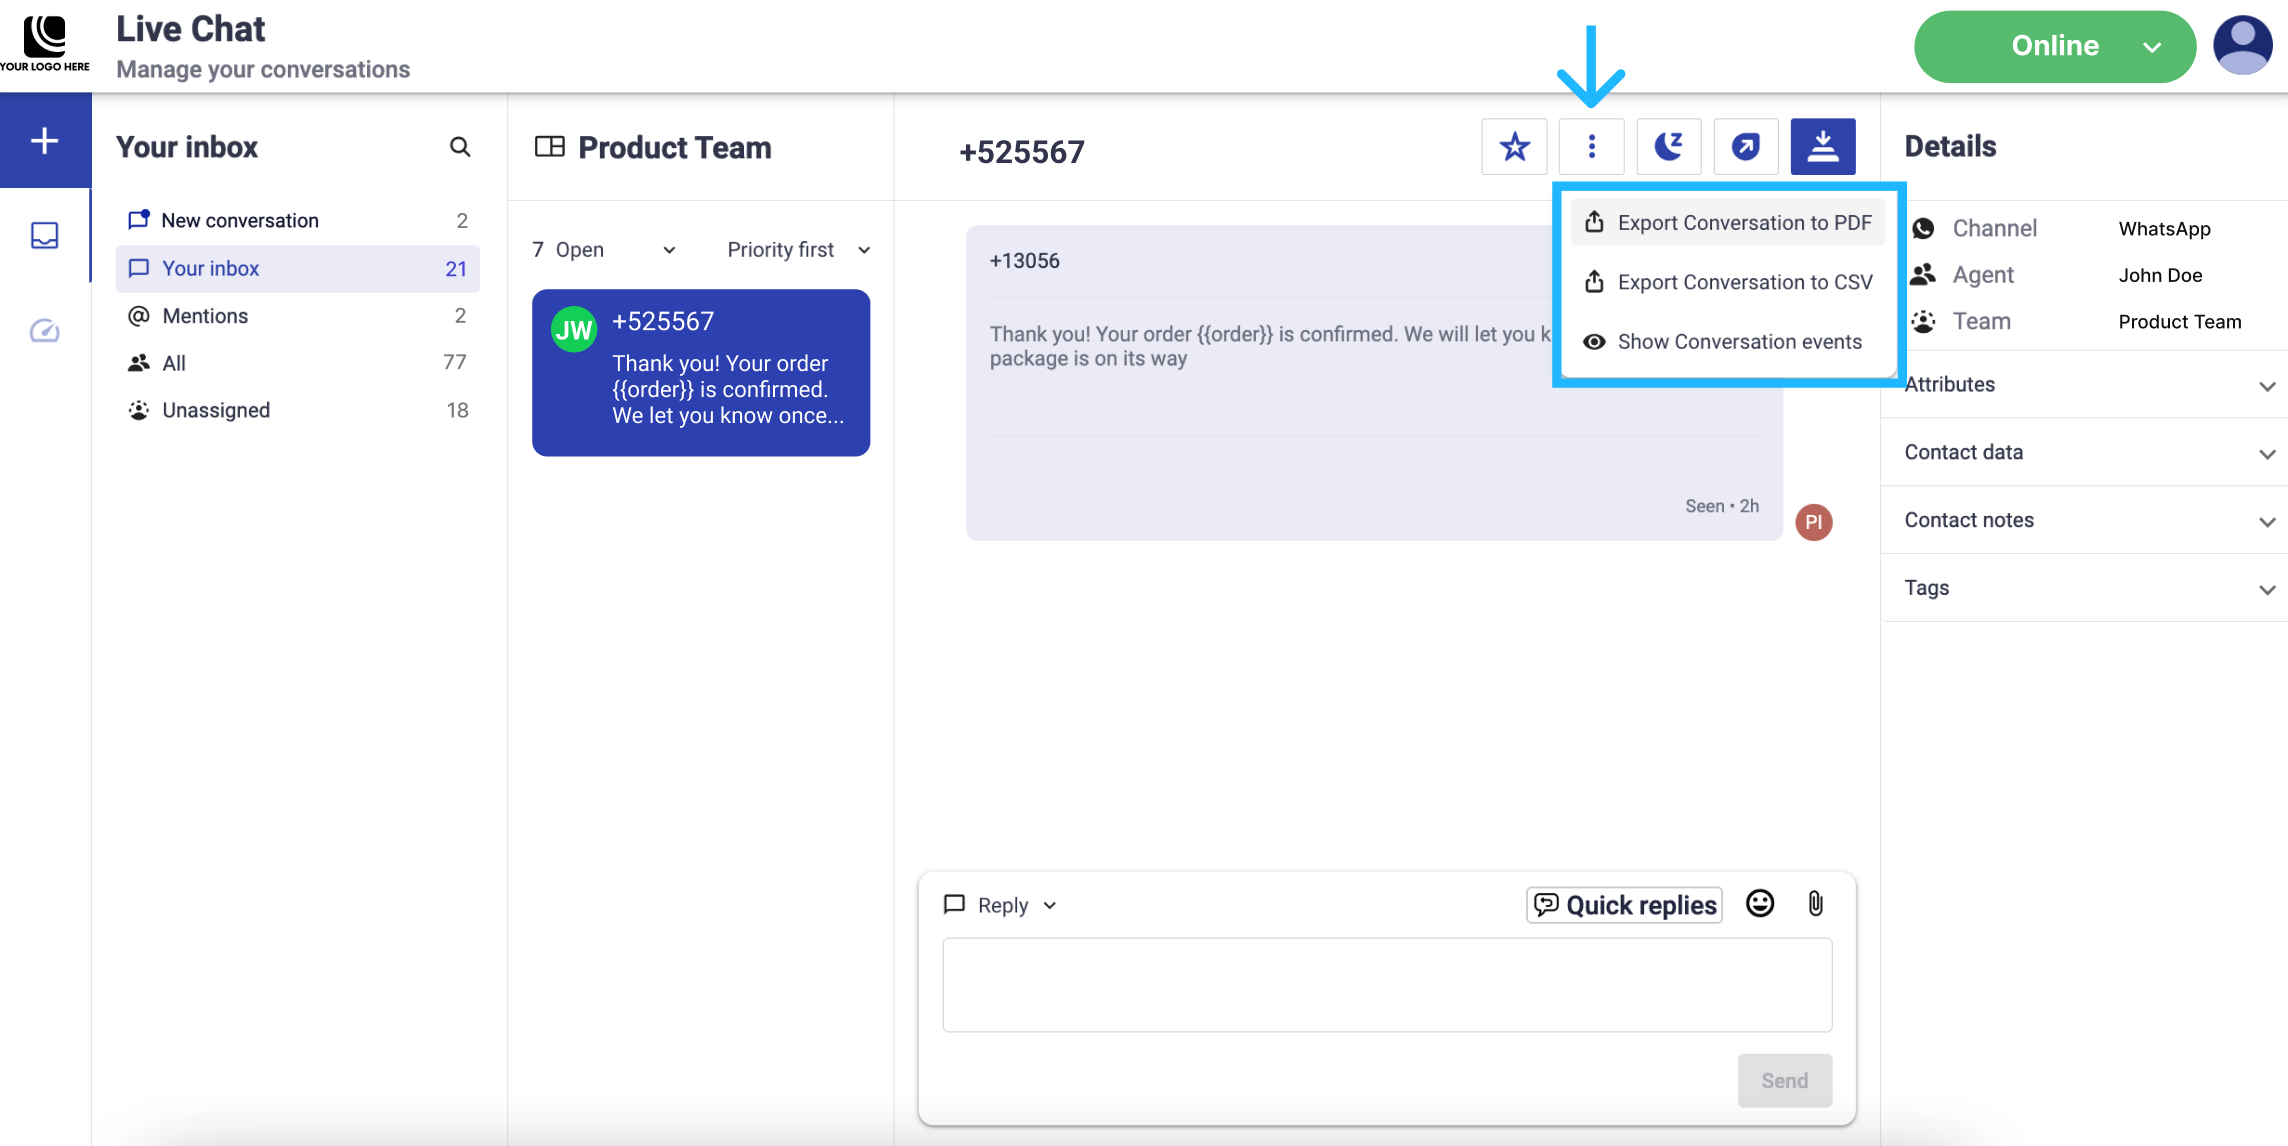
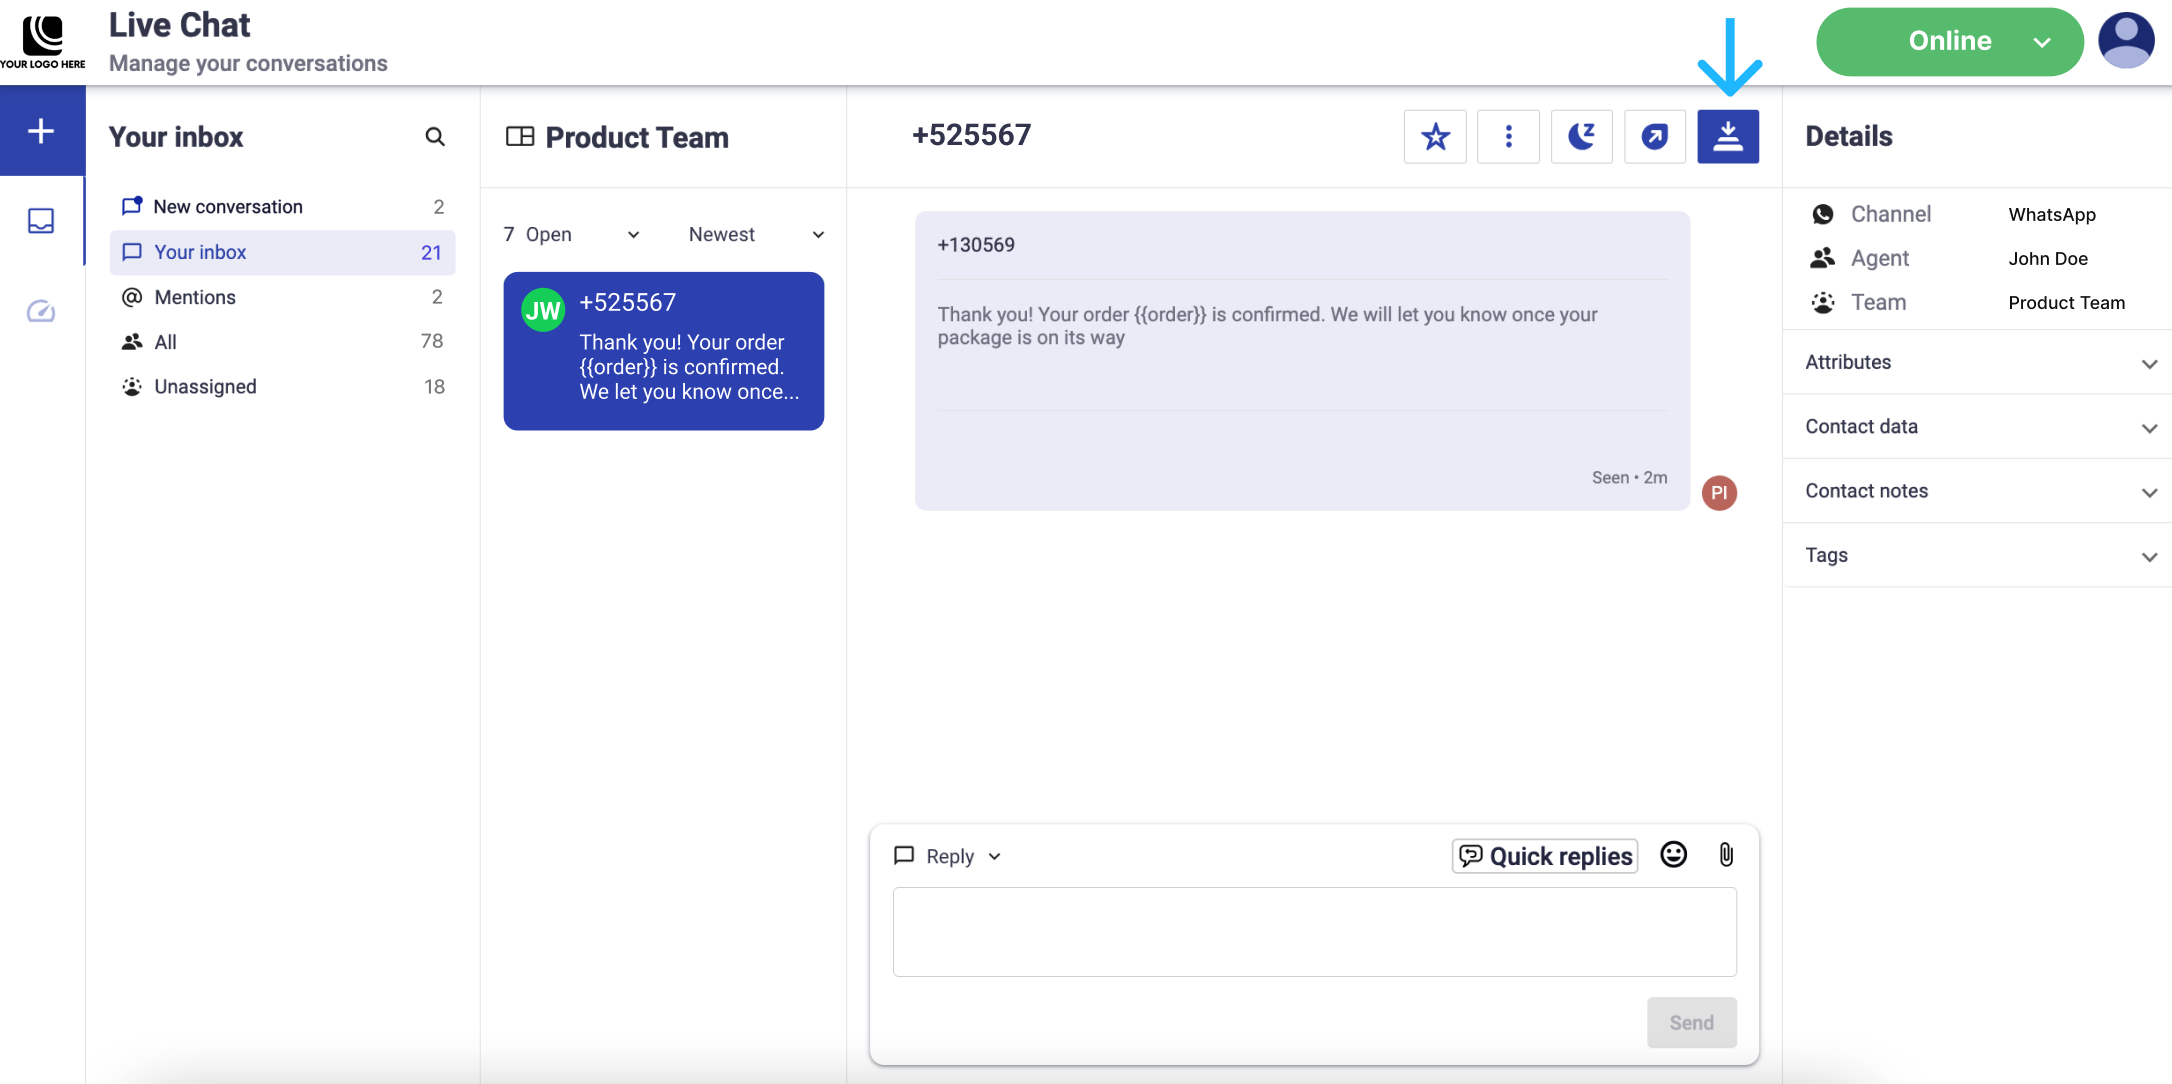
Export Conversation: Generate detailed conversation records by exporting them in CSV or PDF format. You can observe and monitor conversation action events too.
-
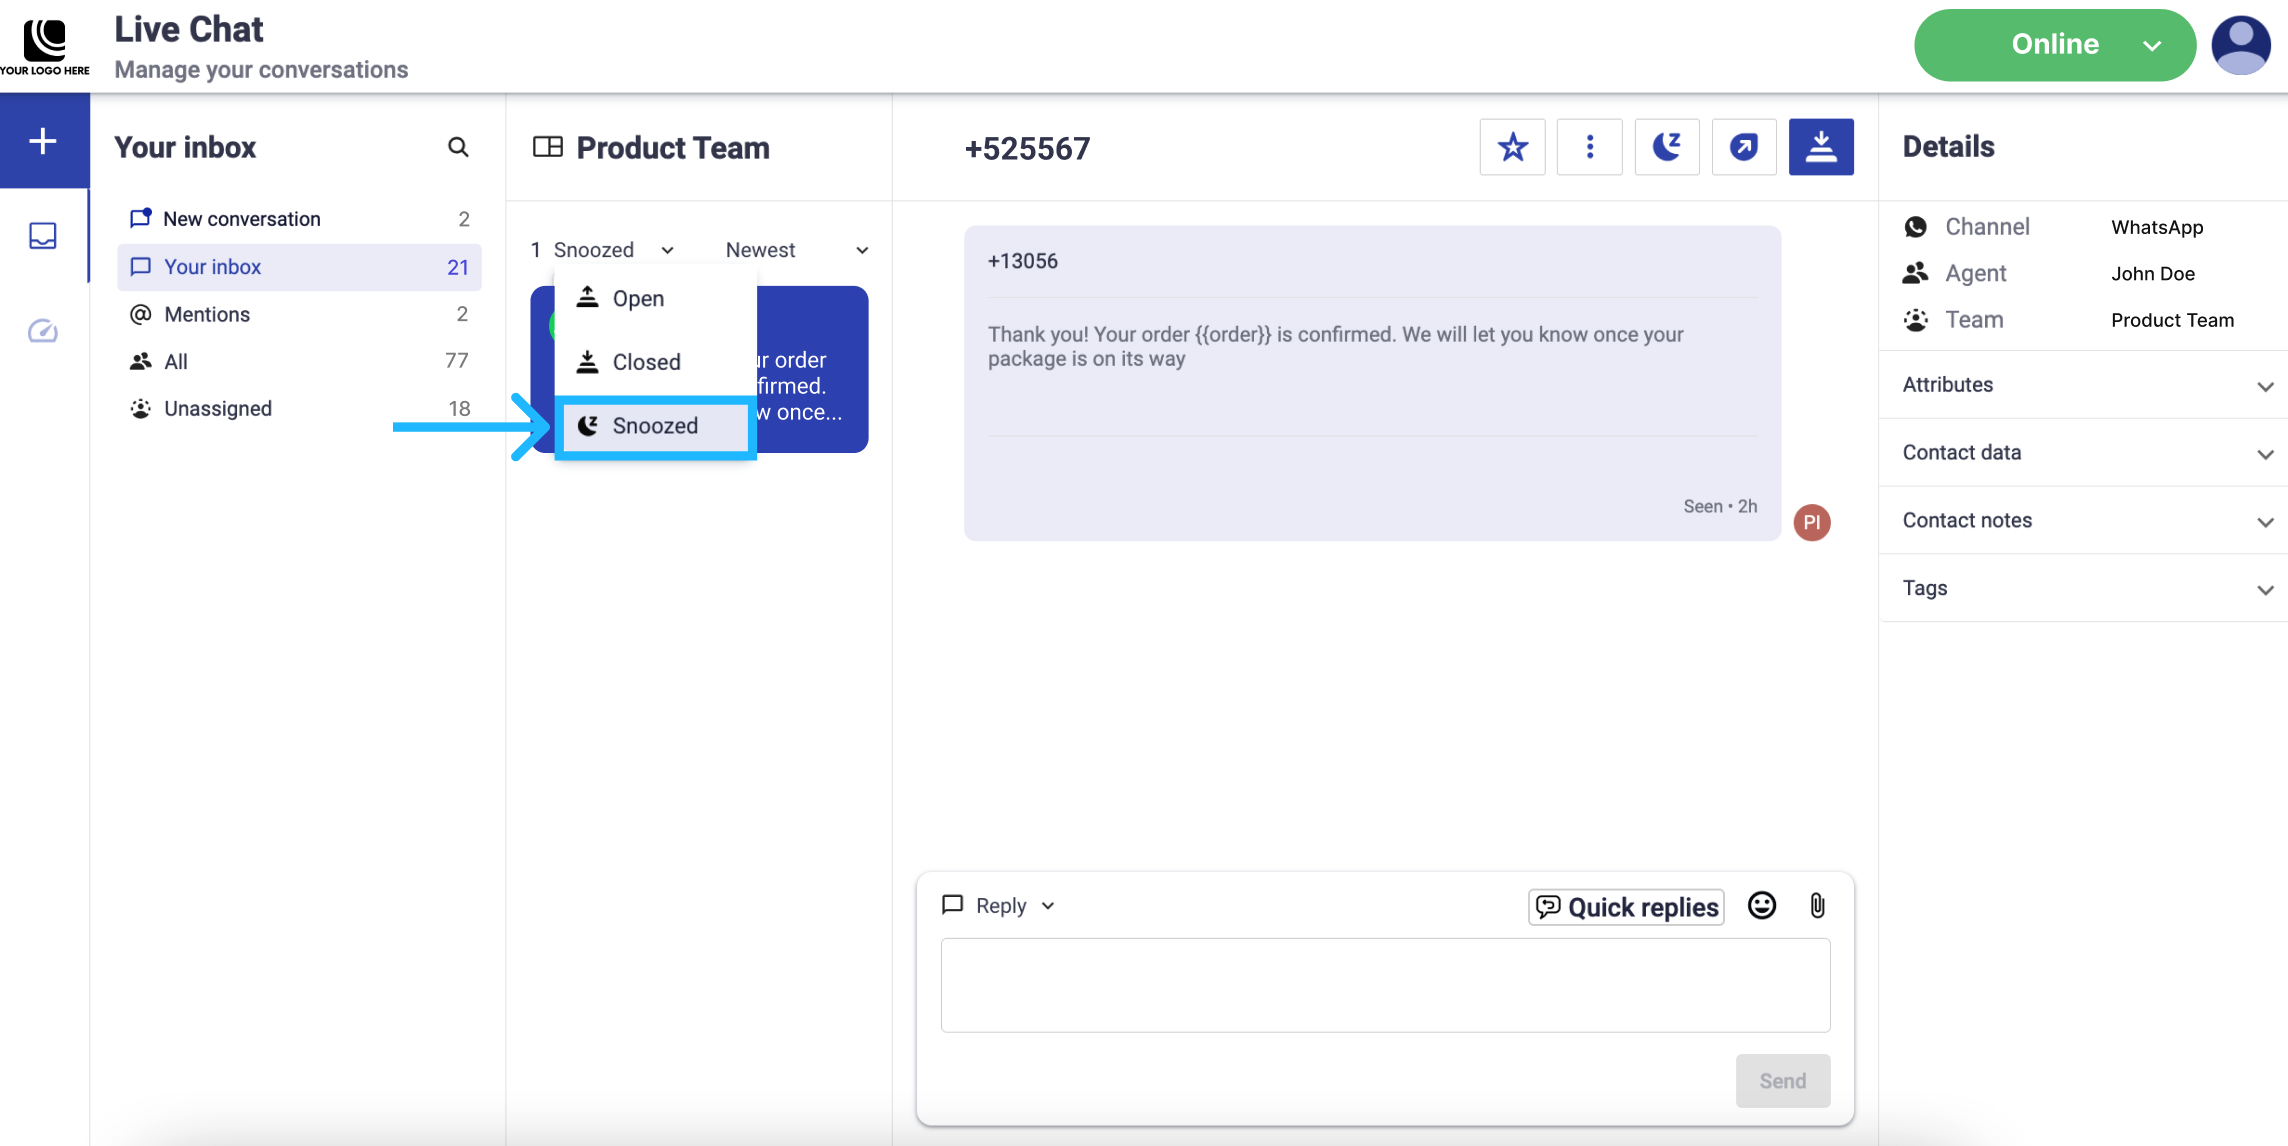
Snooze: Snoozing a conversation will temporarily remove it from your open conversations list for a set period of time. Then, when the snooze period ends, the conversation will reopen.
By clicking on the Snooze button, you can choose how long you’d like your conversation to be snoozed for (1 day, 1 week, or 1 month), and the conversation will move from the Open List to the Snoozed List.

-
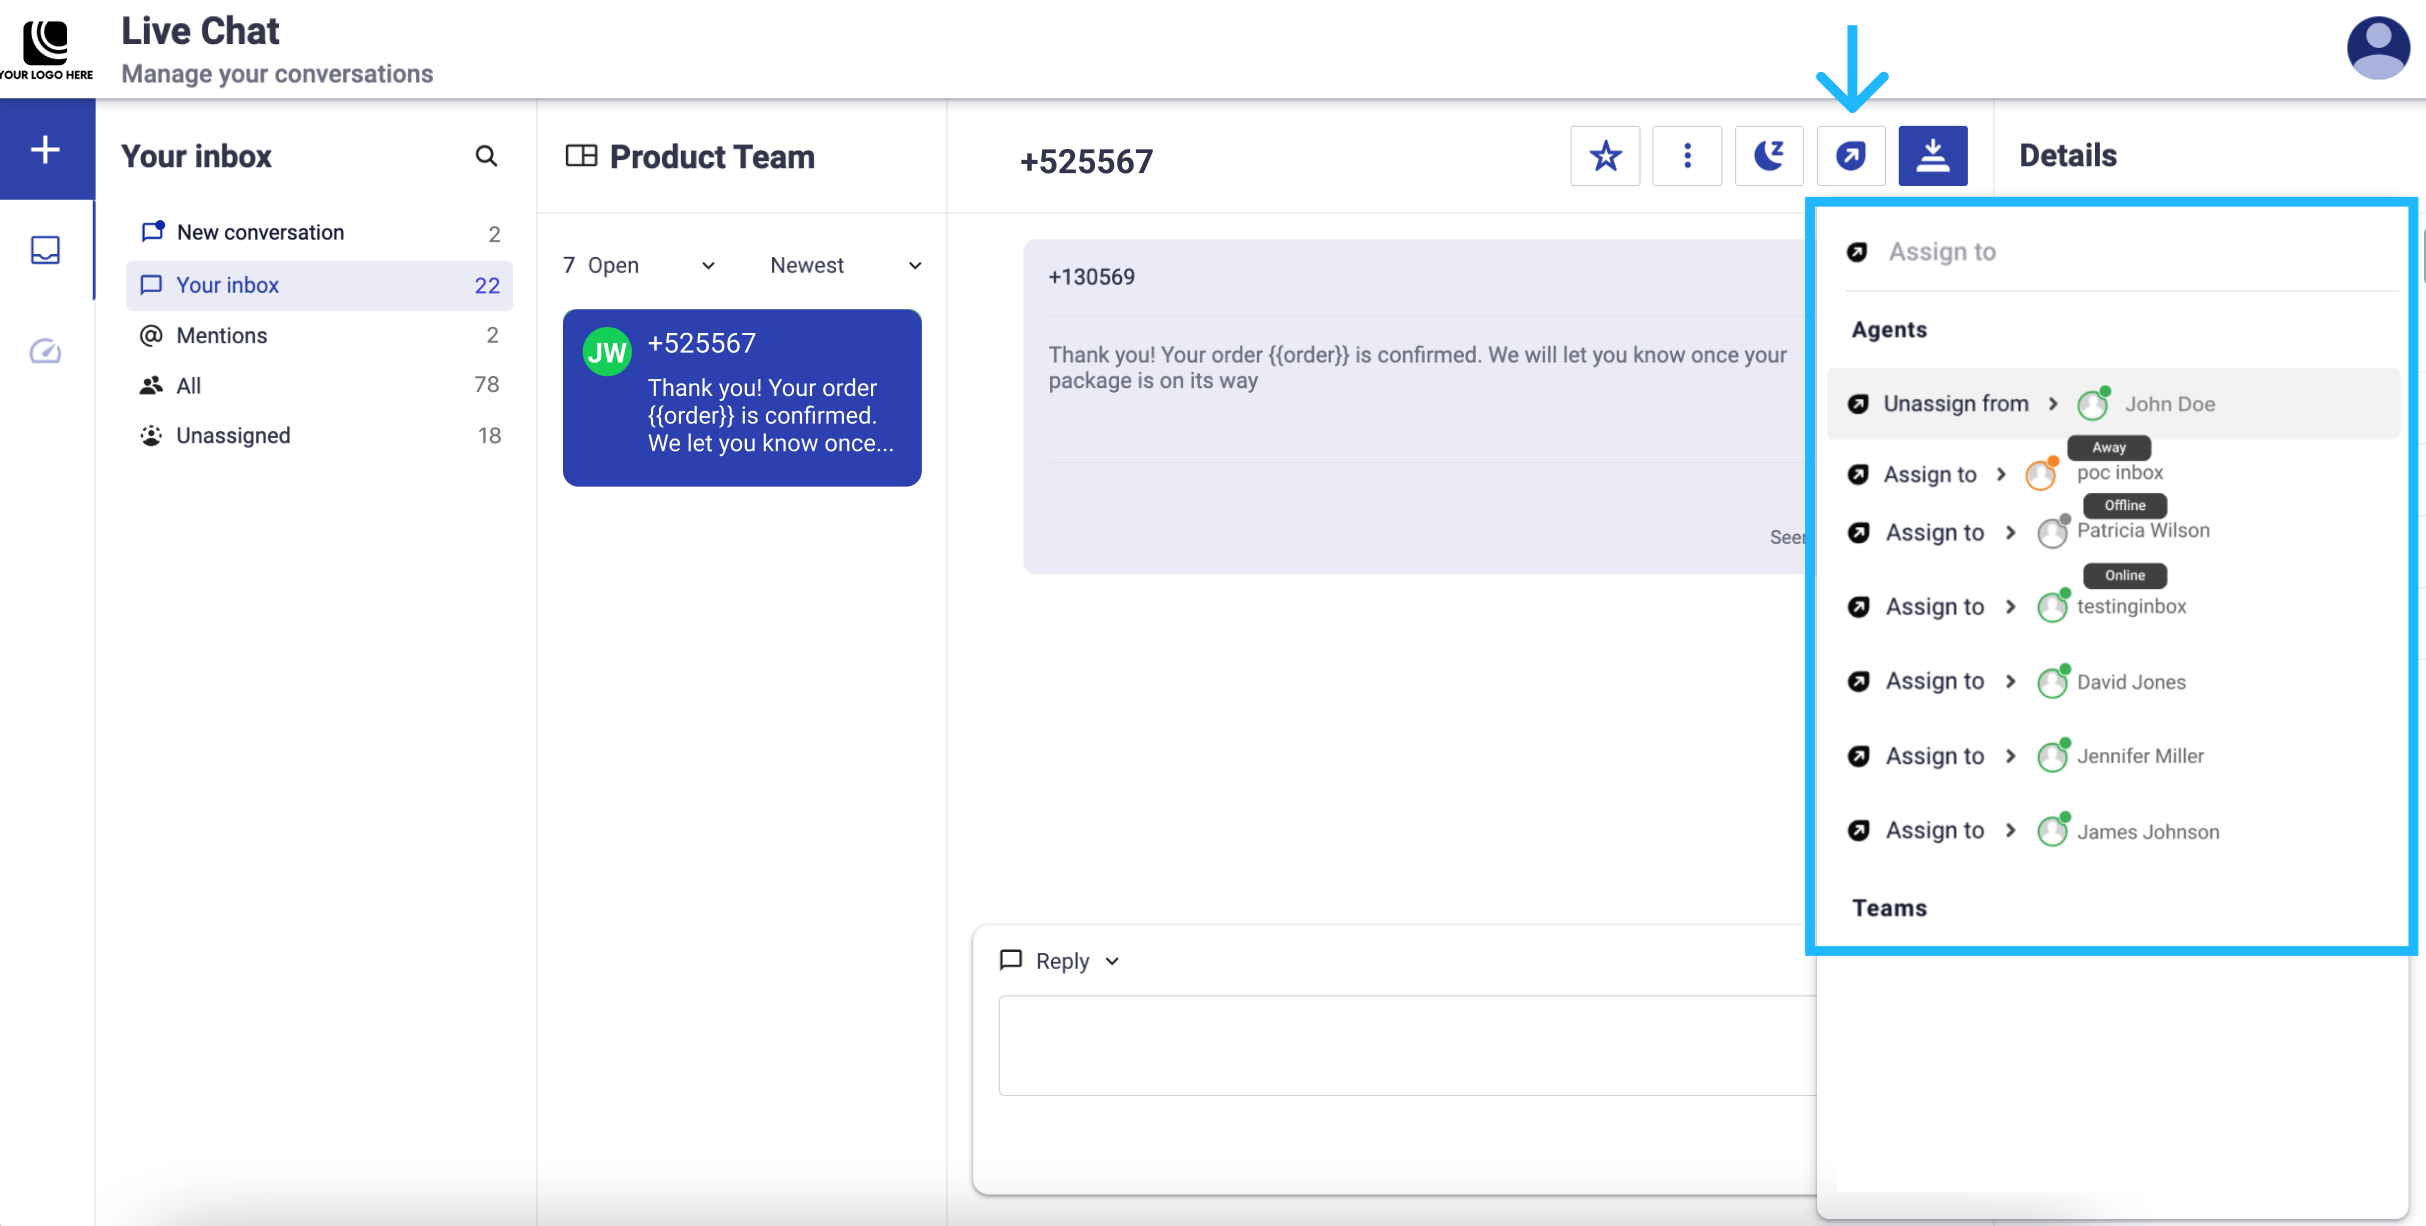
Assign: When managing conversations in your live chat platform, it is essential to assign conversations to the appropriate team or agent who can provide the most effective assistance based on their current availability status. This ensures that customer inquiries are handled promptly and efficiently. The three key statuses for agents are “away,” “offline,” and “online.” Understanding and utilizing these statuses appropriately can significantly enhance your agent and team’s productivity and customer satisfaction.
Agents can have different statuses indicating their availability to handle customer conversations. These statuses help streamline the assignment process and ensure that customers receive timely responses:
- Online status:
- Definition: Agents who are currently logged in and available to take conversations.
- Indicator: They are represented by a green status icon.
- Assignment Preference: These agents should be prioritized for assigning new conversations, as they can immediately respond to customer queries.
- Away status:
- Definition: Agents who are logged in but temporarily unavailable to take new conversations. This could be due to breaks or other short-term reasons.
- Indicator: They are represented by an orange status icon.
- Assignment Preference: While these agents can receive new conversations, it’s advisable to assign chats to them only if no online agents are available to avoid delays in response times.
- Offline status:
- Definition: Agents who are not logged in or are completely unavailable to handle conversations.
- Indicator: They are represented by a grey status icon.
- Assignment Preference: Conversations should not be assigned to offline agents as they are unable to respond. Ensure all assignments are directed towards online or away agents to maintain efficiency.
To ensure a timely and effective response, you can quickly delegate conversations to the most qualified agents or teams. For that, click the Assign button to assign or unassign an Agent or Team to the conversation.
To learn more about the Agent status, visit the Agent Status section.
To find out how to create a Team and assign Agents to it, visit the Teams section located in the Inbox Preferences.
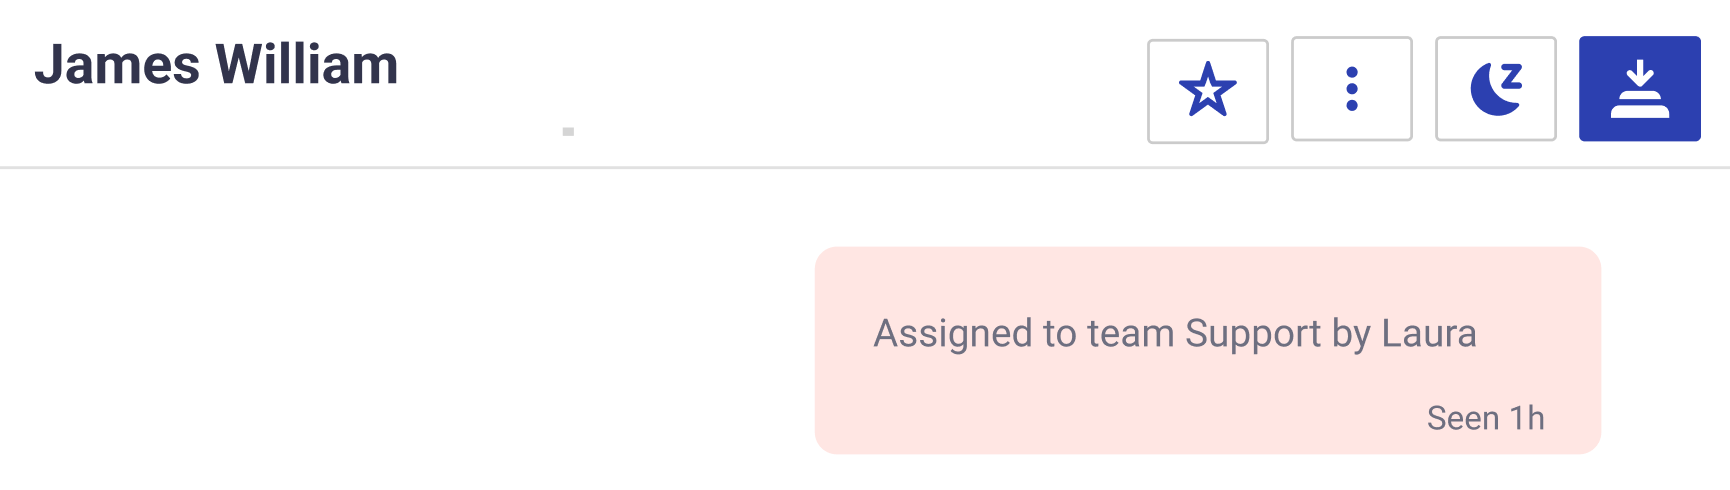
Each movement that applies when assigning agents or teams, the system automatically logs these actions as an event in the conversation history. This helps track who made the change, which team was involved, and when it happened. For example, let’s say agent Laura (not part of any team) assigns a conversation to the Support team.
If you’d like to learn more about the different types of system-generated events, please refer to the Event Logs section.
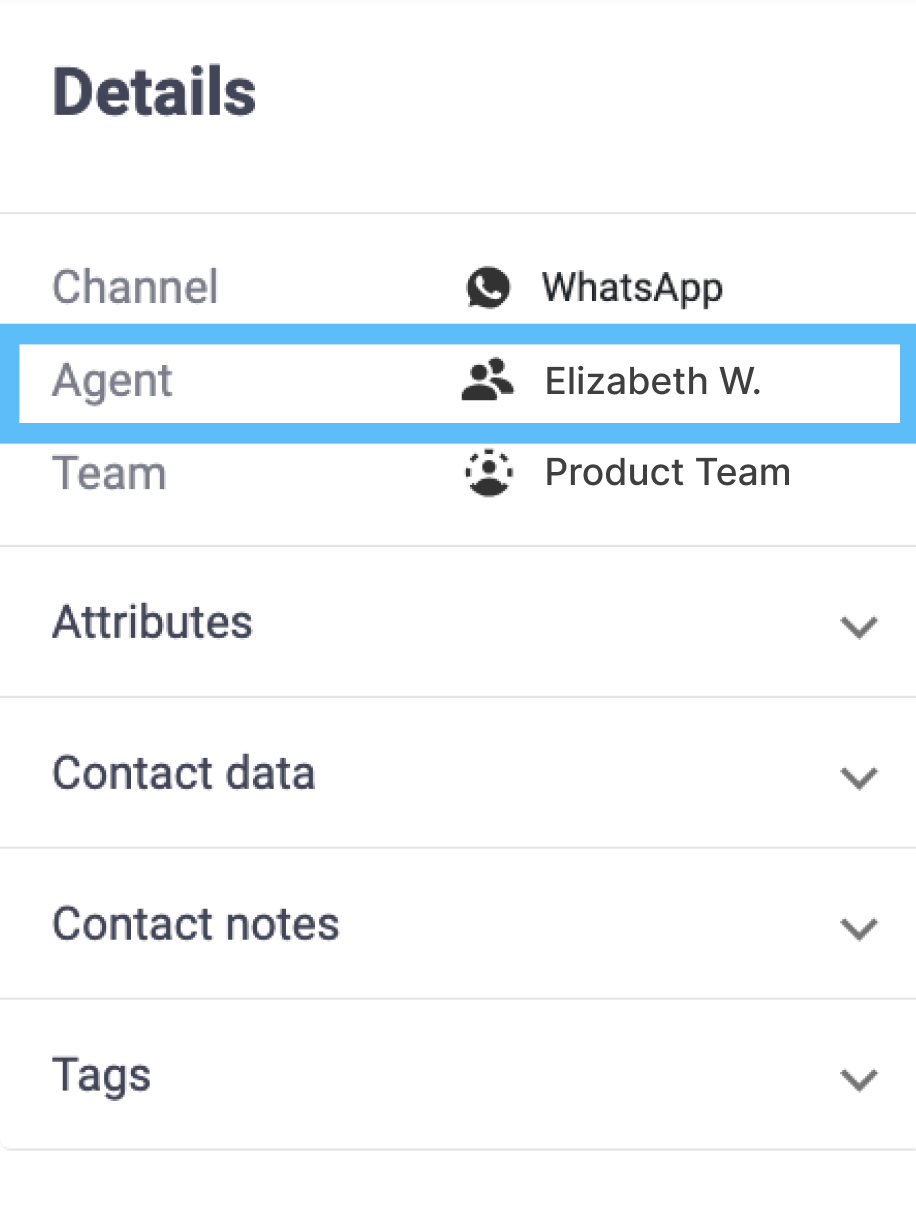
The Details tab, which is located in the right panel of the chat when using the Inbox, provides immediate insight into a conversation that is assigned to an agent or team.
- Online status:
-
Close: After successfully resolving a conversation, you can close it in the Inbox. By clicking on the Close button, the conversation will move from the Open List to the Closed List where it will stay unless you manually reopen it.
Conversation Thread
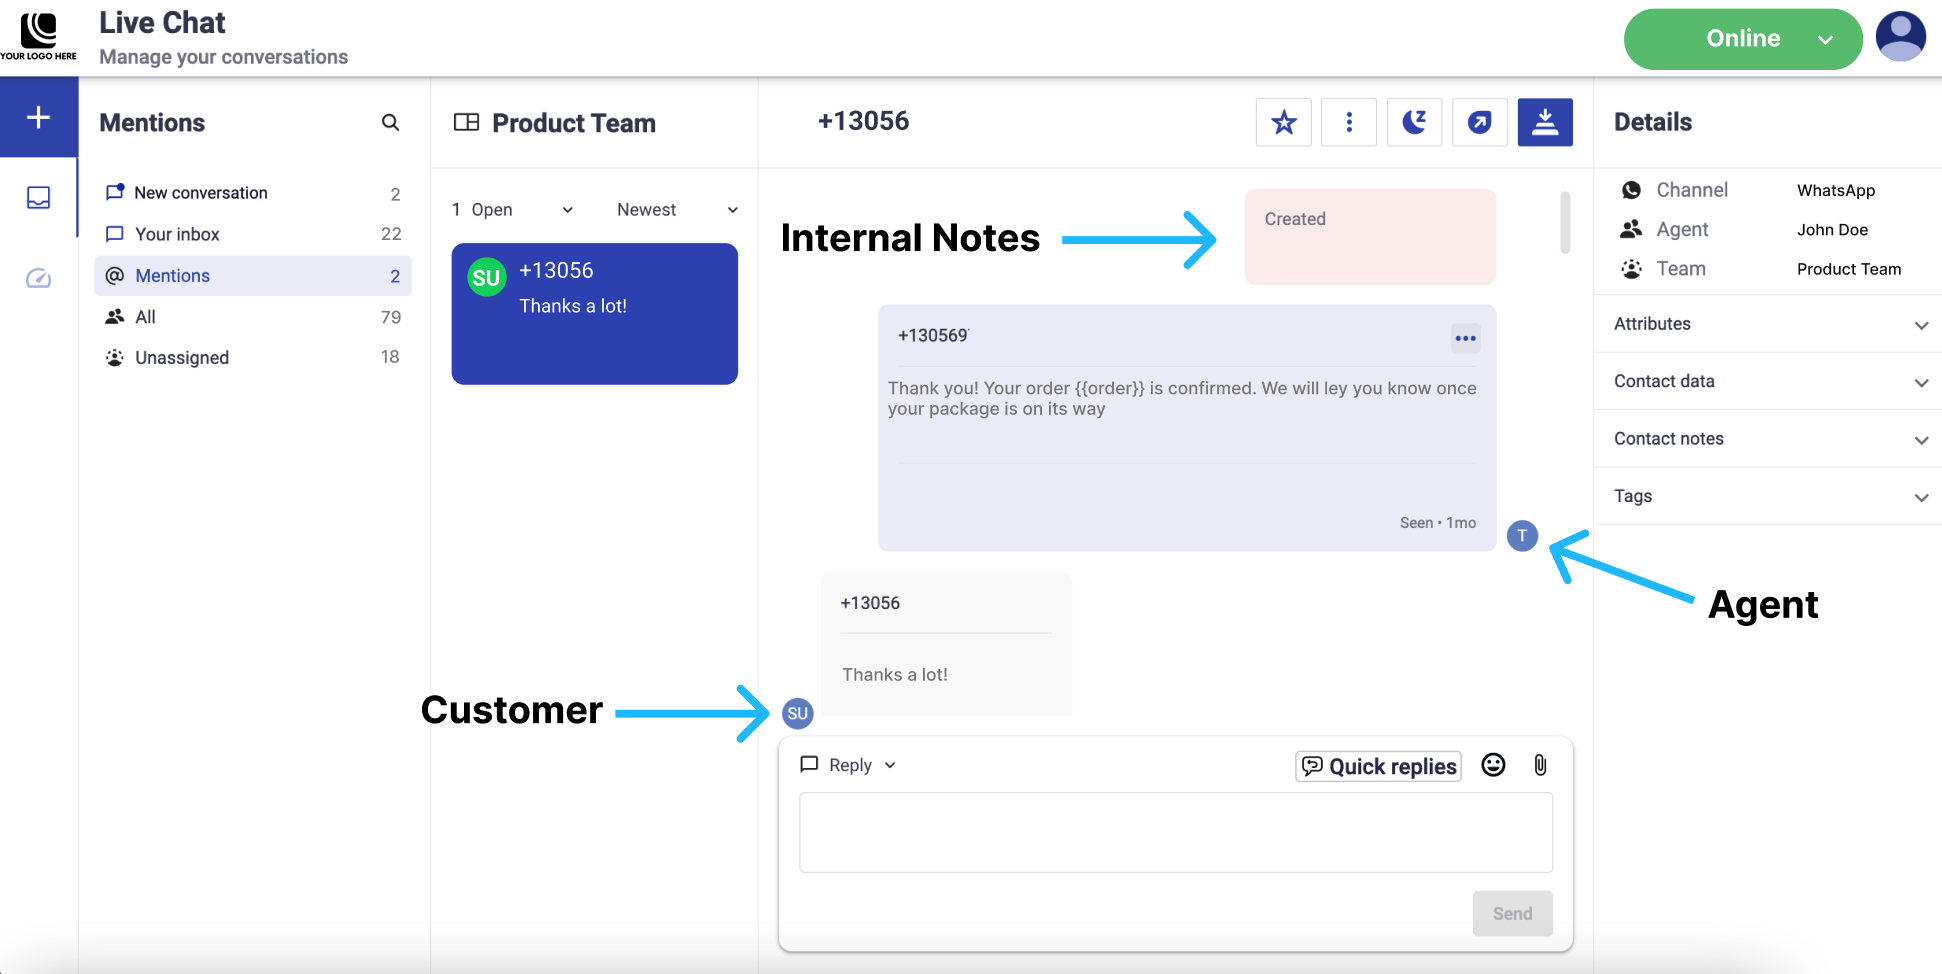
Moving on to the conversation thread the questions and replies from the customer always appear on the left while over on the right you will see your replies. You ‘ve also seen the conversation details in between. These are called conversation events. They help tell the story behind the conversation and give you more context about the event which tells us what type of actions you applied in the conversation.
Tag Message & Conversation
Another action you can take before you respond is tagging a conversation. It is a great way to identify trends and topics in the conversations that your agent or team receives. That is, a good support team goes beyond simply resolving individual customer issues. They proactively leverage the power of conversation tagging to uncover trends, prevalent topics, and emerging patterns within customer interactions. Over time, this meticulous tagging process accumulates a rich repository of valuable insights, readily accessible for future analysis and strategic decision-making. Enabling them to address customer needs proactively and effectively.
For example, tagging messages or conversations with general tags like "Bug" or “Error" transforms customer feedback into a searchable knowledge base, enabling you to see messages and conversations about both topics and make decisions.
To effectively tag messages, follow these simple steps:
-
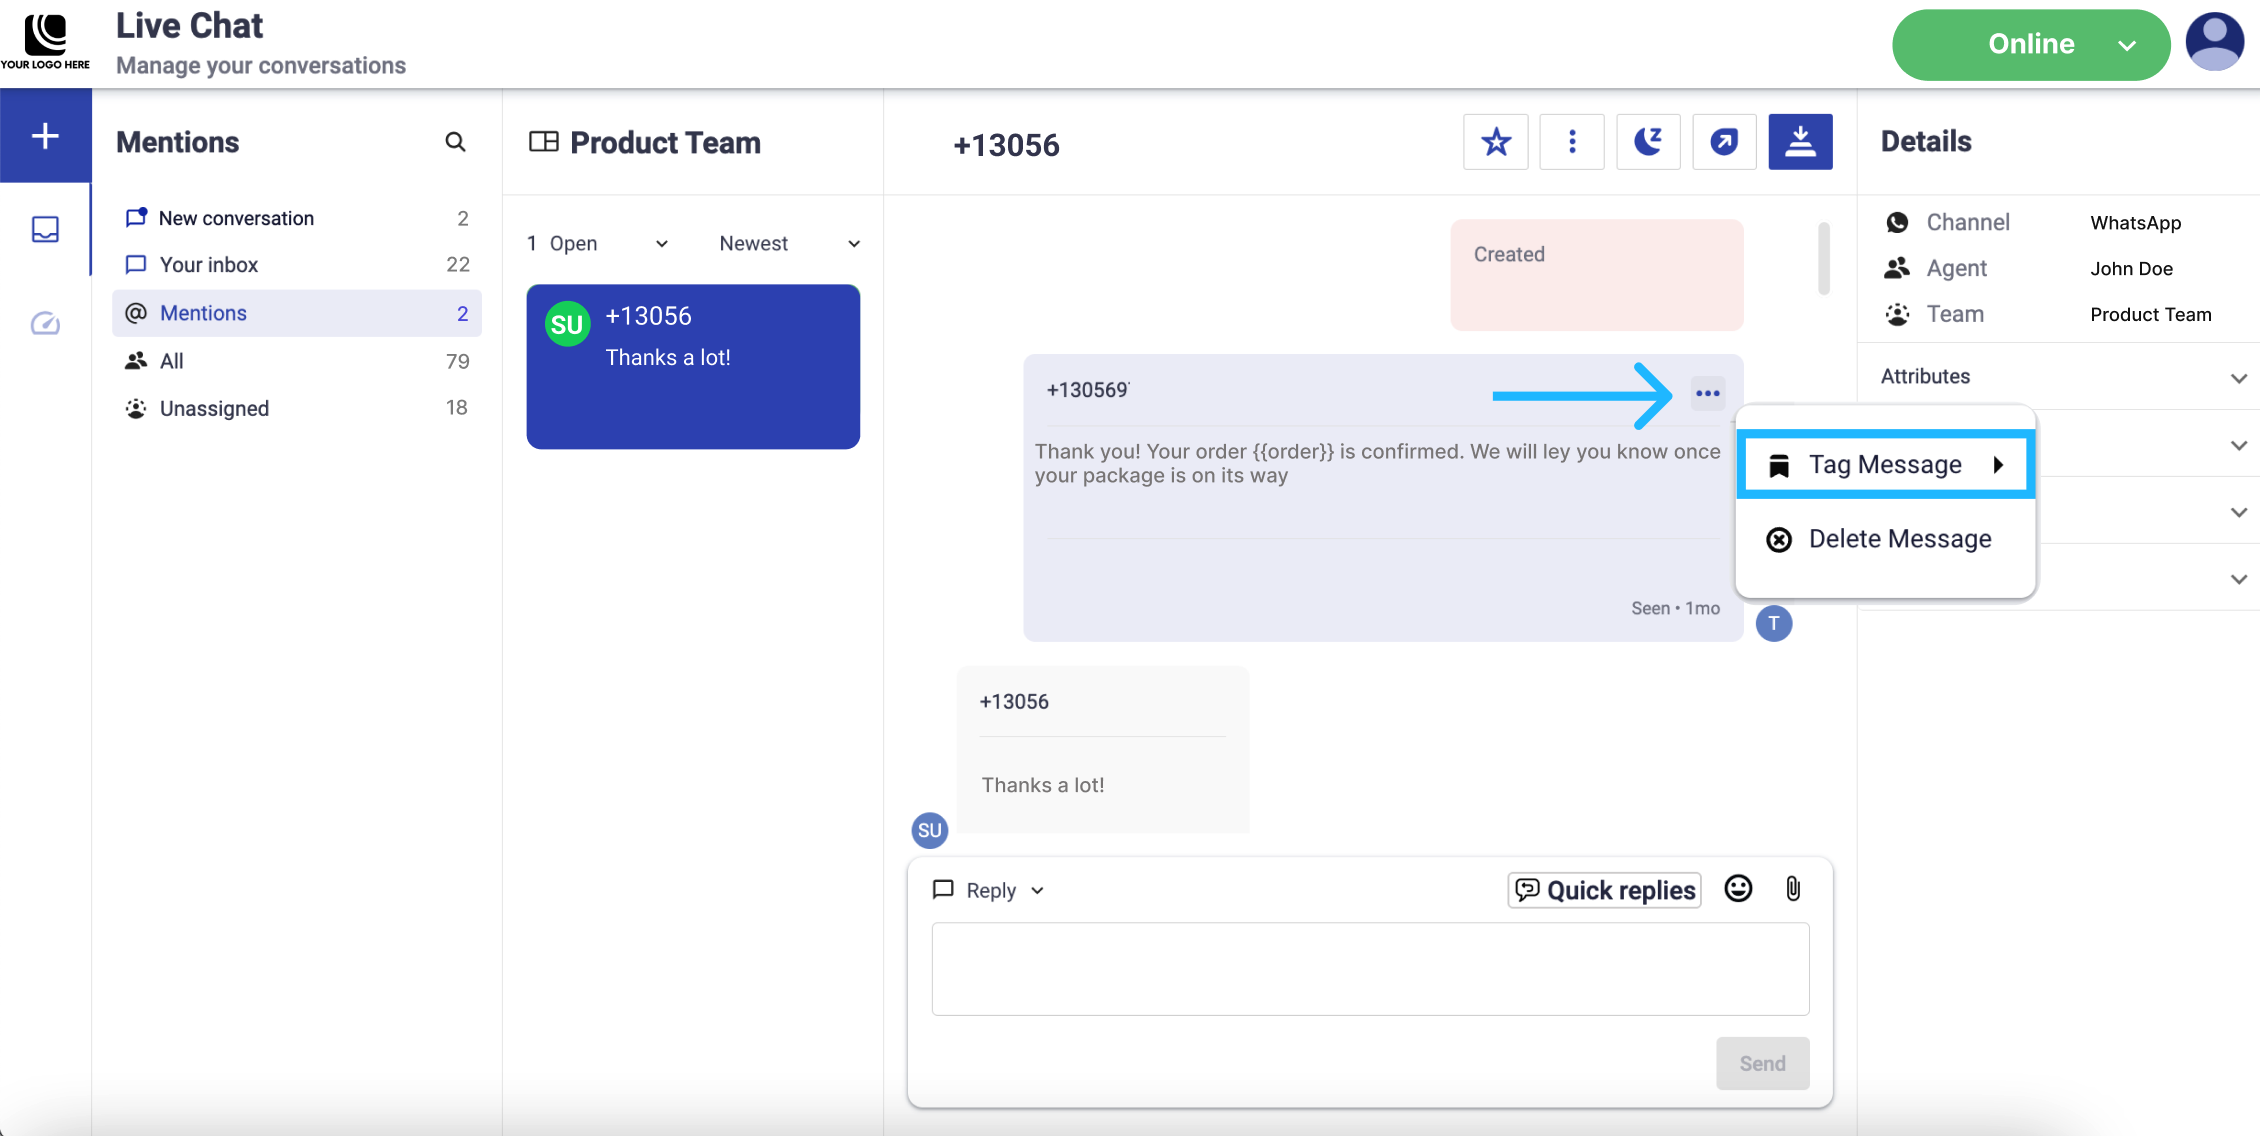
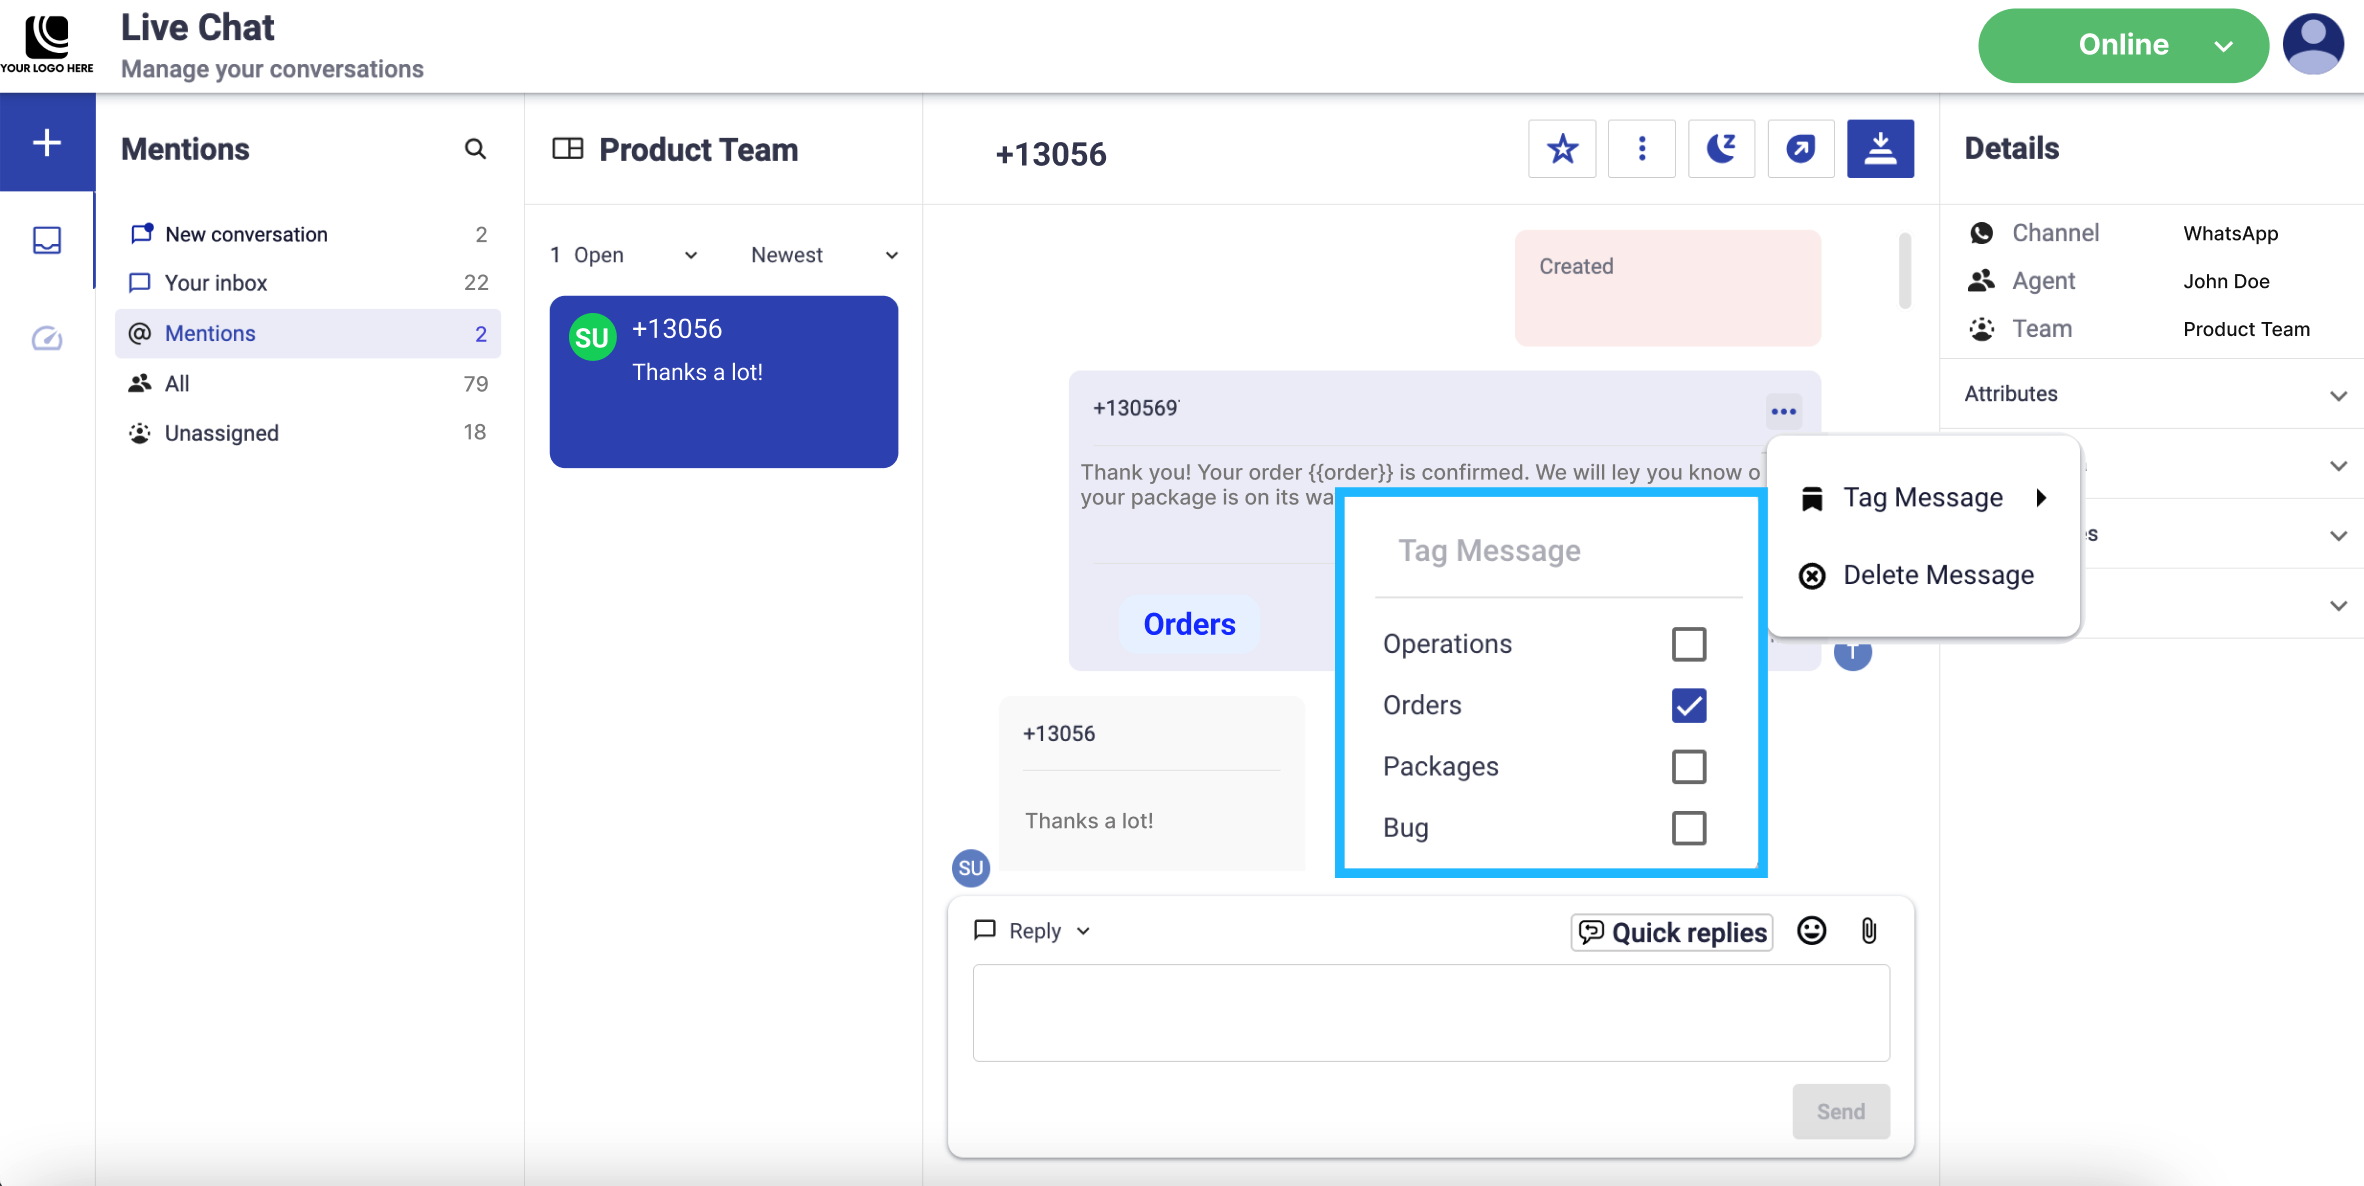
Identifying the message you want to tag in a conversation, and clicking on the Ellipsis icon, a pop-up menu will be displayed. Select the Tag Message option to continue.
-
In this menu, you can search for previously created tags to categorize messages effectively. Up to 7 tags can be selected for each message.
To effectively tag conversations, follow these simple steps:
-
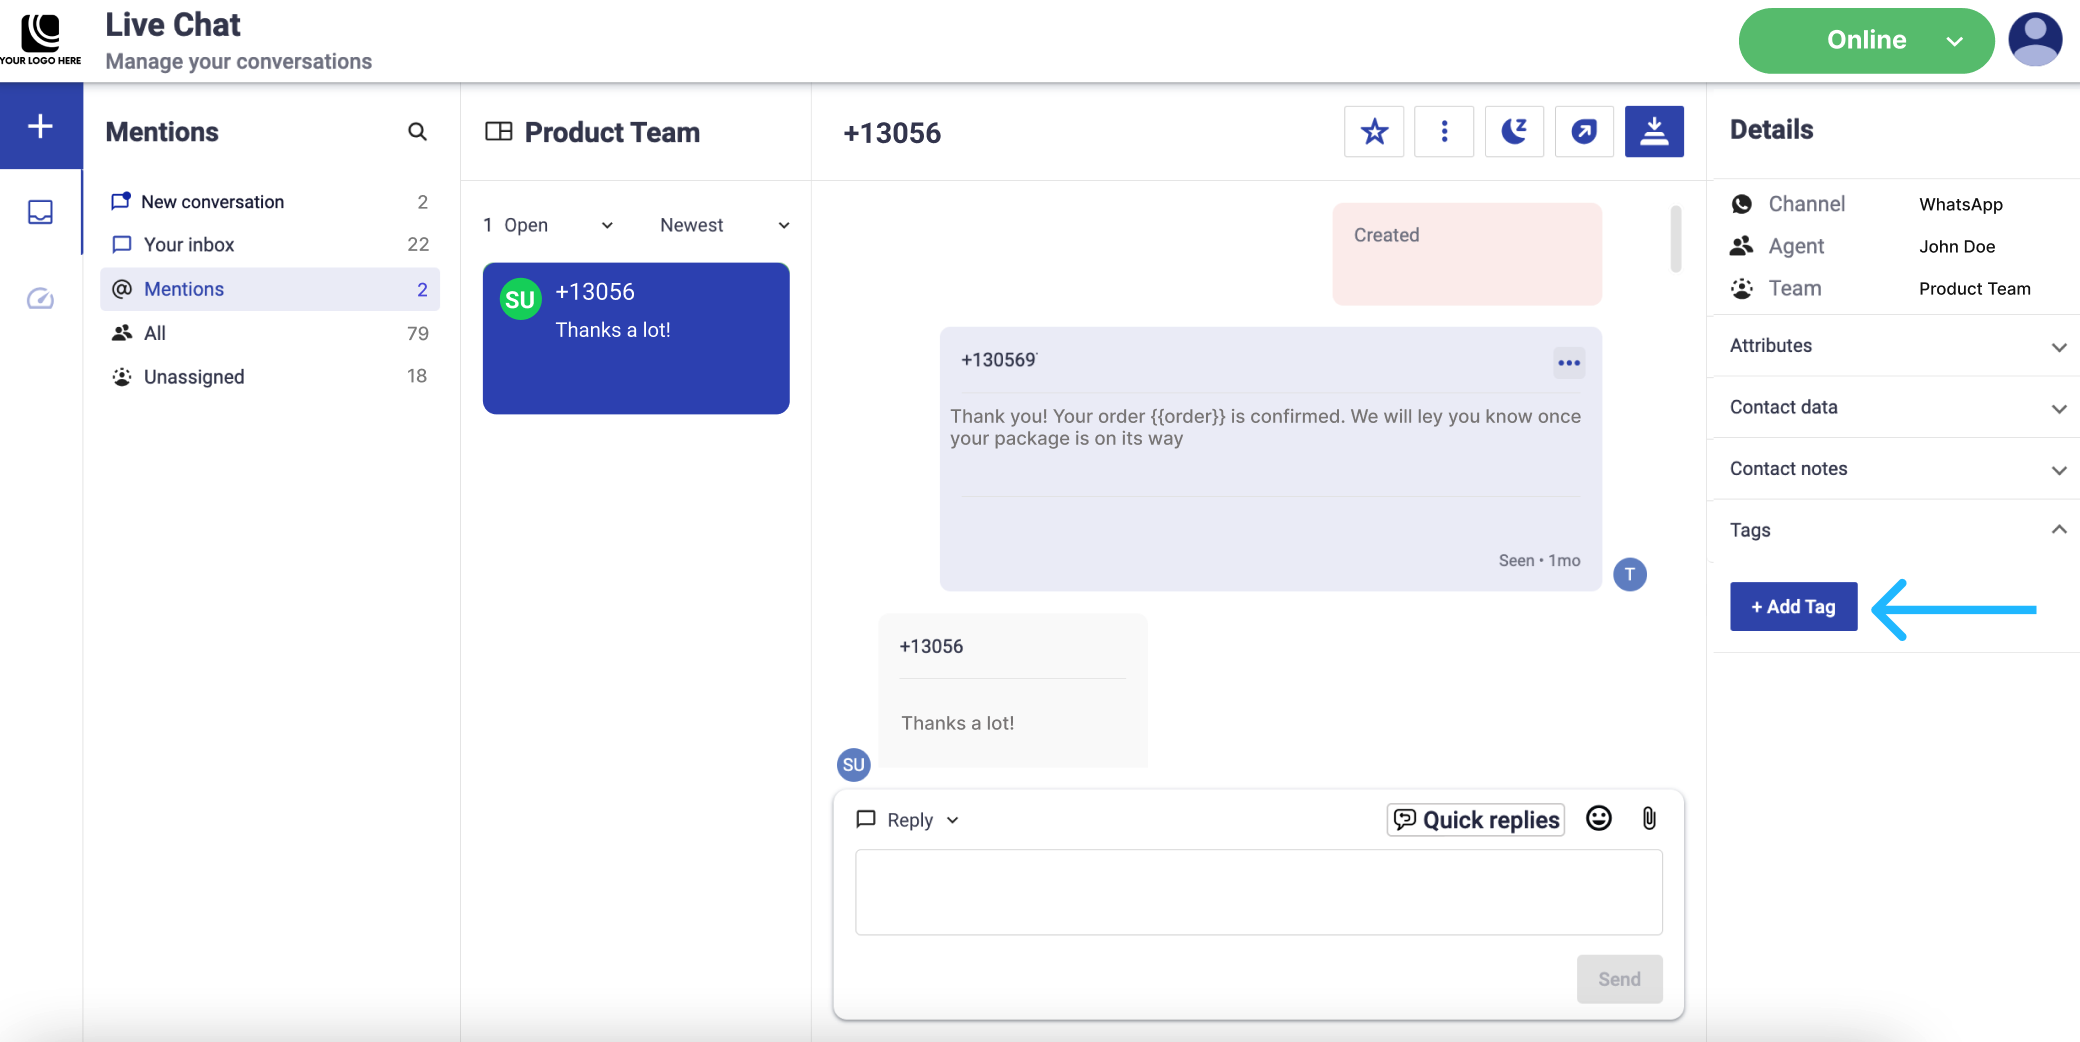
From the Details tab, which is located in the right panel of the chat when using the Inbox, click on the Tags option and select the + Add Tag button to continue.
-
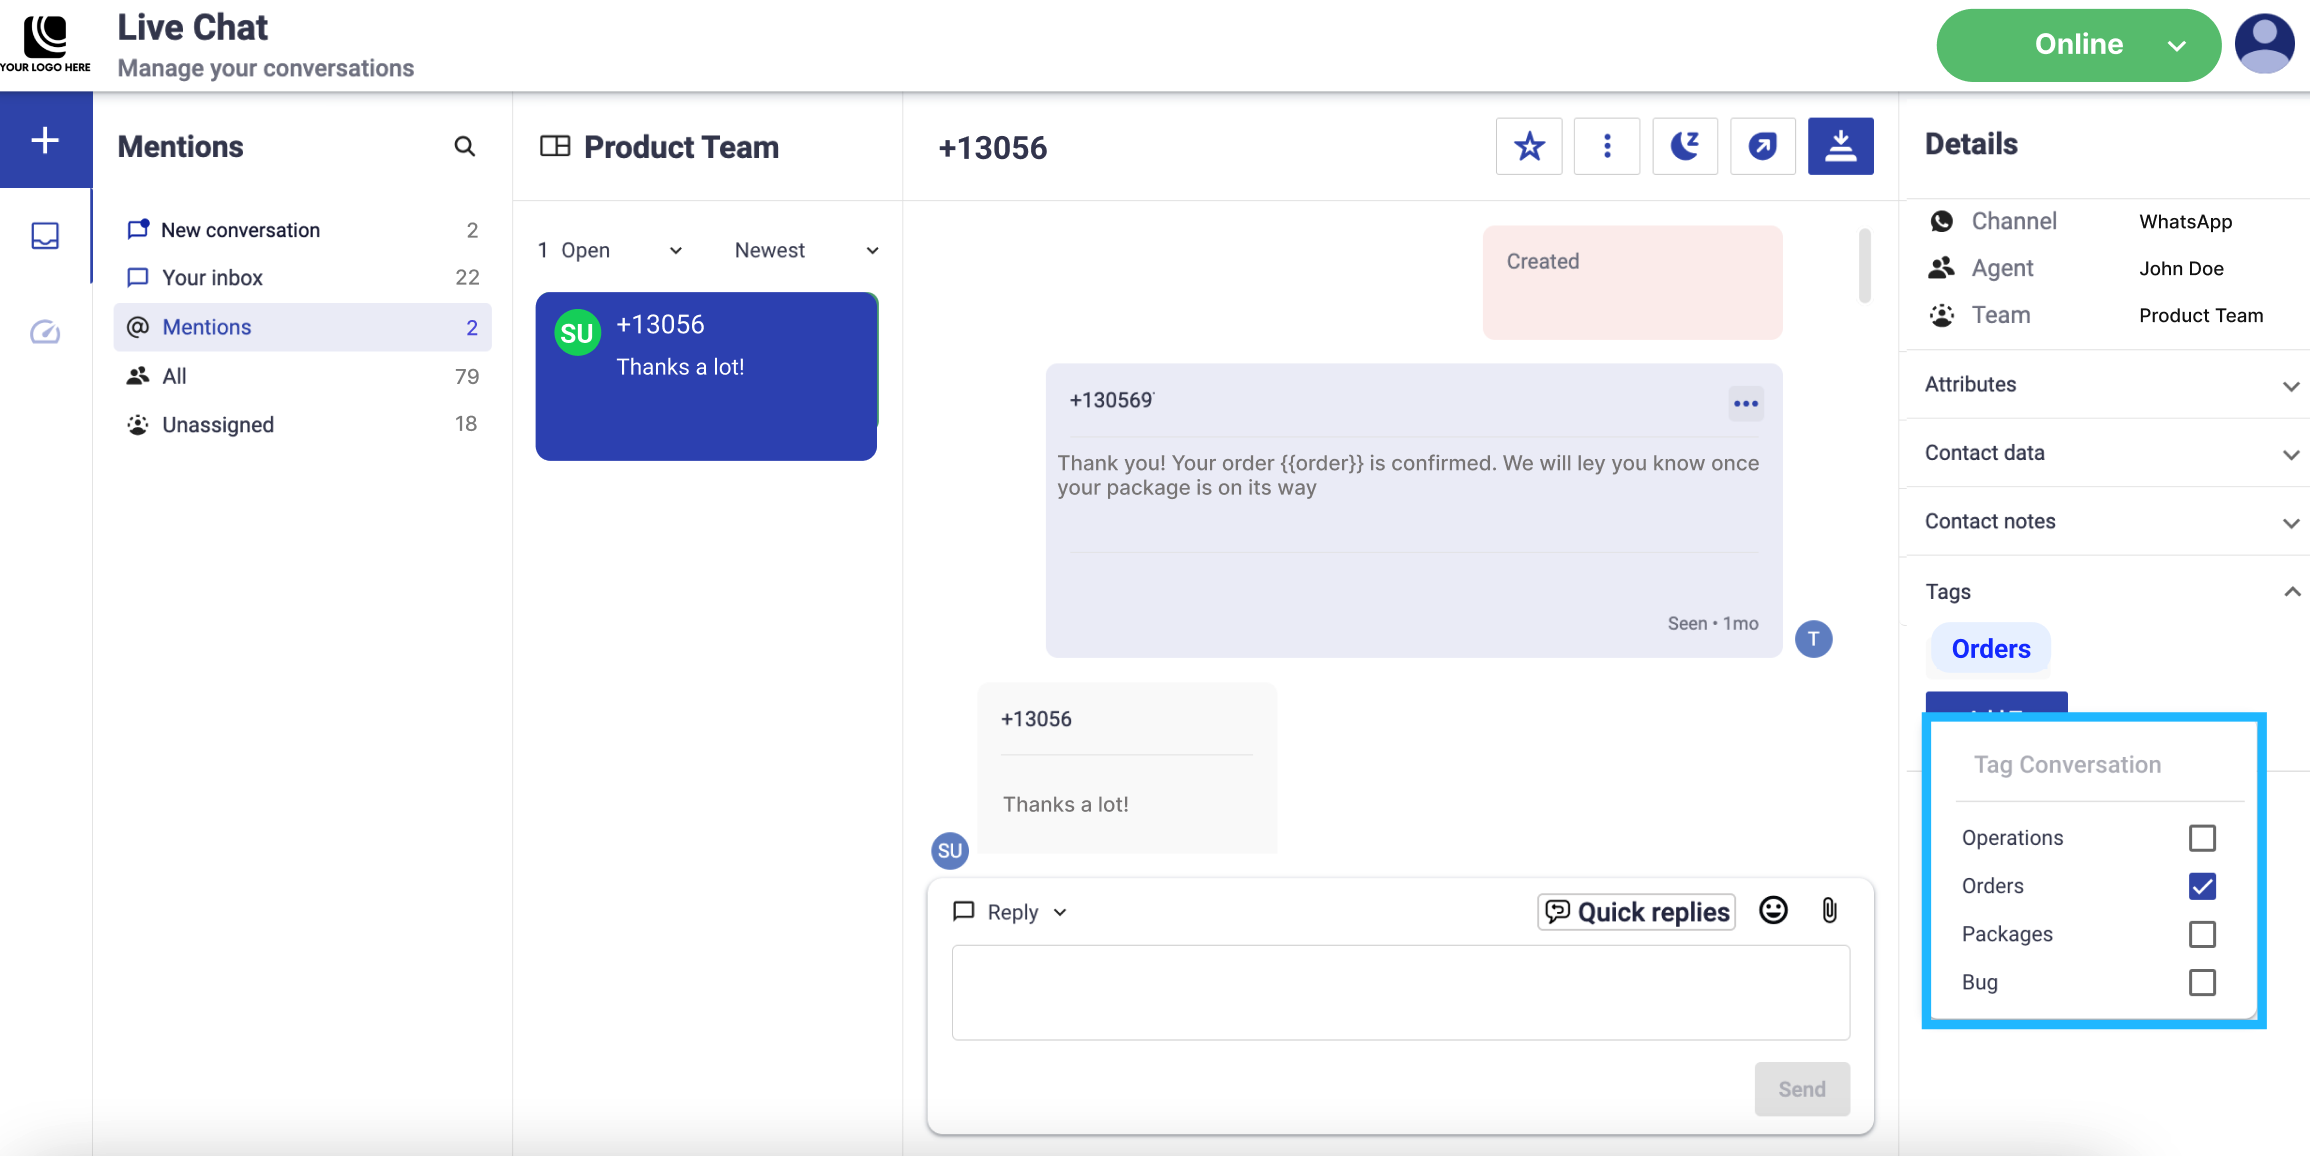
A pop-up menu will be displayed. In this menu, you can search for previously created tags to categorize conversations effectively. Up to 7 tags can be selected for each conversation.
To learn how to create a tag, go to the Creating and Manage Tags section.
Assign Conversation Attributes
The conversation attributes help you to collect data about a conversation in a structured format, so you can easily analyze it and identify trends.
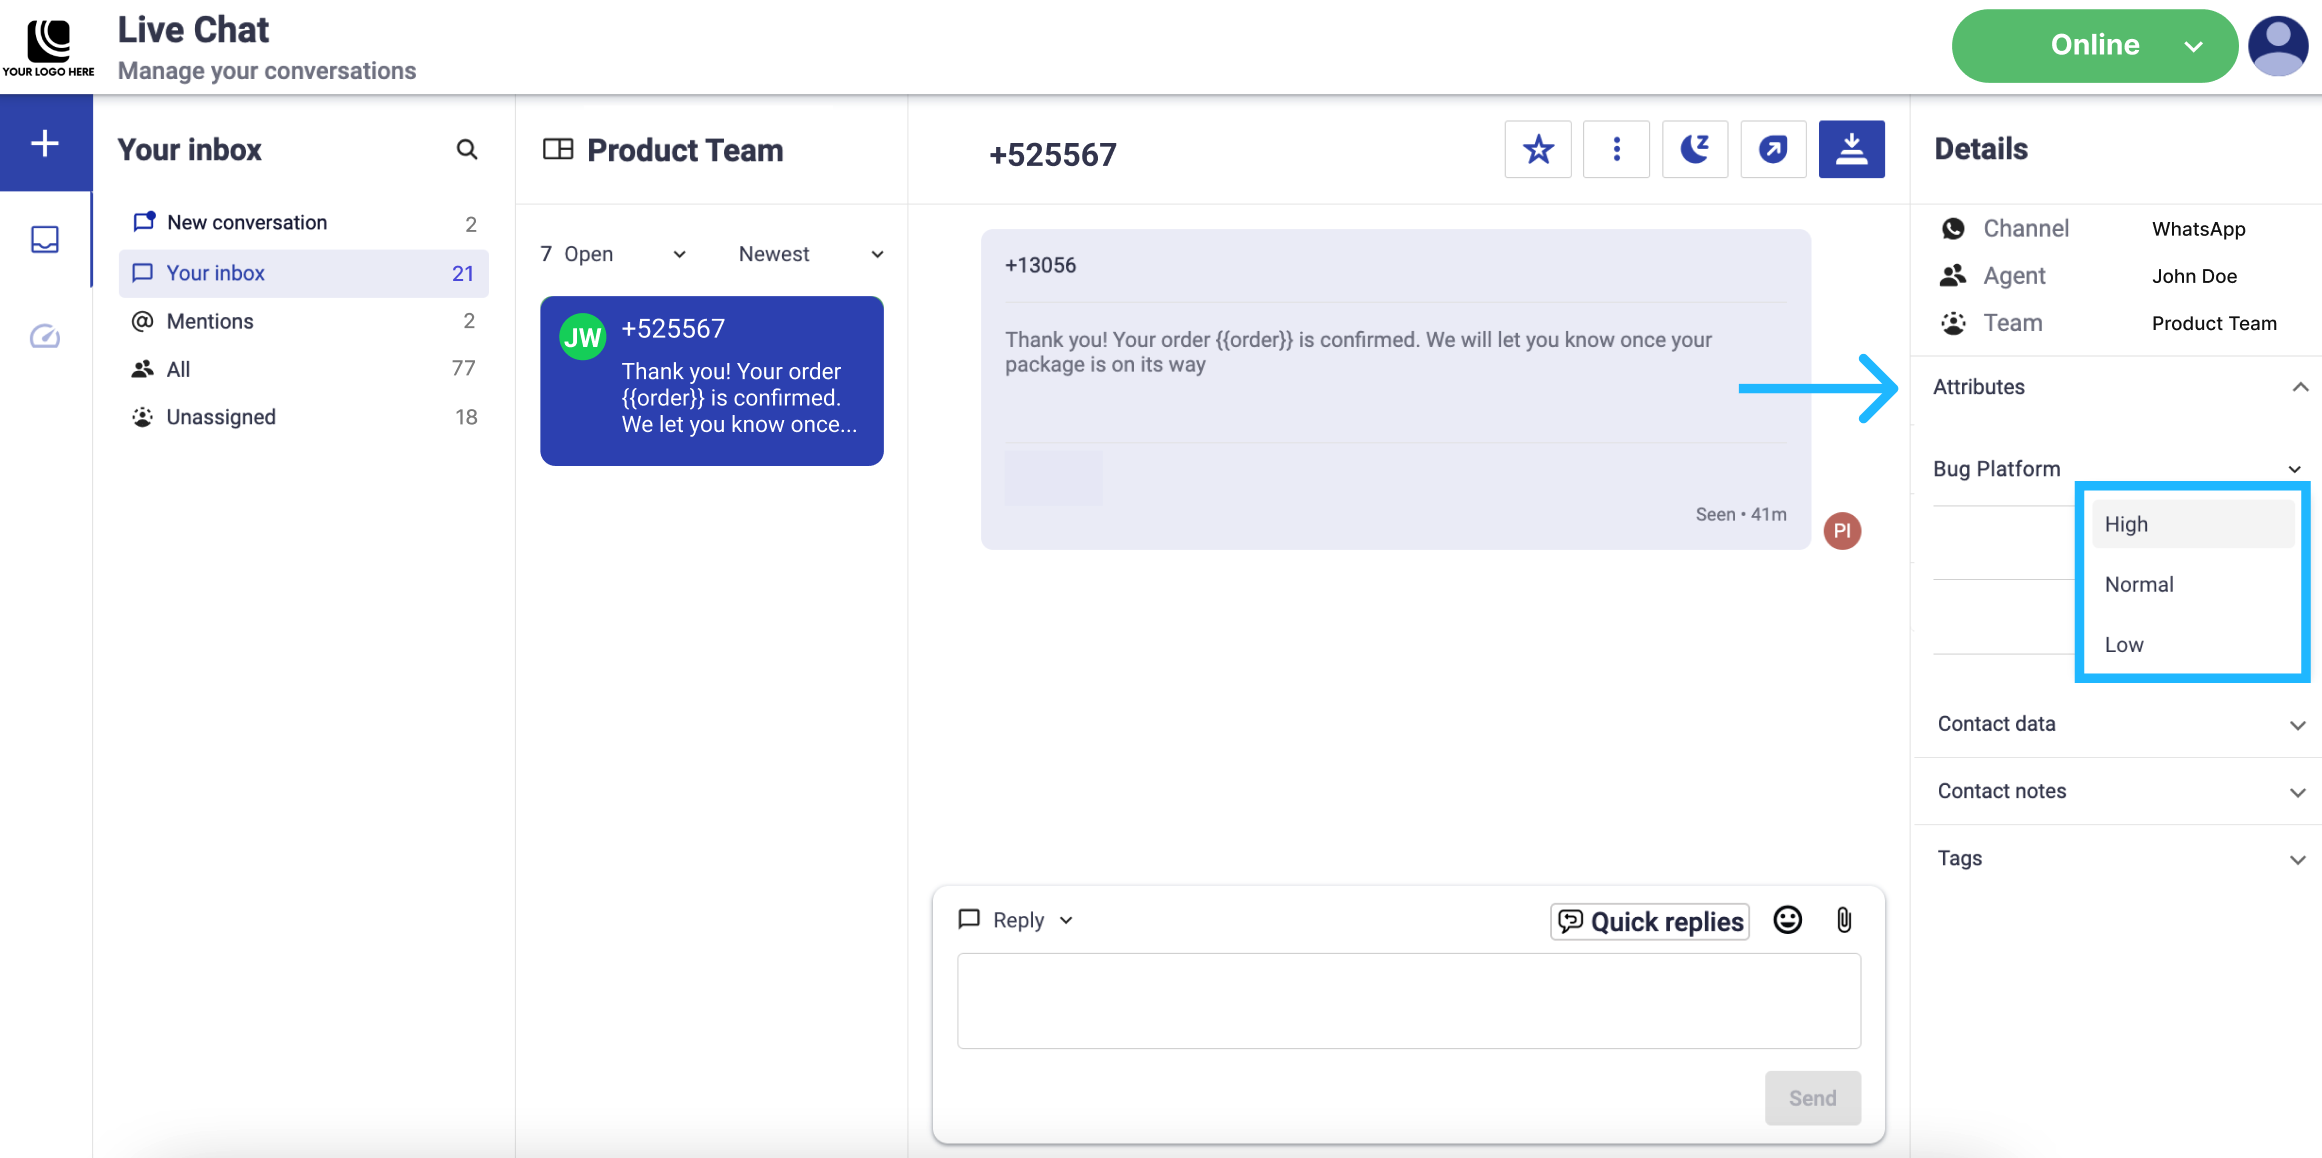
For our example, we defined the “Bug Priority” conversation attribute and added three list attribute options (High, Normal, Low), based on the type of priority to be assigned to the bug when creating the conversation attribute.
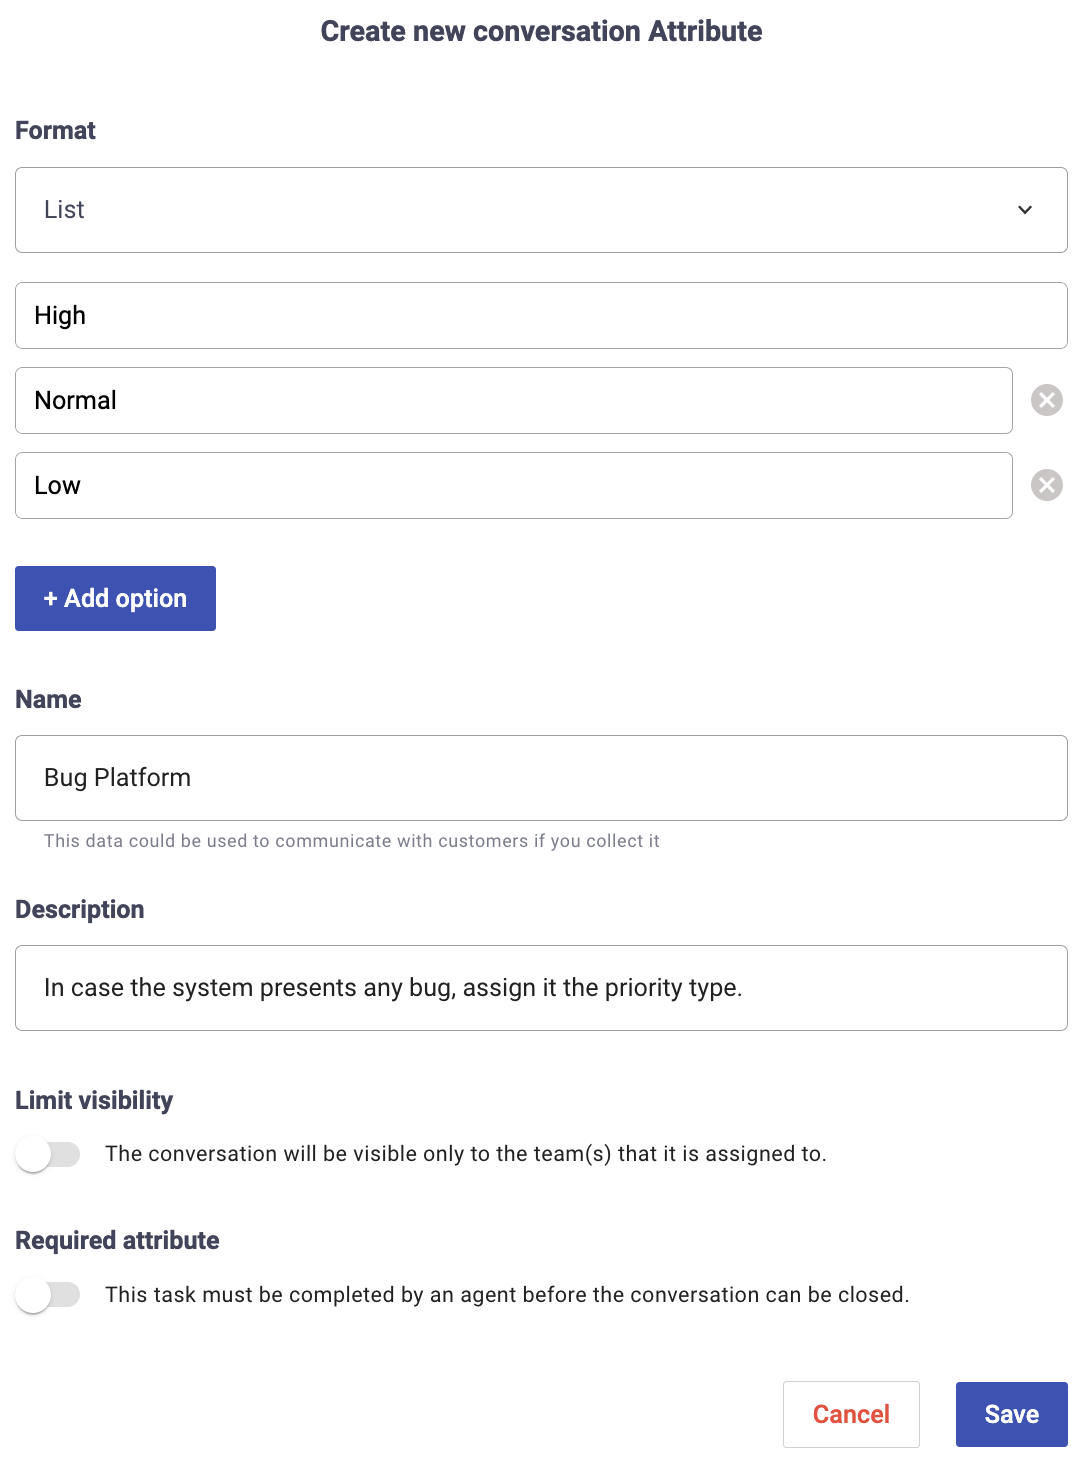
To assign the attribute to the conversation, from the Details tab, which is located in the right panel of the chat, click on the Attributes option. It will display each conversation attribute together with the list attribute options. Select the best attribute option that fits the conversation.
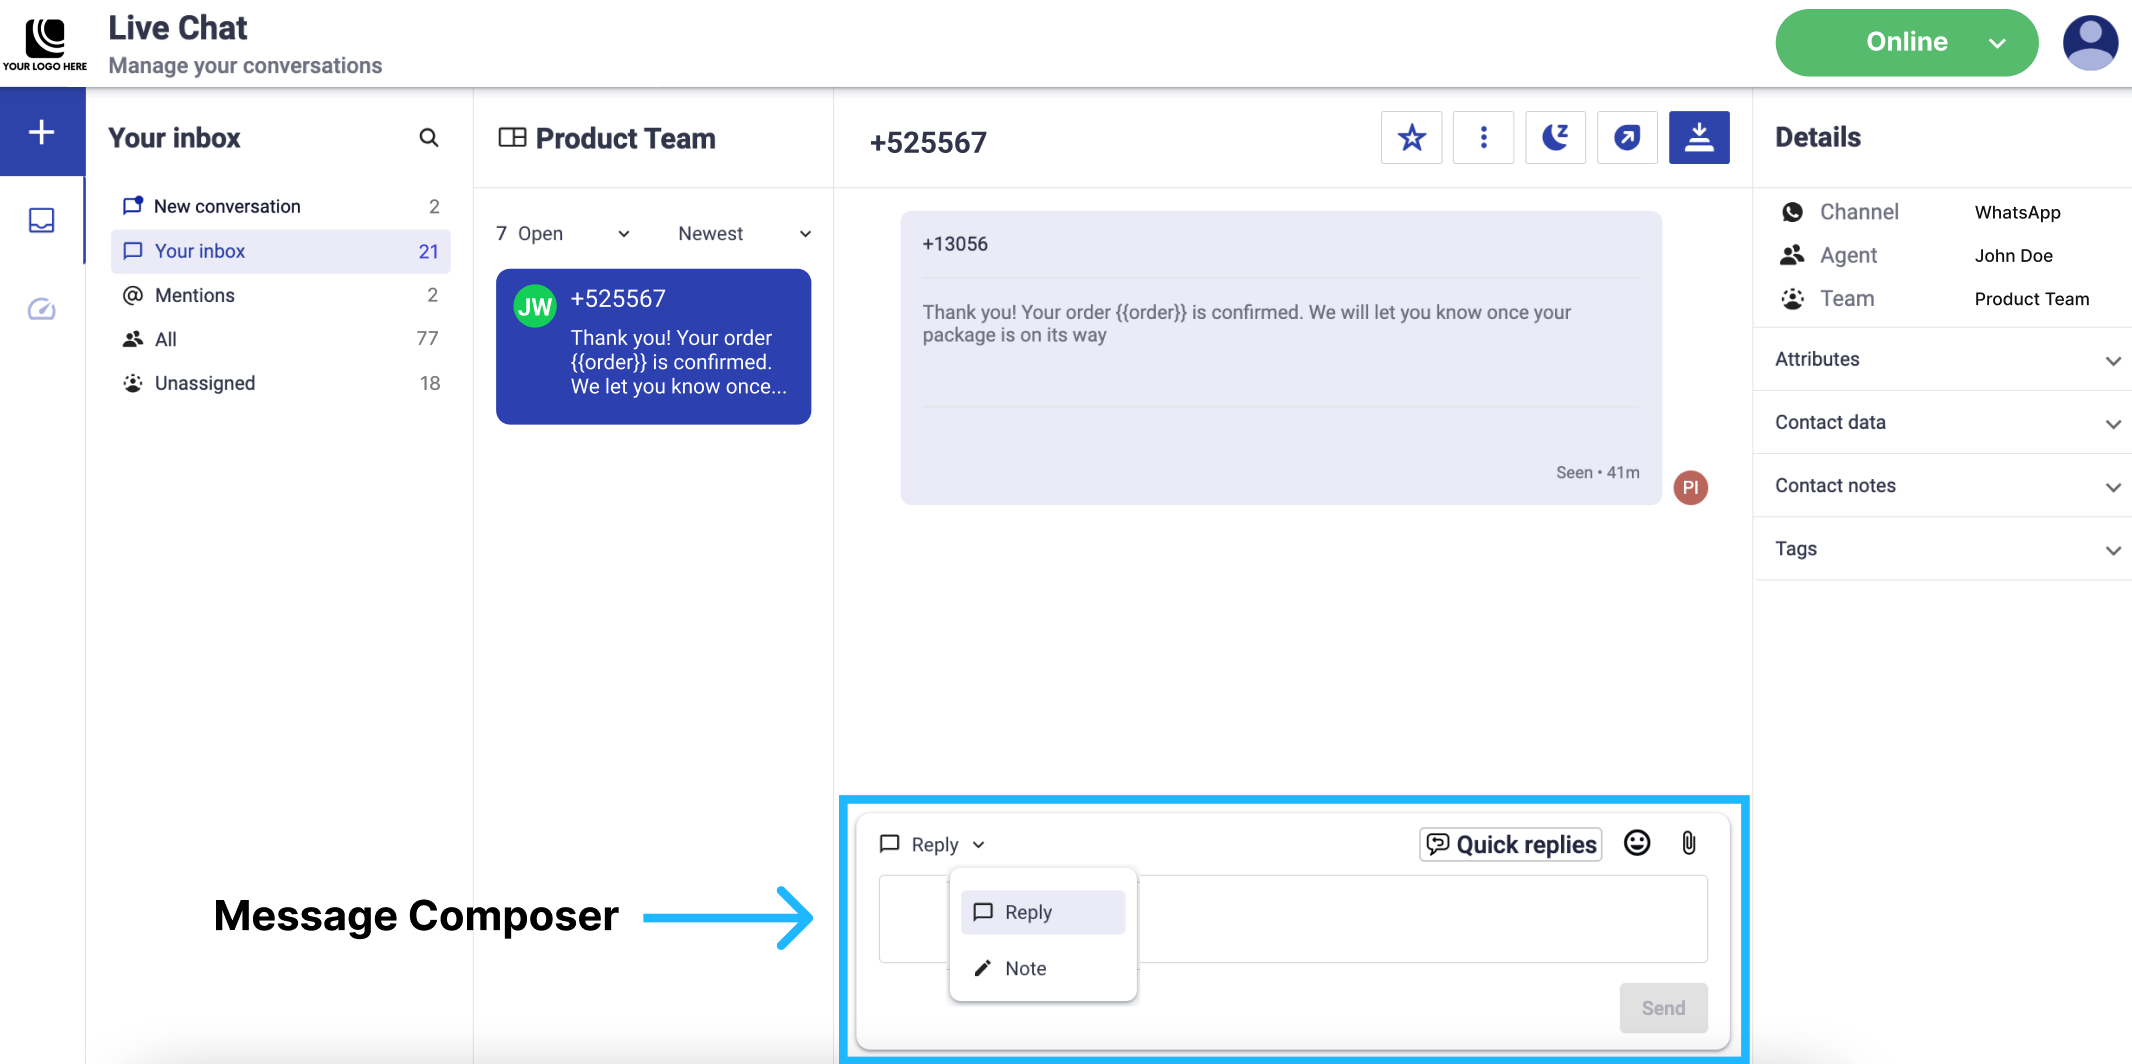
Message Composer
The Message Composer allows agents to compose and send messages to the end user on SMS or WhatsApp.
Key features of the Message Composer include:
-
Reply / Note dropdown: Provides the option to either type and send a response to the end-user by selecting the Reply option or adding a note to the conversation thread by selecting the Note option, which is internal and not visible to the end user. For more information to type internal notes to the conversation thread, go to the Mentions & Internal Notes section.
-
Quick replies: List predefined response messages for SMS and WhatsApp that agents can use to reply faster to common user questions during live chat interactions. They help ensure consistent messaging, save time, and improve response efficiency.
Agents can access Quick Replies directly from the message composer by clicking the Quick replies 💬 button.
To learn how to configure Quick Replies, go to Inbox Preferences → Quick Replies. There, you can create, edit, and manage responses for both SMS and WhatsApp channels.
-
Send button: Once a message is composed, agents can click Send to deliver the message to the end user.
-
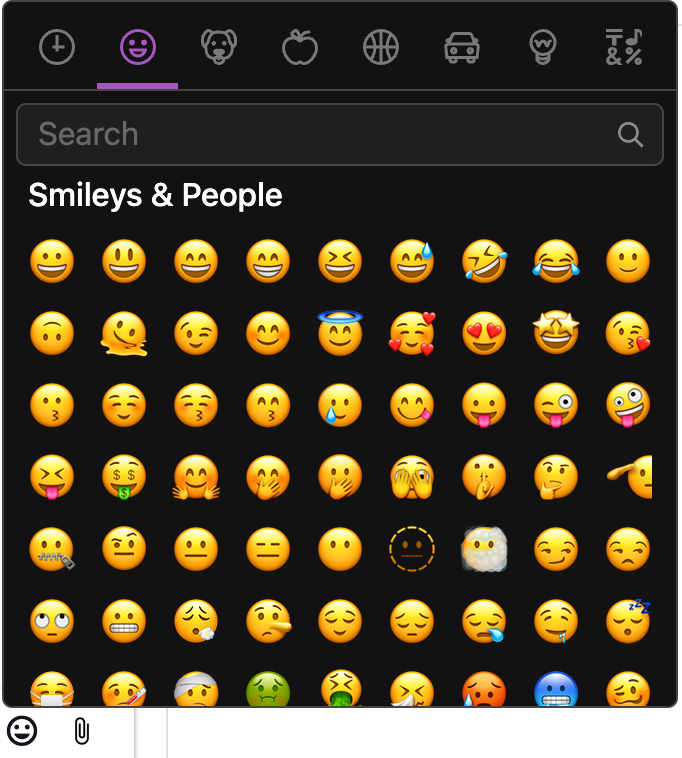
Emojis: Only for WhatsApp, agents can add emojis to their messages using the smiley face icon.
-
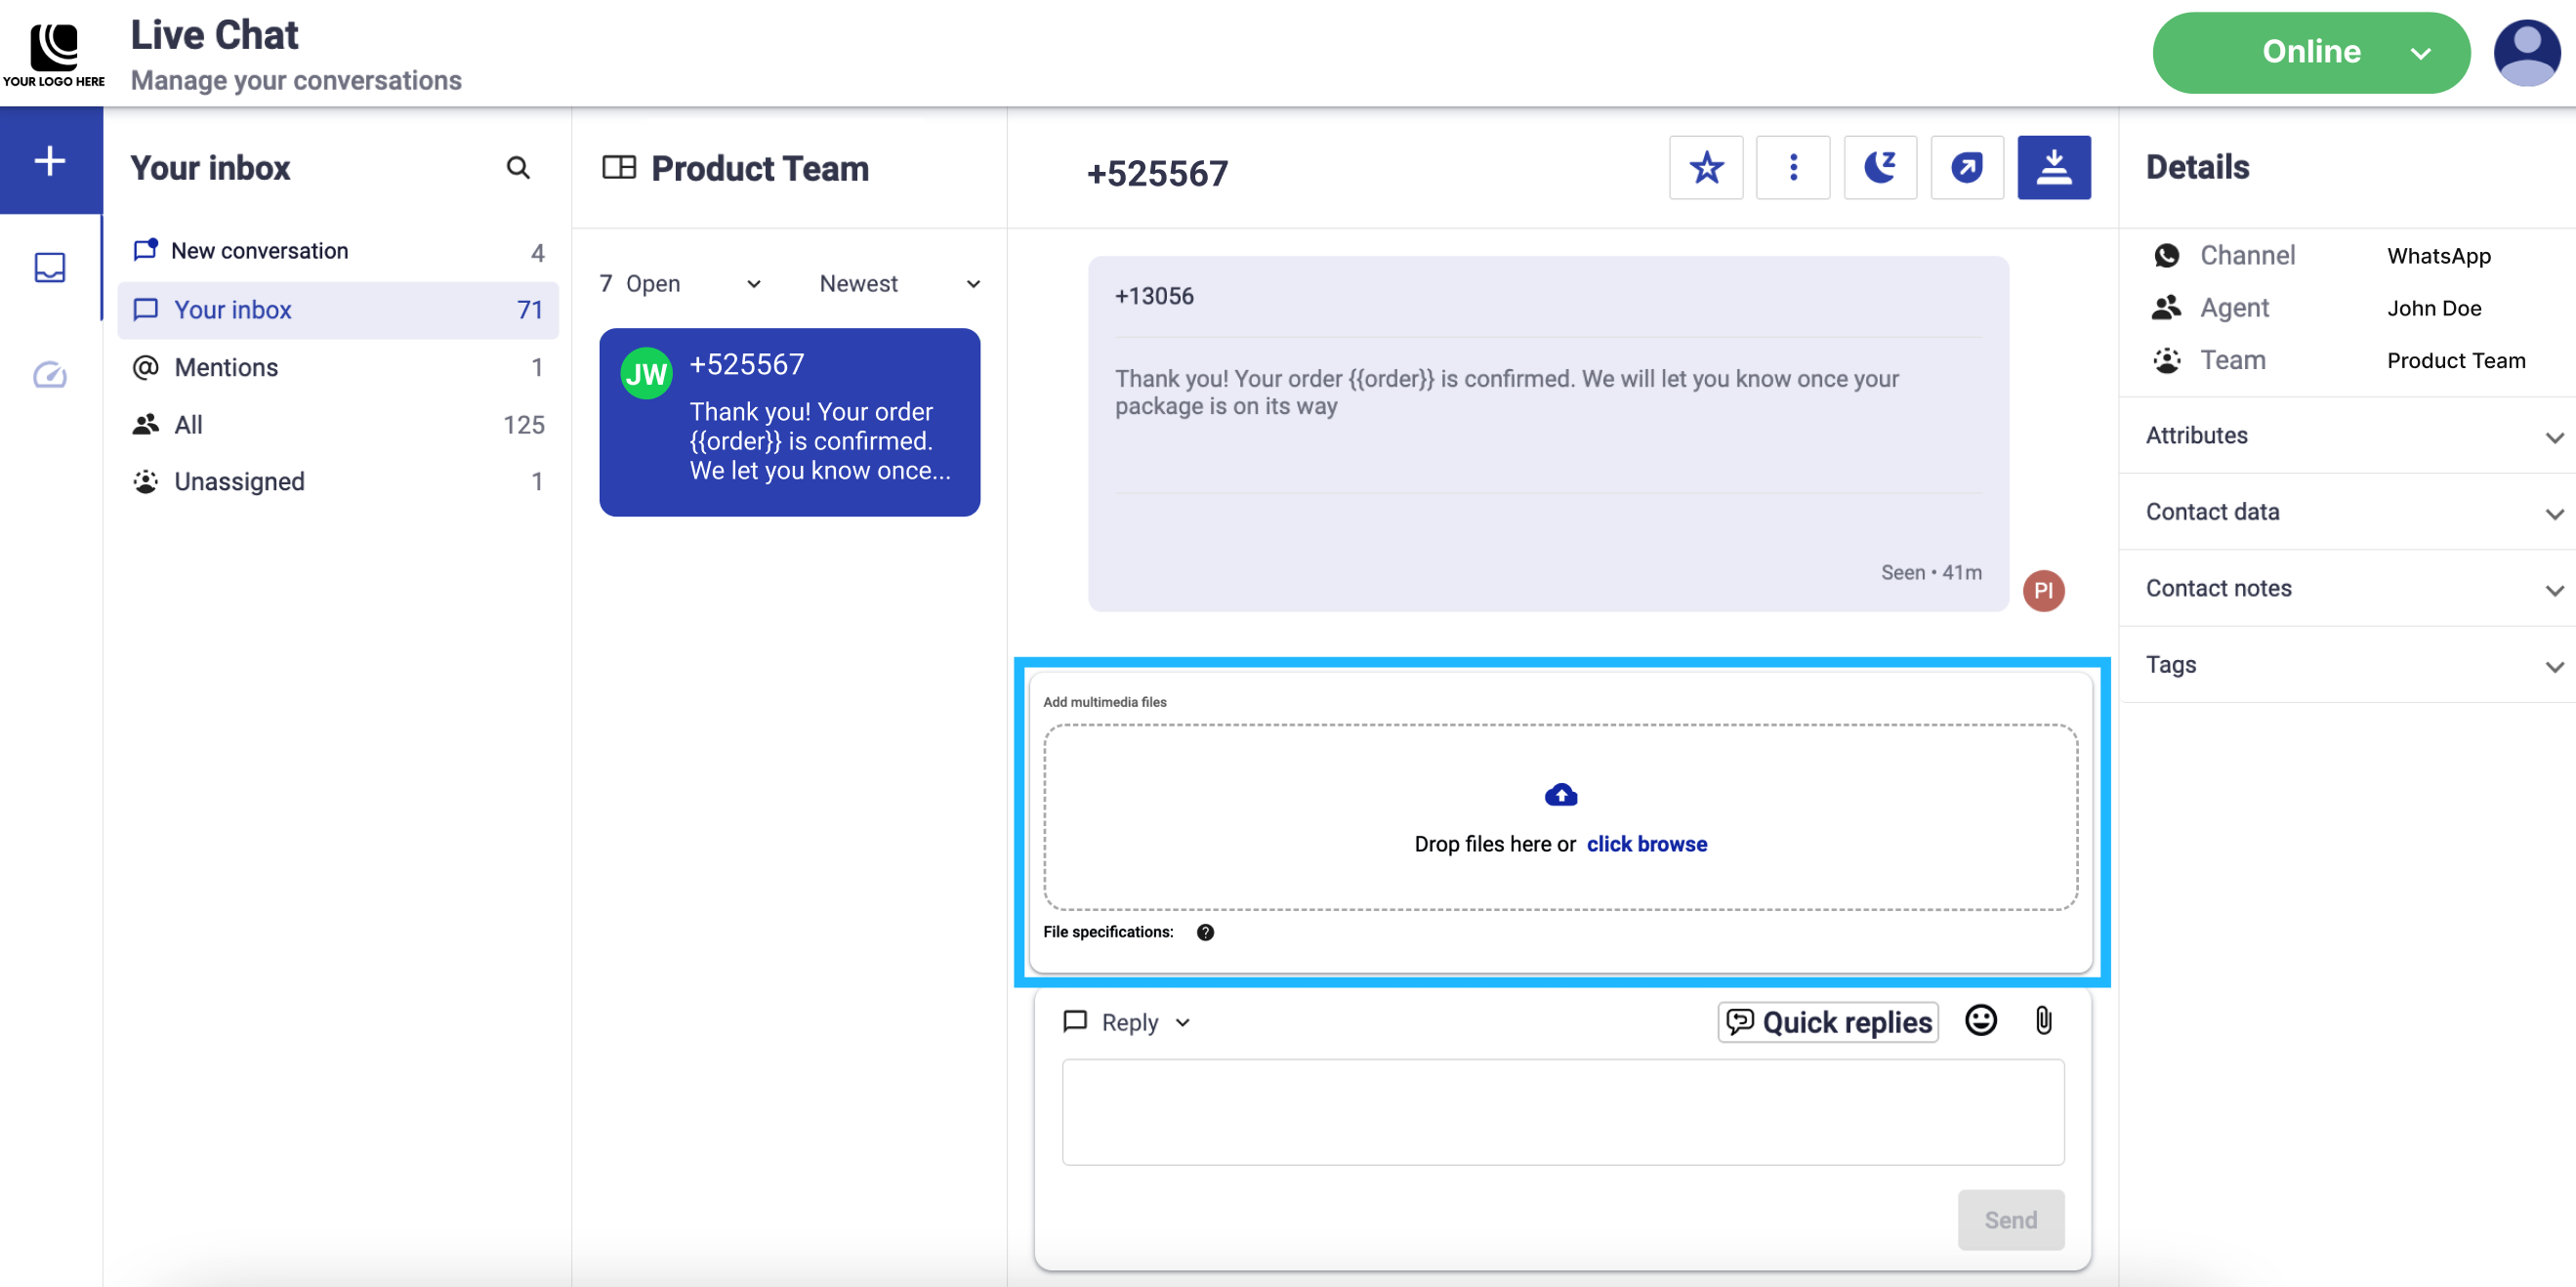
Attachments: Only for WhatsApp, the message composer provides two options to upload and send multimedia files (image, video, document, and audio) to end users, by dragging and dropping multimedia files or by pasting an image directly into the message composer.
-
Drag & Drop area: Agents can easily add files by first clicking the Paperclip icon, then by dragging and dropping them into the designated area or by clicking the “click browse” area to upload them from their device.
Supported Multimedia Files & Formats:
File type Supported formats Maximum file size Image .jpeg,.jpg,.png(Images must be 8-bit, RGB or RGBA)
5 MB Video .mp4(Video files must use the H.264 video codec)
16 MB Document .pdf100 MB Audio .aac,.amr,.mp3,.ogg,.m4a(Audio tracks in video files must use the AAC codec)
16 MB File Status Indicators: After a file is uploaded, its status is displayed using color-coded labels.
-

Green (COMPLETED): The file has been successfully uploaded and is ready to send.
-
Red (FAILED): The file upload failed, likely due to an issue such as a file being too large or incompatible.
-
Blue (IN PROGRESS): The file is currently being uploaded.
-
Gray (NOT COMPATIBLE): The file format is not supported by the system.
-
-
Copy & Paste Image: Agents can attach an image by copying and pasting it directly into the message composer using
Ctrl + V(Windows) orCmd + V(Mac). This method is specifically designed for quick image sharing and is only supported for image files.When an image is pasted into the message composer, a preview of the image is automatically displayed within the composer, allowing the agent to validate the content before sending.
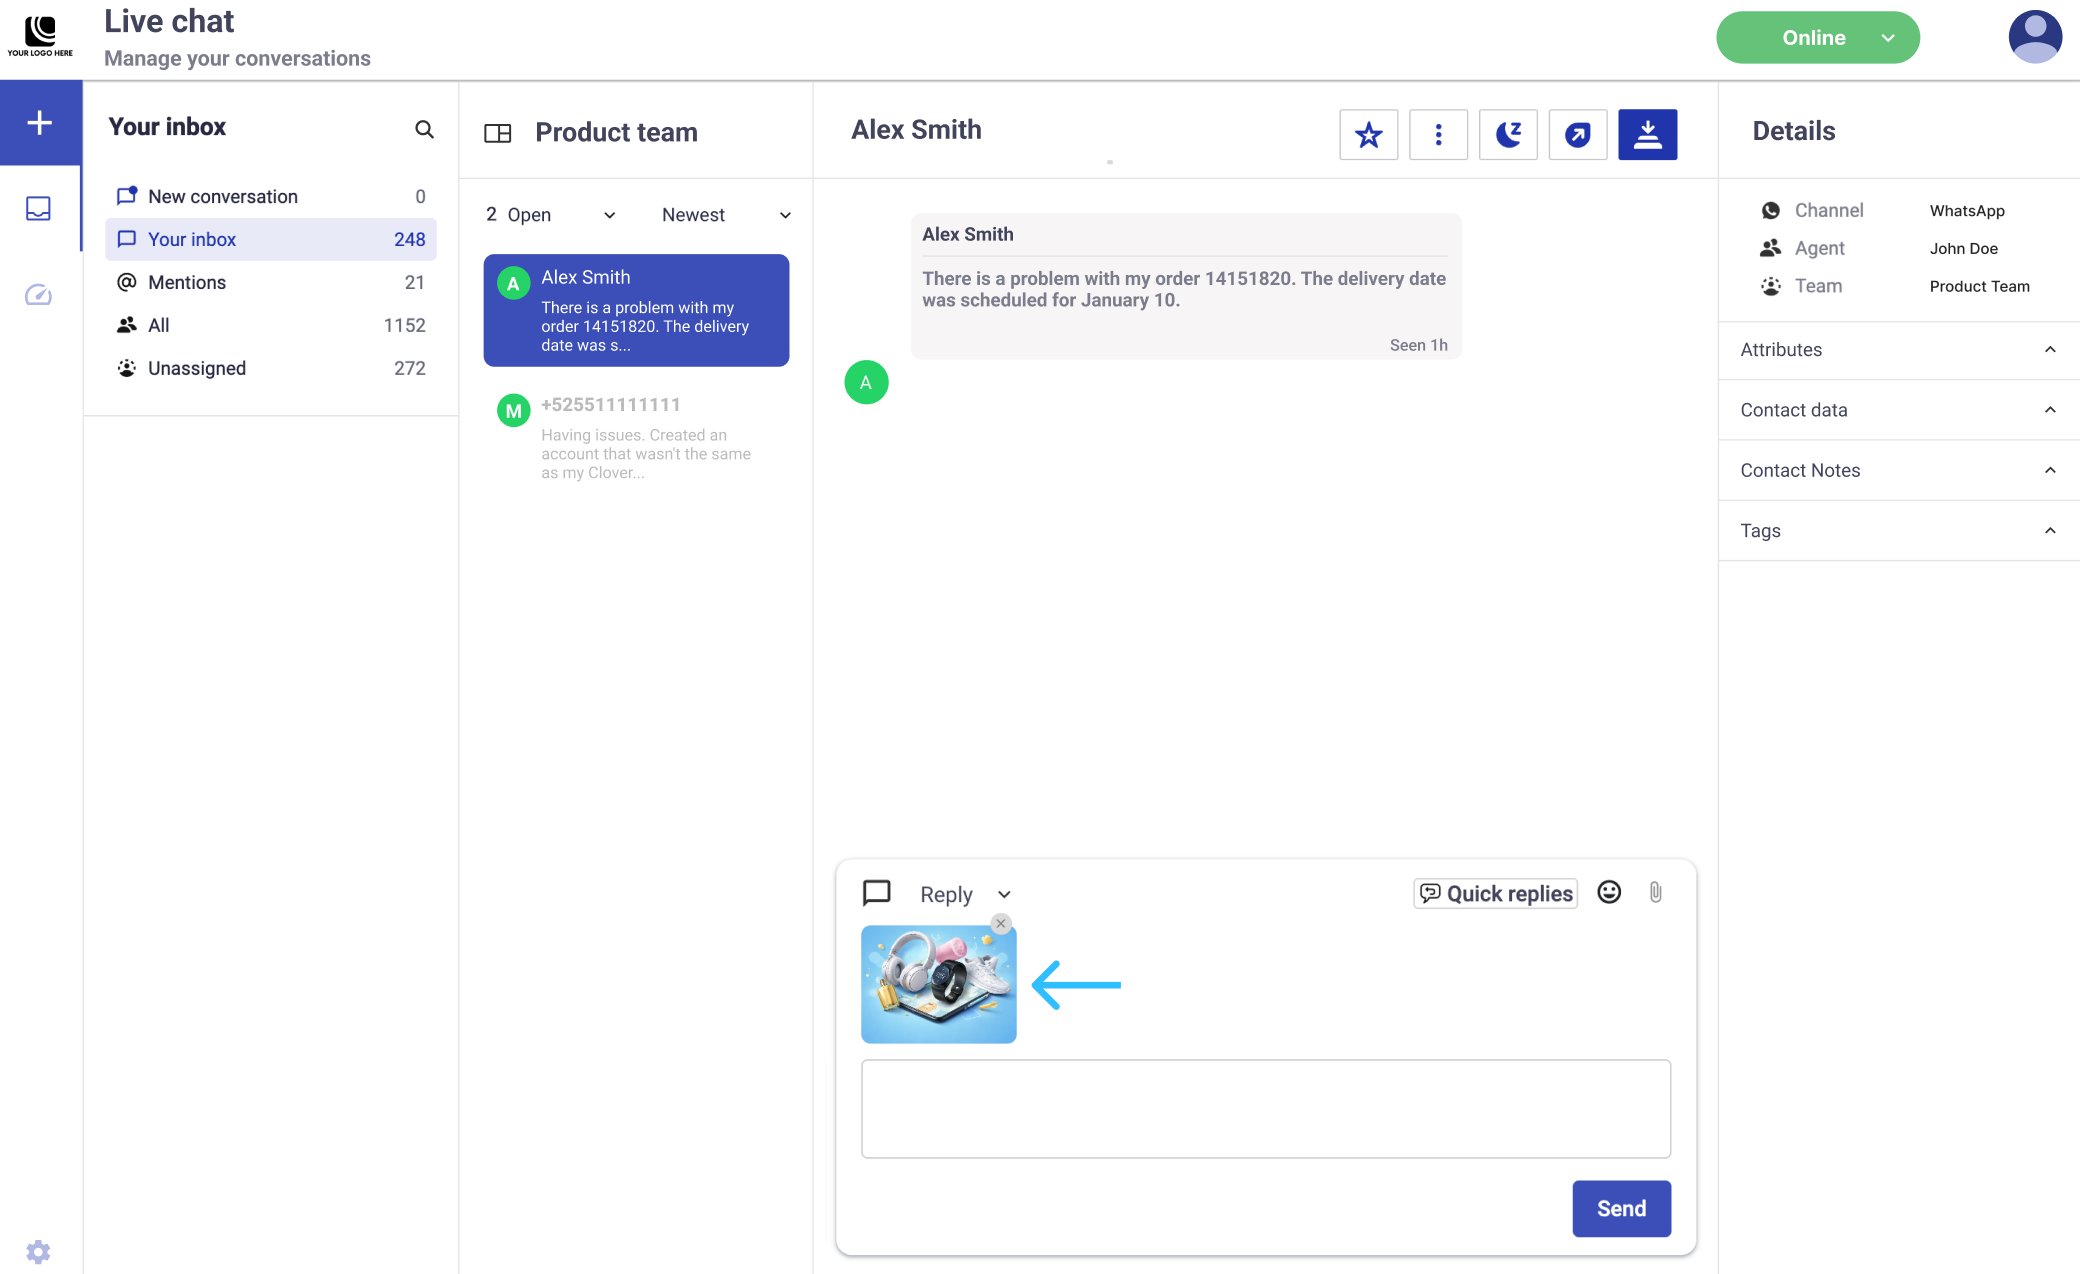
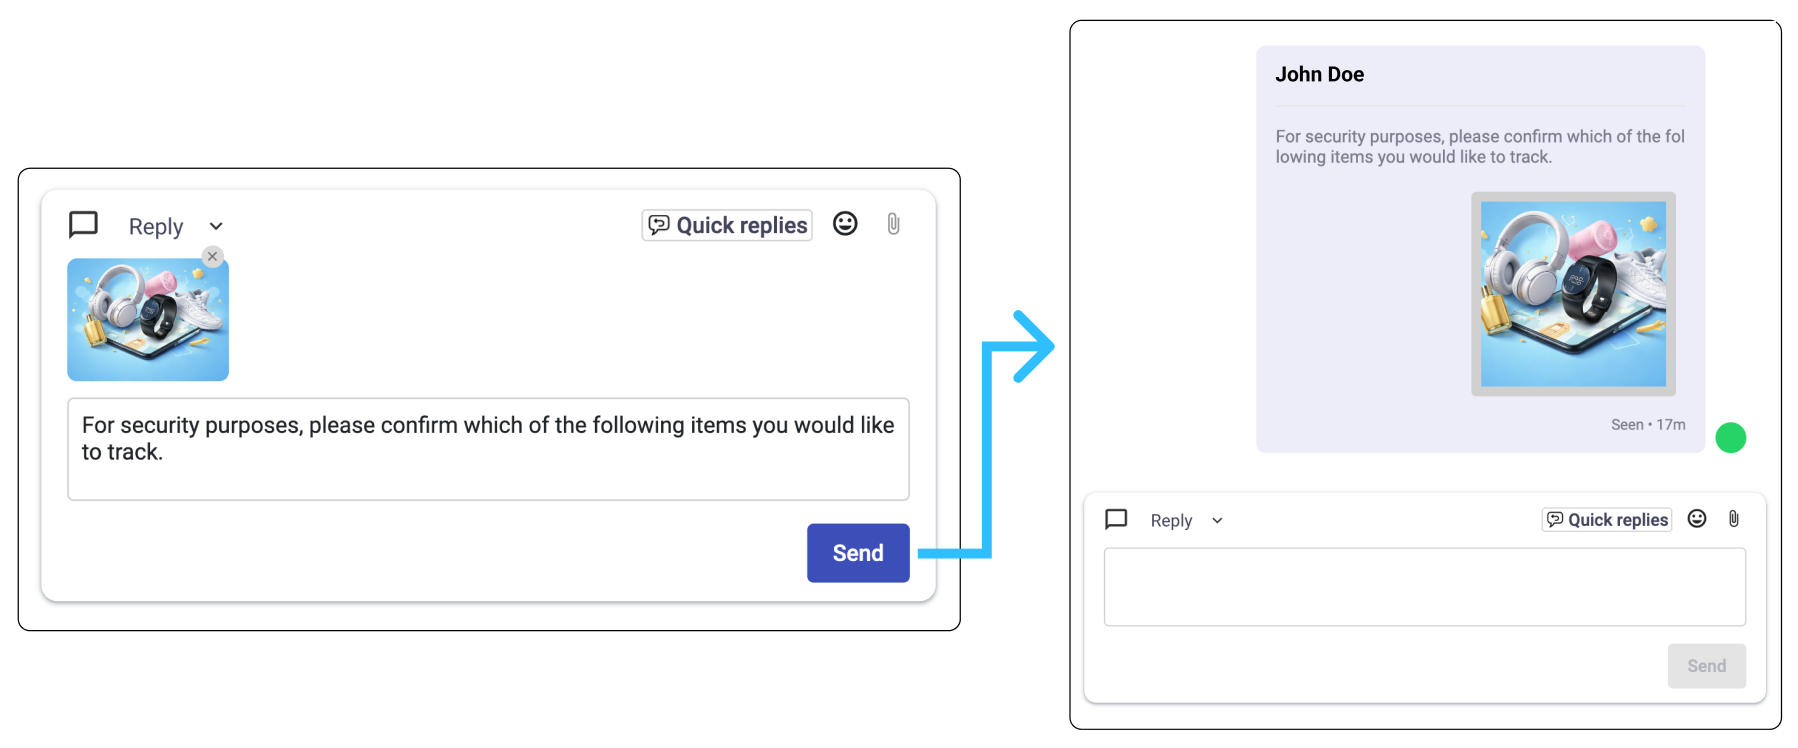
From the message composer, the agent can:
-
Add text alongside the image to provide context or instructions. Once the message is sent, the image is delivered as an attachment through the corresponding channel and appears in the conversation view together with any included text.
-
Remove the image before sending by clicking the
“X”icon located at the top-right corner of the preview.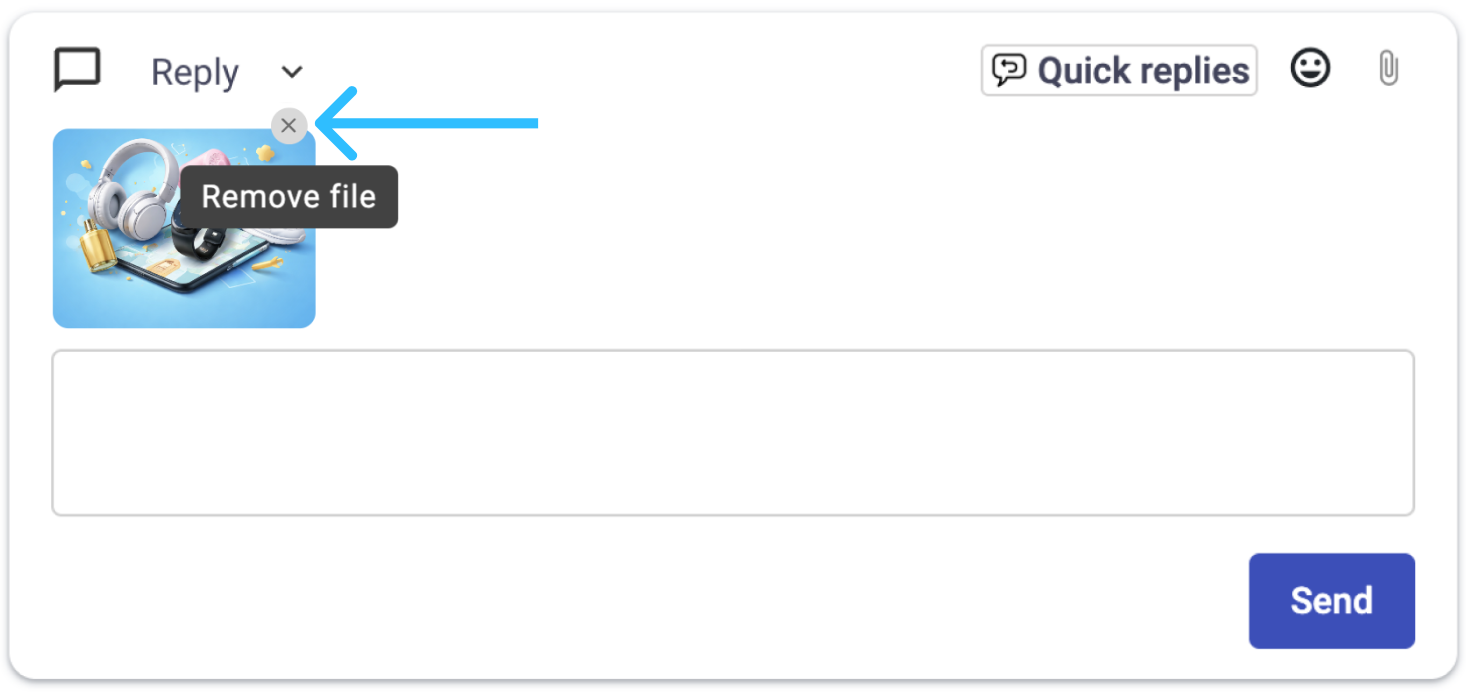
Once you click the Send button, the system validates the image. If an issue is detected, a snackbar notification is displayed and the message is not sent. This may occur in the following cases:
- The image file format is not supported (only
.jpeg,.jpg,.pngare allowed) - The image file size exceeds 5 MB.
- The upload fails due to connectivity or processing issues.
-
-
Updated about 1 month ago