Set up a Mobile App for Push Notifications
A Push Message is a notification that is delivered via the internet to an application on a mobile device. Therefore, before Push Notifications can be made available through the Communications Platform, the following requirements must be satisfied:
-
Have a Mobile Application
-
Registered a Google Firebase and/or Apple Developer Credentials
-
Integrate our SDK into your Application’s code *
Requirements for Recipients to receive Push notifications:
-
Internet connection
-
Installed Application in device
-
Device registered with SDK
If you want to test Push notifications before integrating the SDK into your application, follow these steps:
-
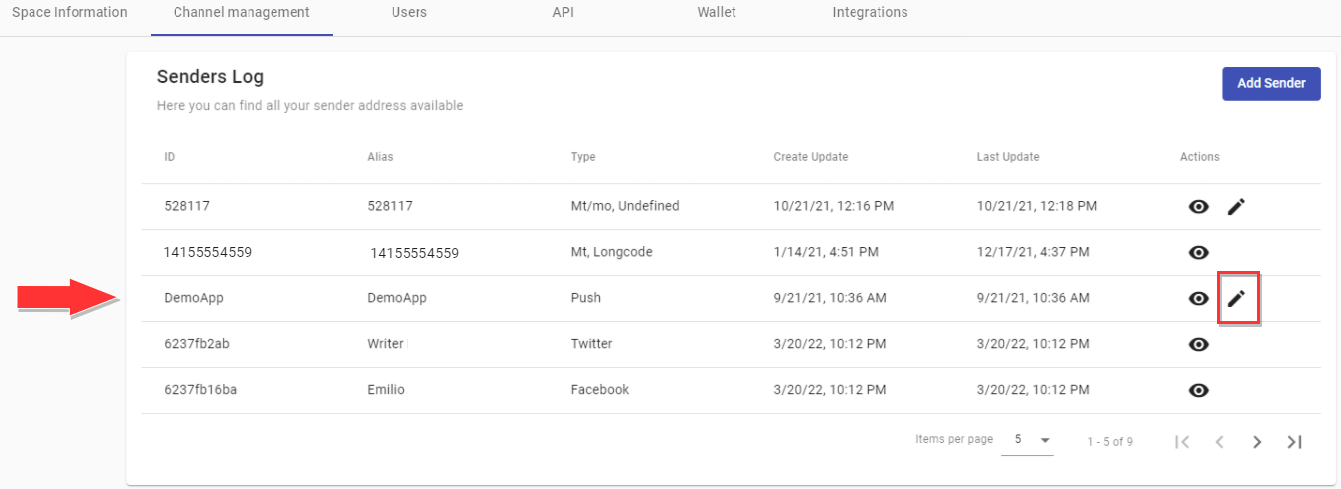
Go to the Sender Address Management tab located in the Preferences section
-
Select the Edit icon from the Actions column of the Push Type.
-
Download the Demo Application by selecting the Google Play (Android) or App Store (iOS) button depending on the operating system of the device you want to test the Push notifications in.
-
Once the Demo app is installed, scan the QR code using the Demo App to test the different types of Push notifications.
- To validate that the device has been registered, go to the Subscribers section and verify the user information in the Subscribers list.

Click on the Edit tool for the Subscriber used for the testing, you will view the device information (Android / iOS).
NOTEDevice information for the Subscriber is not editable
Once this registration has been verified, the device is now registered to receive Push Notifications!
App Configuration
To begin configuring a Mobile Application for Push Notifications, click on the Add Sender button located in the upper right corner of the Sender Address Management tab.
Select the Push option from the dropdown menu.
Either an Android or iOS Mobile Applications can be integrated to deliver Push Notifications using the Platform.
Enter the Name of the Application that is being configured to deliver Push and select a Subscriber List Field to use as the Push Device key.
NOTEThe selected Field must be unique.
Then, follow the required steps depending on the OS of the Application being integrated:
-
Android
-
iOS
Android App Configuration
Under the App Configuration section, select the Android Config drop-down menu and upload the App’s Firebase Service Account file to the displayed upload box.

Firebase Service Account File

The following steps allow you to obtain the Firebase service account file, enter the App’s Firebase account.
-
Select the Project Overview Settings button
-
Select the Project’s Settings
-
Select the Service Account tab
-
Click the Generate New Private Key button
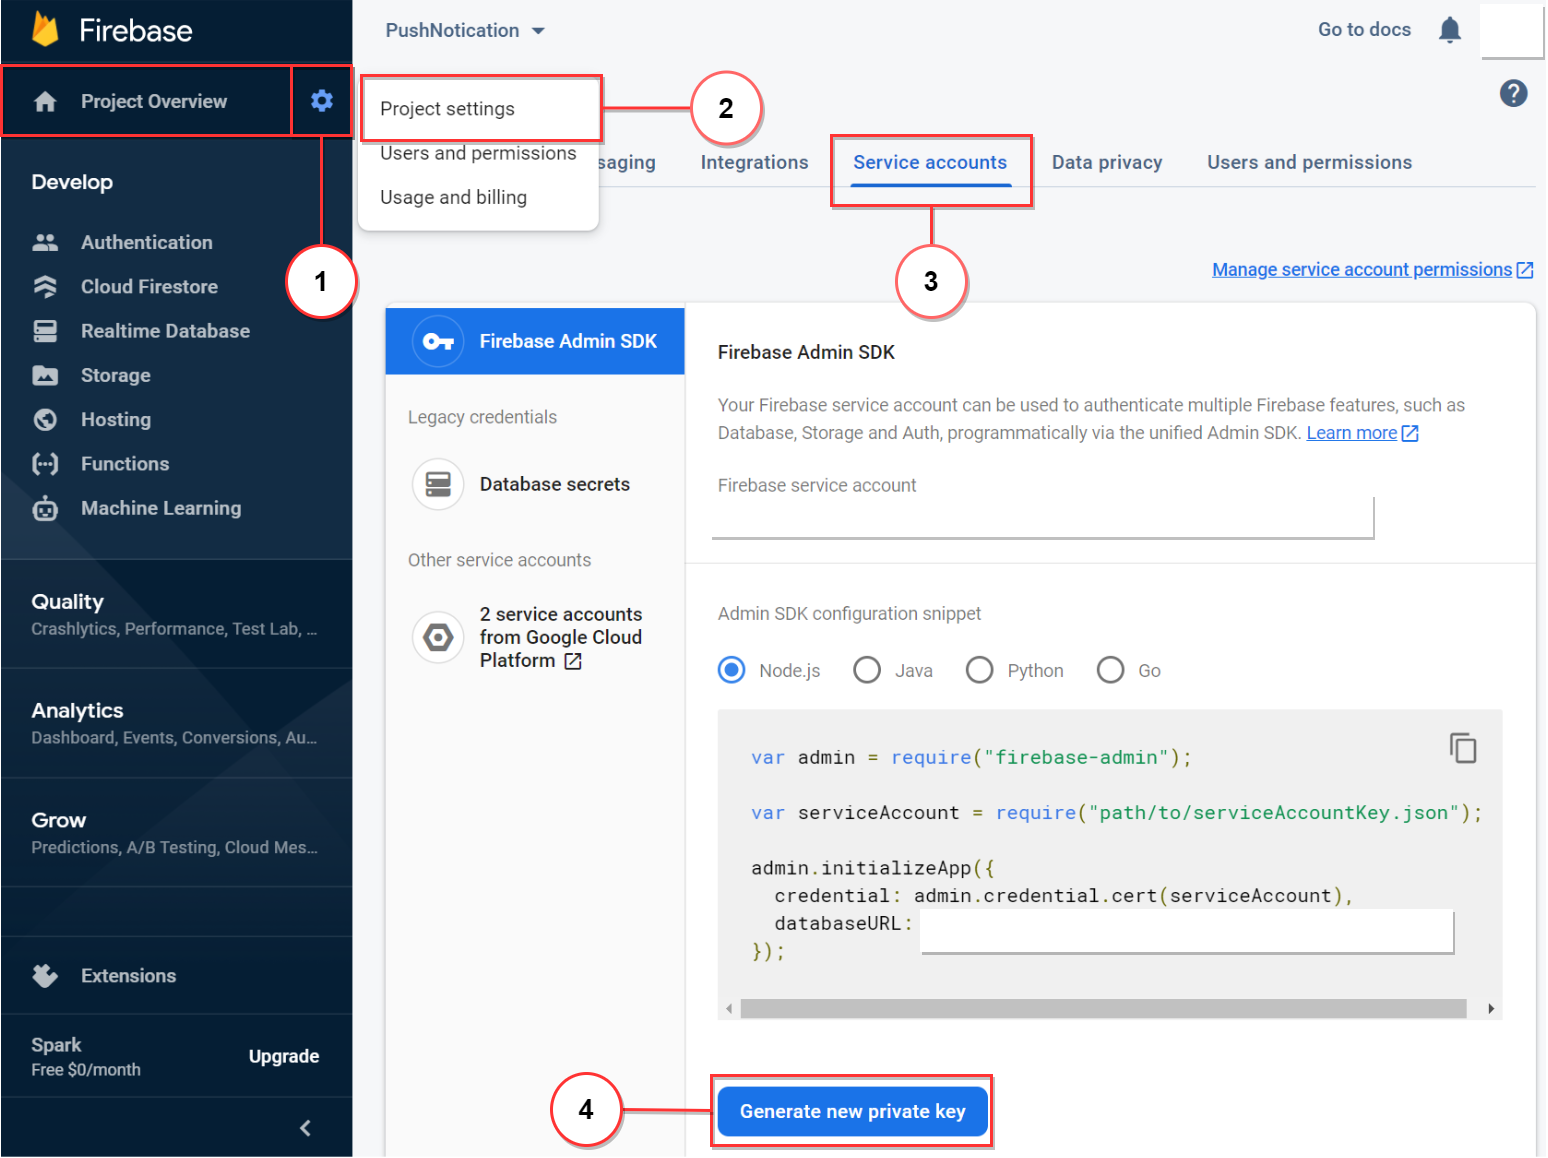
Once the Generate a new private key button is selected, a JSON file with the Private Key will be downloaded.
Upload this file to the Firebase Service Account upload box by selecting the Browse Files button.

Once these steps have been completed, the following will be displayed in the Push section:
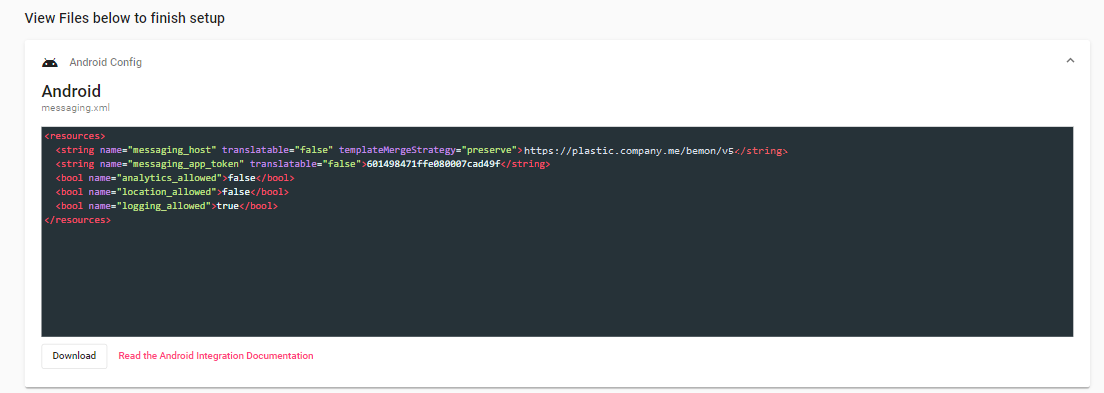
Download the file by clicking on the Download button and add it to your Application’s project.
iOS App Configuration
Under the App Configuration section, select the IOS Config drop-down menu, you will see the following required fields:
-
Bundle ID
-
iOS Key ID
-
iOS Team ID
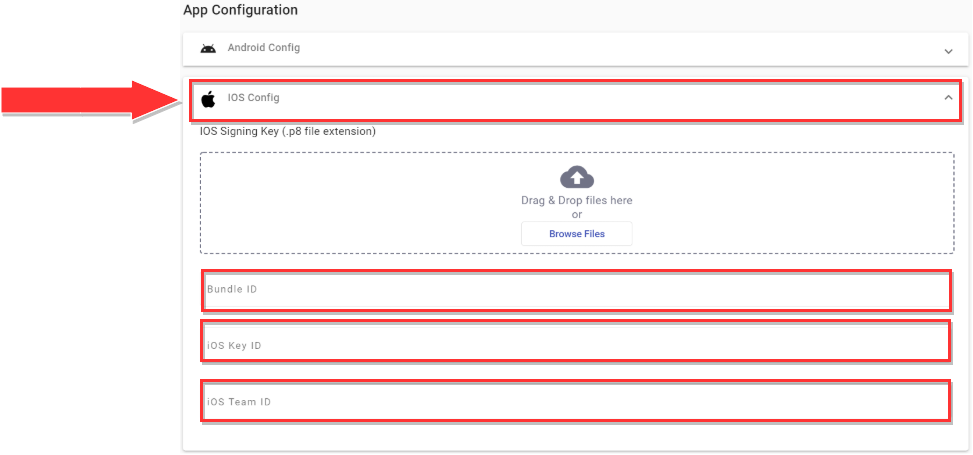
Bundle ID (App ID): Represents the App’s unique identifier under the iOS ecosystem.
To obtain the App’s Bundle ID, open your project with XCode, select the top project item in the project navigator at the left. Then Select TARGETS -> General.
Bundle Identifier is found under Identity.
iOS Team ID: From the Apple’s Developer Central Center, under the Account section, click Membership and under Membership Information, copy the Team ID field.
iOS Key ID: Establish a secure communication with an APN using stateless authentication tokens.
You need an APNs authentication token signing key to generate the tokens to be used by the server to deliver Push Notifications.
Request this key from your developer account on developer.apple.com.
From the Apple’s Developer Center account, under the Certificates, Identifiers & Profiles, Select the Keys section.
Select the APNs service and Enter the key’s name, and click Continue.
When you request a key, Apple gives you:
-
A 10-character string with a Key ID. You must include this string in your JSON tokens.
-
An authentication token signing key, specific as a text file (with a .p8 file extension) that you will load in the next step.
Here, you will find your Key ID:
iOS Signing Key: By establishing an APN authentication, you will obtain an authentication token signing key. This will be in a text file (with a .p8 file extension).
Upload the file into the displayed upload box by selecting the Browse Files button.
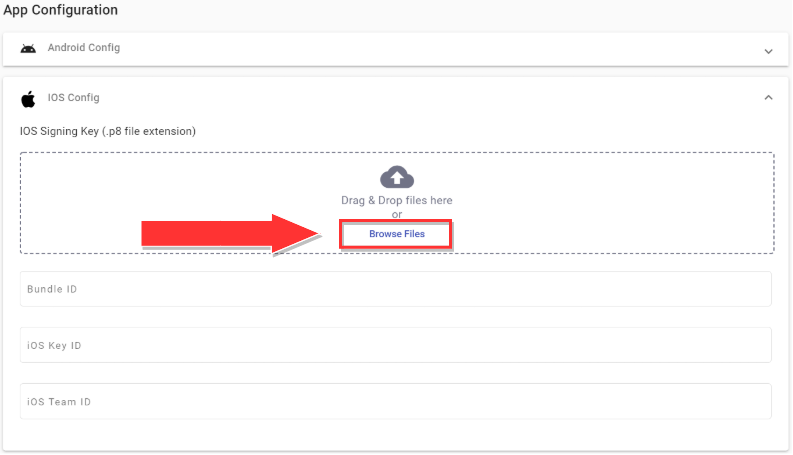
Once the required fields (Bundle ID, iOS Key ID, iOS Team ID) have been entered for the desired OS of the Integrated Application, click on the Save button.
The following will be displayed in the Push section:
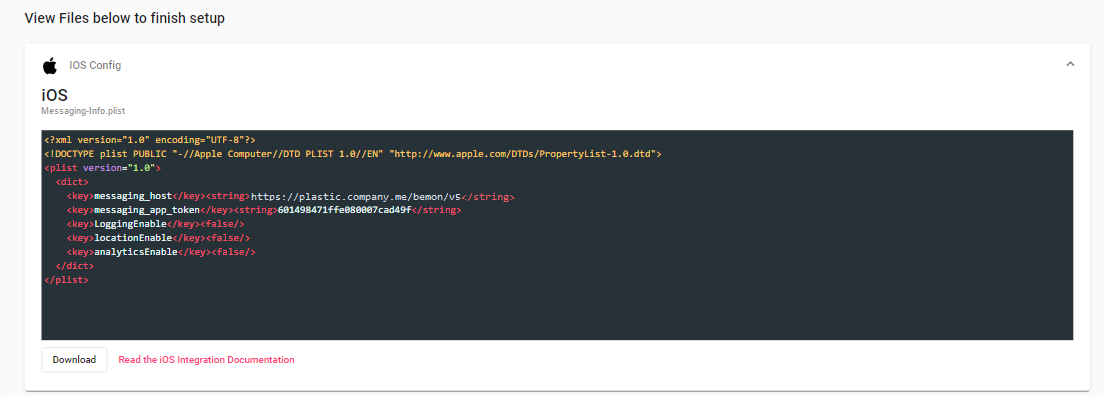
Download the file by selecting the Download button and add it to your Application’s project.
Review App configuration
At any time, you can verify and review your apps configuration by selecting the eye tool in the row corresponding to the App. The information that will be displayed depends on how the App was set up. An example is shown in the following figure, depicting a scenario where both OS have an App that is available (Google Play and App Store) so both Push notification Services have been configured.

By selecting the down arrow of the far right you can view the file configuration of the SDK for each OS as follows.
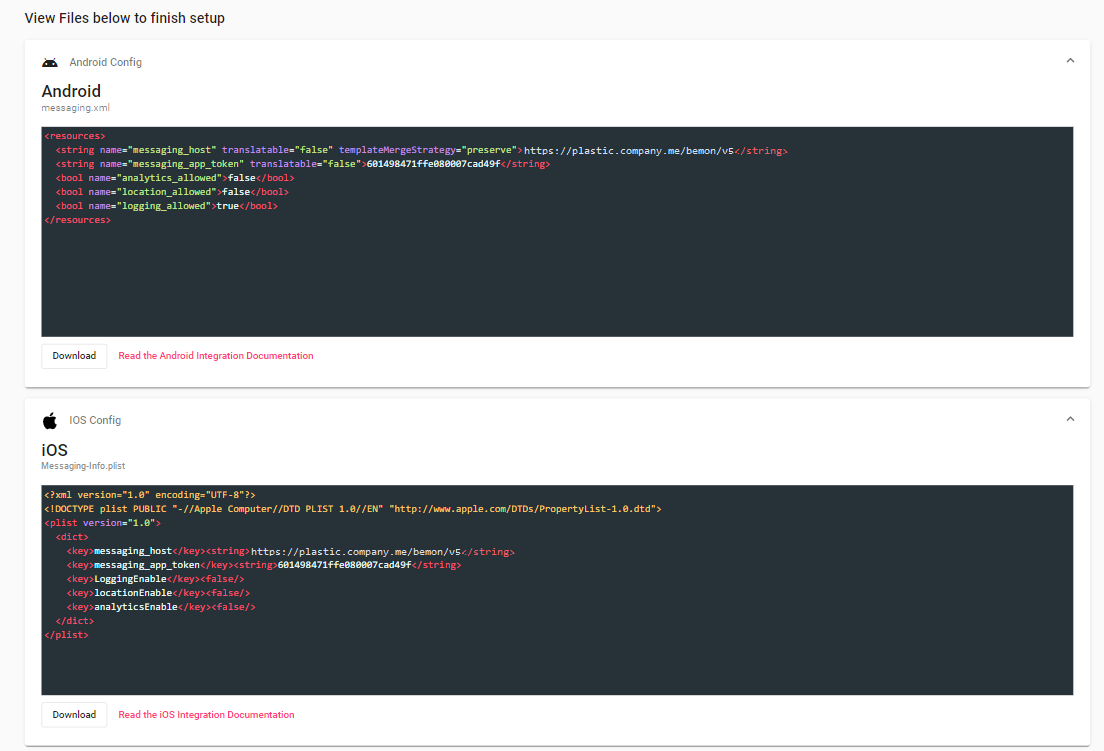
In the event that one of the OS has not been configured it will be displayed as shown below.

Updated about 1 month ago
