Delivery & Recipients
Configure both the delivery method and the target audience for your broadcast or automation here. The setup covers two key aspects:
- Delivery: Defines the method or channel your broadcast or automation will use to reach users.
- Recipients: Defines the audience or contacts who will receive the broadcast or automation.
Configuring both is required for a successful broadcast or automation launch.
Delivery
The Delivery section defines how your broadcast or automation will be sent to participants. Depending on the broadcast or automation type, multiple channels are available, including SMS, Email, WhatsApp, and RCS. The following table shows what types of delivery or engagement schemes are available for each automation:

SMS
The SMS broadcast is available for: Polls & Surveys, Keyword, and Chatbot automations.
To send the automation through the SMS broadcast:
- Select the SMS button.
- Select the Sender Number from the dropdown box.
- Define Recipients by selecting the Recipients dropdown box.
The Define Recipients section covers recipient selection.

RCS
The RCS broadcast is available for Polls & Surveys, Keyword, and Chatbot automations.
To send the automation through the RCS broadcast:
-
Select the RCS button.
-
Select the Agent from the dropdown box.
-
Define the Recipients by selecting an option from the Recipients dropdown box.
The Define Recipients section covers recipient selection.
ON KEYWORDKeyword and Chatbot automations, by definition, do not specify recipients.

WhatsApp
The WhatsApp broadcast is available for Polls & Surveys, Keyword, and Chatbot automations.
To send the automation through the WhatsApp broadcast:
-
Select the WHATSAPP radio button.
-
In the Sender WhatsApp Business Account dropdown, choose from the list of available WhatsApp senders configured in your Workspace. Each sender is listed by its alias and associated phone number.
-
Once a sender is selected, a summary panel titled WhatsApp Sender Information will automatically appear below the dropdown. This panel displays real-time information about the selected sender, including:
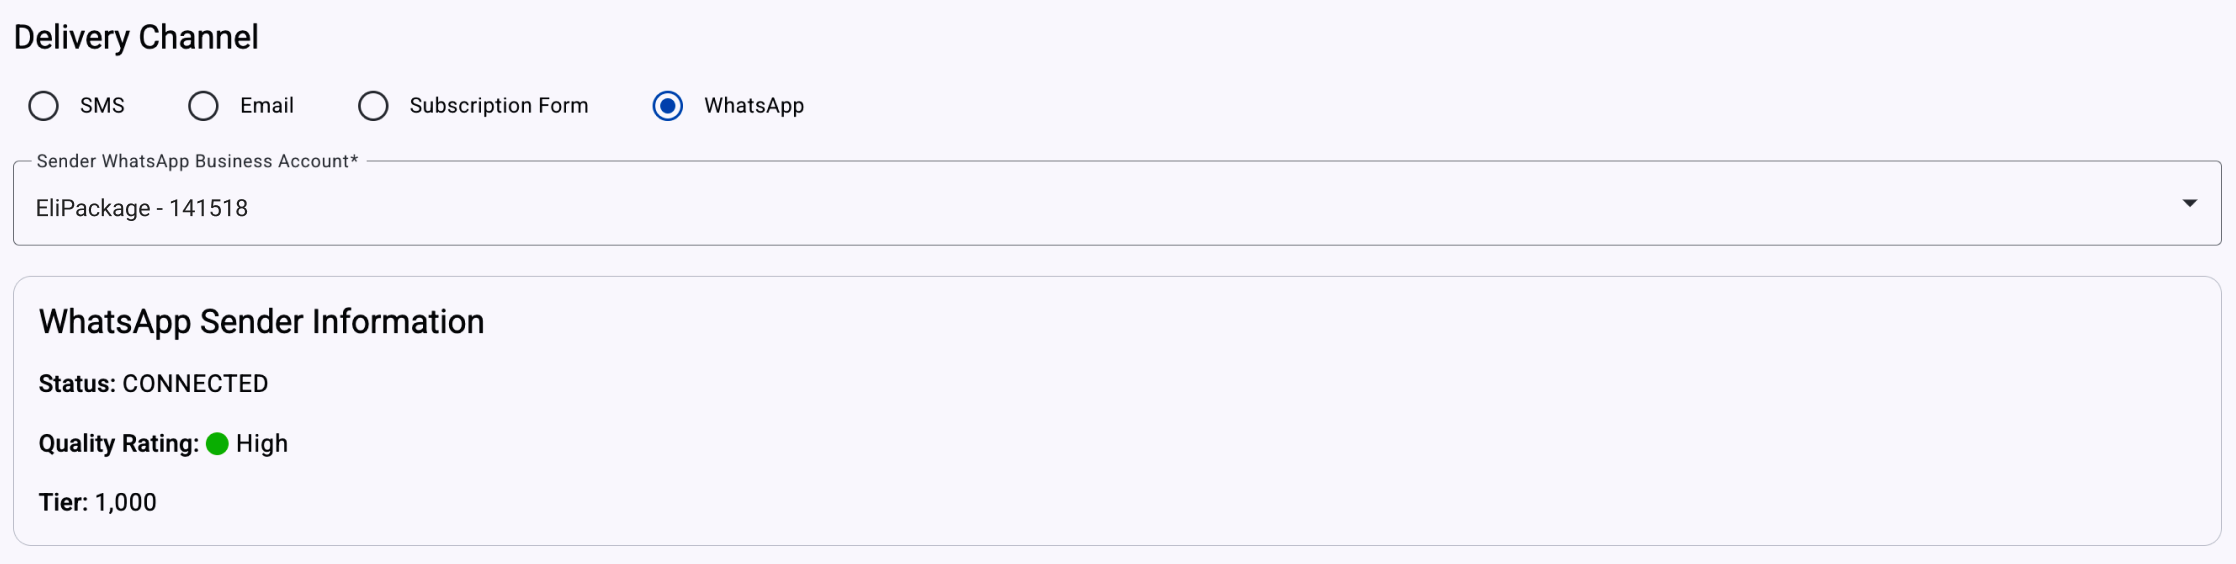
- Status: Indicates the current connectivity state of the sender with the platform. A status of CONNECTED means the sender is actively linked and can send and receive messages.
- Quality Rating: Reflects the performance level of the sender, based on user engagement and message quality as determined by Meta. A High rating suggests good message delivery performance and user experience.
- Tier: Displays the messaging tier level assigned to the sender, which determines the maximum number of business-initiated conversations allowed per day. For example, a Tier value of 1,000 allows up to 1,000 customer-initiated conversations daily using approved templates.
The panel confirms that the selected sender is active and compliant with Meta's quality and messaging volume requirements.
NOTEThe ability to proceed with a WhatsApp broadcast is contingent upon the operational status of the selected sender. If the sender is assigned any of the following statuses —
RESTRICTED,PENDING,DISCONNECTED,UNKNOWN,DELETED, orBANNED— it will be considered ineligible for broadcast or automation execution.Senders in these states are not authorized to dispatch WhatsApp messages or message templates, as they fail to meet the connectivity or compliance requirements established by Meta.
Consequently, the platform will prevent progression to subsequent configuration steps, such as selecting recipients or composing the message, until a sender with a valid status is selected.
For a detailed explanation of Tier levels, Quality Rating values, and Status definitions, please refer to the corresponding documentation section: WhatsApp Sender Quality Rating & Status.
Recipients
You define the Recipients by uploading a CSV file, writing contacts manually, or triggering participation through a keyword. Five recipient options are available:
API Endpoint
The API Endpoint option generates an endpoint that the Workspace owner integrates into their existing system to trigger the automation. After the automation is created and in Live Status, the Delivery Endpoint tab is available. The delivery endpoint delivers the automation through the configured method.
The Delivery Endpoint is available for the following automations:
-
Polls & Surveys
-
Chatbot

The platform provides the following endpoint, located in the Endpoint URL text field:
https://elastic.messangi.me/thetrident/v1/campaigns/<Campaign_ID>/triggerThe developer is required to call this endpoint to send SMS text messages to final users. For example, if the user makes a recharge of $12 (USD), the system calls that endpoint with the receiver's phone number and transaction details. The API sends the SMS text message with a link to the final user.
The developer copies the endpoint and the Payload Sample.
{
	"receiver": "5555555",
	"campaignLabel": "demo"
}
Each automation generates a different Delivery endpoint. The automation ID (11129 in the sample below) appears in the endpoint.

You test the automation by selecting Try Out now! below the Payload.

When you select Try Out now!, the pop-up Try Out filling the blank fields form appears.

You test the automation by providing the final user's phone number in the receiver field. After you select Send Request, the message is sent immediately. The platform displays the response in the Try out response section.

Contacts in Platform
The Contacts in Platform option delivers the broadcast or automation to a specific set of recipients based on the Contact List.

This is the default option. The platform automatically detects the following from the Contact List:
-
Number of Contacts that have a valid Mobile Number.
-
Number of Contacts that have an empty Mobile Number Field.
In the example above, it has detected a total of 18 Contacts with Valid Mobile Numbers and 10 Contacts that have empty Mobile Number Fields.
When you select Contacts in Platform, you select any available filter or segment from either dropdown, or leave both unset.
Filter
Filters segment contacts based on rules placed on Contact List Fields.

-
None: No filter is applied. The broadcast delivers to all contacts on the platform by default.
-
Create a New Filter: Creates a filter to segment contacts based on rules on Contact List Fields. A dialog opens to start the filter creation process.

The Filters section covers filter creation.
Segment
Segments group contacts into lists for targeted delivery.

-
None: No segment is applied. The broadcast delivers to all contacts in the selected option by default.
-
Create a New Segment: Creates a contact segmentation list based on rules. A dialog opens to start the segment creation process.

The Segments section covers segment creation.
Upload CSV List
The Upload CSV List option delivers the broadcast or automation to a specific set of recipients from an uploaded CSV file.
Once the option is selected, it will display a dialog with Terms of Service:

You select Confirm to continue uploading recipients. If you select Cancel, users cannot be uploaded until you accept the Terms of Service.
After you select Confirm, you upload multiple users by providing an existing CSV file.

Essential Conditions for Uploading a CSV File with Recipients
File Format and Structure
CSV Format: The file must be a comma-separated values (CSV) file. This ensures compatibility with the upload system which typically parses CSV formats.
Column Headers: Include clear, descriptive column headers at the top of the file. The headers are
mobile,name.Avoid using duplicate column headers, regardless of their case, wheter lowercase or uppercase.
No fields should be left empty.
No extra or empty rows.
Avoid using duplicate column headers, regardless of their case, whether lowercase or uppercase.
Data Types and Content
Mobile Numbers:
- Data Type: Numeric. Ensure there are no letters or symbols unless required (e.g., + in international codes).
- Consistency: Use a consistent format, especially if including country codes. It helps in the validation process.
Email Addresses:
- Valid Format: Must conform to standard email formats (e.g., [email protected]). This typically means no Workspaces, a single '@' symbol, and a domain.
- Lowercase: To avoid case-sensitive issues, it might be advisable to ensure all emails are in lowercase.
Names:
Data Type: Textual. Names should be free from numbers or symbols unless culturally relevant.
Capitalization: Proper names should have appropriate capitalization for readability and professionalism.
Encoding & Size:
- UTF-8 Encoding: Use UTF-8 to accommodate international characters. This prevents issues with non-ASCII characters like accents or other diacritics.
SMS (Upload Mobile Numbers by CSV)
If you selected SMS as Delivery Channel when the CSV file has been uploaded, you need to define the Column from the uploaded File that contains the Recipient's Mobile Number.
In this example, the uploaded CSV file containing the Recipient information had mobile phone numbers under the Column labeled as 'PhoneNumber'.

Once the file's column that contains mobile phone numbers has been selected, it will automatically detect the following information for the recipients in the uploaded CSV file:
-
Number of users that have a valid Mobile Number (Green-Box).
-
Number of users that have an invalid Mobile Number (Red-Box).
-
Number of users that have an empty Mobile Number Field (Gray-Box).

In the example, in the uploaded CSV file, the platform detected 1 user with a valid Mobile Number, 2 users with an invalid Mobile Number, and no users with an empty Mobile Number field.
You click the red box to correct any invalid Mobile Numbers. A dialog appears for modifying them.

After you correct the mobile numbers, a check mark appears next to the number field.

If more than 5 recipients have invalid mobile phone formats, you click Items per page in the lower-right corner of the list.
You click Save to save the formatting changes and return to the Recipients step. Immediately, a confirmation message will display at the bottom of the screen once the SMS Recipients have been updated. The confirmation message will disappear after a few seconds.

Email (Upload Email addresses by CSV)
If you selected Email as the broadcast, when the CSV file has been uploaded, you need to define the Column from the uploaded File that contains the Recipient's Email.
Once the file's column that contains emails has been selected, it will automatically detect the following information for the recipients in the uploaded CSV file:
-
Number of users that have a valid Email (Green-Box).
-
Number of users that have an invalid Email (Red-Box).
-
Number of users that have an empty Email Field (Gray-Box).

In the example, in the uploaded CSV file, the platform detected 1 user with a valid Email, 1 user with an invalid Email, and 1 user with an empty Email field.
You click the red box to correct any invalid emails. A dialog appears for modifying them.

After you correct the emails, a check mark appears next to the field.

If more than 5 recipients have invalid email formats, you click Items per page in the lower-right corner of the list.
You click Save to save the formatting changes and return to the Recipients step. Immediately, a confirmation message will display at the bottom of the screen once the Email Recipients have been updated. The confirmation message will disappear after a few seconds.

Write down Contacts
The Write-down Contacts option delivers the broadcast or automation through contacts you copy, type, or paste into the text box.
Once the option is selected, it will display a dialog with Terms of Service:

You select Confirm to continue adding contacts manually. If you select Cancel, contacts cannot be added until you accept the Terms of Service.
A text box appears for copying and pasting the CSV content of the contacts you want to add.

ON ENTERING CONTACTS MANUALLYYou can enter up to a maximum of 5,000 lines, and no minimum. Make sure that you are following the CSV file format.
After you enter the contacts, you select Load Contacts to load each contact's information.
If you selected SMS as broadcast, when the contacts have been uploaded, you need to define the Column from the uploaded File that contains the Recipient's Mobile Number.

Once you have entered the contacts's information, it will automatically detect the following information:
-
Number of users that have a valid Mobile Number (Green-Box).
-
Number of users that have an invalid Mobile Number (Red-Box).
-
Number of users that have an empty Mobile Number Field (Gray-Box).
If you selected Email as broadcast, when the contacts have been uploaded, you need to define the Column from the uploaded File that contains the Recipient's Email.

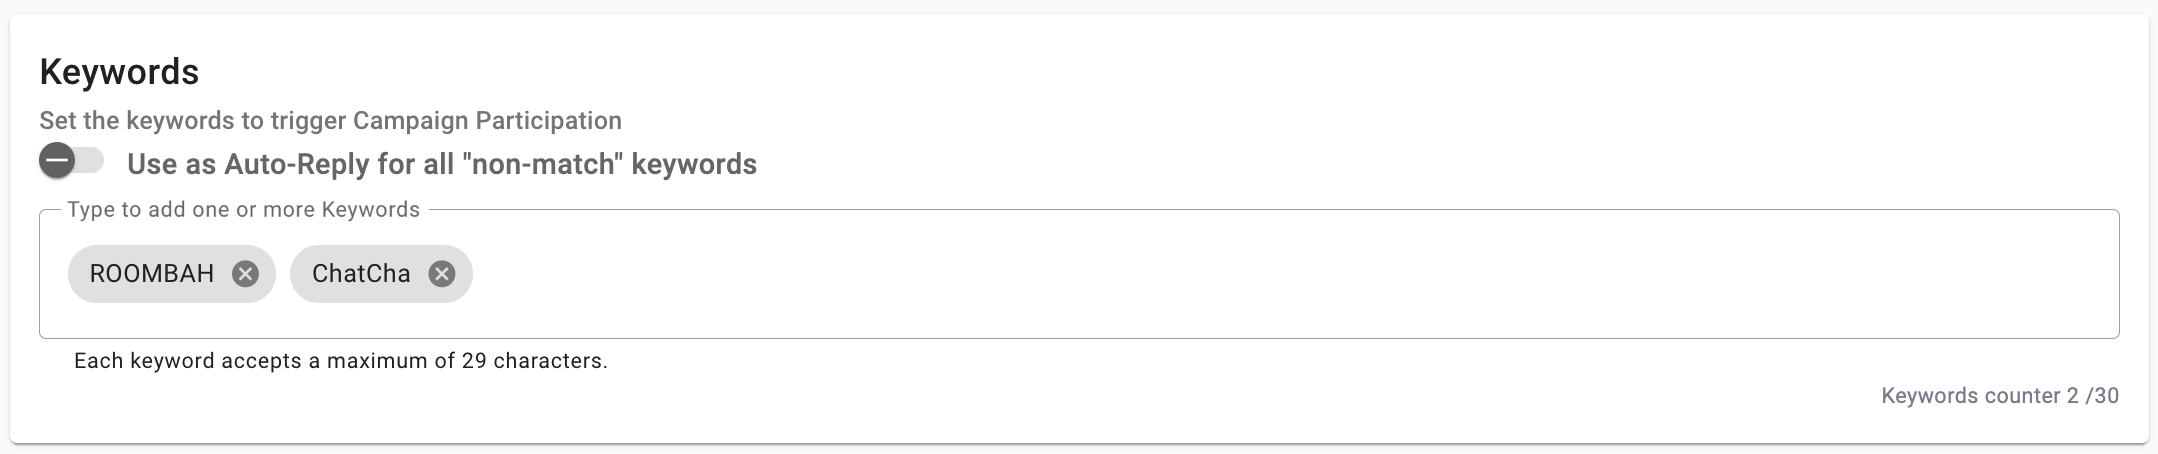
Keyword
You define keywords to trigger participation using the Keyword option.
KEYWORD PARTICIPATION AVAILABILITYThis option is available when SMS or WhatsApp are the engagement broadcasts.
For SMS, RCS, and WhatsApp, the Keyword option is available. The platform provides a Keyword entry section, as shown in the following image.
For example, you want users to participate in your Chatbot to get discounts on their next flights.
NOTE ON to Save up to 30% on your Next Flight!
KEYWORDS CONFLICTA keyword and its corresponding platform engagement entity are unique. For example, the
12345shortcode is being used with the keyword "TRIAL". Creating a different broadcast or automation with the shortcode12345and the "TRIAL" keyword will create a conflict with the existing keyword.You can have up to 30 keywords, and each keyword accepts up to 29 characters. To keep track of the number of keywords in use, at the bottom right corner of the Keywords section is a keyword counter.
For more information about keywords, go to the Keyword Automation section.
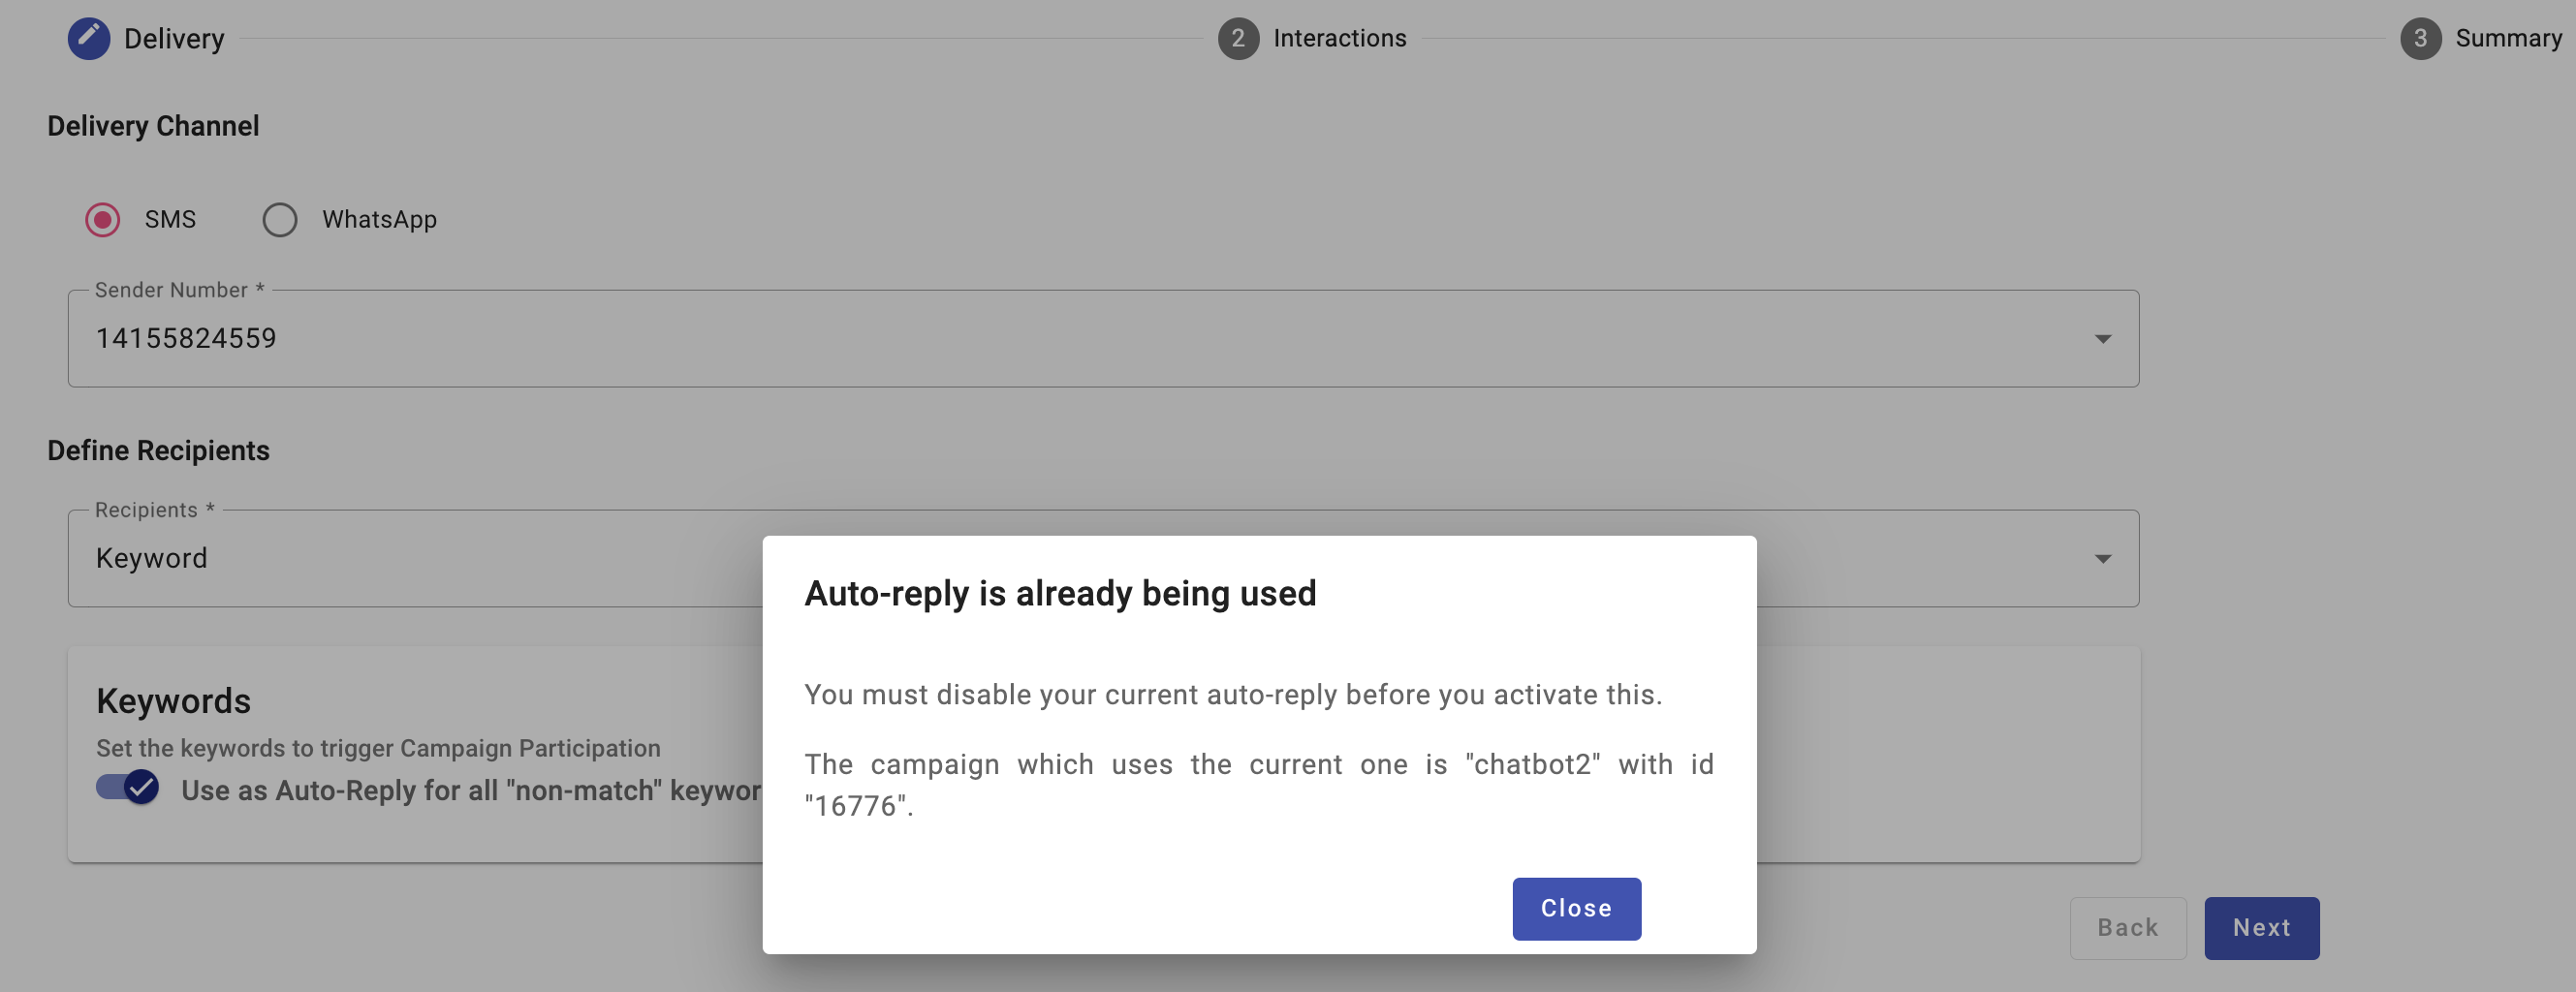
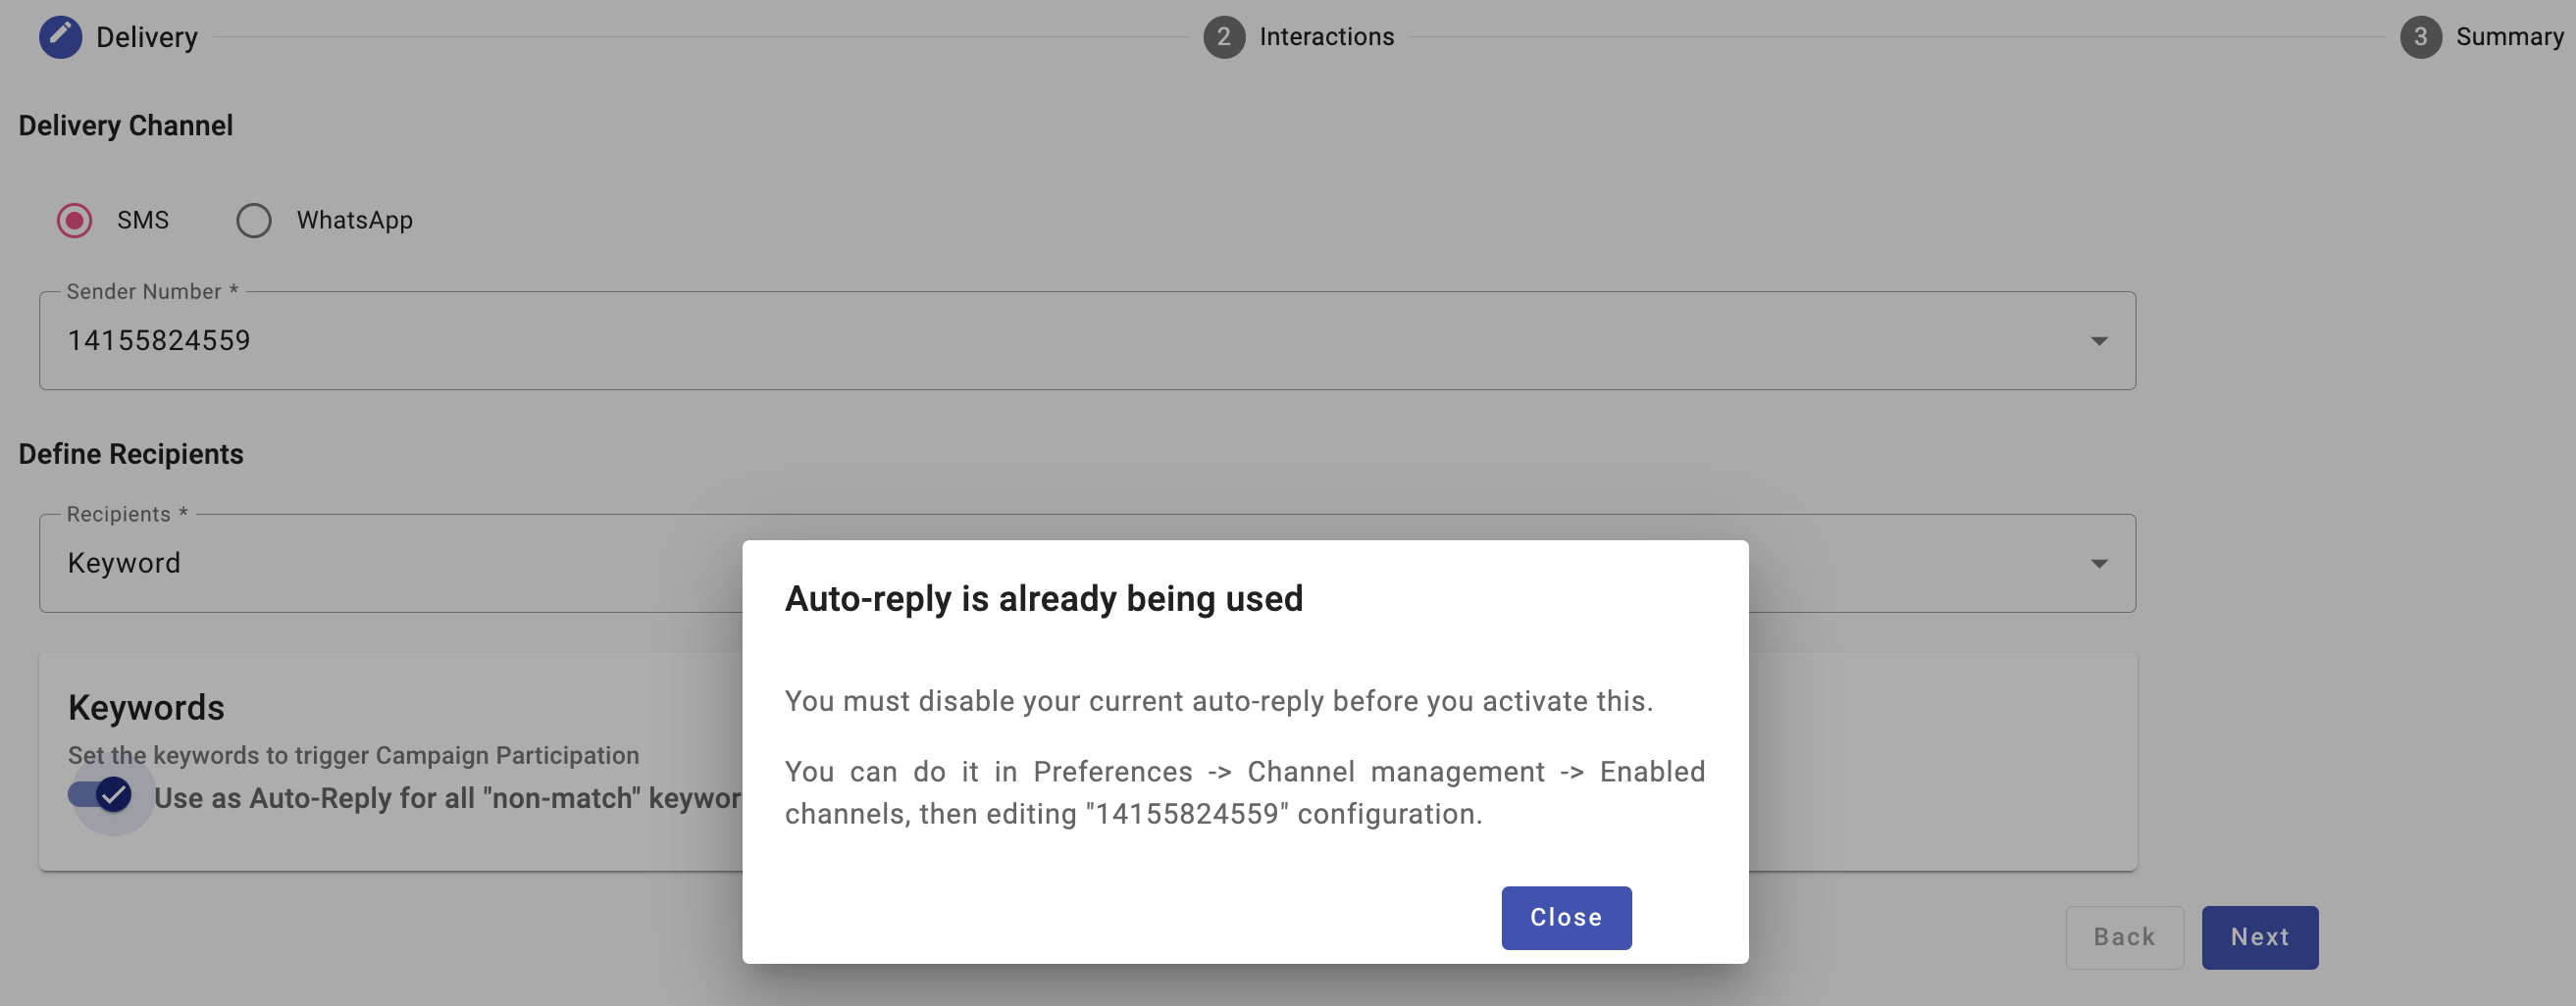
If you do not want to enter a keyword, you use the Auto-Reply feature for all non-match keywords. For example, if the user enters any keyword, the chatbot sends the Welcome Message configured in the Interactions section. This feature acts as a pre-start of the automation when the user enters any keyword.
For Polls & Surveys automations, the automation sends the Message section content and a short URL when the user enters any keyword.
You slide the toggle to the right to use this feature. First, consider the following:
-
If another automation has activated the 'Auto-Reply' function with the same sender number, you won't be able to use this feature. To use it, you need to disable the 'Auto-Reply' from the automation that is already being used.
You slide the toggle to the right to find which automation uses Auto-Reply. A pop-up message displays the automation name and ID.
-
If a sender number is already activated by the 'Auto-Reply Message' function, you won't be able to use the 'Auto-Reply' function. To use it, you need to disable the 'Auto-Reply Message' by editing the sender number from the Sender Number Configuration (Channel Management tab) located in the Preferences section.
You slide the toggle to the right to find which sender number uses Auto-Reply Message. A pop-up message displays the sender number.
Updated 18 days ago