OpenAI
OpenAI Integration
OpenAI is an AI research and deployment company. You use this integration to build interactive virtual assistants that carry out conversations naturally.
An OpenAI account is required before the integration becomes operational. You integrate it into the platform using the following steps:
- Select the OpenAI card from the pane.
- Select Next.
The platform takes you to a window showing the OpenAI integration details. Two configuration steps follow: OpenAI Information for the account, and Connections for the platform communication channels.
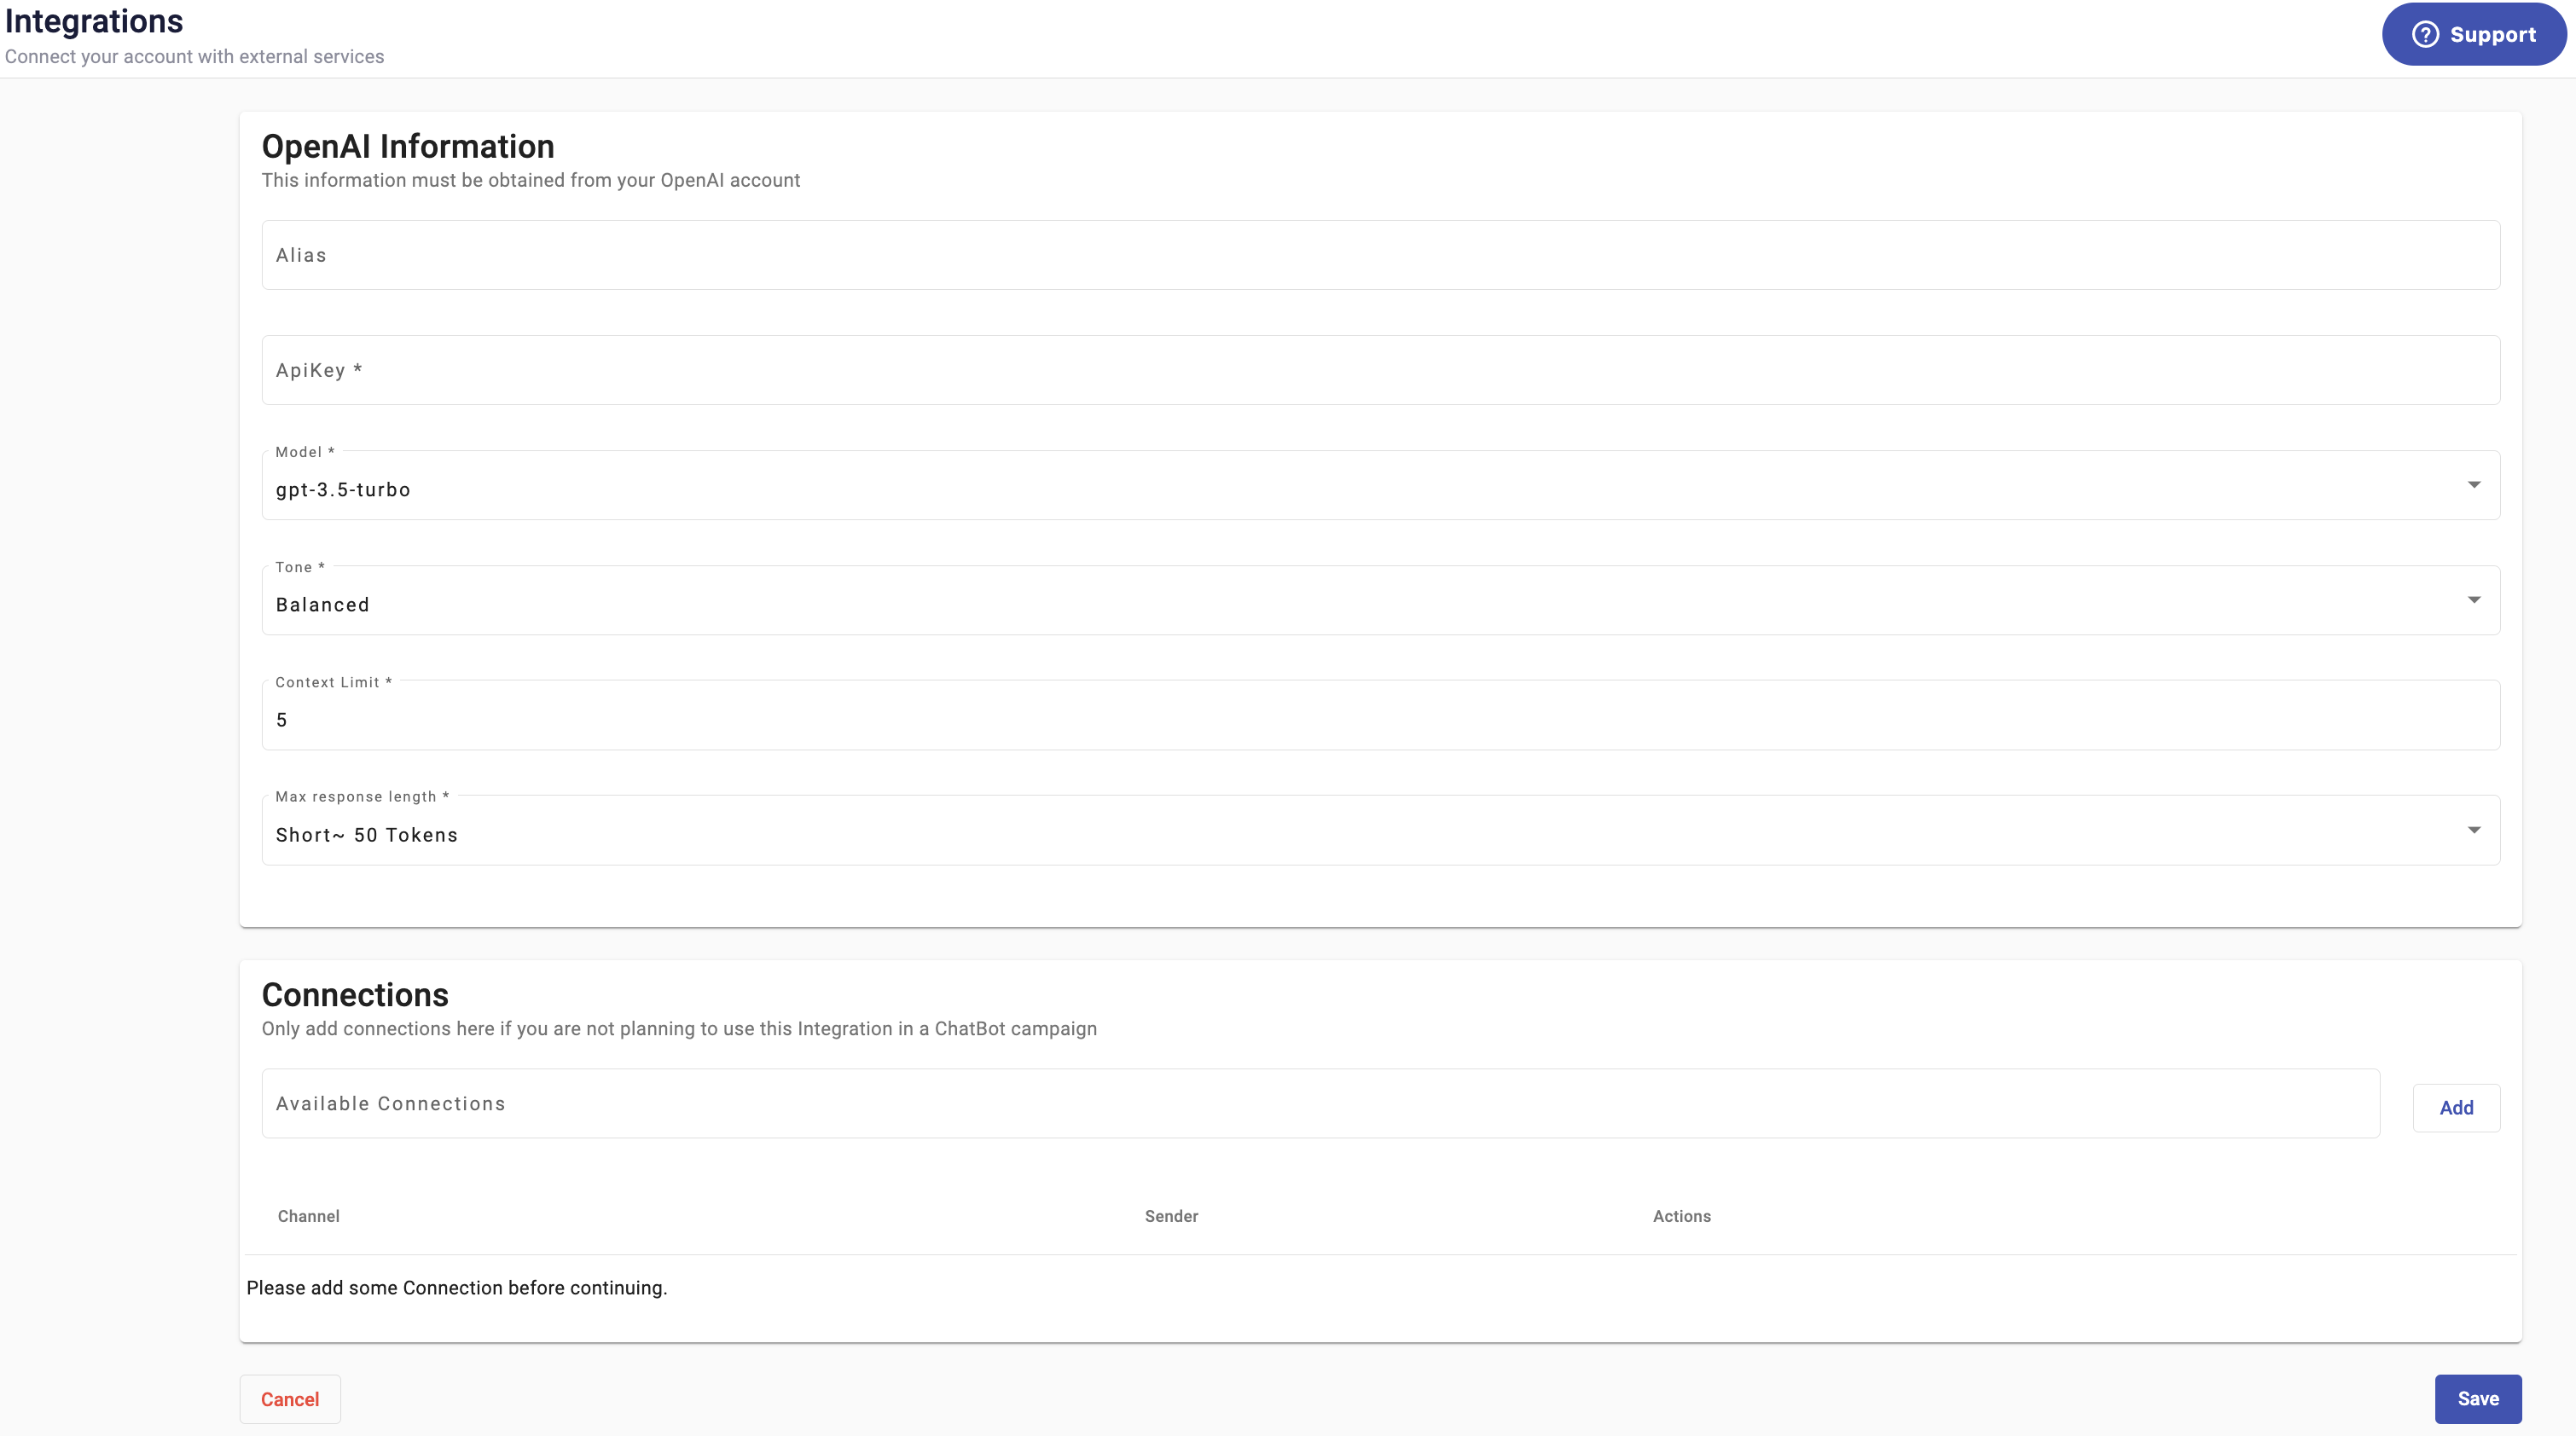
OpenAI Information
In the OpenAI Information section, you enter the following information from your OpenAI account:
-
Alias: Type a custom name to identify the OpenAI.
-
ApiKey: Type your API Key. If you do not have one, select + Create new secret key from the API Keys OpenAI.
The OpenAI API uses API keys for authentication.
NOTERemember that your API key is a secret! Do not share it with others or expose it.
-
Model: Select the desired GPT model.
OpenAI is powered by a diverse set of models with different capabilities and price points.
GPT-4 is a large multimodal model accepting text inputs and emitting text outputs. It solves difficult problems with greater accuracy than previous models.
GPT-3.5 models can understand and generate natural language or code. The most capable and cost-effective model in the GPT-3.5 family is gpt-3.5-turbo. It is optimized for chat but works well for traditional completion tasks.
| Models | Description |
|---|---|
| GPT-4 | More capable than any GPT-3.5 model, able to do more complex tasks, and optimized for chat. Will be updated with our latest model iteration. |
| gpt-4-0314 | Snapshot of GPT-4 from March 14th, 2023. Unlike GPT-4, this model will not receive updates and will be deprecated 3 months after a new version is released. |
| gpt-4-32k | Same capabilities as the base GPT-4 mode but with 4x the context length. Will be updated with our latest model iteration. |
| gpt-4-32k-0314 | Snapshot of gpt-4-32 from March 14th, 2023. Unlike gpt-4-32k, this model will not receive updates and will be deprecated 3 months after a new version is released. |
| gpt-3.5-turbo | Most capable GPT-3.5 model and optimized for chat at 1/10th the cost of text-davinci-003. Will be updated with our latest model iteration. |
| gpt-3.5-turbo-0301 | Snapshot of gpt-3.5-turbo from March 1st, 2023. Unlike gpt-3.5-turbo, this model will not receive updates and will be deprecated 3 months after a new version is released. |
- Tone: Select the desired Tone type for the chat behavior.
- Balanced: best for the most common tasks, like search, maximum speed
- Creative: for generating new content; longer output, more expressive, slower
- Precise: most factual, minimizing conjectures
-
Context Limit: Total number of messages the model retains for context. If a user writes more than 5 messages, the model considers only the last 5.
By default is 5 messages.
-
Max response length: Total number of tokens permitted by your model. This is the total number of tokens OpenAI returns.
Tokens are pieces of words. Before the API processes the prompts, the input is broken down into tokens — not cut exactly where words start or end, so they can include trailing spaces and even sub-words.
- Short -> 50 Tokens
- Medium -> 100 Tokens
- Long -> Unlimited Tokens
- Select the Save button to save the information of your OpenAI integration.
Connections
You select the platform channels for interactions in the Connections step. A pull-down menu shows the available platform channels for the OpenAI integration. The screenshot below shows an example.
NOTEIf you want to engage (integrate) OpenAI with a Chatbot Service automation, do not add any connections to the OpenAI.
The channels to be used in the OpenAI integration cannot be shared with the platform Keyword or Chatbot type automations as it would create an operational conflict.
Two types of channel connections are available:
-
SMS texting
-
WhatsApp
Additional channel connections may be added in future releases.

NOTEConnections may reference senders that are also used in other platform features, such as auto-replies or keyword automations.
Connection conflicts are evaluated during activation, not during configuration. This means that connections can be added successfully even if they later fail to activate.
To configure the connecting channels,
- Select the desired connection from the Available Connections dropdown menu. The left side of the connection shows the channel type. The right side shows the connection code.

- Select the Add + button to add the connection.
You repeat this step for every channel that is part of the integration. The platform includes the selected channels in the table immediately below the menu.

After you define both OpenAI Information and Connections, you select Save.
If you are integrating OpenAI with a Chatbot Service automation, you enter the required fields without adding any connection and select Save.
The following steps cover enabling the OpenAI integration with and without connections:
OpenAI Integration with Connections
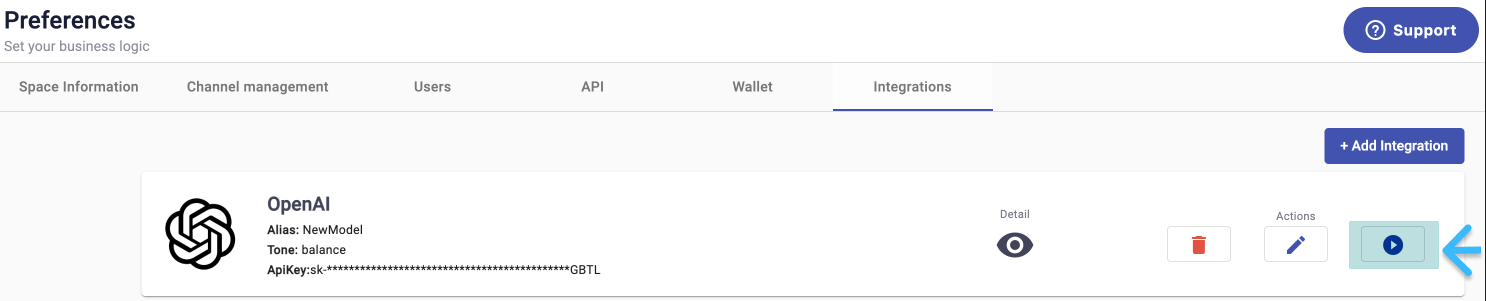
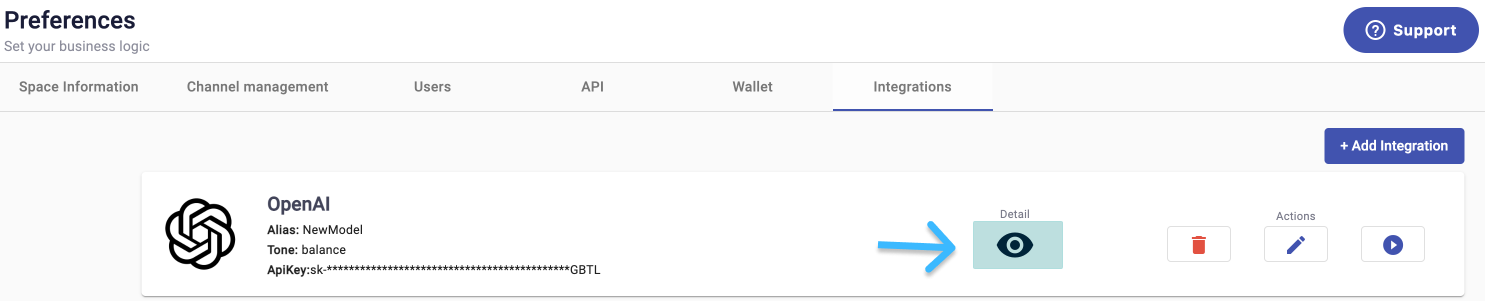
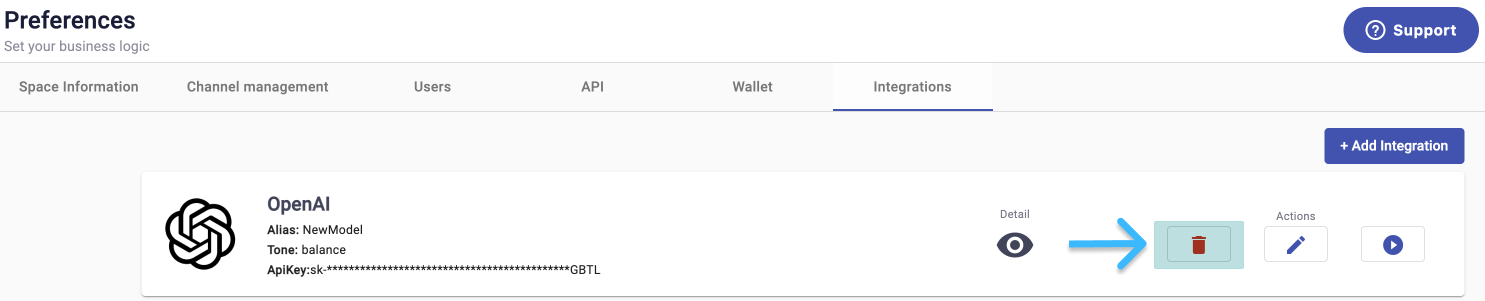
The saved integration appears under the Integrations tab as a card. The card shows the Alias, Tone, API Key, connection types (Details), and delete, edit, or activate options.
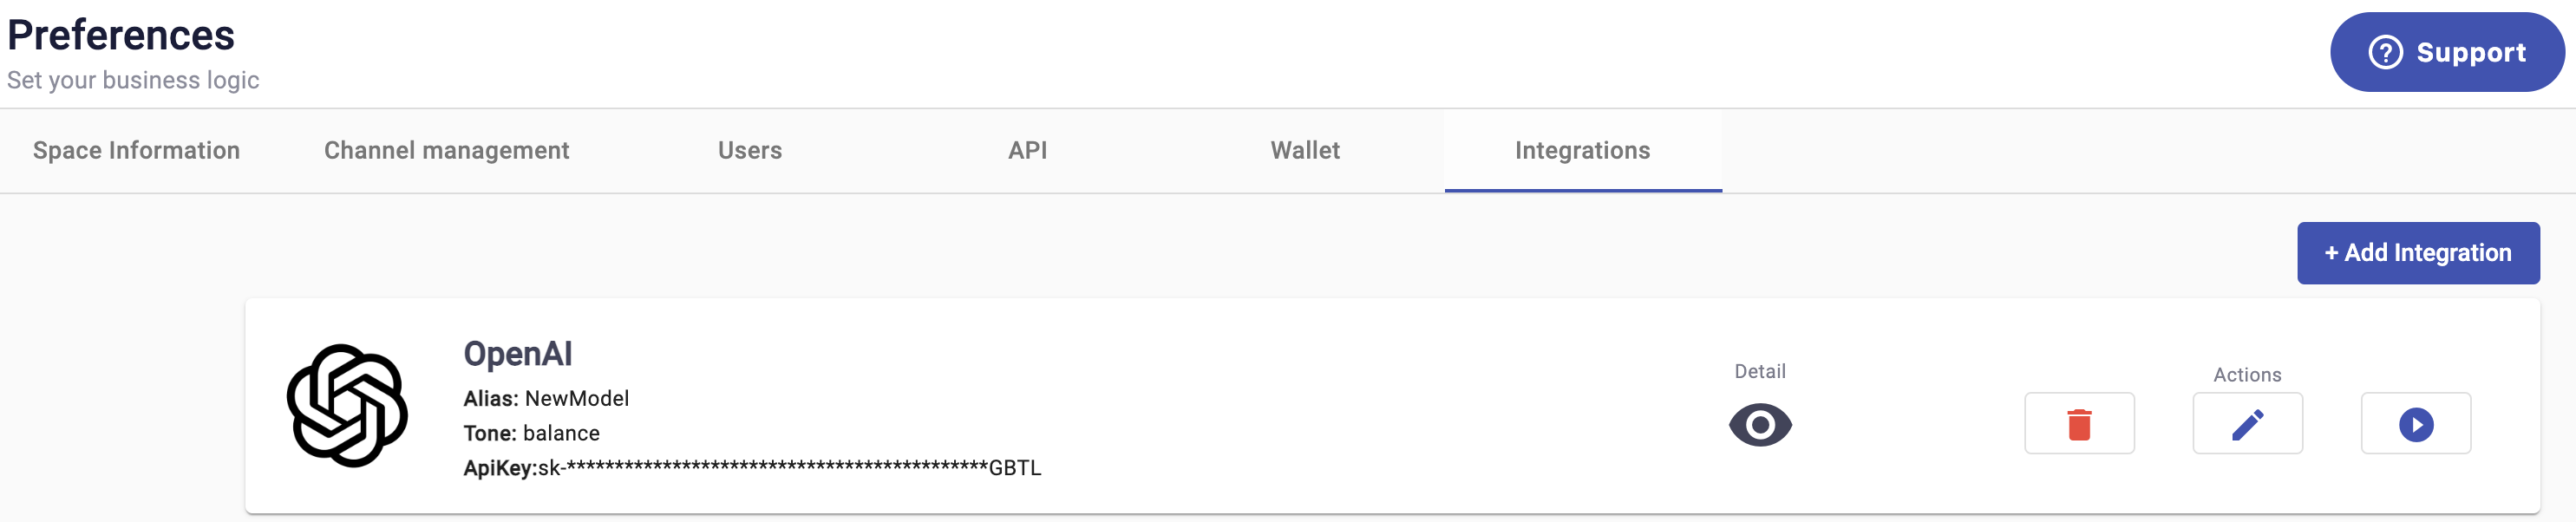
You activate the integration by selecting Start ▶. The integration card updates to show its active state with connection icons in blue.

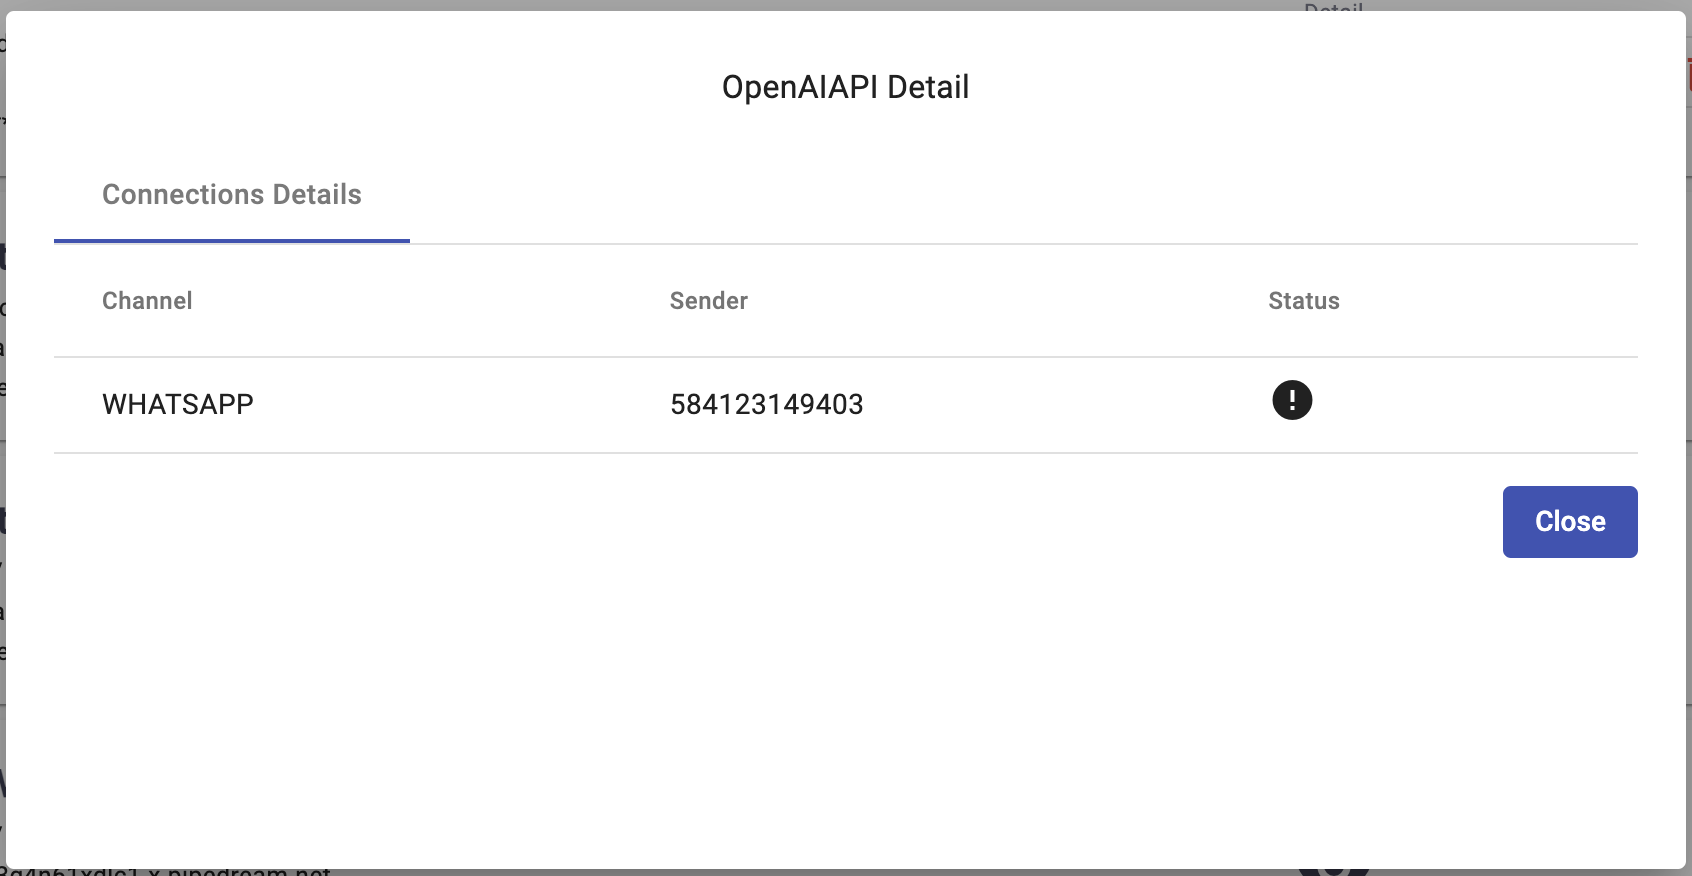
The Details icon in the card shows the channel and sender associated with that connection. Once the integration is active, the Stop under Actions will return it to the inactive state.
WARNINGWhen activating a OpenAI integration with connections, the platform attempts to activate:
- The integration itself
- Each configured connection independently
The platform no longer blocks activation before attempting it. Instead, activation outcomes depend on the result of each connection.
The following scenarios may occur.
No connections activated: If none of the configured connections can be activated:
- The integration remains inactive
- An error message is displayed
- No connections are enabled
Partial connection activation: If at least one connection is successfully activated and others fail:
- The integration becomes active
- A message is displayed indicating that not all connections were activated
- Connections that encountered errors remain inactive
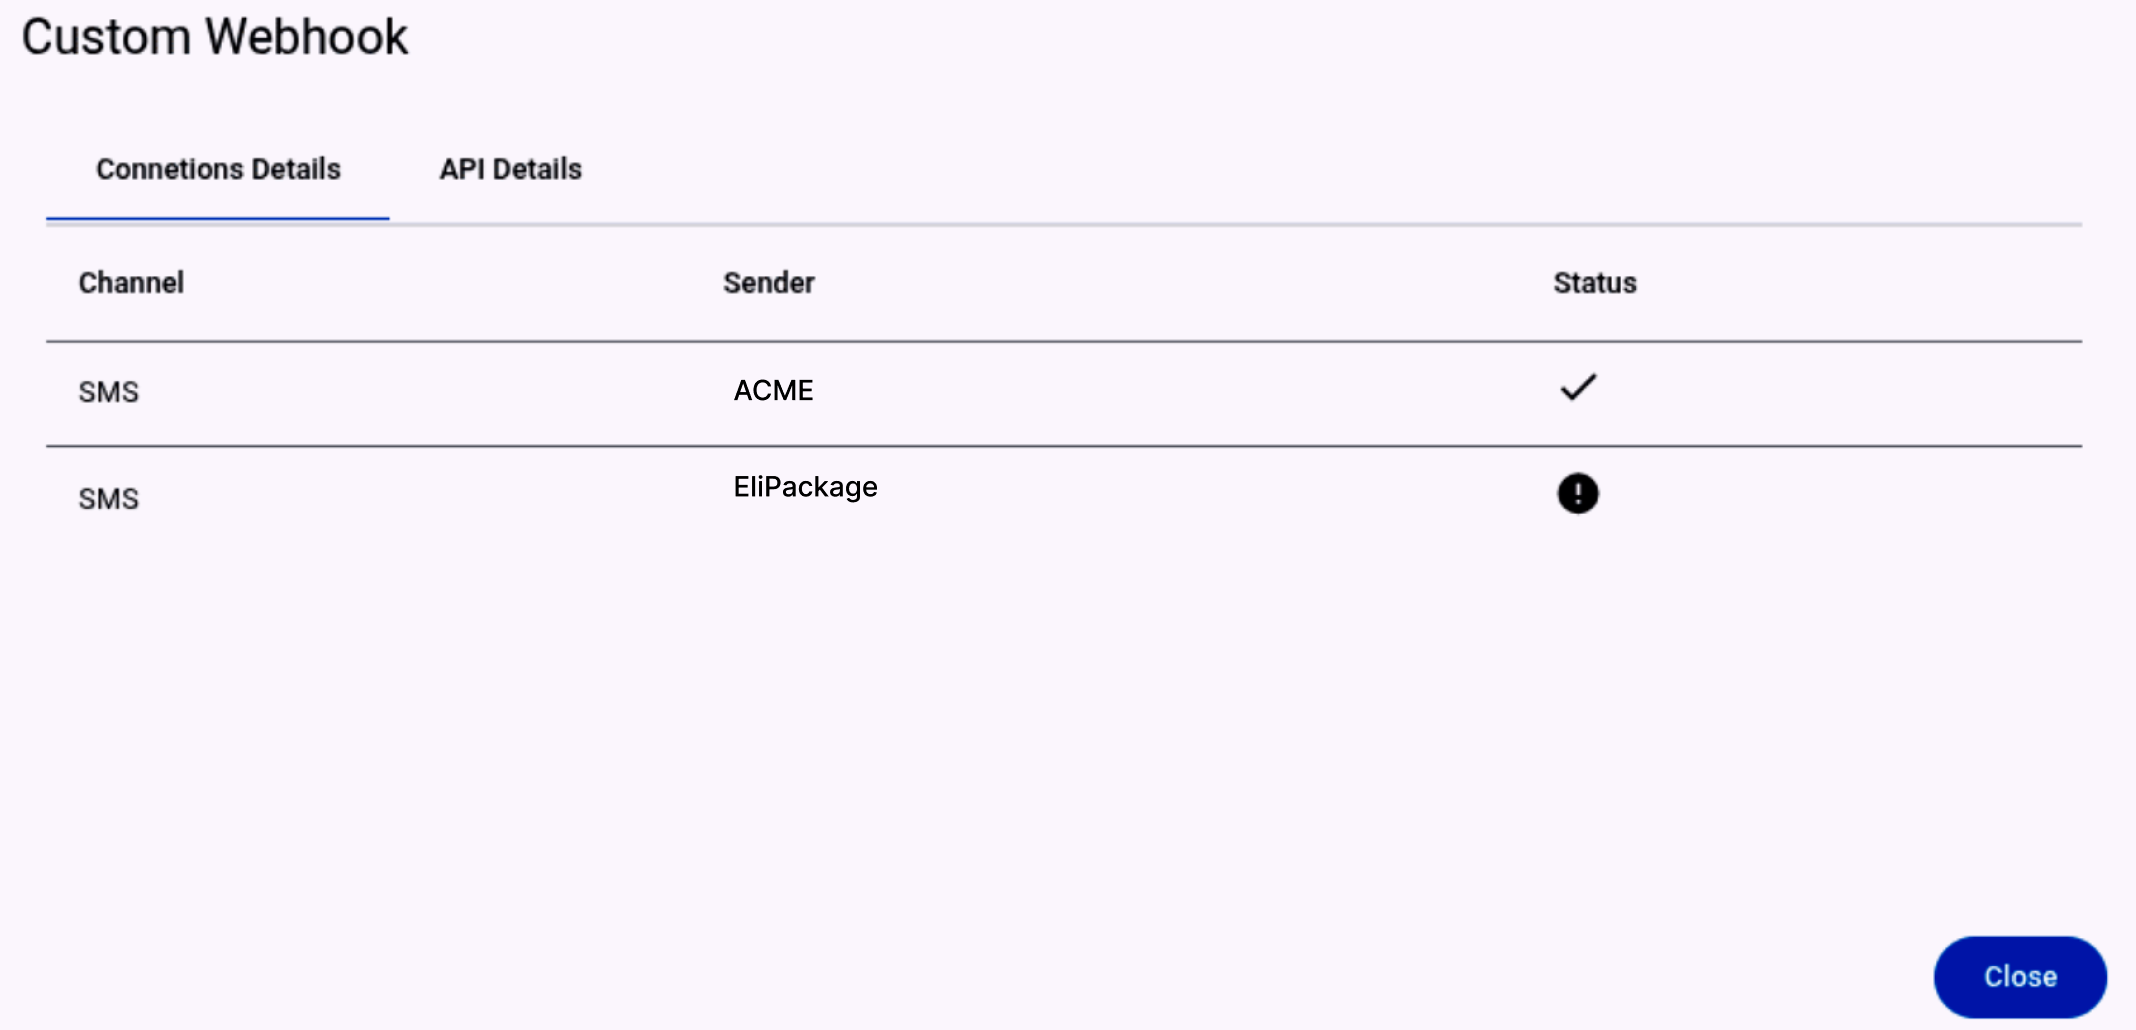
Therefore, when an integration is activated with partial connection errors, a snackbar notification is displayed. This message includes a link that opens the Connections Details dialog.
The Connections Details dialog shows:
- Each configured connection.
- Its activation status, which means what connections are active or inactive.
This dialog is the same one accessible through the Details icon on the integration card.
A common reason for connection failure is when a sender already has an active auto-reply or is being used elsewhere in the platform.
OpenAI Integration with Chatbot Service
After you add the OpenAI integration without connections, you enable the integration between OpenAI and the Chatbot Service automation.
The saved integration appears under the Integrations tab as a card. The card shows the Alias, Tone, API Key, connection types (Details), and delete, edit, or activate options.
You activate the integration by selecting Start ▶. The integration card updates to show its active state.
After the OpenAI integration is enabled, you integrate the Chatbot automation with OpenAI. The Chatbot Service section covers configuring a chatbot automation that uses the OpenAI integration.
NOTEThe OpenAI integration must be Active to be associated with a Chatbot Service automation.
After you create the Chatbot service and enable it in Live status, the integration card updates to show the Detail icon.
After you select the Campaigns icon, you see which automation the OpenAI integration is linked to. A dialog appears with the following information:
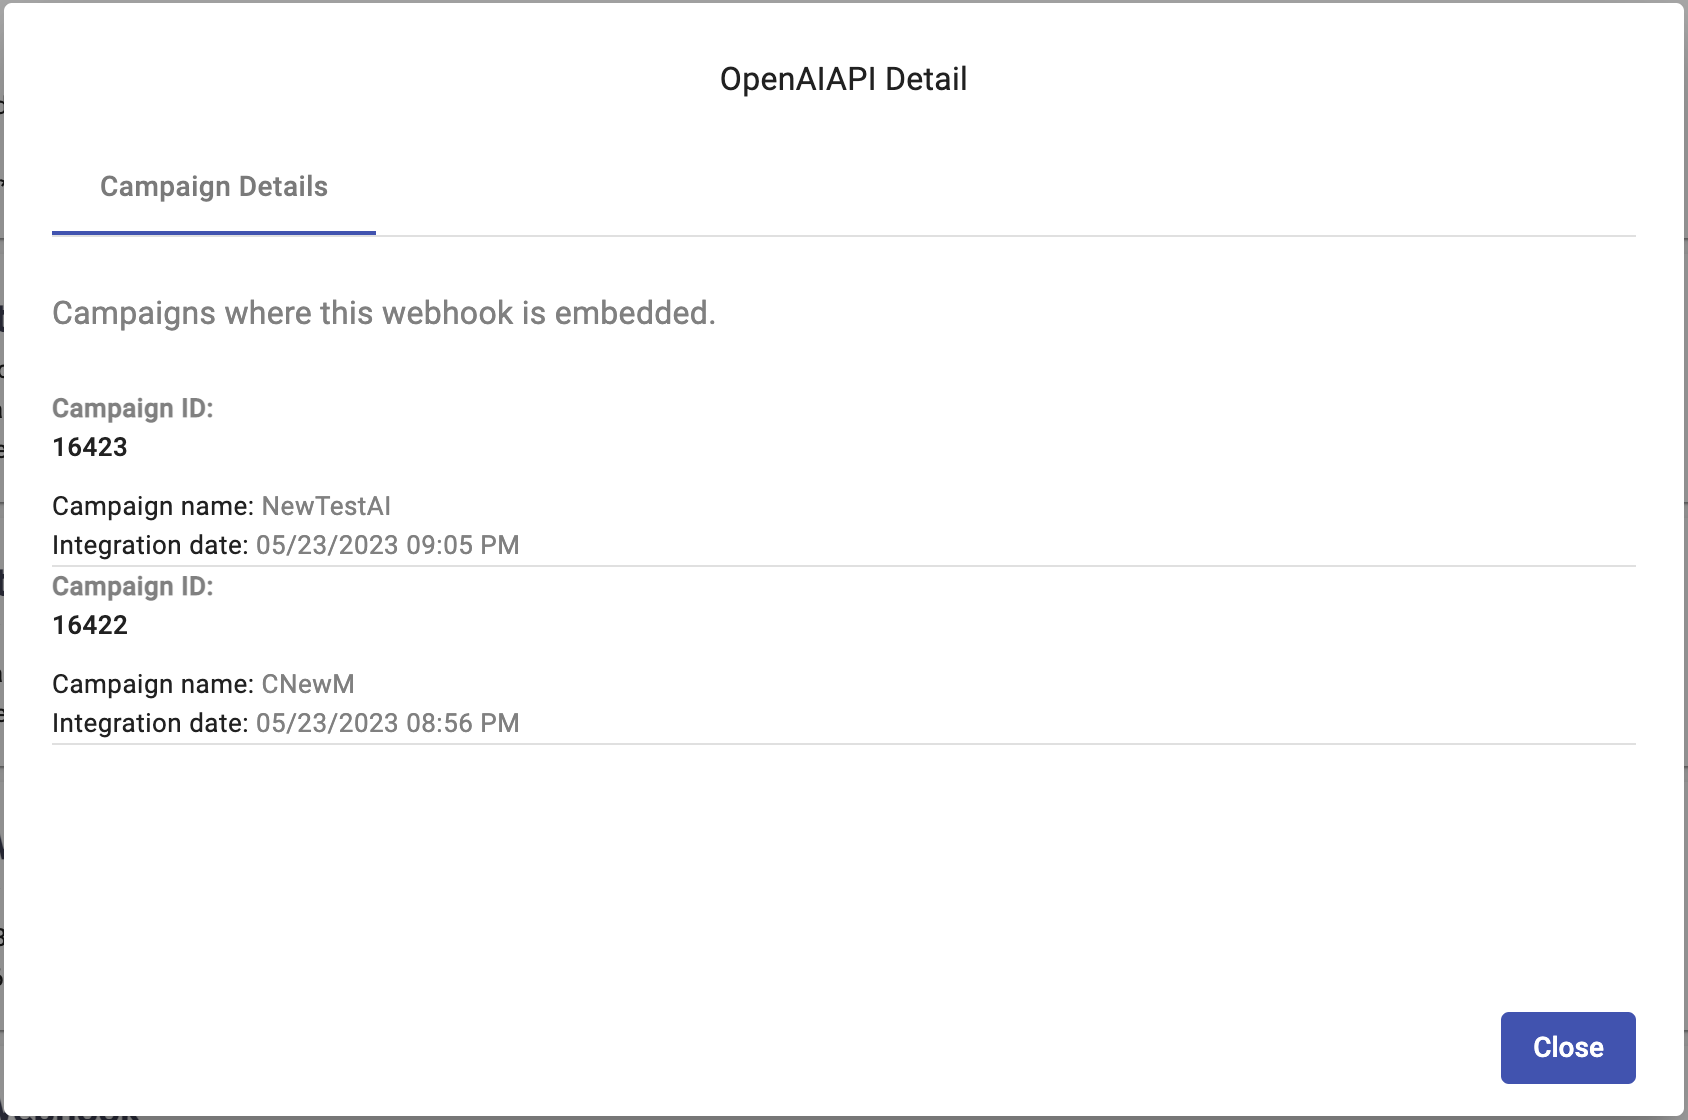
At the top of the dialog, the integration type is displayed.
- Campaign Id: Unique identifier of the automation.
- Campaign Name: Name of the automation.
- Integration Date: Date when creating the automation linked to the integration and enabling it in Live status.
Considerations
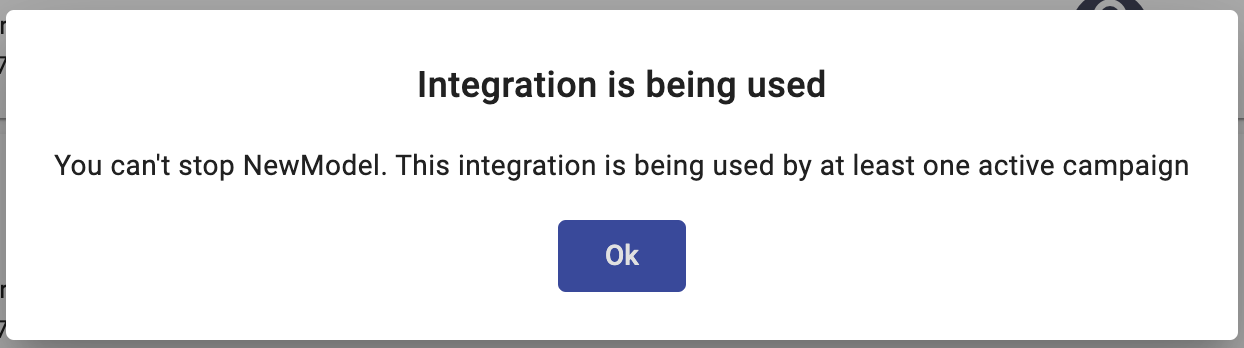
If the OpenAI integration is linked to any automations, you will not be able to pause (stop) the integration. If you try to pause it, a dialog appears indicating the action is not permitted.
You remove the OpenAI integration associated with automations using the following steps:
- To remove the OpenAI integration, you first disable the automations linked to the integration. To do it, go to the Live automations associated with the OpenAI integration. Then, select the Report button and click the Pause button. A dialog appears to confirm the action. Select the Confirm button.
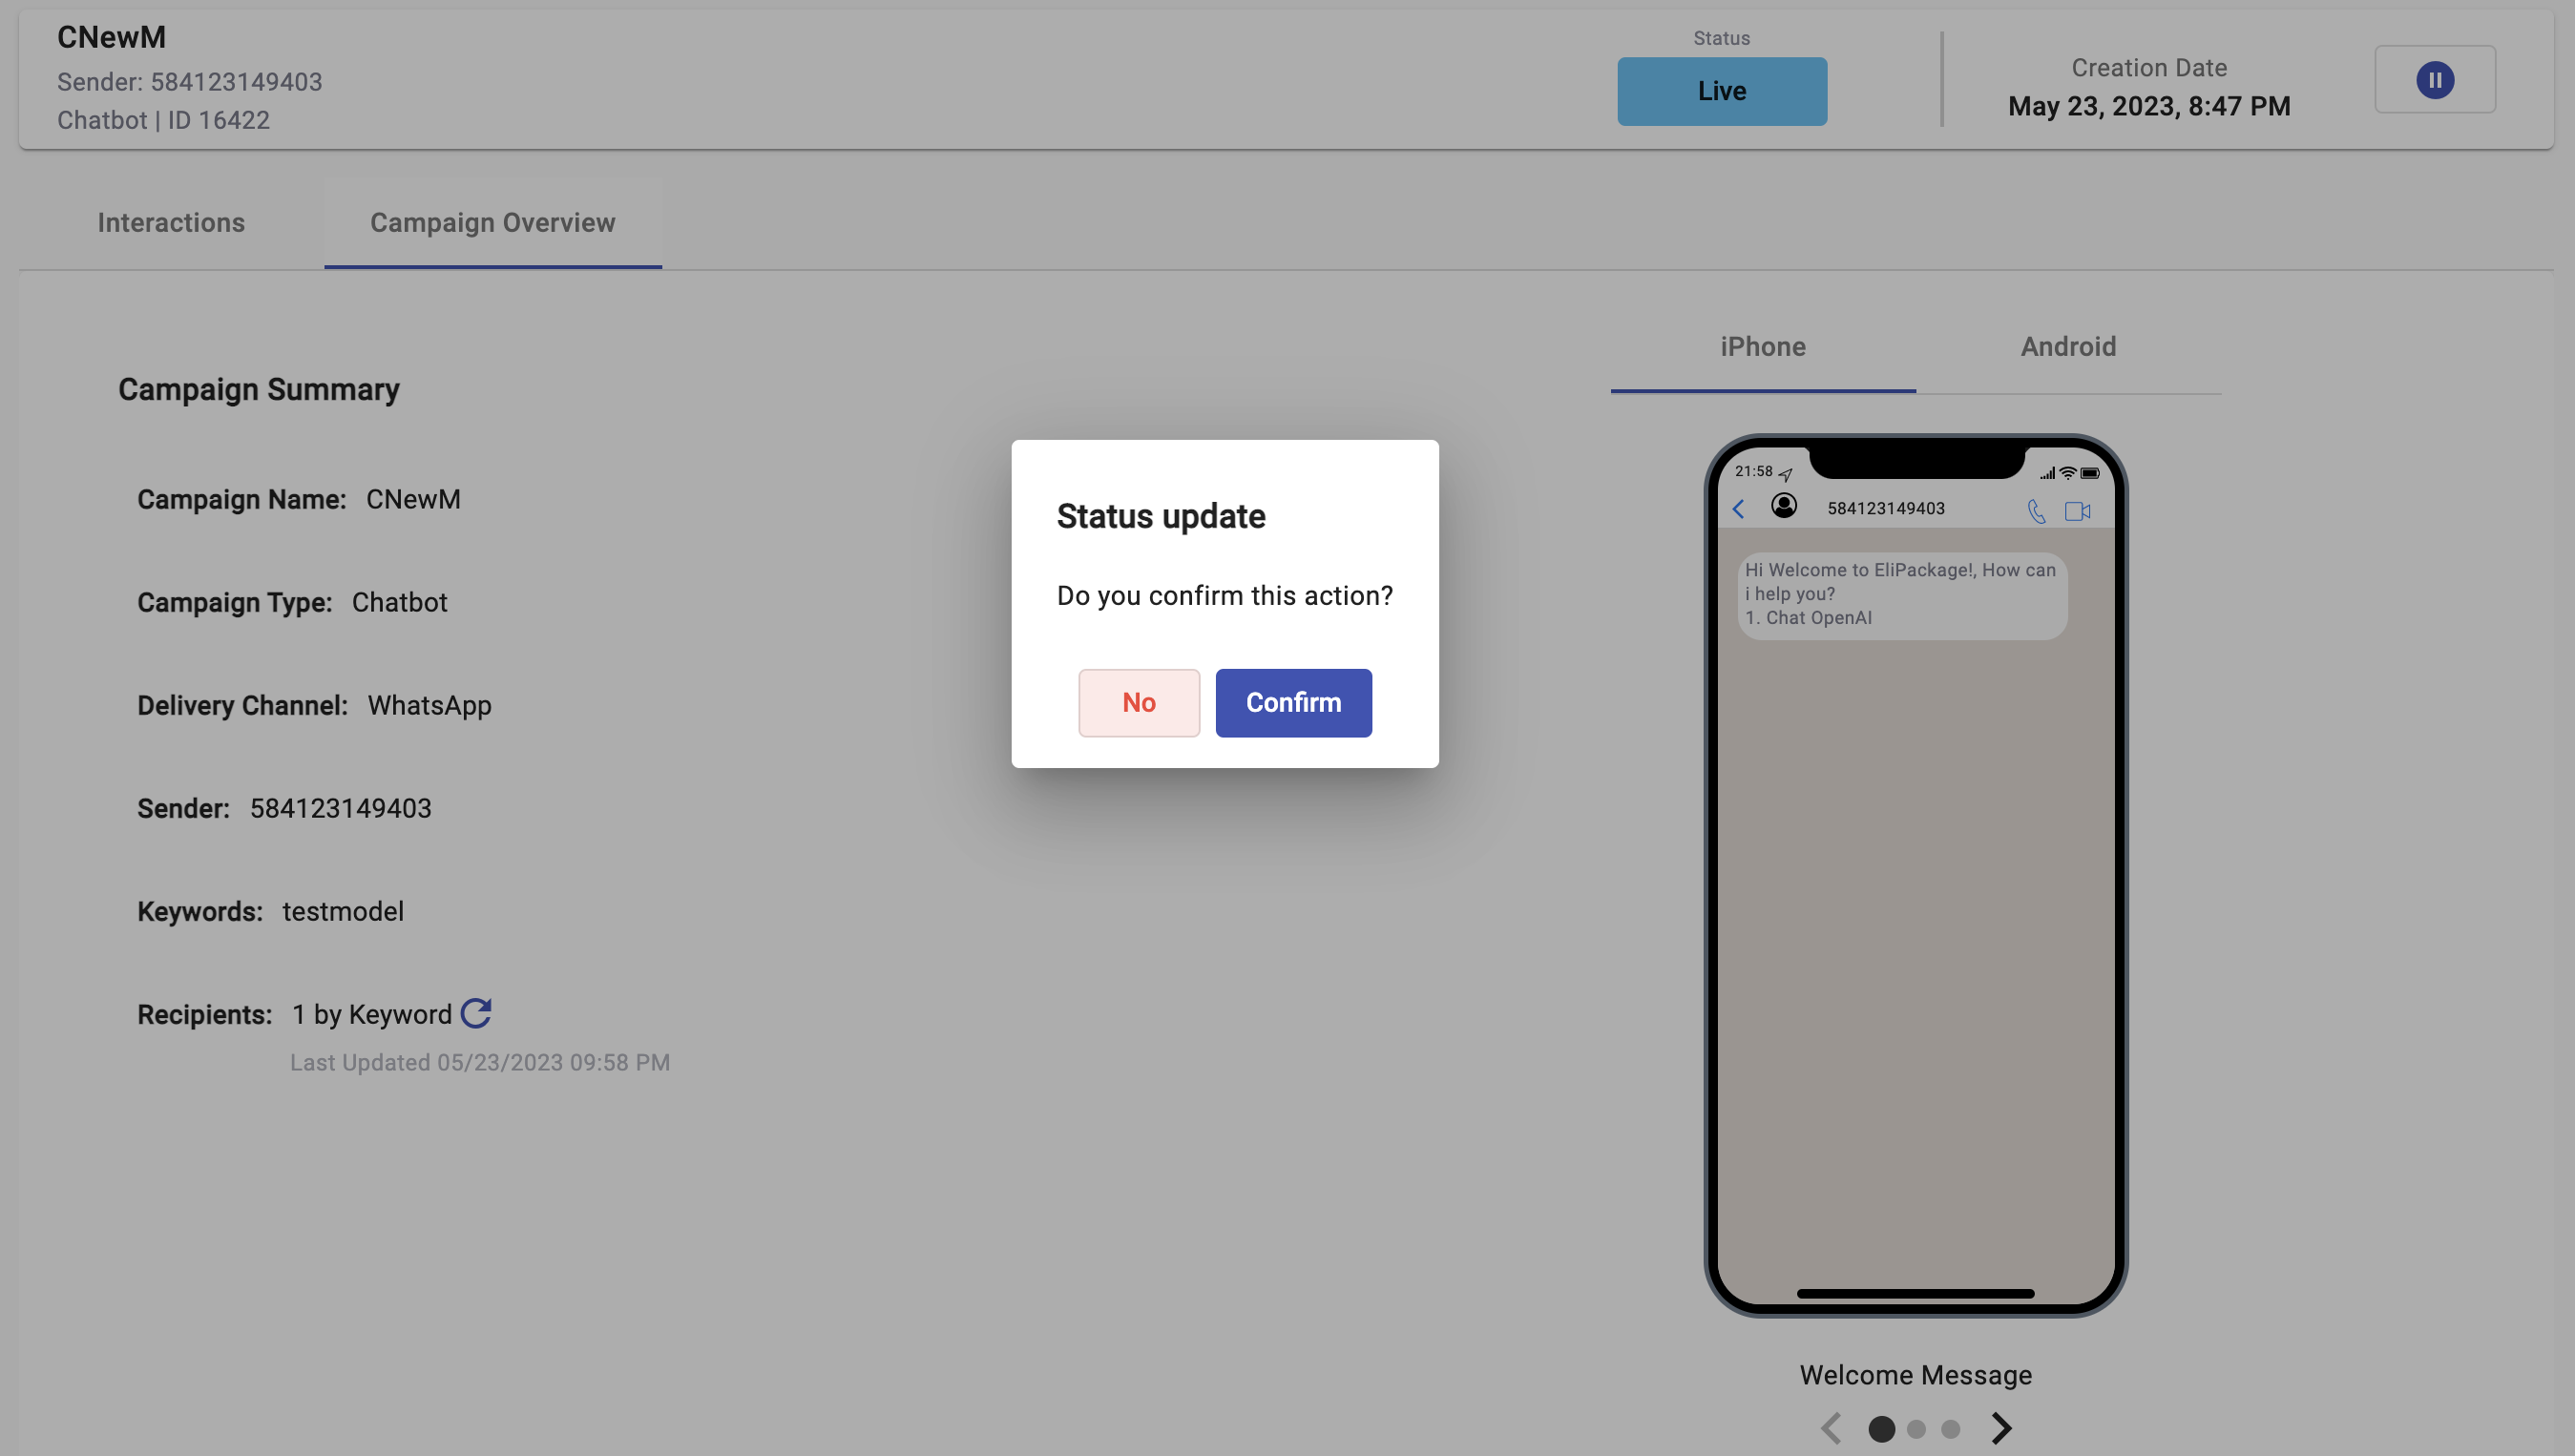
-
Finally, go back to the Integrations tab from the Preferences section and select the Pause button.
In case you want to delete the integration, select the Delete icon from the Actions buttons.
Updated 15 days ago