Adding Multiple Links Backside Wallet
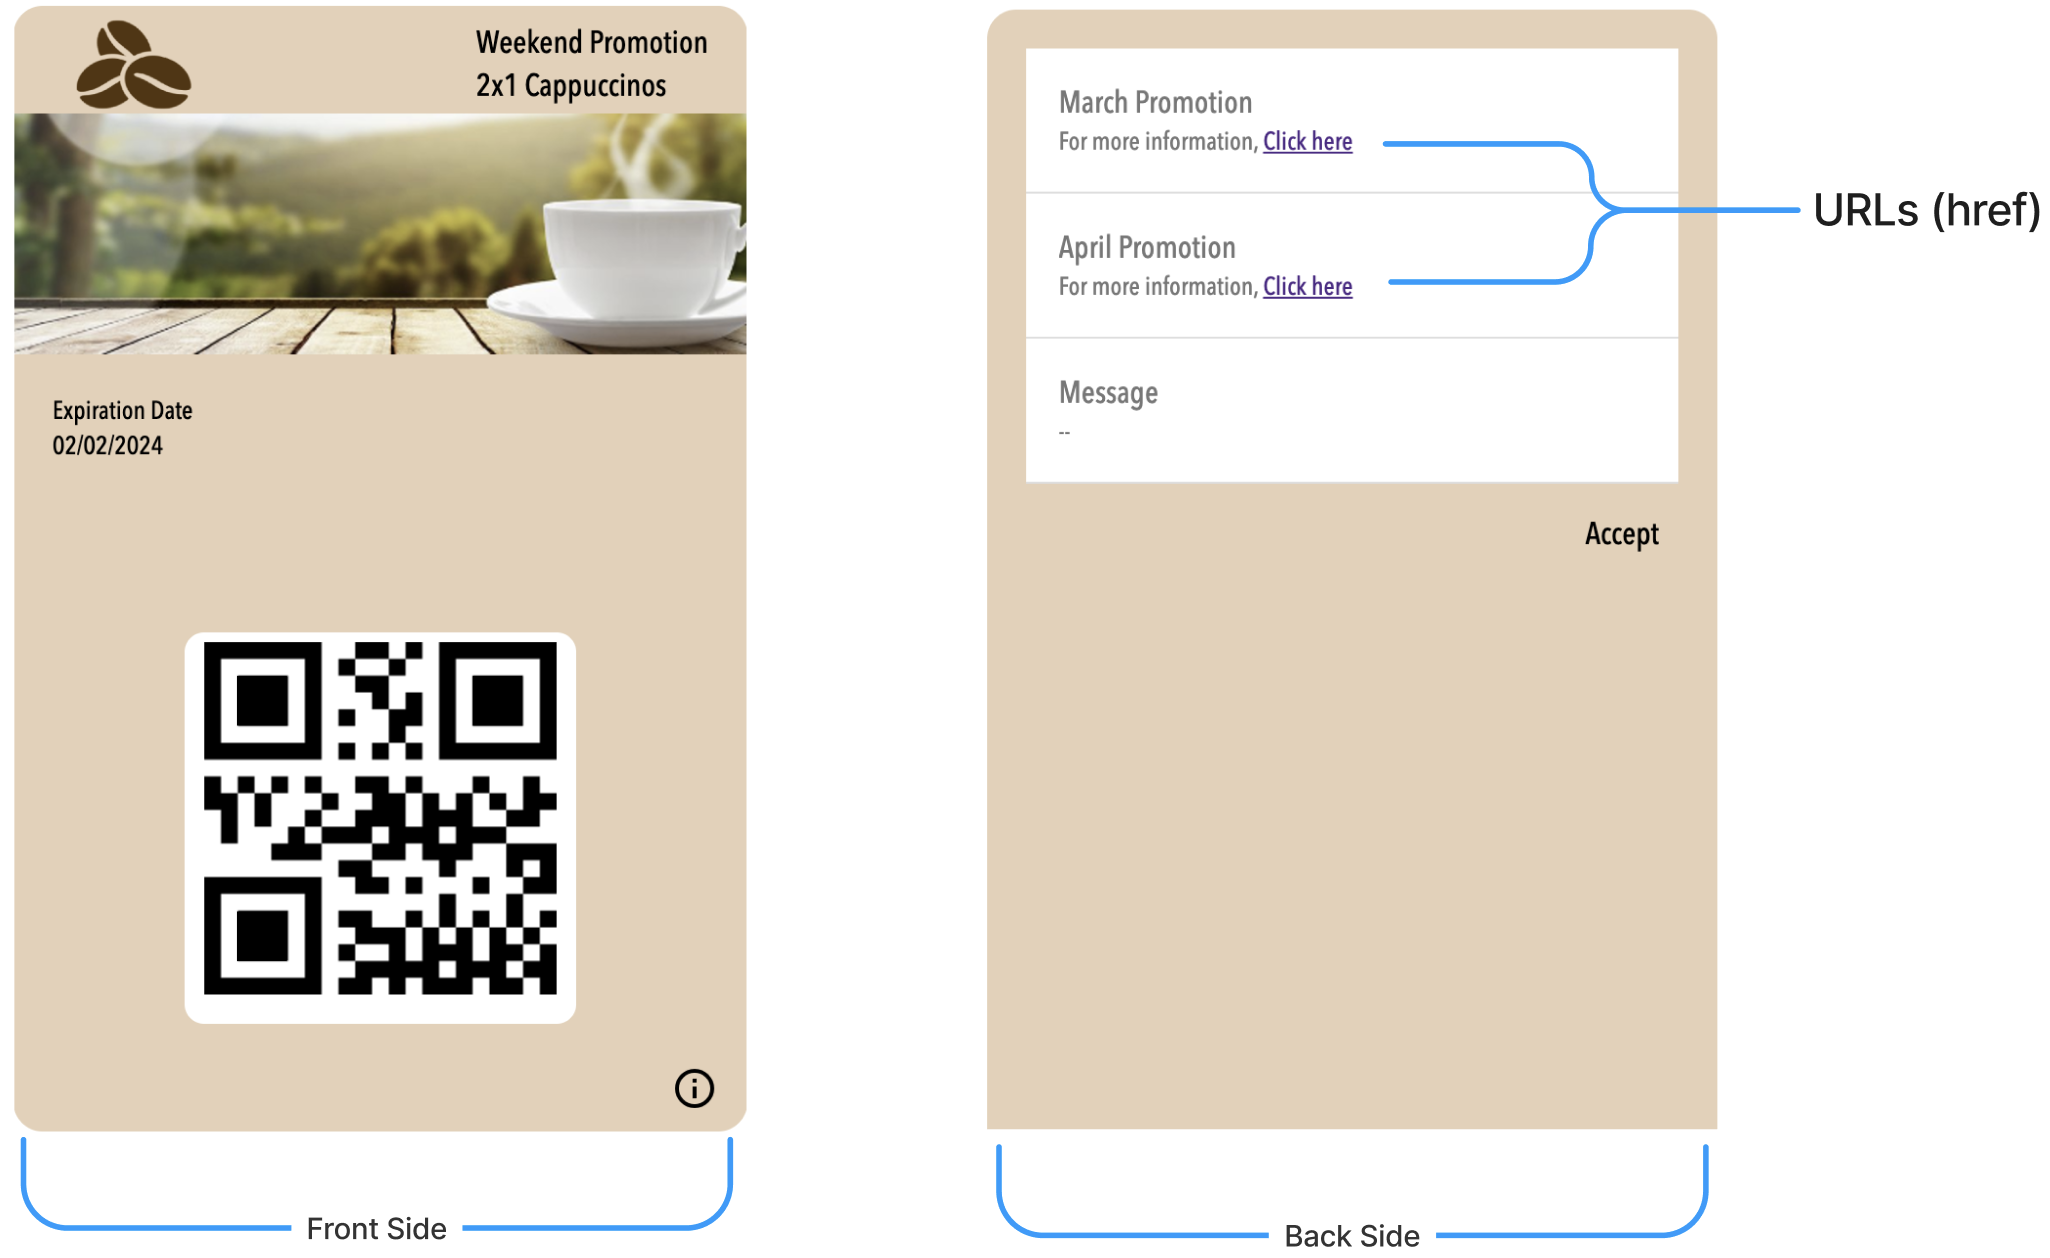
In this scenario, we'll explore the process of attaching multiple links to the backside of a Wallet Template (Member Card), as illustrated in the image below:
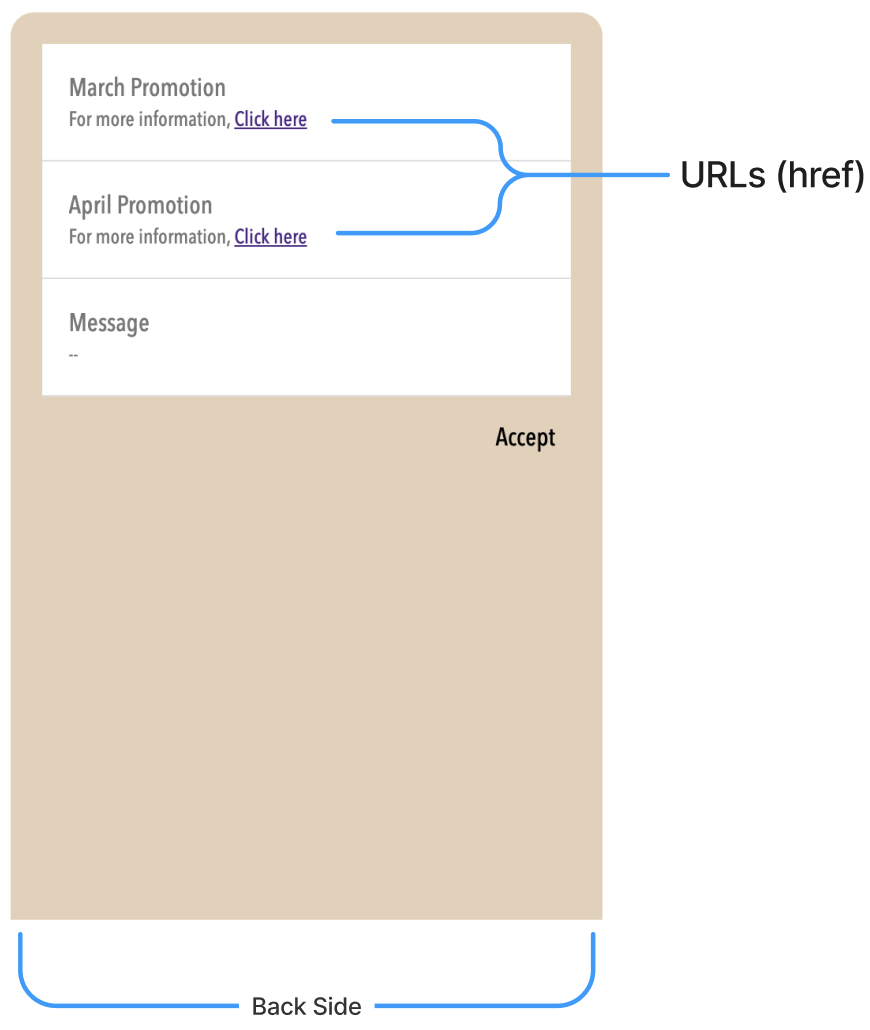
NOTEIn this example, every generated Pass will attach unique links, meaning each end user will receive a pass with personalized links.
Before beginning, it is essential to take into account the following prerequisites.
- You already have access to the Communications Platform.
- Get API Key: From the Communications Platform, copy the API Key located in Preferences section > API tab.
Create Wallet Template
As a suggestion, we advise creating and sending a wallet template to allow you to visualize the pass design through the Communications Platform. Therefore, the first step is creating a Member Card Campaign.
NOTEIn this instance, every end user will receive a unique special discount for March and April 2024. To discover the discount type, end users need to click on the links situated on the backside of the pass.
WARNINGFor testing purposes, send the member card to a single team member. The aim of creating this campaign is to preview the design of the member card.
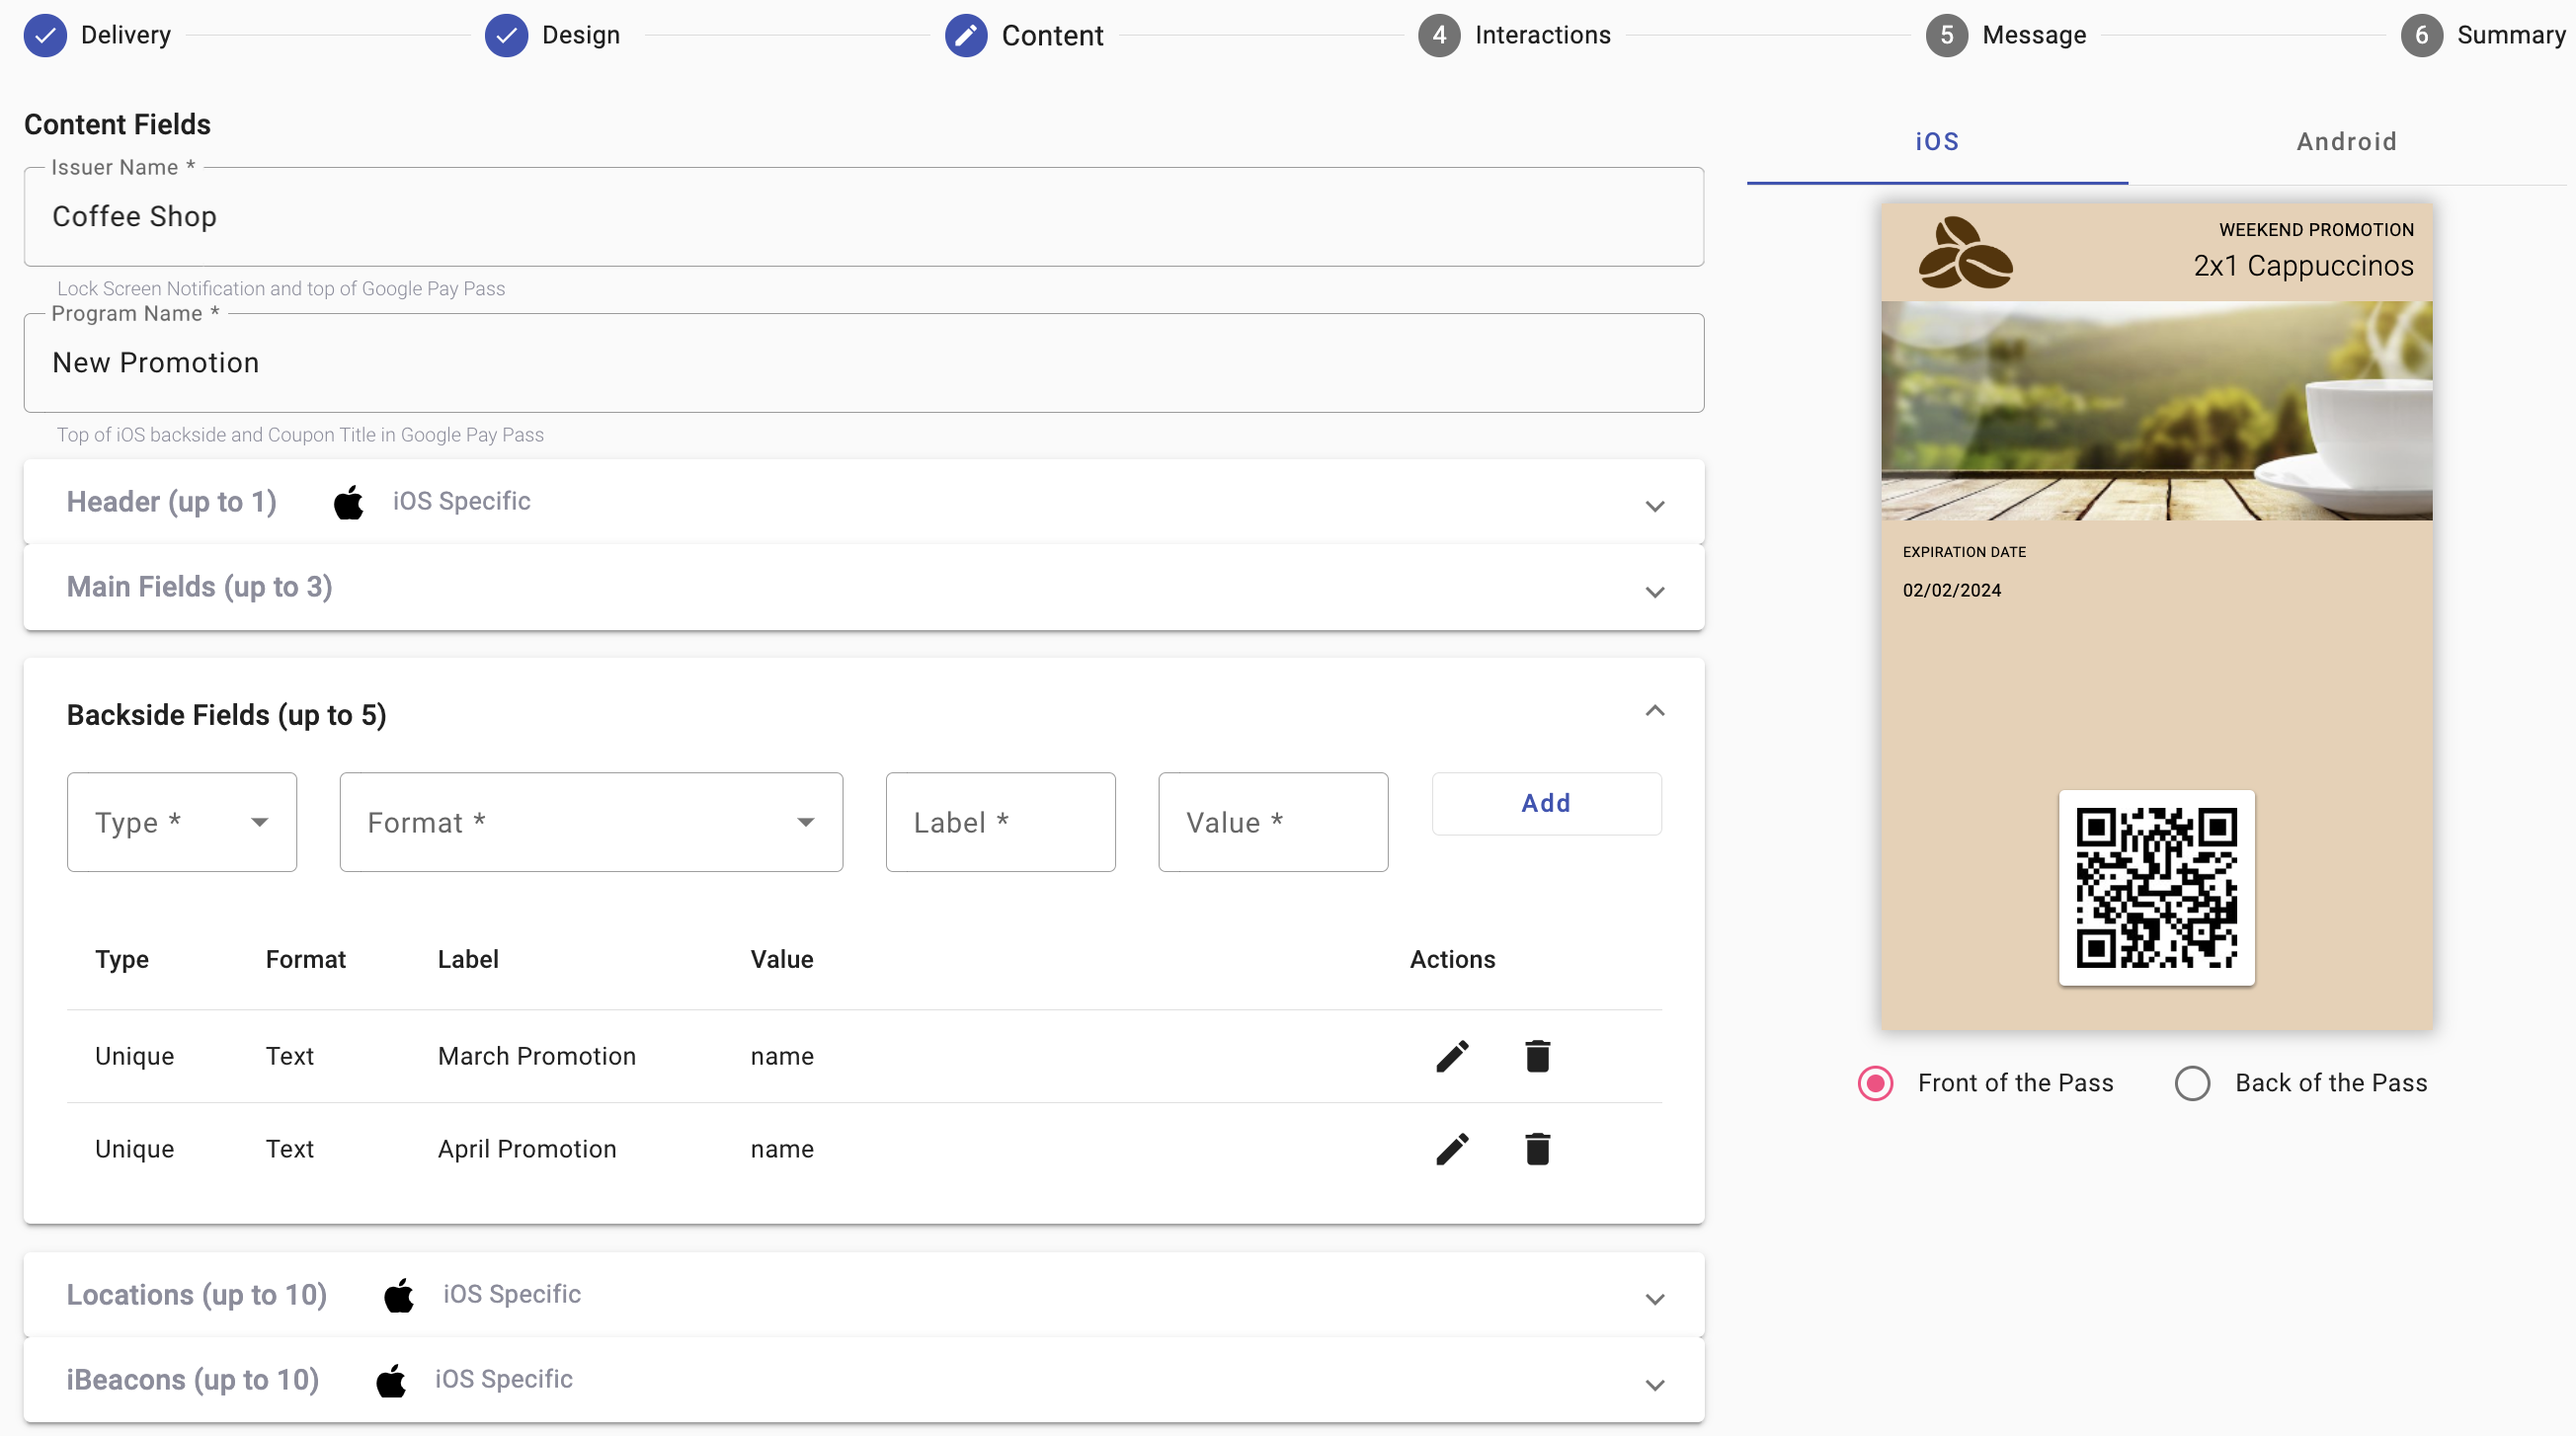
From the Backside Fields dropdown while setting up the Content step, during the creation of the member card campaign, we set a couple of backside fields to be used for personalized URLs:
-
Type: Unique.
The Unique Fields are personalized for each member card that is generated, which means they are used to display personalized and variable fields for each user.
-
Format: Text.
-
Label: A Field Label that accompanies the text content on a member card.
In this example, the labels will be: March Promotion, April Promotion.
-
Value: Select any column of type string.
In this example the set the name as value.
Get Wallet Template ID
Once the member card campaign has been created and sent to one member of the team. The next step is getting the unique identifier of the wallet template ("serial" parameter) via API through the following endpoint:
HTTP Request: GET /v2/wallet/templates
NOTETo retrieve only the wallet template that has been created recently, enter the next filter from the
Query Params:
limit: 1
curl -X GET "https://elastic.messangi.me/ironbank/v2/wallet/templates?limit=1&sort=-creationDate%2C%2Bname&select=name%2Cdescription" -H "accept: application/json" -H "Authorization: Bearer <YOUR_API_KEY>"{
"meta":{
"timestamp":1706906992963,
"transactionId":"ee9c461a-6215-4bc3-8747-836f55cde4e6"
},
"pagination":{
"limit":1,
"page":1,
"pages":501,
"total":501
},
"items":[
{
"serial":"65bd53d21dd",
"name":"Member Card",
"description":"New Promotion",
"googlePayCompatible":false
}
]
}Response Body Parameters
| Parameter | Description |
|---|---|
| serial | Unique identifier of the wallet template. |
| name | Wallet Template name. |
| description | A brief description of your wallet passes’s intent. |
| googlePayCompatible | This wallet template pass type also generates GooglePay passes.
By default it is |
- Copy the request body and paste it in your terminal command.
- Press Enter key
- From the response body, copy the unique identifier of the wallet template (
“serial”) parameter.
Set URLs & Create Wallet Pass
Once the unique identifier (“serial”) of the wallet template has been obtained, the next step is setting the URLs while creating the pass via API.
HTTP Request : POST /v2/wallet/templates/{serial}/passes/batch
Before beginning, in this API call, you need to provide the unique identifier (“serial”) of the Wallet Template previously created.
NOTEWhen creating one or more wallet passes, the request body contains the unique values you specified during the creation of the wallet template.
When creating the wallet template, it was included only two unique values located on the backside of the Wallet Template:
{
    "fields": [
        {
            "place": "BACK",
            "label": "March Promotion",
            "fixed": false,
            "value": "name"
        },
        {
            "place": "BACK",
            "label": "April Promotion",
            "fixed": false,
            "value": "name"
        }
    ]
}
NOTEIn this request body, we will replace the
"name"value in both"value"parameters with URLs that include HTML code for the href (hyperlink's destination):
"For more information, <a href=\"https://google.com/\">Click here</a>"
curl -X POST "https://elastic.messangi.me/ironbank/v2/wallet/templates/<Wallet_Template_ID>/passes/batch" -H  "accept: application/json" -H "Authorization: Bearer <YOUR_API_KEY>" -H  "Content-Type: application/json;charset=UTF-8" -d '{
  "items": [
     {
         "recipientId": "121314",
         "uniqueValues": {
             "fields": [
                 {
                     "place": "BACK",
                     "label": "March Promotion",
                     "fixed": false,
                     "value": "For more information, <a href=\"https://google.com/\">Click here</a>"
                 },
                 {
                     "place": "BACK",
                     "label": "April Promotion",
                     "fixed": false,
                     "value": "For more information, <a href=\"https://google.com/\">Click here</a>"
                 }
             ]
         }
     }
  ]
}'
Request Body Parameters
| Parameter | Required | Description |
|---|---|---|
| items | Yes | List (array) of wallet passes that will be created. |
| items. recipientId |
Yes | Unique identifier of the recipient. The recipient ID must be different for each generated wallet pass. |
| items. uniqueValues |
Yes | Specify the unique values you set in the wallet template as fields, images, barcode or beacons for each wallet pass. |
| items. uniqueValues. fields |
Yes | Wallet Template text fields you set as unique values. |
| items. uniqueValues. fields. place |
Yes | Field type. There are 4 types of fields you can add to the wallet template according to the pass type chosen when creating the template:.
For this example, we set the |
| items. uniqueValues. fields. fixed |
Yes |
|
| items. uniqueValues. fields. value |
Yes | Value of the field text. |
{
  "meta": {
    "timestamp": 1707107201954,
    "transactionId": "47402dda-dc94-496c-9aad-45504432d679"
  },
  "items": [
    {
      "recipientId": "121314",
      "url": "https://elastic-tyrion.messangi.me/R1214z"
    }
  ]
}
Response Body Parameters
| Parameter | Description |
|---|---|
| items | List (array) of wallet passes created. |
| items.recipientId | Unique identifier of the recipient. The recipient ID must be different for each generated wallet pass. |
| items.url | URL of the wallet pass. Copy and paste the URL into your browser to download the wallet pass that has been created. |
Copy the value of the “url” parameter and paste it into your browser to download the wallet pass that has been created.
"Click here" is now clickable and redirects to the original URL.
Updated 3 months ago