The Email API empowers you to send personalized and high-performance email communications—whether for marketing broadcasts, transactional messages, or customer engagement workflows.
Designed for reliability and ease of integration, our Email API supports:
- HTML and plain-text content
- Verified sender identities
- Email delivery monitoring and optimization
- broadcast-level reporting
Whether you're sending a single message, the Email API ensures your emails are delivered efficiently and securely.
Built on top of Amazon SES, the API enforces best practices for deliverability and domain authentication, helping you maximize inbox placement and minimize bounce rates.
NOTEThe Amazon SES Auto Validation has been enabled to strengthen email deliverability and protect sender reputation across outbound email traffic. This feature automatically evaluates recipient email addresses before delivery and suppresses messages sent to addresses considered invalid or high-risk, helping reduce bounce rates and spam-related reputation issues.
The Amazon SES Account-Level Suppression List has been enabled to improve email deliverability and protect sender reputation across outbound email communications. This feature automatically suppresses email addresses that previously generated delivery issues, such as hard bounces or spam complaints, preventing future delivery attempts to recipients considered problematic.
Email Onboarding
Before you can begin sending emails through the Email API, your sender email address must be verified. This verification is required to ensure compliance with industry standards and improve deliverability.
Step 1: Sender Email Verification
If you plan to send bulk or high-volume emails, you must first verify your sender email address.
To begin this process:
- Contact our Support Team.
- Provide the email address you want to use as your sender.
- The Support Team will initiate the verification process on your behalf.
Step 2: Amazon SES Authorization
Once the verification request is submitted:
-
You will receive an automated email from Amazon Web Services (SES).
-
This email will include a confirmation link to authorize the sender address.

To complete the verification:
- Open the email from Amazon SES.
- Click the verification link to confirm your sender address.
- Once verified, your email address will be approved for sending through the API, and you’ll be ready to deliver messages at scale.
Before sending bulk Emails, we recommend you read the Email Best Practices section, because it's essential that you monitor the number of hard bounces in your email program, and that you remove hard-bouncing email addresses from your recipient lists. When email receivers detect a high rate of hard bounces, they assume you don't know your recipients well. As a result, a high hard bounce rate can negatively impact the deliverability of your email messages. And your account could be suspended from sending more emails when the Bounce Rate is 5% or higher.
Sending Email
Once your sender email address is verified, you're ready to start sending emails using the Email API.
When you send an Email, the request body contains the following data:
HTTP Request : POST / emails
| Query Parameter | Description |
|---|---|
| unsubscribeMsg | Defines the display text for the unsubscribe link included in the email body, allowing recipients to opt out of future communications. This text will appear as the clickable anchor in the unsubscribe URL. |
{
  "to": "[email protected]",
  "from": "[email protected]",
  "text": "we have a new offer this week",
  "subject": "EliPackage Promo",
  "externalId": "123456789abcde",
  "clientId": "48118112",
  "callbacks": [
    "string"
  ],
  "alias": "New User"
}
The parameters presented in the request body example when sending the Email are the following:
| Parameter | Required | Description |
|---|---|---|
| to | Yes | Recipient’s email address. |
| from | Yes | Sender's verified email address. |
| text | Yes | Email content (can be plain text or HTML). |
| subject | Yes | Subject line of the email. |
| externalId | No | Alphanumeric identifier used for reporting purposes. |
| clientId | No | Unique user identifier that can be used for reporting purposes. This is an identifier you can use to uniquely identify the destination address in your systems. This is similar to the externalId and will be sent back to you if you are requesting callbacks that contain status changes of the messages you send. |
| callbacks | No | Indicate one or more (separated by comma) webhook URLs to notify about the status of the message delivery.That is, If you want to receive the status of the message you've sent to your contacts, you need to specify your endpoint. Your endpoint must have a HTTP POST access method and receive a JSON body. The URL is the external callback where the events of the Email will be registered and published. Once an email is processed, its status will be posted to your callback URL. To view the full list and meaning of each status, please refer to the Email Status section. |
| alias | No | Assign a custom label or reference name to the email recipient. |
When you send the Email, the response body contains the following data:
{
  "meta": {
    "timestamp": 456787654,
    "transactionId": "1f9ca37b-4d1"
  },
  "data": {
    "id": "67f6bce6cd",
    "to": "[email protected]",
    "from": "[email protected]",
    "userName": "EliPackage",
    "operator": "EliPackage",
    "text": "we ha",
    "status": "QUEUED",
    "subject": "EliPackage Promo",
    "externalId": "123456789abcde",
    "clientId": "48118112",
    "callbacks": [
      "string"
    ],
    "alias": "New User"
  }
}
The parameters presented in the response body example when sending the Email are the following:
| Parameter | Description |
|---|---|
| data | Data contained in the Email. |
| data. id |
Unique identifier of the Email. |
| data. to |
Recipient’s email address. |
| data. from |
Sender's verified email address. |
| data. userName |
Owner or creator of the Email. |
| data. operator |
User who is a member of the owner or creator’s Workspace. |
| data. text |
Email content (can be plain text or HTML). |
| data. status |
It represents the current state of the email within the system. When an email is sent, the system assigns one of several possible statuses to track its delivery progress. To view the full list and meaning of each status, please refer to the Email Status section. |
| data. subject |
Subject line of the email. |
| data. externalId |
Alphanumeric identifier used for reporting purposes. |
| data. clientId |
Unique user identifier that can be used for reporting purposes. This is an identifier you can use to uniquely identify the destination address in your systems. This is similar to the externalId and will be sent back to you if you are requesting callbacks that contain status changes of the messages you send. |
| data. callbacks |
Indicate one or more (separated by comma) webhook URLs to notify about the status of the message delivery.That is, If you want to receive the status of the message you've sent to your contacts, you need to specify your endpoint. Your endpoint must have a HTTP POST access method and receive a JSON body. The URL is the external callback where the events of the Email will be registered and published. Once an email is processed, its status will be posted to your callback URL. To view the full list and meaning of each status, please refer to the Email Status section. |
| data. alias |
Custom label or reference name to the email recipient. |
Email best practices
Several factors can lead to your email program's success or failure. Understanding how an email is delivered and following certain best practices can increase your chances of reaching your customers' inboxes. Even when you have customers' interests in mind, you may still encounter situations that impact your messages. The following paragraphs contain some recommendations to ensure your email communications reach your intended audience.
Authentication
- Authenticate your domain with SPF. Sender Policy Framework (SPF) is an email validation standard that prevents email spoofing. Domain owners use SPF to tell email providers which servers can send emails from their domains.
- Sign your outbound mail with DKIM. DomainKeys Identified Mail (DKIM) is an email security standard designed to ensure that the domain owner authorized an email that claims to have come from a specific domain. It uses public-key cryptography to sign an email with a private key. Recipient servers can then use a public key published to a domain's DNS to verify that parts of the email have not been modified during the transit.
ADDING AN EMAIL SENDERWhen adding an email sender to your account, you must contact your account manager or support team to get the TXT Records to authenticate your domain with SPF and DNS Records to sign outbound mail with DKIM.
The procedures for updating DNS records vary depending on which DNS or web hosting provider you use.
- Test your authentication settings. Sending an email to an ISP-based email address you own, such as a Gmail or Hotmail account, and inspecting the original message is one way to verify your domain configuration is correct. In the case of Gmail you can proceed as follows. After sending the email from the domain you intend to use to to your gmail account, open it, and see if you received the email from your domain. Check the Inbox as well as the Spam folders. If you find the email message you sent from the domain you intend to use, your email is authenticating. Gmail does not accept emails that do not authenticate. You can confirm this by inspecting the details of the email message.
To do this, open the received email message and on the header of the message, to the far right of the From select the kebab menu (three vertical dots). It will display several options, and you are interested in the Show Original. (See figure below).

This will result in a screen that displays a detailed view of the received message, and most importantly it will display the authentication that was performed on the message and against which domain and IP address. A sample screenshot is shown below.
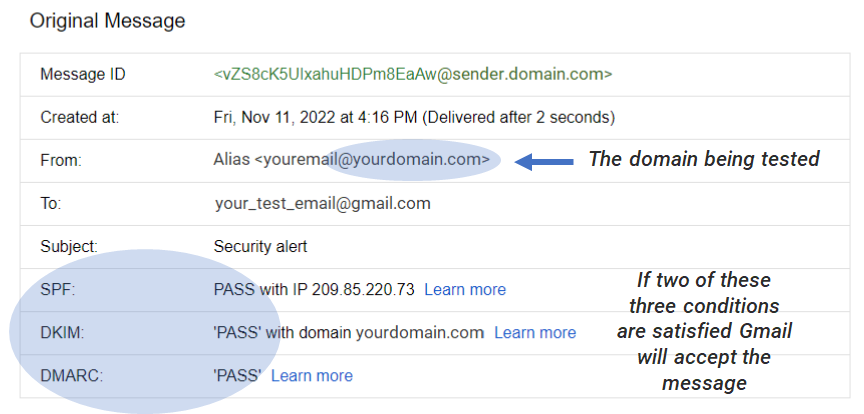
Note in the figure above that the yourdomain refers to the domain you intend to use for your email messages on the platform. The description above is the desired outcome.
However, if the test email message is not received in your account, it is an indication that the domain is not being authenticated or signed.
Domain and "From" address considerations
- Think carefully about the addresses you send emails from. The "From" address is one of the first pieces of information your recipients see and, therefore, can leave a lasting first impression. Additionally, some ISPs associate your reputation with your "From" address.
- Avoid using a no-reply address, such as [email protected], as your "From" or "Reply-to" address. Using a no-reply@ email address sends your recipients a clear message: that you aren't offering them a way to contact you and that you're not interested in their feedback.
- Ensure that the WHOIS information for your domain is accurate. Maintaining an honest and up-to-date WHOIS record demonstrates that you value transparency and allows users to identify whether or not your domain is legitimate quickly.
Maintain a Clean List
- Implement a double opt-in strategy. When users sign up to receive an email from you, send them a message with a confirmation link, and wait to start sending them emails until they confirm their address by clicking that link. A double opt-in strategy helps reduce the number of hard bounces resulting from typographical errors. This type of organically grown list is the best bet for keeping a healthy subscription list.
- Perform minimal validation on addresses collected with a web-based form. For example, ensure that the addresses you collect are well-formed (that is, they are in the format [email protected]) and that they refer to domains with valid MX records.
- Use caution when allowing user-defined input to be passed unchecked. Forums registrations and form submissions present unique risks because the content is entirely user-generated, and spammers can fill out forms with their content. It's your responsibility to ensure that you only send emails with high-quality content.
- Avoid sending emails to standard alias (such as postmaster@, abuse@, suppor@, or noc@). Ensure that you only send messages to real people who want to receive them. This rule is especially true for standard aliases, which are customarily reserved for email watchdogs. These aliases can be maliciously added to your list as a form of sabotage to damage your reputation.
- Periodically purge your list form inactive users to keep your email list and reputation with email service providers healthy.
HARD BOUNCESIt's essential that you monitor the number of hard bounces in your email program, and that you remove hard-bouncing email addresses from your recipient lists. When email receivers detect a high rate of hard bounces, they assume that you don't know your recipients well. As a result, a high hard bounce rate can negatively impact the deliverability of your email messages.
Your account will be suspended from sending more emails when the Bounce Rate is 5% or higher.
Bounce & Complaint Rates
Monitoring bounce and complaint rates is crucial for maintaining a strong email sender reputation and ensuring the success of your email broadcasts. These metrics help identify potential issues with your email list or content, allowing you to take corrective actions to improve deliverability and engagement.
Bounced
A bounce happens when an email you send cannot be delivered due to a permanent issue. This may occur if the recipient’s email address is invalid, does not exist, or if the recipient’s email provider blocks emails from your domain or IP address.
The bounce rate measures the percentage of emails that were not successfully delivered. To maintain good standing, your bounce rate should remain below 5%. If it exceeds your ability to send emails may be temporarily paused.
Bounces are categorized into two types:
- Hard Bounce: Permanent delivery failures caused by issues such as:
- Invalid email addresses.
- Non-existent domains.
- Blocked senders.
These addresses should be removed from your email list immediately.
- Soft Bounce: Temporary delivery failures due to issues like:
- The recipient’s mailbox is full.
- The recipient’s email server is temporarily down.
- Email size exceeds limits.
These addresses can remain on your list, but delivery should be retried later.
NOTEIt isessential that you monitor the number of hard bounces in your email program, and that you remove hard-bouncing email addresses from your recipient lists. When email receivers detect a high rate of hard bounces, they assume that you don't know your recipients well. As a result, a high hard bounce rate can negatively impact the deliverability of your email messages. Your account will be suspended from sending more emails when the Bounce Rate is 5% or higher.
High bounce rates are viewed negatively by email providers, as they suggest you may be sending emails to people who haven’t given explicit consent. This can harm your sender's reputation and negatively affect the delivery of your emails.
By keeping your bounce rate within recommended limits, you can avoid interruptions to your email sending and maintain a healthy sender reputation.
Complaint
A complaint is triggered when a recipient marks your email as unwanted or spam, often using the “Report Spam” feature in their email client. Email providers treat complaints as a strong indication that your emails may be unsolicited. As a result, a high complaint rate can severely damage your sender's reputation and negatively impact email deliverability.
The complaint rate for your account should remain below 0.1%. If the complaint rate for your account exceeds 0.1%, The email service might temporarily pause your account's ability to send emails.
Common Causes of High Complaint Rates:
- Sending emails to users who did not explicitly opt-in.
- Overly frequent or irrelevant email content.
- Misleading subject lines or content.
- Lack of a visible and functional unsubscribe option.
How to Maintain a Low Complaint Rate:
- Ensure Consent: Send emails only to users who have opted in to receive communications.
- Provide Relevant Content: Tailor email content to match the recipient’s preferences and expectations.
- Make Unsubscribing Easy: Include a clear and accessible unsubscribe link in all emails.
- Monitor Feedback: Regularly review complaint rates and address any recurring issues.
- Segment your email list: Target specific groups with content that matches their interests.
By keeping your complaint rate below the recommended threshold, you can maintain a healthy sender reputation, avoid disruptions, and ensure consistent email delivery.
Blocked Due to Bad Sending Practices
The BLOCKED_DUE_BAD_BEHAVIOUR status is triggered when the sending system detects that your behavior as a sender has violated best practices for email delivery. This does not happen because of a single message but rather due to an accumulated pattern of negative activity.
Why is BLOCKED_DUE_BAD_BEHAVIOUR Triggered?
This status is activated when one or more of the following critical criteria are met:
-
High Bounce Rate (≥ 5%)
- This means a significant portion of your emails could not be delivered because the addresses were invalid or non-existent.
- It indicates poor list hygiene or sending to unverified recipients.
-
High Complaint Rate (≥ 0.1%)
- This occurs when recipients mark your emails as spam.
- It suggests your messages may be irrelevant, annoying, or unsolicited.
-
Violations of Acceptable Use Policies (AUP)
- Sending messages to users without explicit consent (no opt-in).
- Using suspicious practices such as misleading content, spoofing, or phishing.
- Sending bulk emails from domains with improper configuration.
-
Negative Impact on the System’s Reputation
- If your behavior affects the provider’s overall deliverability, the system will stop your ability to send messages.
What Does It Mean to Receive This Status?
- All outgoing emails from your account or domain are blocked.
- In most cases, there is no prior warning: the block is automatic and remains in place until the case is reviewed.
- It is a preventive system action to protect the infrastructure and its overall reputation.
How to Avoid It
- Keep your bounce rate below 5%.
- Ensure your complaint rate stays below 0.1%.
- Use lists with explicit opt-in.
- Include a visible and functional unsubscribe link.
- Segment your lists and send relevant content.
- Continuously monitor your deliverability metrics.
Thresholds for Bounce and Complaint Rates
Email service providers monitor bounce and complaint rates to ensure the quality of email broadcasts and protect their systems from misuse. If these rates exceed specific thresholds, warnings or account restrictions may be applied to maintain compliance and preserve the sender's reputation.
The following table summarizes the percentage of each bounce and complaint threshold:
| Metric | Warning Threshold | Blocking Threshold | Description |
|---|---|---|---|
| Bounce Rate | 2.5% | 5% | If your bounce rate reaches 2.5%, you will receive a warning indicating that your email delivery practices need improvement. This is a signal to review your email list and address potential issues. If your bounce rate exceeds 5%, your account’s ability to send emails may be temporarily blocked. This occurs because a high bounce rate indicates poor list hygiene and poses a risk to the email provider’s reputation. |
| Complaint Rate | 0.05% | 0.1% | A complaint rate of 0.05% triggers a warning, suggesting that your recipients may find your emails irrelevant or unsolicited. Immediate steps should be taken to reduce complaints, such as improving content and ensuring audience consent. If your complaint rate surpasses 0.1%, your account may be blocked from sending emails. A high complaint rate is a strong indication of non-compliance with best practices, such as sending to unengaged or unconsented recipients. |
Updated 3 days ago