Custom Webhook
Configure a Custom Webhook integration, define request parameters and connections, activate the integration, and send response messages through the Webhook API.
Configure a Custom Webhook integration to send contact events to your endpoint and send response messages back into active SMS or WhatsApp chats.
A webhook is an HTTP callback request sent to an external application when an event occurs. In the Custom Webhook integration, the platform sends event payloads to the webhook URL you configure.
A webhook HTTP request includes:
- A start line with the HTTP method and URL
- Headers
- A body, also called the payload
Before you start
- Prepare the endpoint URL that will receive webhook events.
- Configure your endpoint to accept JSON payloads.
- Choose the HTTP method your endpoint supports. The platform supports
POST,GET,PUT, andDELETE. - Choose the authentication type your endpoint requires: API Key, Basic, Bearer Token, or No Authentication.
Create the Custom Webhook integration
- Select the Custom Webhook card from the integrations pane.
- Select Next.
The platform opens the Custom Webhook integration window.
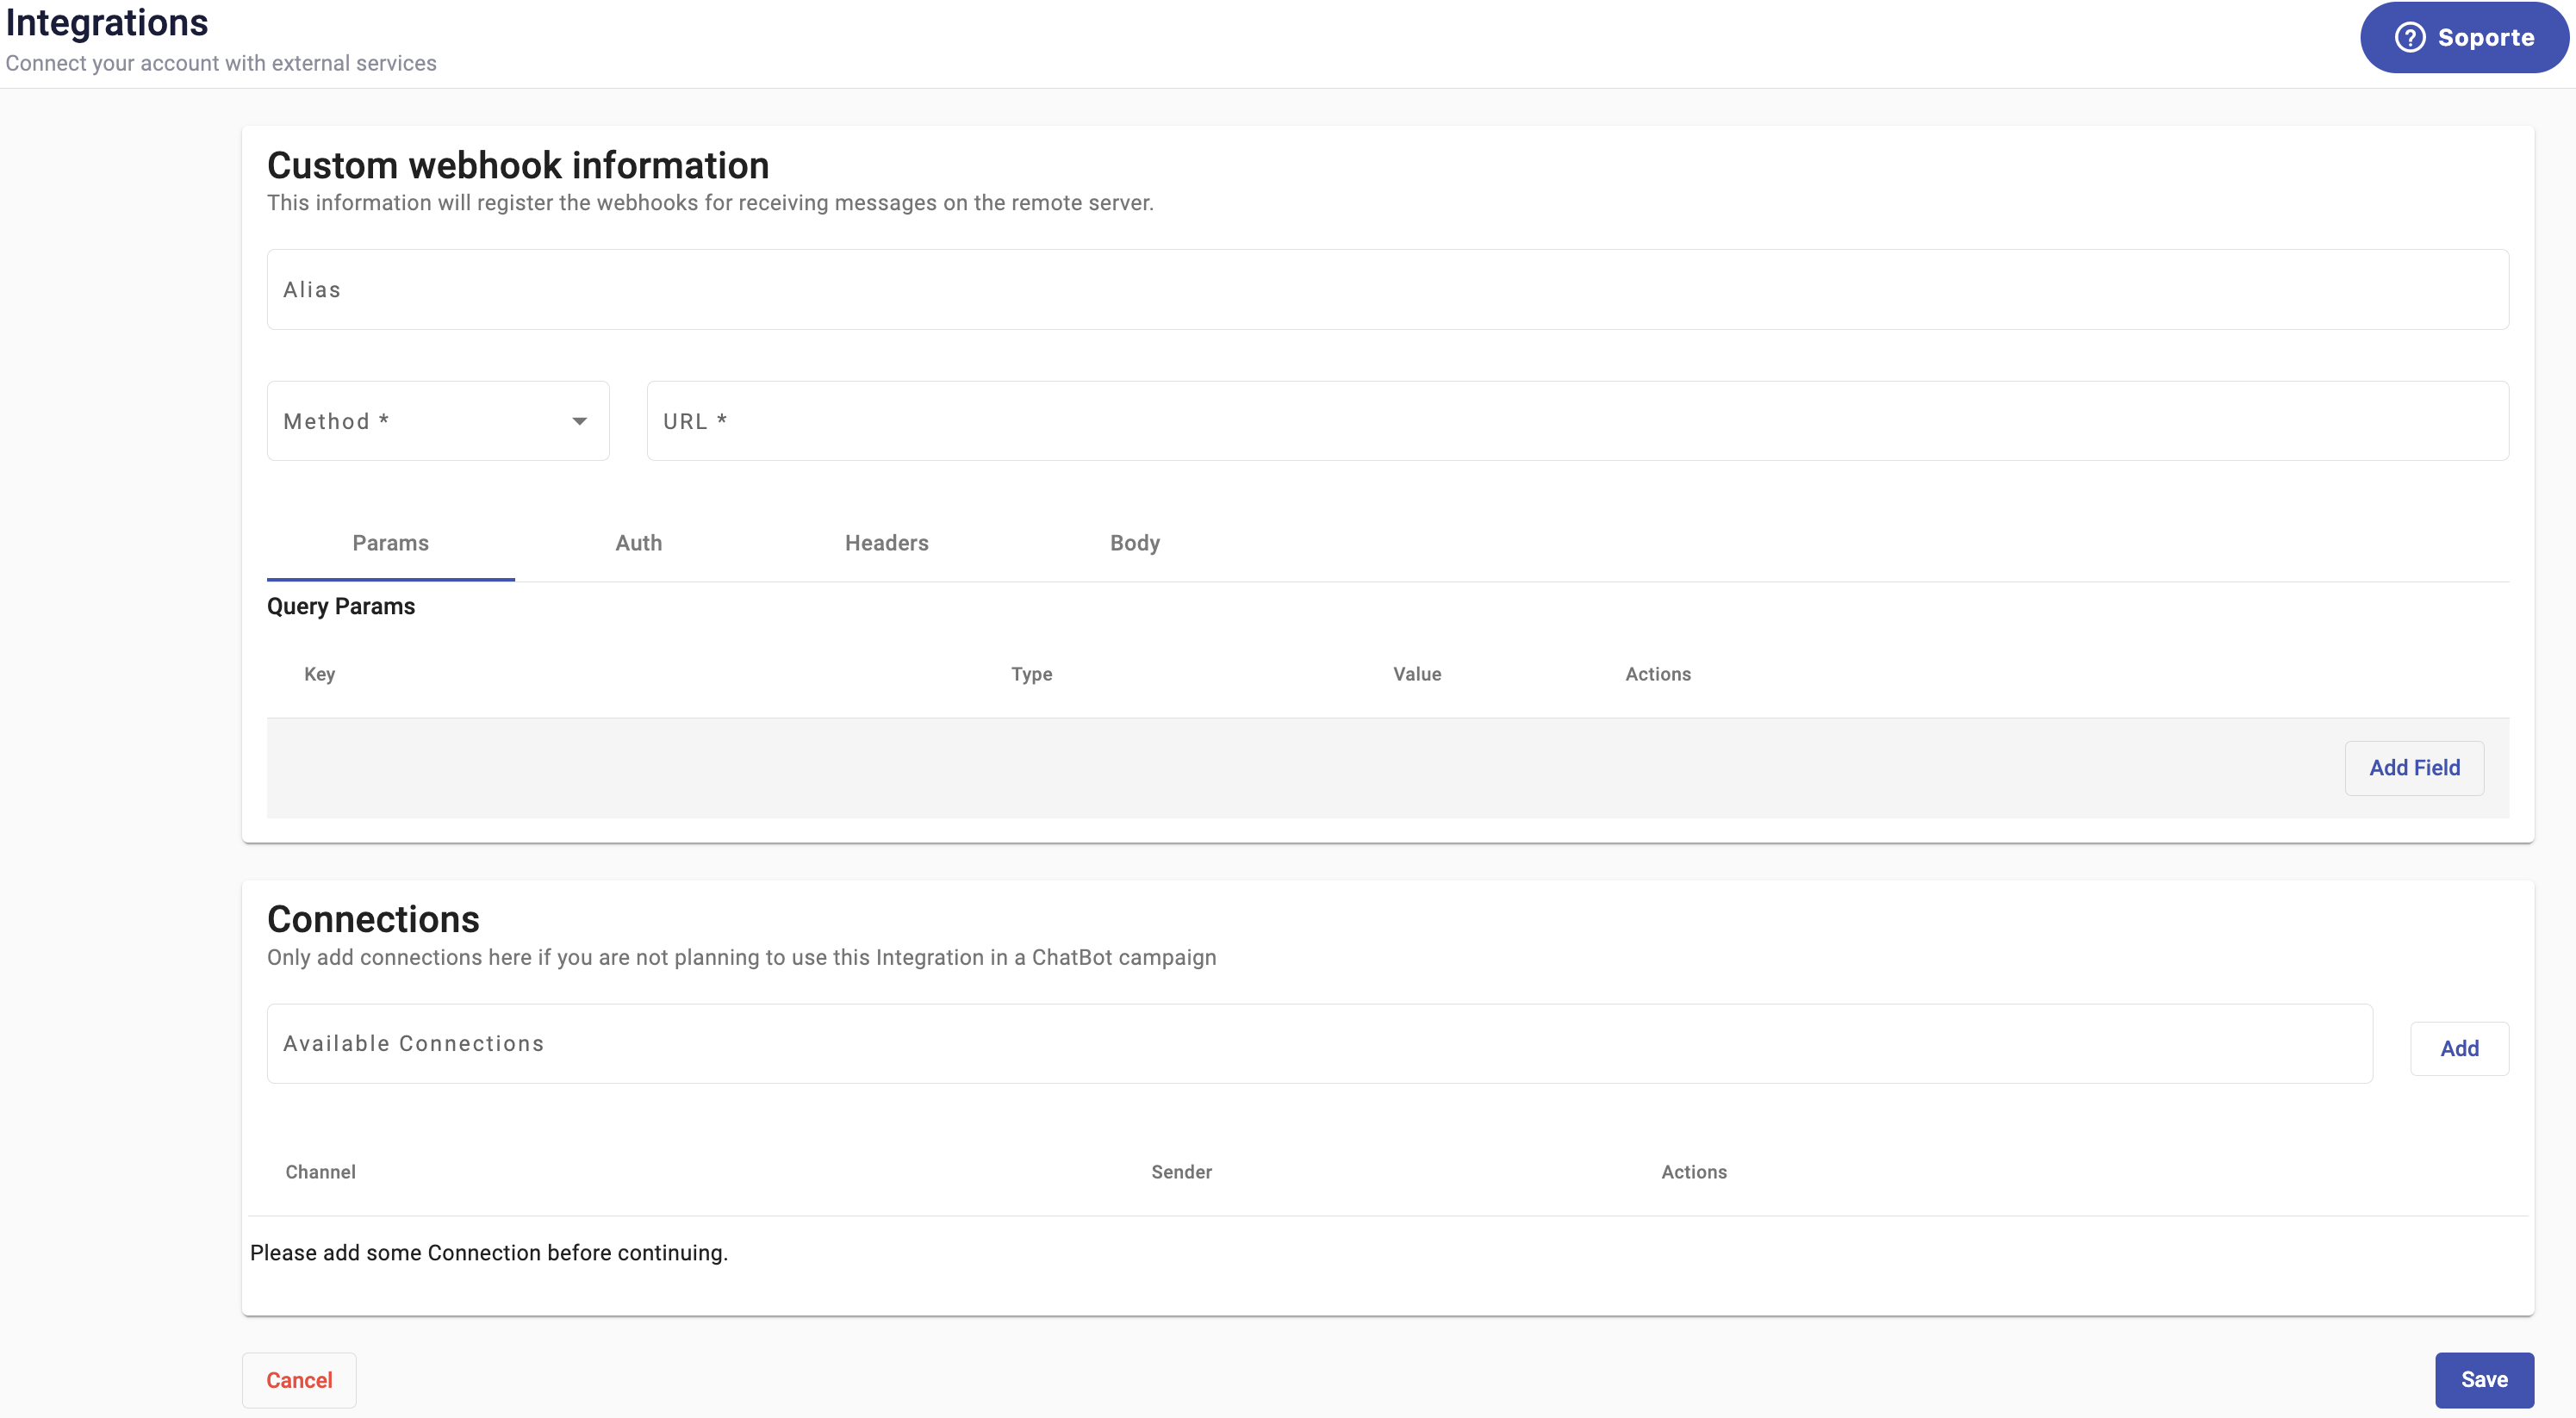
Configure the integration in two sections:
- Custom Webhook Information: Defines the webhook alias, request method, URL, parameters, authentication, headers, and body.
- Connections: Defines the platform communication channels used by the integration.
Configure Custom Webhook Information
Use the Custom Webhook Information section to define how the platform sends requests to your webhook endpoint.
Add an alias
Enter an Alias that identifies the Custom Webhook integration in the platform.
Set the method and URL
Select the HTTP method your endpoint supports, then enter the endpoint URL.
Use this URL structure:
METHOD https://Your_Domain/Your_PathMETHOD must be one of the supported HTTP methods: POST, GET, PUT, or DELETE.
Configure request components
The Custom Webhook request has four configurable components:
- Params
- Auth
- Headers
- Body
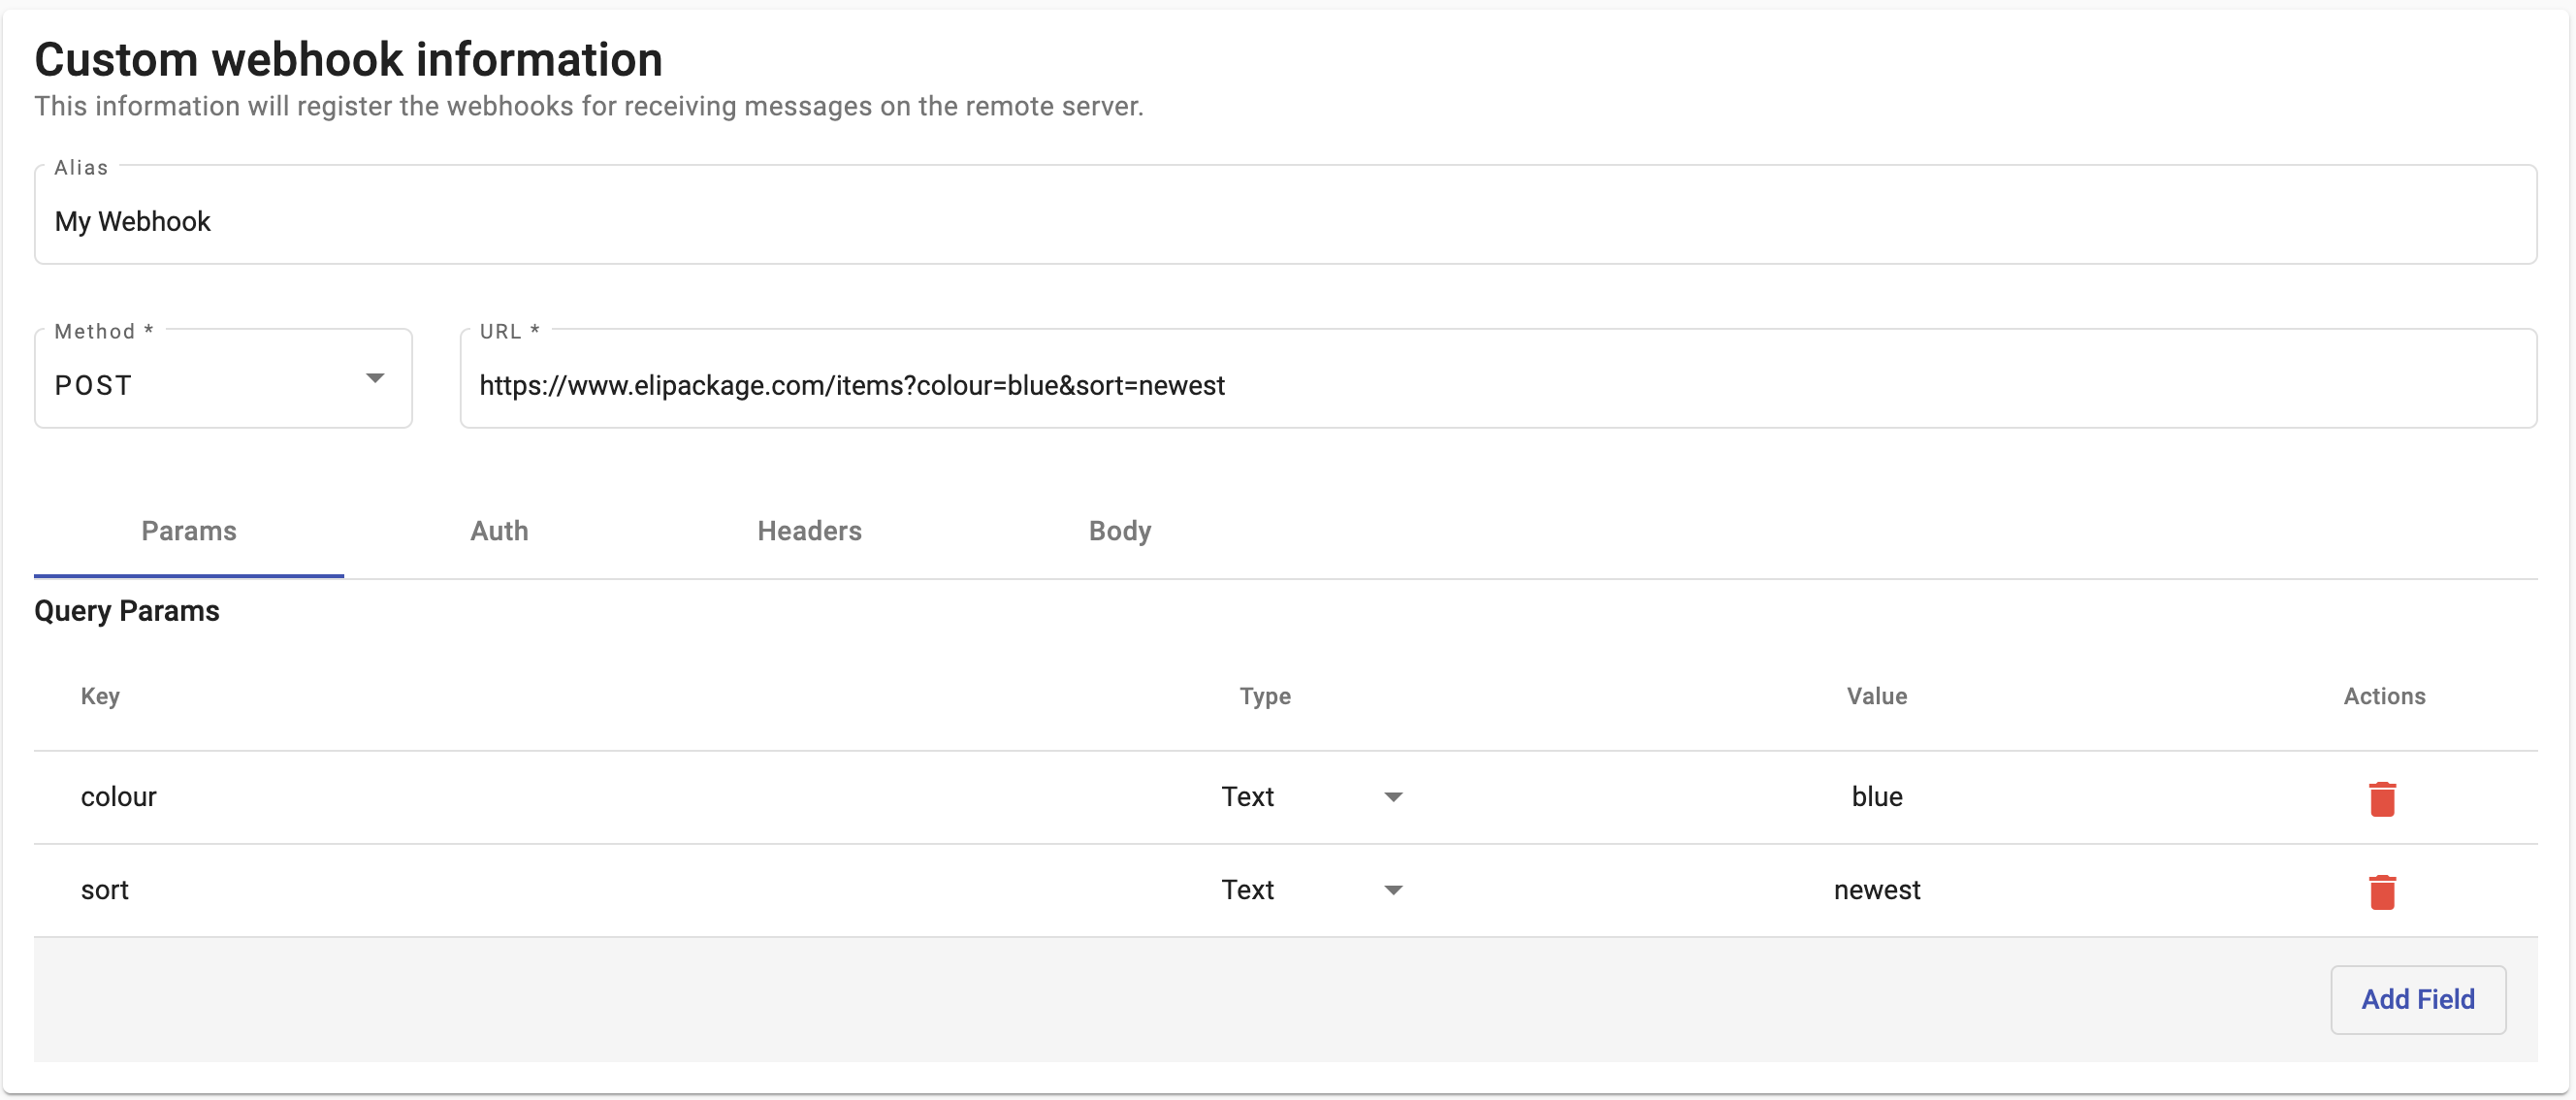
Params
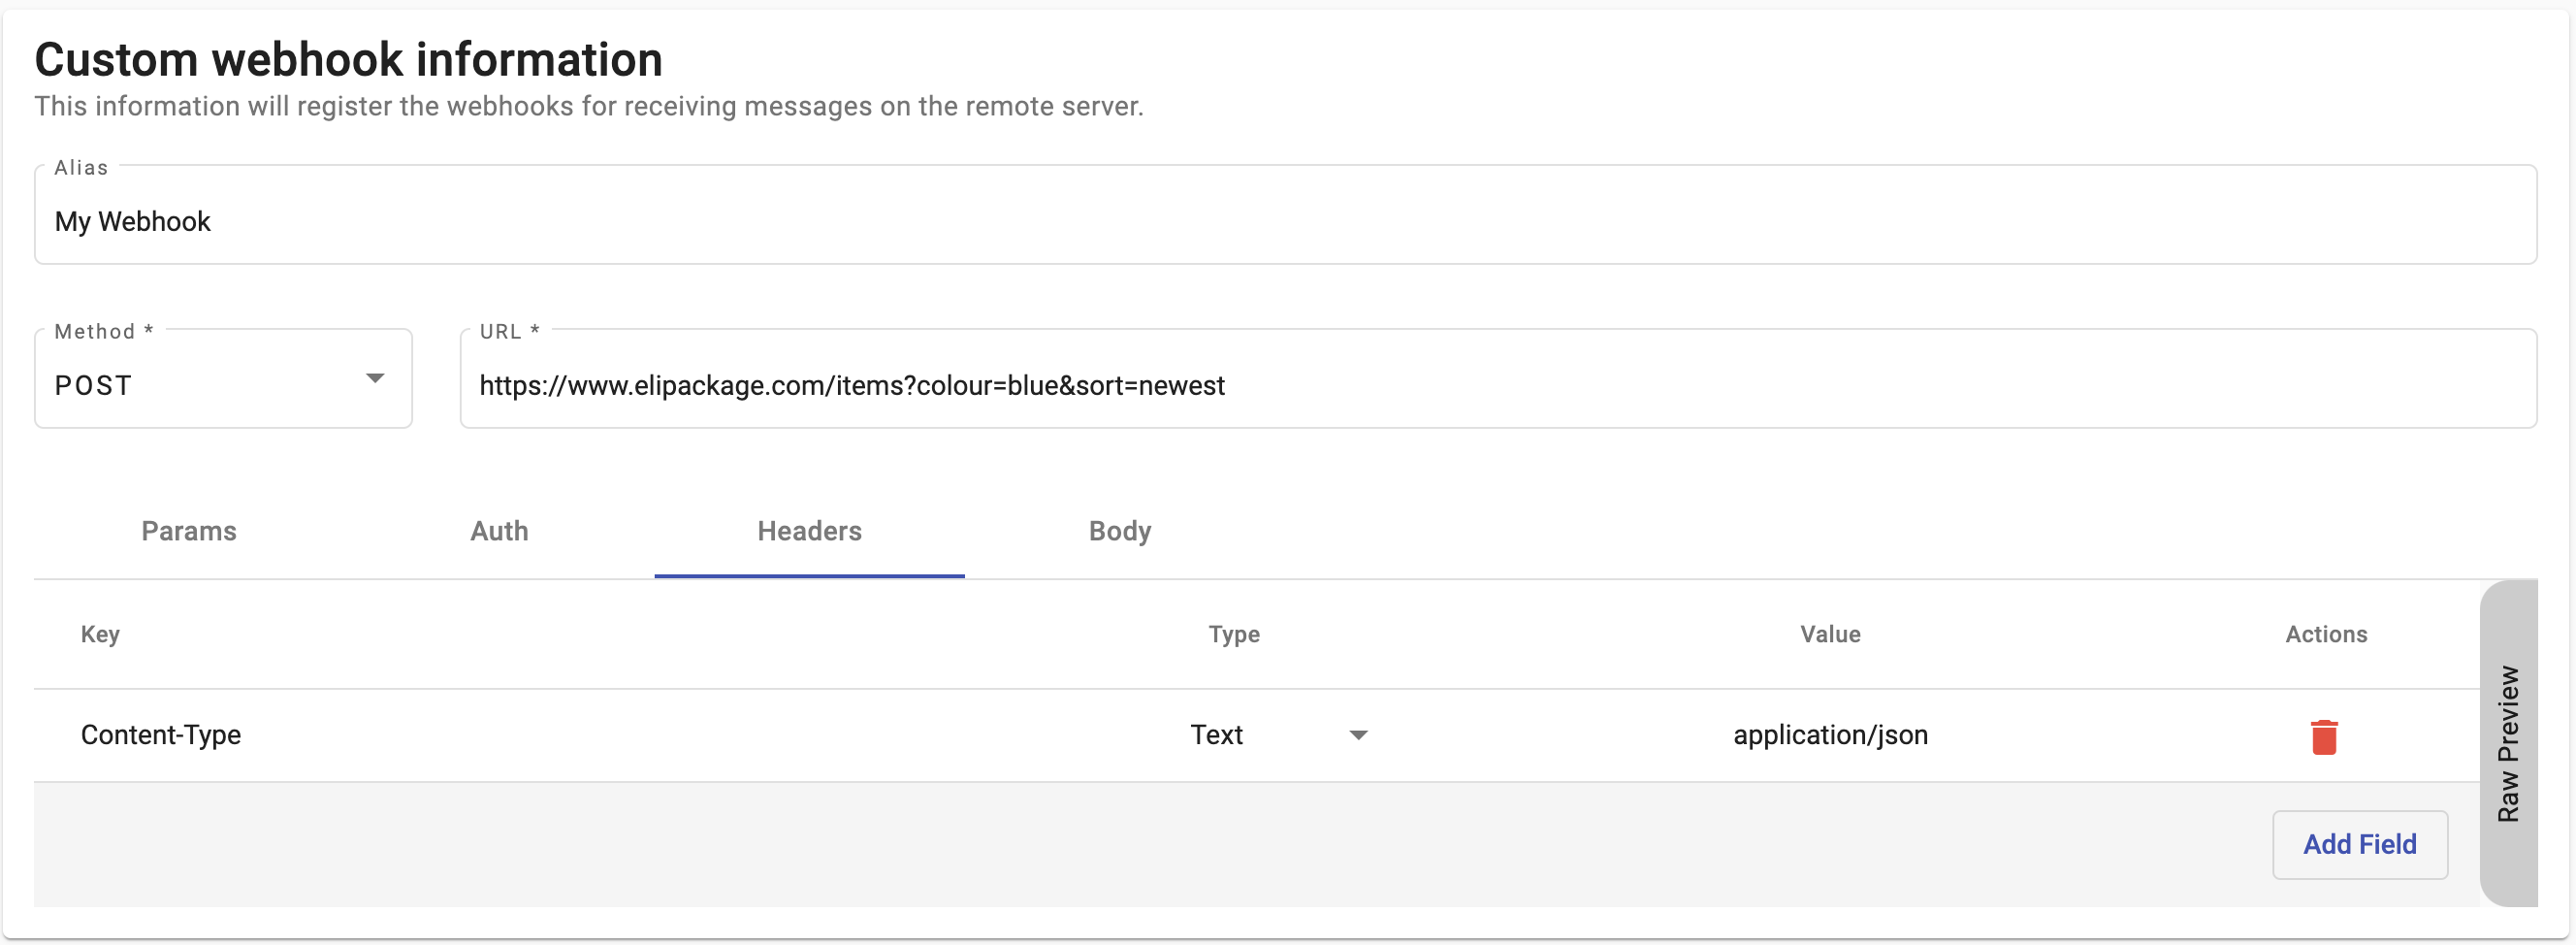
URL parameters, also known as query parameters, are key-value pairs appended to the end of a URL. They appear after a question mark (?). Multiple query parameters are separated by an ampersand (&).
A URL with query parameters uses this format:
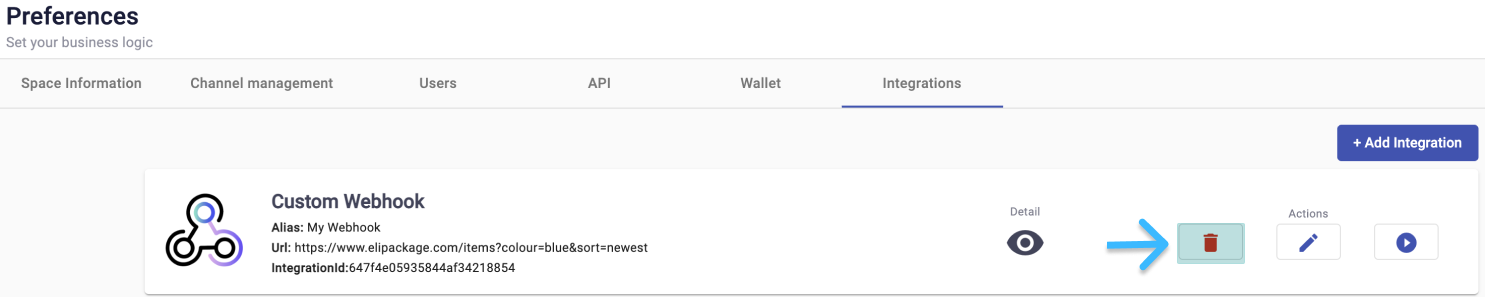
https://www.elipackage.com/items?colour=blue&sort=newest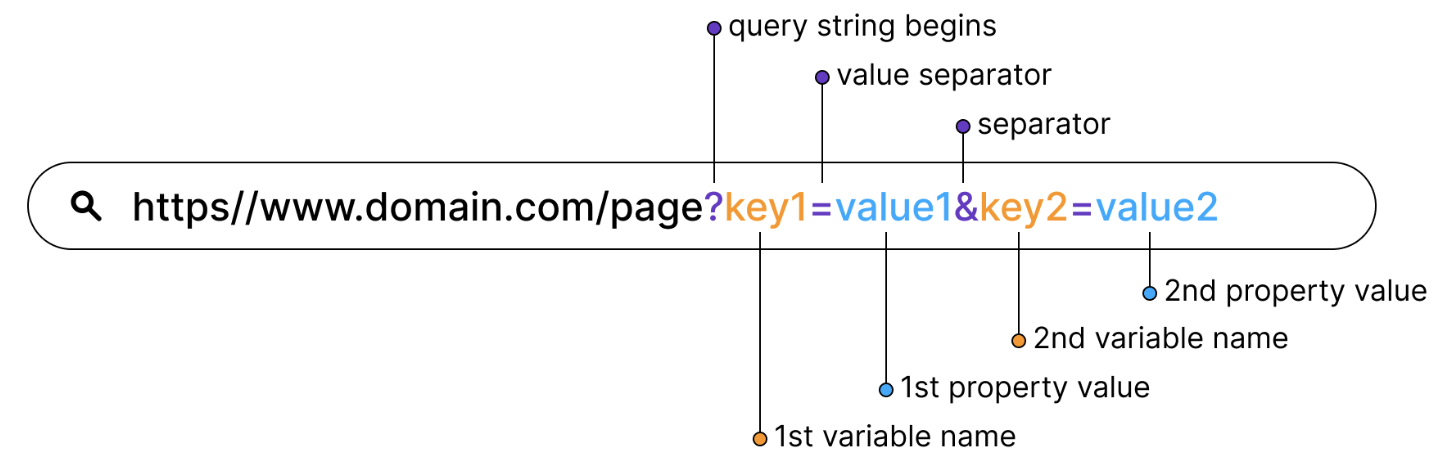
To add query parameters:
- Open the Query Params tab.
- Select Add Field.
- In the Key column, enter the parameter name.
- In the Value column, enter the parameter value.
- In the Type column, select Text or Variable, depending on the information you want to receive in your webhook.
Auth
Authentication secures webhook requests sent to destination systems. Use the Auth tab to choose the authentication type your webhook endpoint requires.
The platform supports these authentication types:
- API Key
- Basic
- Bearer Token
- No Authentication
To configure authentication:
- Open the Auth tab.
- Select the Type dropdown.
- Select the authentication type your webhook requires.
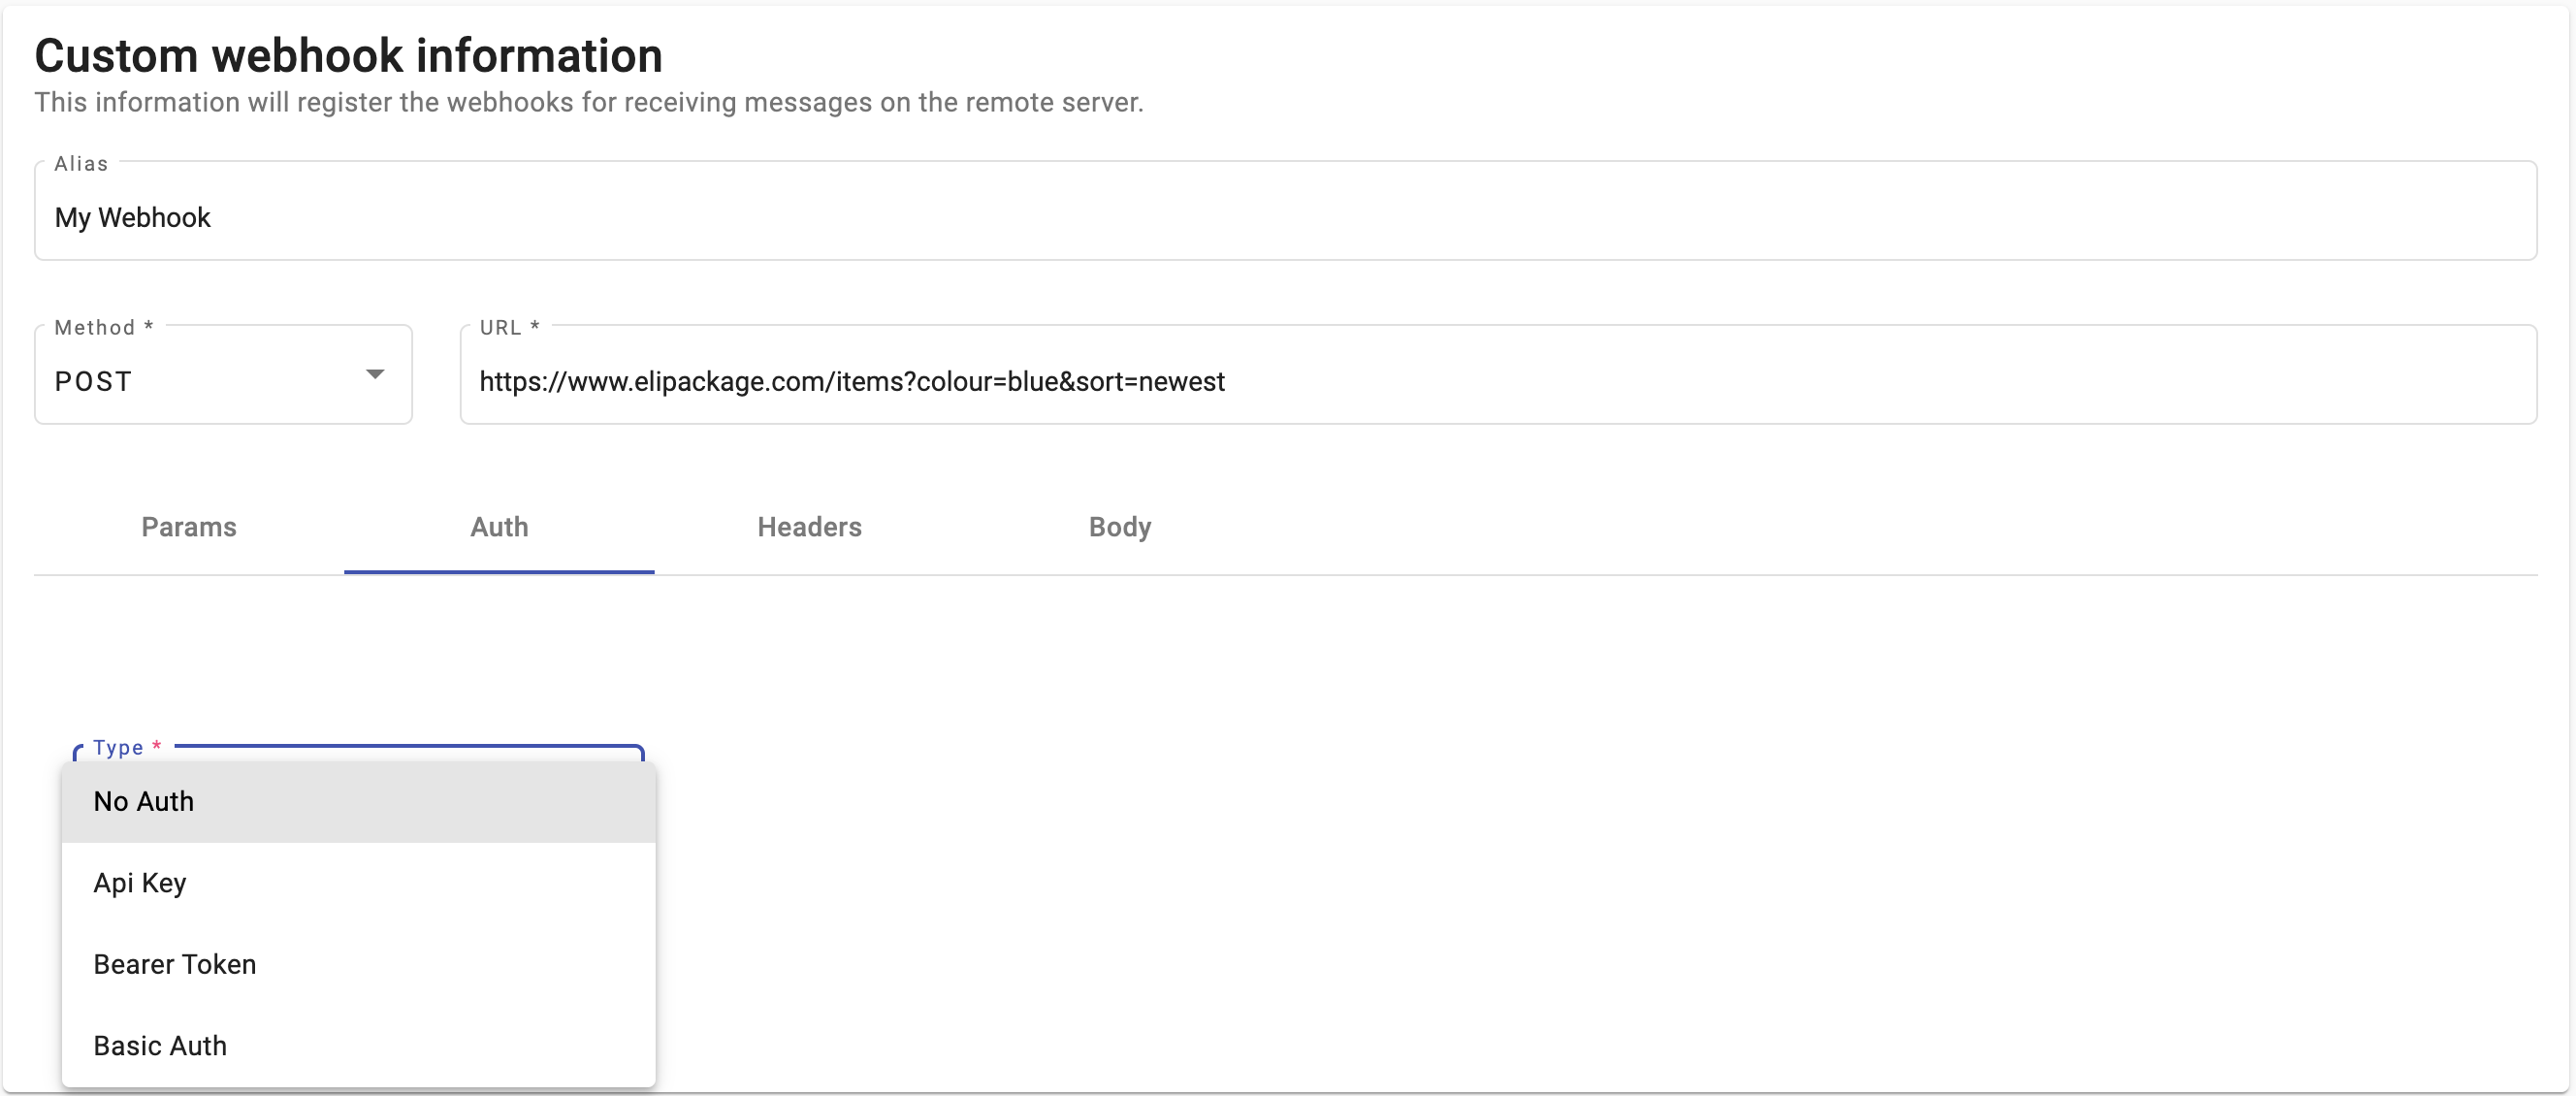
If your webhook does not require authentication, select No Authentication.
Headers
Headers provide metadata for the webhook HTTP request. You can use default headers or add custom headers that the platform sends with the payload.
Common default headers include:
Content-Type: Describes the data sent in the body, such asapplication/json.Content-Length: Defines the request size in bytes.
To add custom headers:
- Open the Headers tab.
- Select Add Field.
- In the Key column, enter the header name.
- In the Value column, enter the header value.
- In the Type column, select Text or Variable, depending on the information you want to send.
You can remove a header by selecting the Delete icon in the Actions column.
The following example shows header key-value pairs sent with all requests:
Body
The body contains the JSON payload sent to your callback URL. The payload includes events recorded when end users participate in your automation.
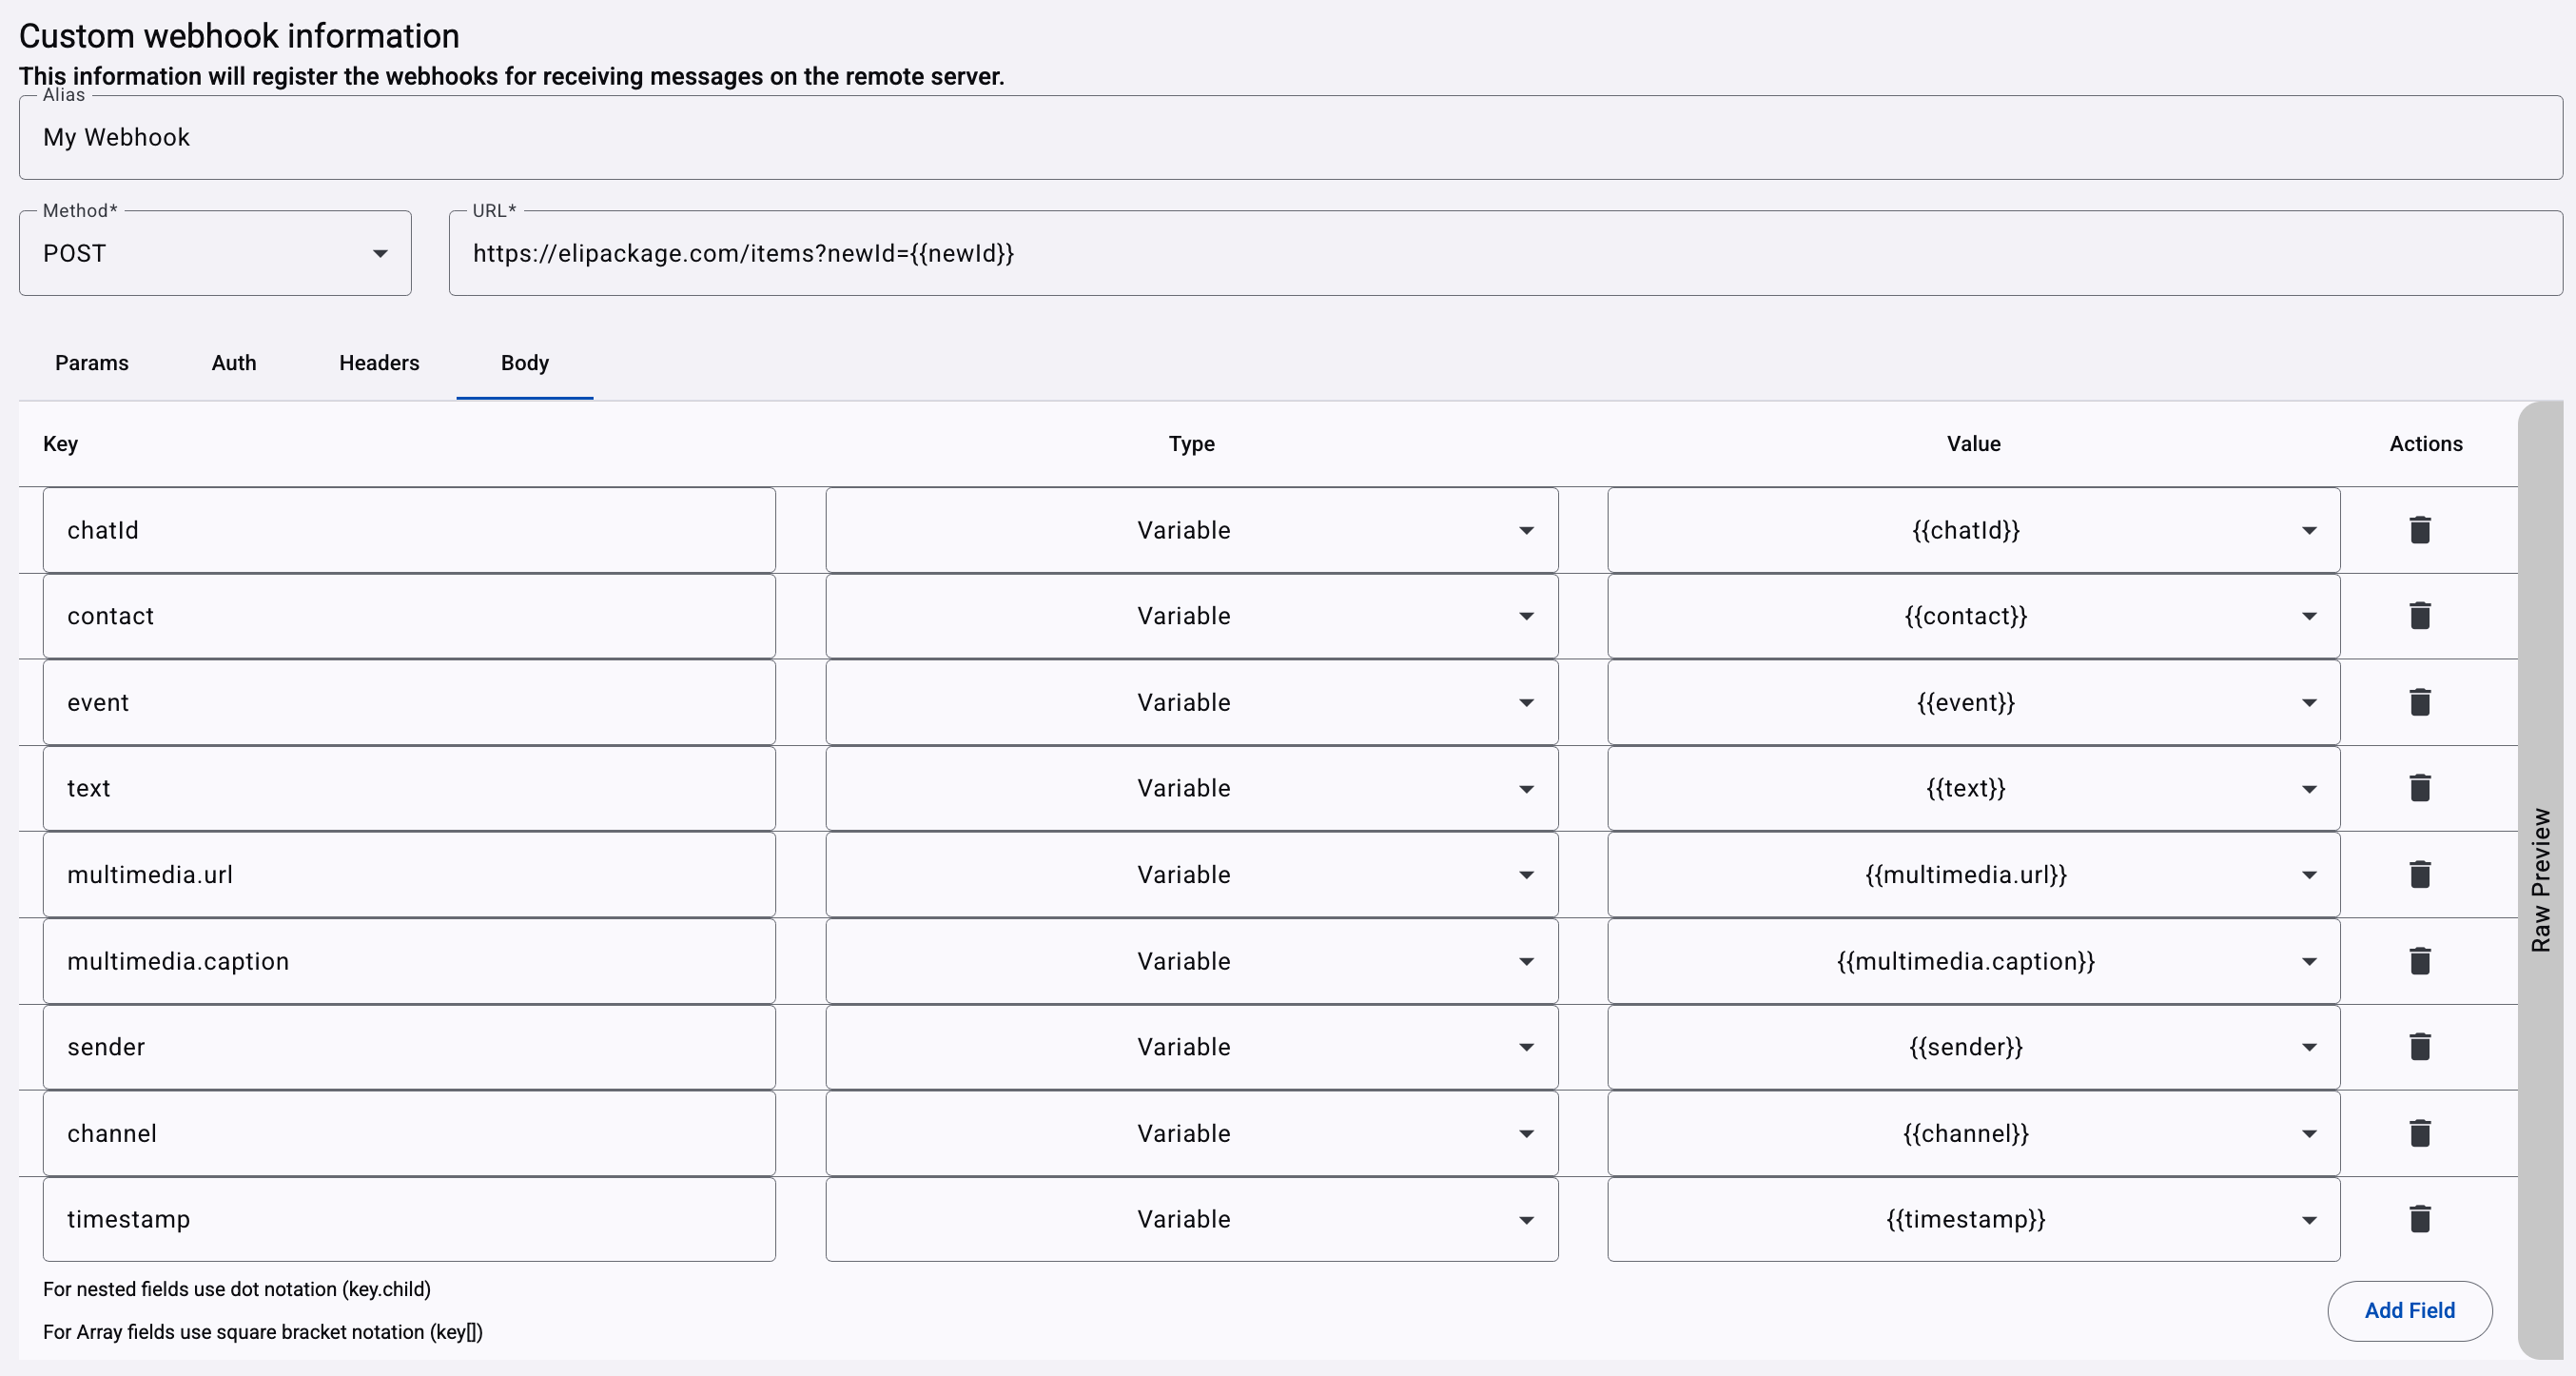
| Parameter / Key | Description |
|---|---|
| chatId | Unique identifier of the chat. |
| contact | Phone number of the end user. |
| event | Event that triggered the webhook request. The webhook can receive MESSAGE events and END events when the chat session closes. |
| text | Text received by the webhook. |
| multimedia.url | URL of the multimedia file received by the webhook. |
| multimedia.caption | Caption of the multimedia file received by the webhook. |
| sender | Sender identifier used during the active end user's interaction. This field reflects the origin of the message based on the active connection associated with the webhook. Use this key when you configure multiple senders within the same Custom Webhook connections and need to identify which sender was used for routing, tracking, analytics, or reporting.
|
| channel | Communication channel through which the interaction occurred, such as SMS or WhatsApp. Use this key to distinguish events when multiple channels are configured under the same webhook integration. |
| timestamp | Date and time when the message was received or generated. Use this timestamp when external systems need to store, sort, or process webhook events chronologically. |
NOTEFor nested fields, use dot notation, such as
key.child.For array fields, use square bracket notation, such as
key[].
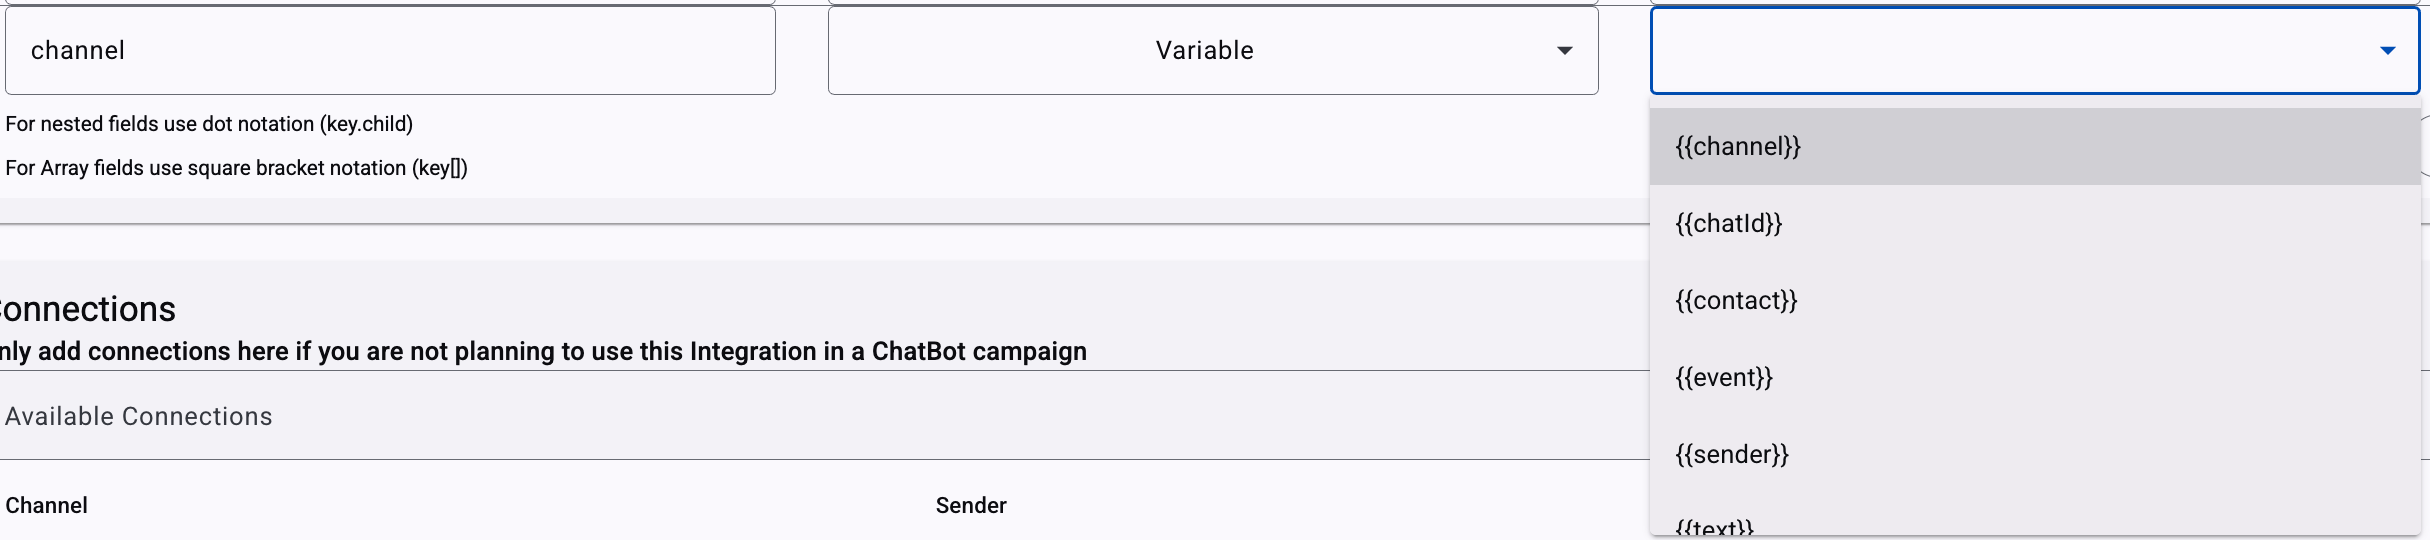
To receive additional parameters in your webhook:
- Select Add Field.
- In the Key column, enter the parameter name.
- In the Type column, select Variable.
- In the Value column, choose the variable to send.
For example, to receive the channel where the interaction occurred:
- In the Key column, enter
channel. - In the Type column, select Variable.
- In the Value column, choose
{{channel}}.
To exclude a predefined parameter from your webhook body, select the Delete icon in the Actions column.
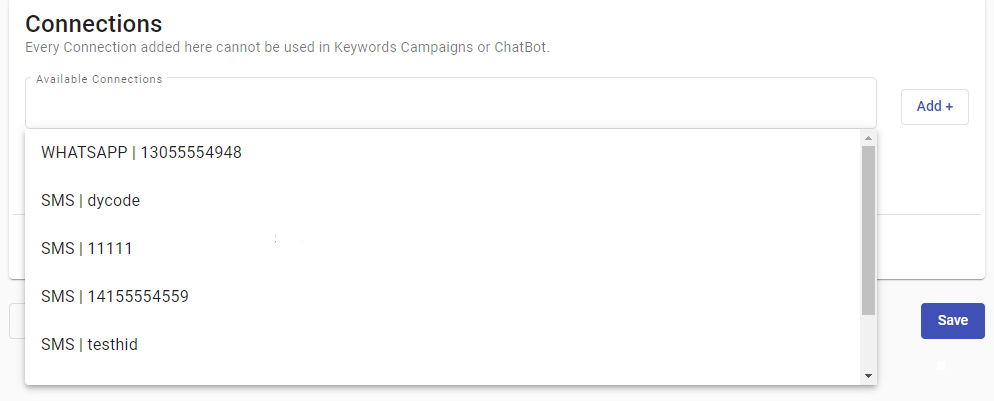
Configure connections
Use Connections to select the platform channels used for Custom Webhook interactions.
If you want to integrate Custom Webhook with a Chatbot Service automation, do not add any connections to the Custom Webhook.
Channels used in the Custom Webhook integration cannot be shared with Keyword or Chatbot automations because this creates an operational conflict.
You can add these channel connection types:
- SMS texting
Additional channels may be added in future releases.
NOTEConnections may reference senders that are also used in other platform features, such as auto-replies or keyword automations.
Connection conflicts are evaluated during activation, not during configuration. This means you can add connections successfully even if they later fail to activate.
To configure channel connections:
-
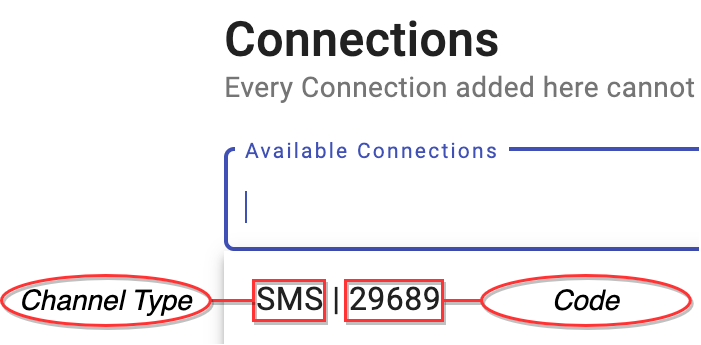
Select a connection from the Available Connections dropdown.
The left side of the connection shows the channel type. The right side shows the connection code.
-
Select Add +.
-
Repeat these steps for each channel that is part of the integration.
The platform adds the selected channels to the table below the menu.

After you define Custom Webhook Information and Connections, select Save.
If you are integrating Custom Webhook with a Chatbot Service automation, complete the required Custom Webhook Information fields without adding connections, then select Save.
Activate a Custom Webhook with connections
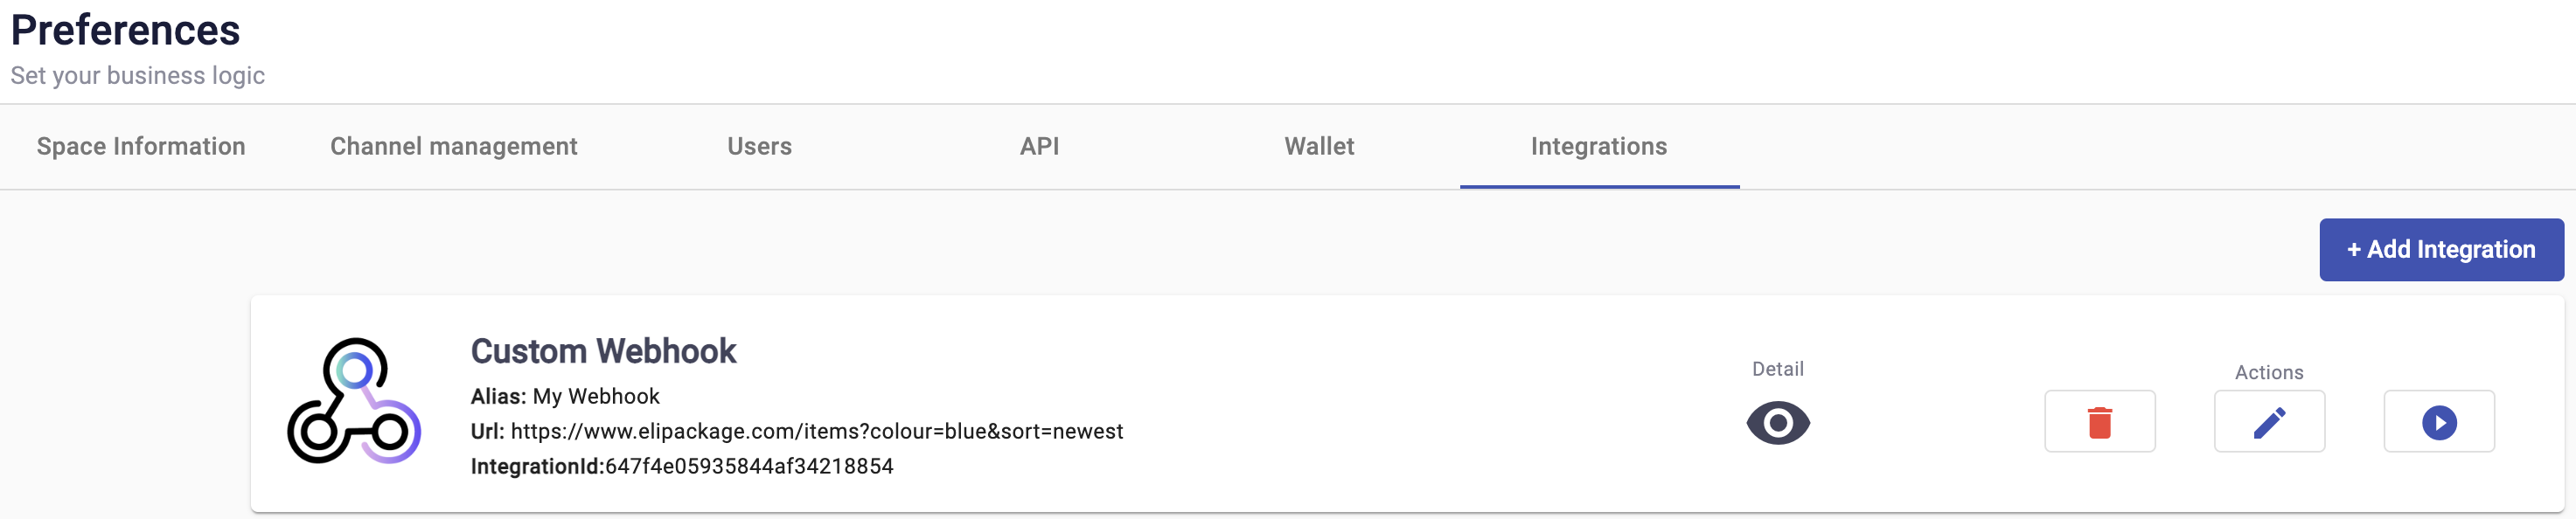
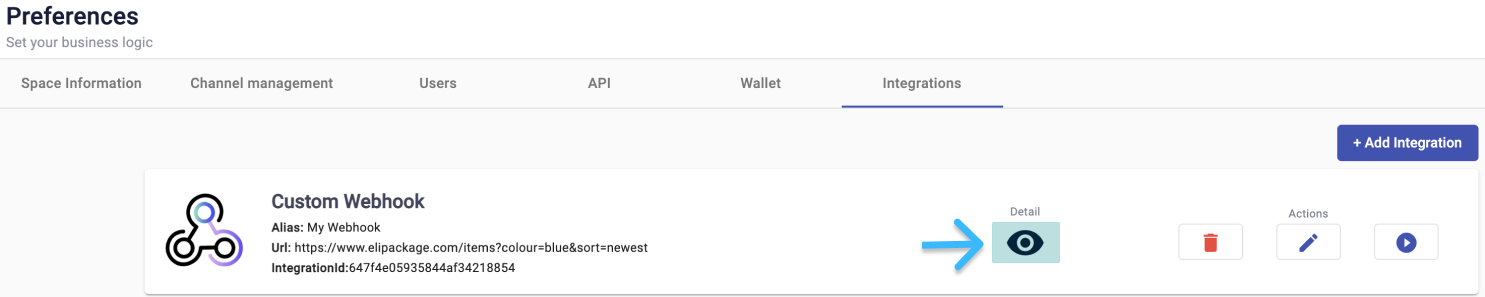
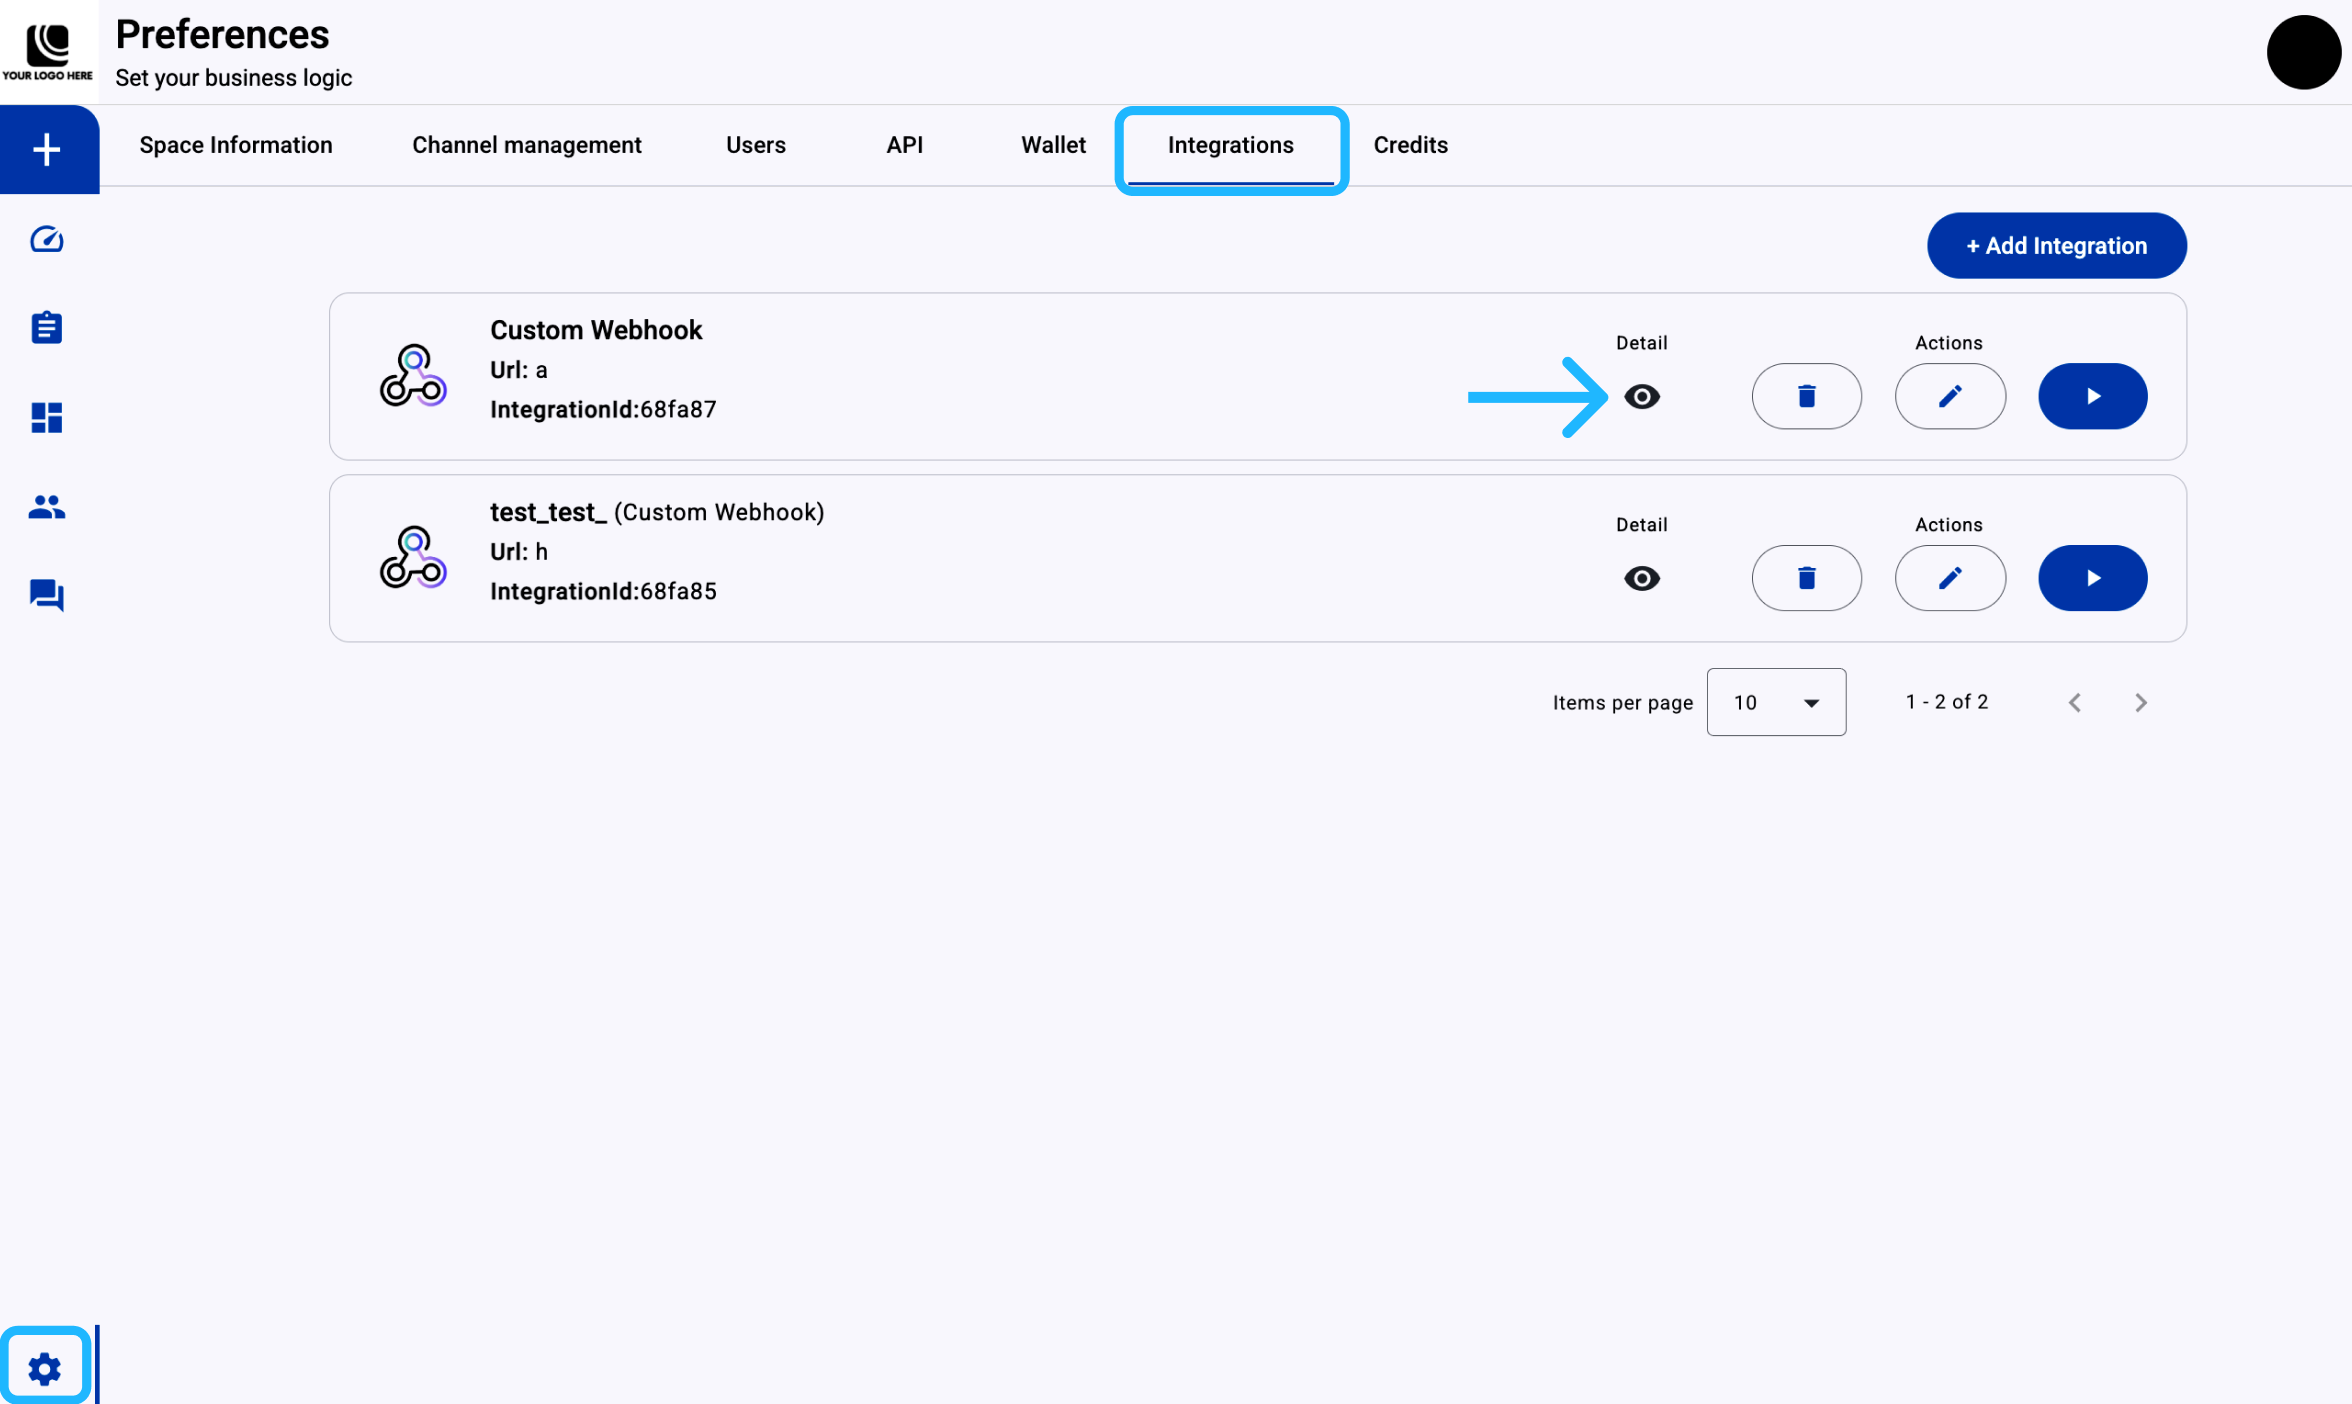
After you save the integration, the platform displays it as a card under the Integrations tab. The card shows the alias, URL, integration ID, connection details, API details, and actions to delete, edit, or activate the integration.
To activate the integration:
- Select Start ▶.
- Confirm that the integration card changes to the active state.
When the integration is active, the connection icons appear in blue.

To view sender details, select the Details icon on the card. The Connection Details tab shows the channel and number or code associated with each sender.
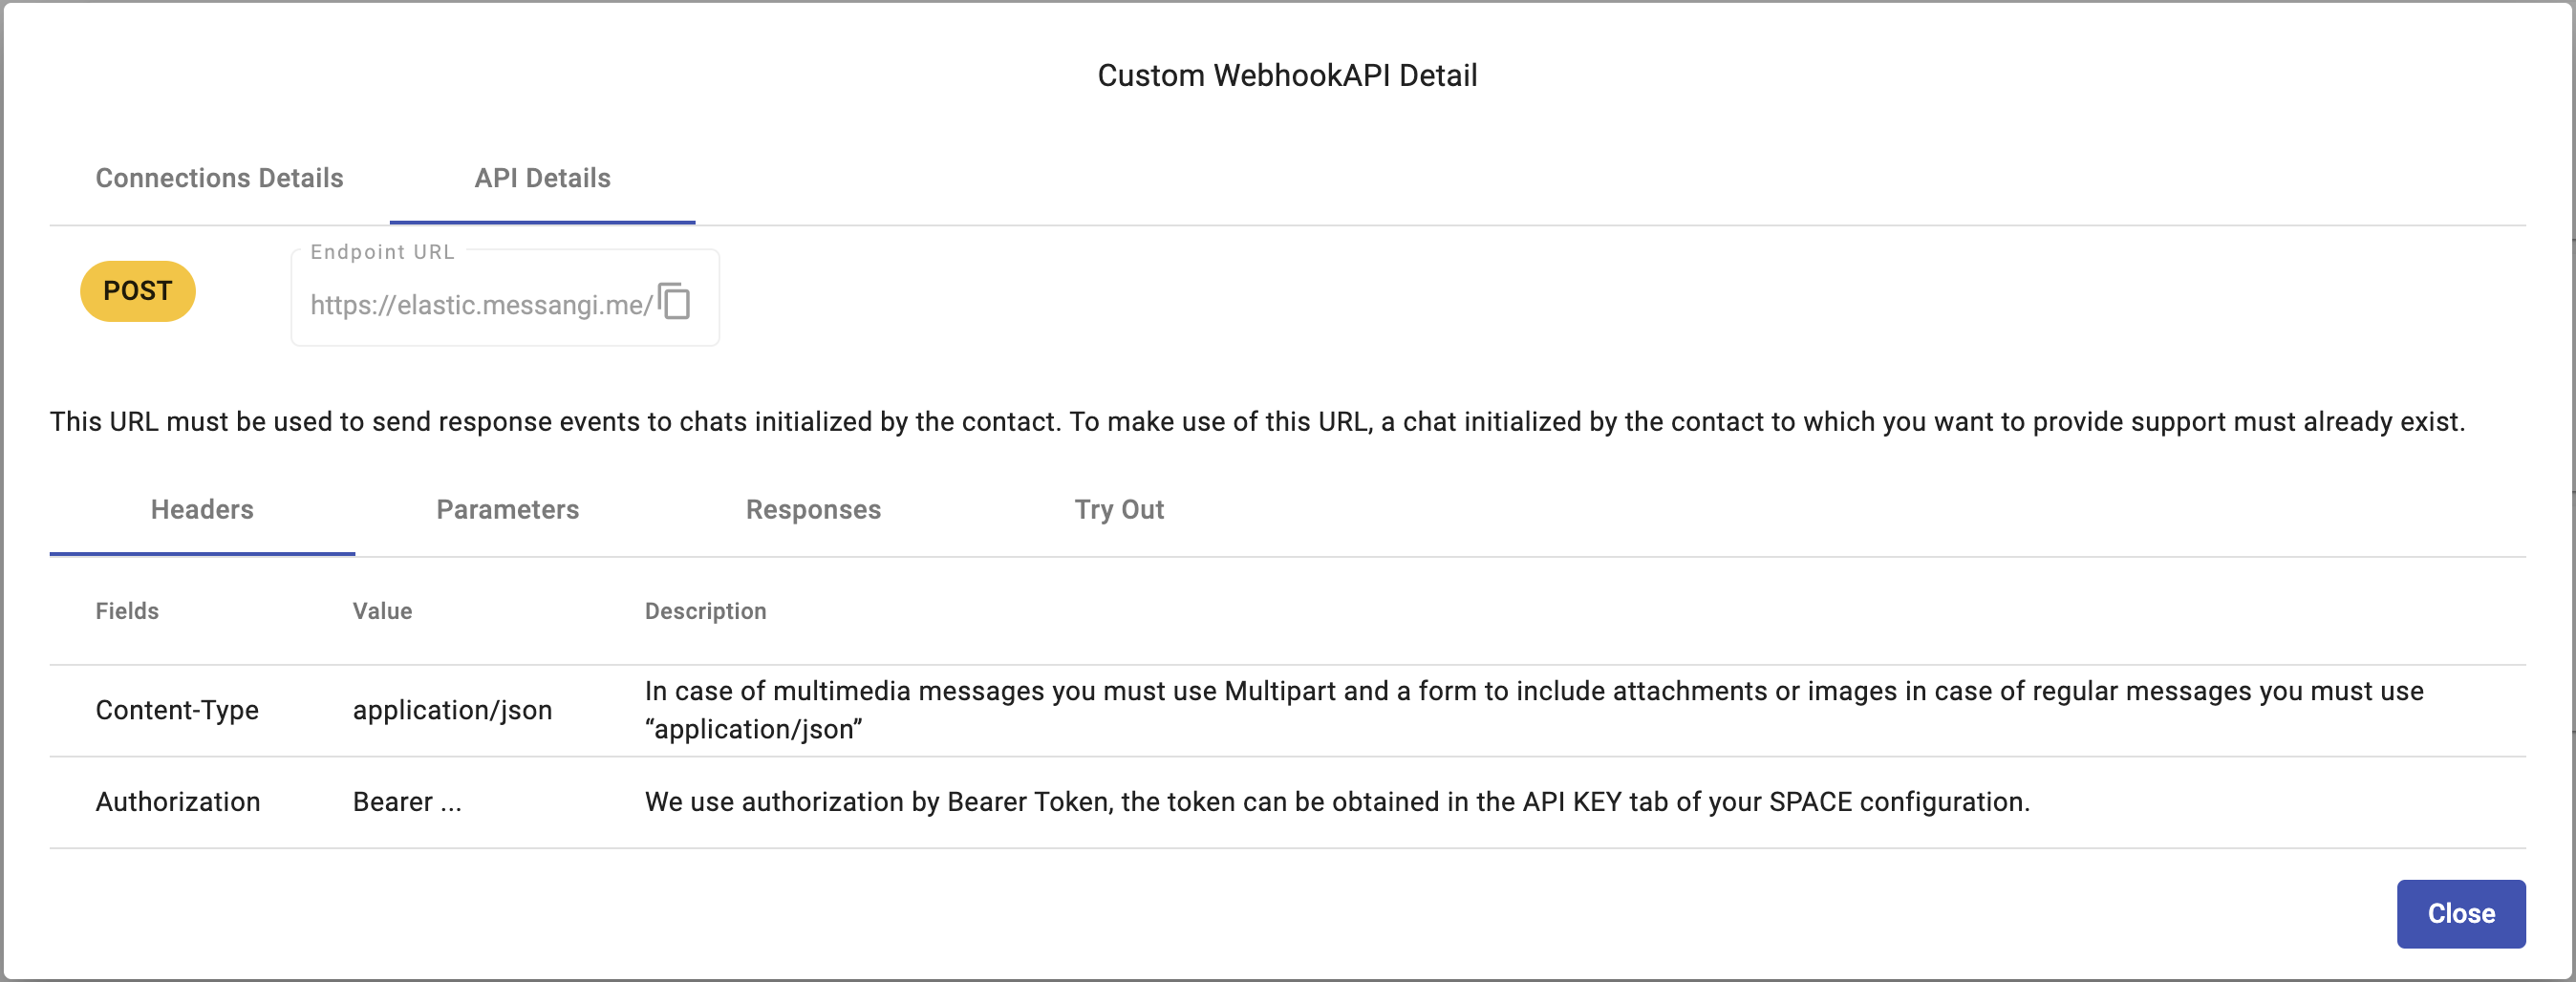
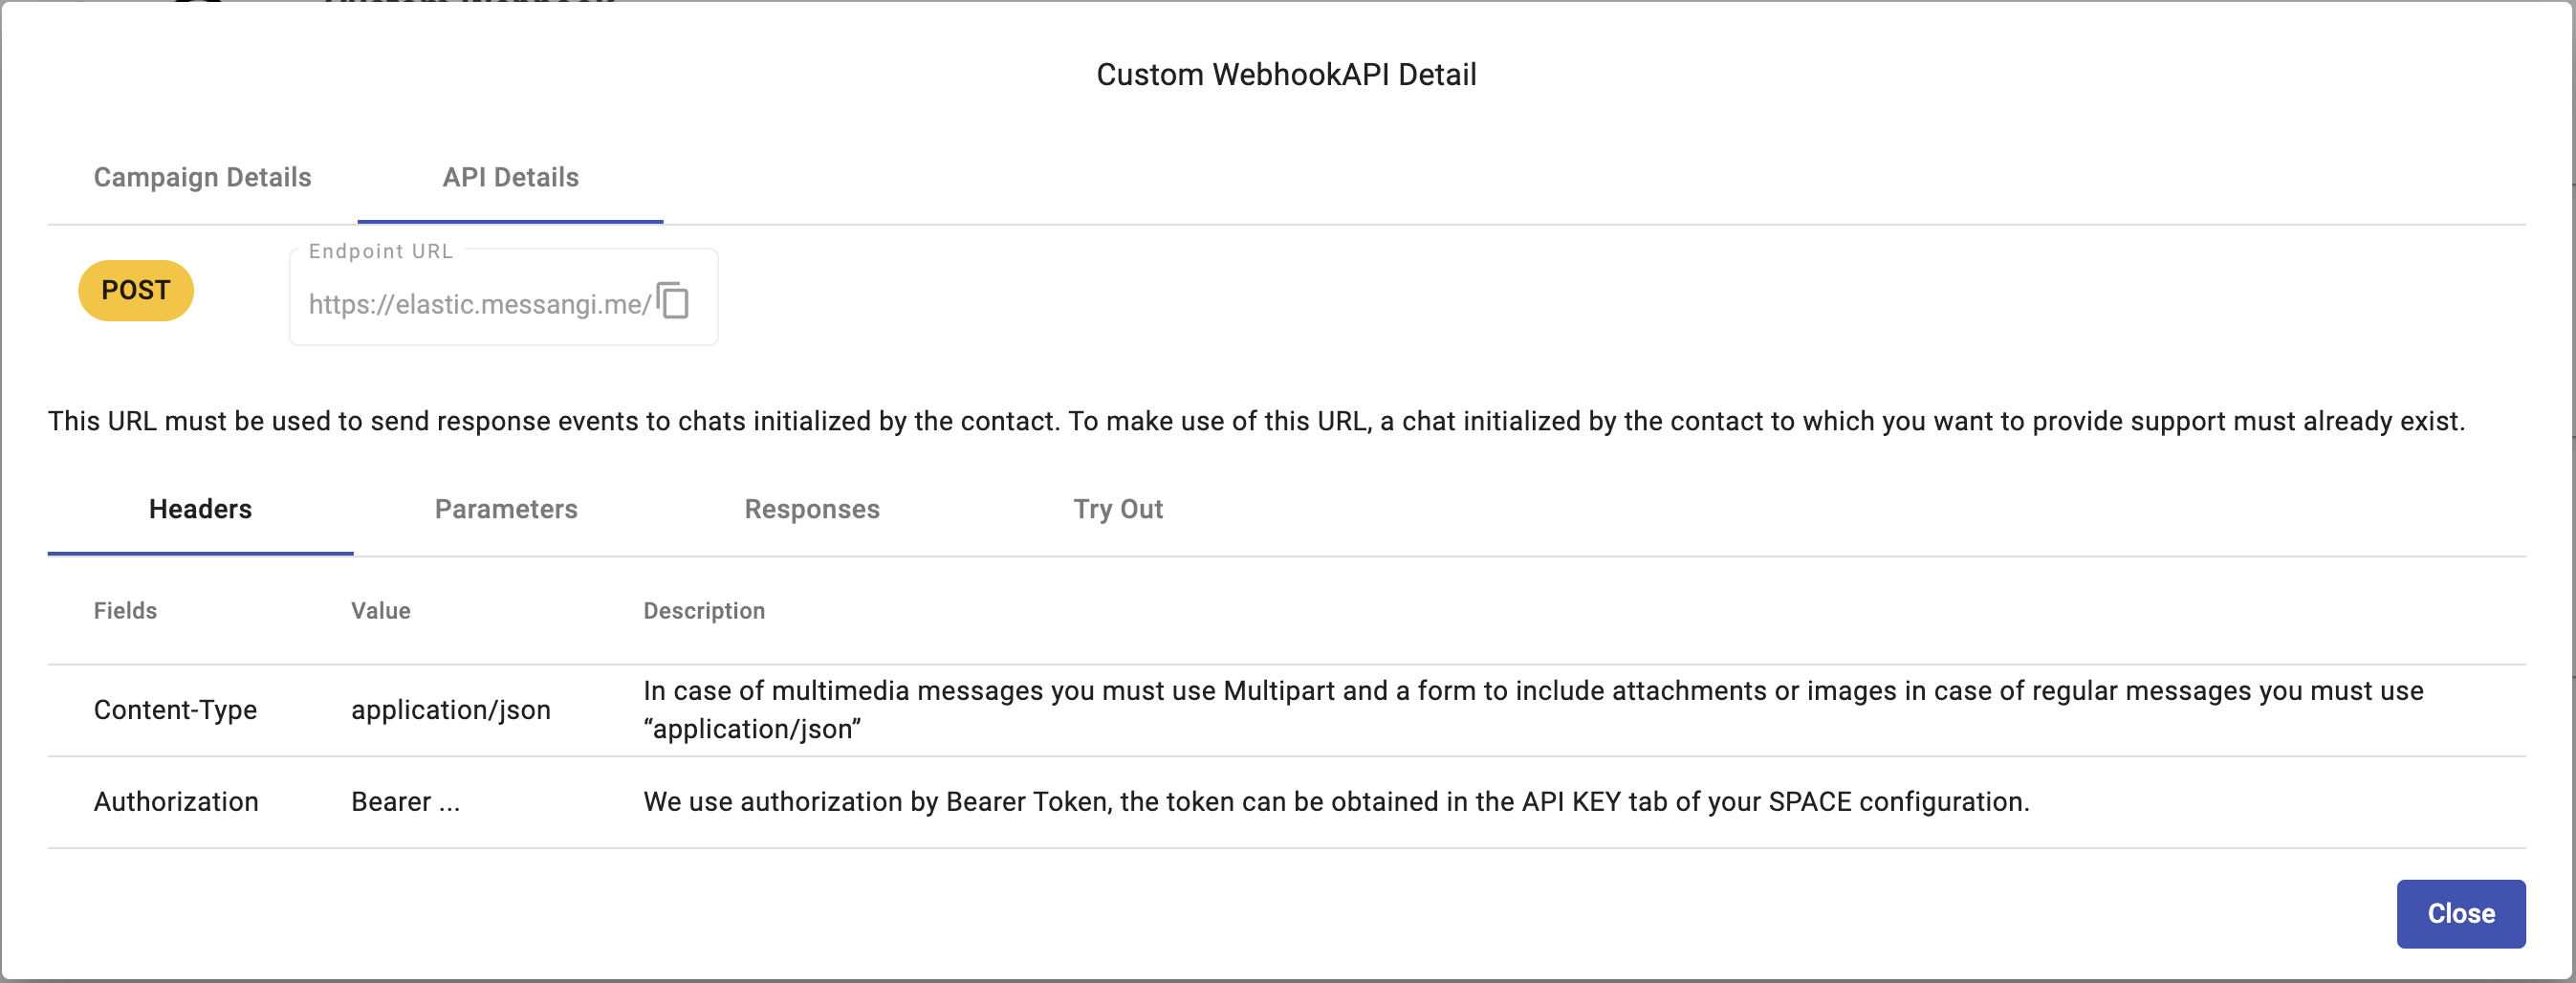
To view API details, select the API Details tab. This tab shows the endpoint URL, headers, parameters, and responses.
Use the Try Out tab to send response events to chats initialized by a contact. A chat initiated by the contact must already exist before you can use this URL. For more information, see Send Response Messages via Webhook API.
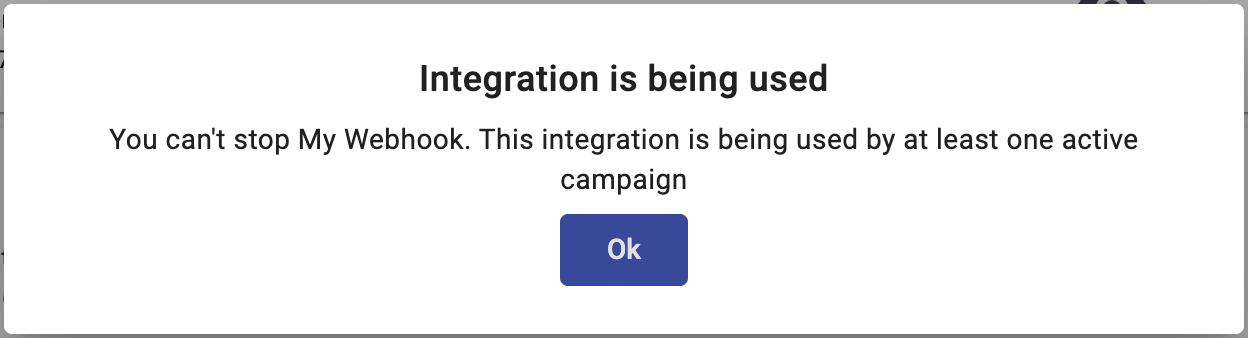
To deactivate an active integration, select Stop under Actions.
WARNINGWhen you activate a Custom Webhook integration with connections, the platform attempts to activate the integration itself and each configured connection independently.
The platform does not block activation before attempting it. Activation outcomes depend on each connection result.
No connections activated: If none of the configured connections can be activated:
- The integration remains inactive.
- An error message is displayed.
- No connections are enabled.
Partial connection activation: If at least one connection is activated and others fail:
- The integration becomes active.
- A message indicates that not all connections were activated.
- Connections with errors remain inactive.
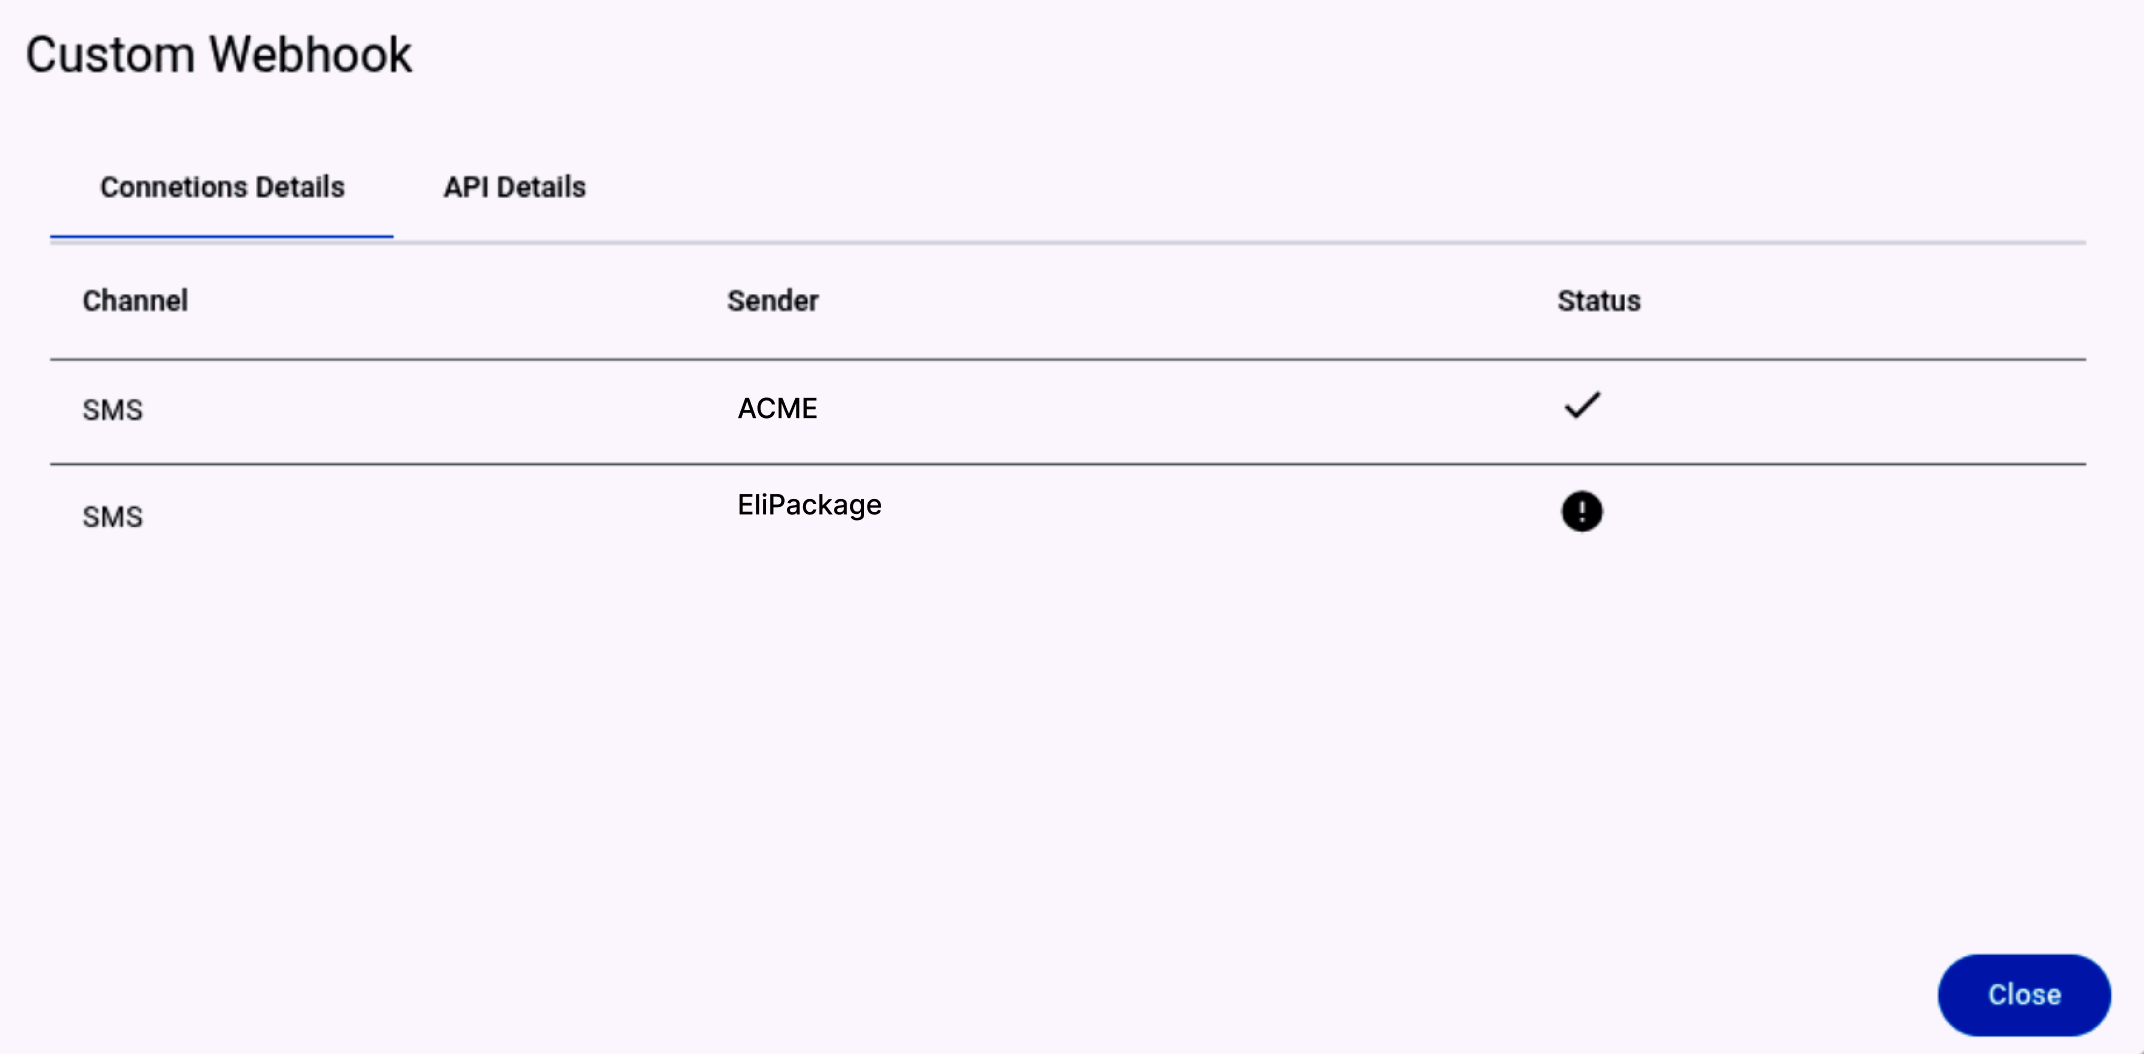
When an integration is activated with partial connection errors, a snackbar notification appears. The message includes a link that opens the Connection Details dialog.
The Connection Details dialog shows each configured connection and each connection activation status.
Configure the integration in two sections:
- Custom Webhook Information: Defines the webhook alia
You can also open this dialog from the Details icon on the integration card.
A common reason for connection failure is that a sender already has an active auto-reply or is being used elsewhere in the platform.
Activate a Custom Webhook for Chatbot Service
If you saved the Custom Webhook integration without connections, activate it before associating it with a Chatbot Service automation.
The saved integration appears under the Integrations tab as a card. The card shows the alias, URL, integration ID, API details, and actions to delete, edit, or activate the integration.
To activate the integration:
- Select Start ▶.
- Confirm that the integration card changes to the active state.

After the Custom Webhook integration is active, configure the Chatbot automation that will use it. See the Chatbot section for configuration steps.
NOTEThe Custom Webhook integration must be Active before you can associate it with a Chatbot automation.
After you create the Chatbot and enable it in Live status, the integration card displays the active state and the Details icon.
Select the Automations icon to view the automation linked to the Custom Webhook integration.
The dialog displays:
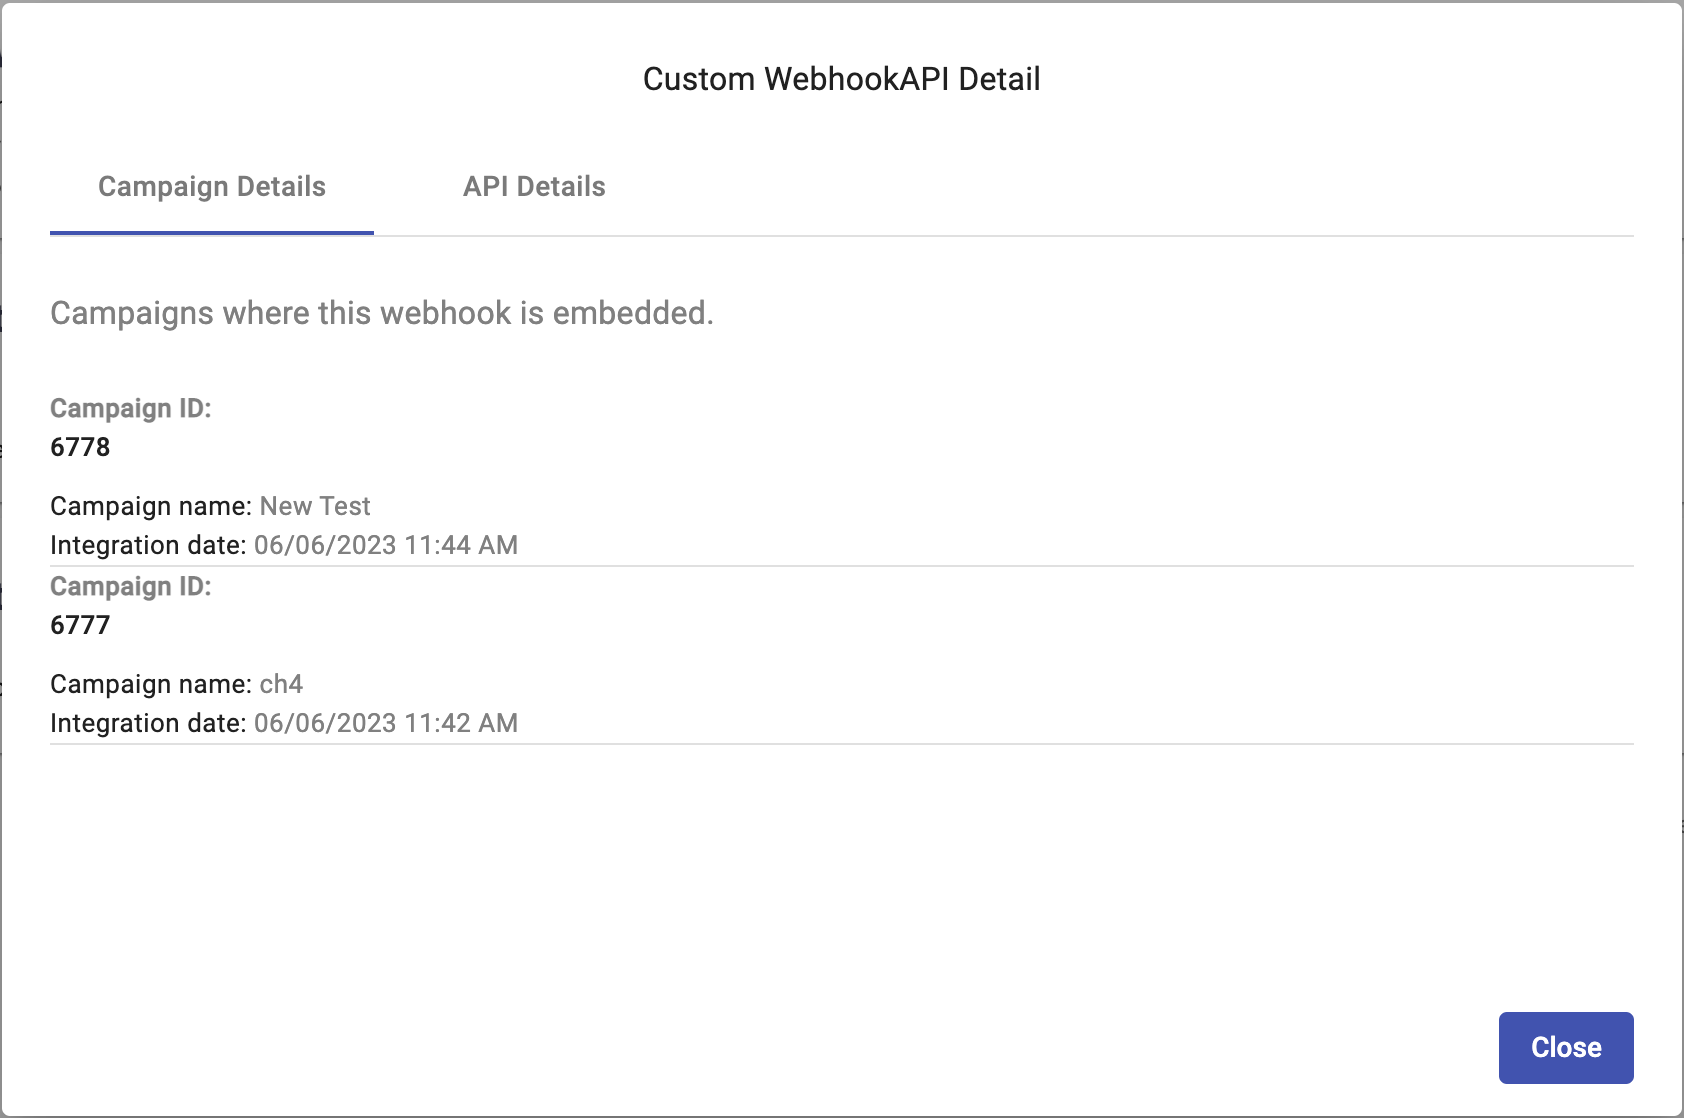
- Campaign Id: Unique identifier of the automation.
- Campaign Name: Name of the automation.
- Integration Date: Date when the automation was created, linked to the integration, and enabled in Live status.
Select the API Details tab to view the endpoint URL, headers, parameters, and responses. Use the Try Out tab to send response events to chats initialized by a contact. A chat initiated by the contact must already exist before you can use this URL.
Remove a Custom Webhook linked to automations
You cannot pause or stop a Custom Webhook integration while it is linked to automations. If you try to pause it, the platform displays a dialog indicating that the requested action is invalid.
To remove a Custom Webhook integration linked to automations:
- Disable the Live automations associated with the Custom Webhook integration.
- Go to the Live automation associated with the Custom Webhook integration.
- Select Report.
- Select Pause.
- In the confirmation dialog, select Confirm.
After you disable the associated automations:
- Return to the Integrations tab from the References section.
- Select Pause.
- Optional: To delete the integration, select the Delete icon from the Actions buttons.
Send response messages via Webhook API
Use the Webhook API to send outbound messages, also known as MT (Mobile Terminated) messages, from your system to an end user through an existing Custom Webhook chat session.
This endpoint does not start new conversations. It injects events into existing chats, so it requires an active chat context. A chat can become active in different ways depending on the broadcast and business logic.
The Custom Webhook integration uses two endpoints:
- Client Webhook endpoint: The external endpoint you configure in the Custom Webhook integration. The platform sends inbound events generated by the contact, such as MO (Mobile Originated) messages, to this endpoint.
- Response Webhook endpoint: The endpoint generated by the platform for the integration. Your system sends outbound MT response messages to this endpoint to inject them into an existing chat session.
A common response flow works like this:
- Your business sends an outbound SMS or WhatsApp message to the contact, such as a notification, broadcast message, or operational alert.
- The contact replies to that message.
- The platform receives the reply as an inbound message event, also known as an MO message.
- The inbound message creates or activates a chat session associated with the contact and the communication flow.
- The platform sends the inbound event in JSON format to the Client Webhook endpoint configured in the integration.
- Your system receives and processes the inbound event data.
- Your system sends a new outbound MT message to the Response Webhook endpoint associated with the integration, targeting the existing chat session.
- The platform receives the request, routes the outbound message through the appropriate sender and channel configuration, and delivers it to the contact.
MT response messages are valid only when a chat already exists. If the contact has not initiated the conversation, there is no active chat context, and the MT request cannot be associated with a session.
Endpoint URL
Send MT messages with a POST request to this endpoint:
https://elastic.messangi.me/integrations/live-chat/{{ID_Integration}}/chats/{{chatIdentifier}}/eventsPath parameters:
{{ID_Integration}}: ID of the Custom Webhook integration.{{chatIdentifier}}: Contact number of the contact who will receive the message.
Required headers:
Authorization: Valid Bearer token.Content-Type:application/json.
SMS POST message example
Use this JSON structure to send an outbound SMS message through the Webhook API:
{
  "type": "MESSAGE",
  "channel": {
    "type": "SMS",
    "route": "141518",
    "connection": "AWSexample121218"
  },
  "msg": "Thank you for attending. We look forward to seeing you again soon."
}| Parameter | Required value | Description |
|---|---|---|
type | "MESSAGE" | Event type injected into the chat session. |
channel | Object | Communication broadcast configuration used to route the outbound message through the infrastructure configured in the Custom Webhook integration. |
channel.type | "SMS" | Communication broadcast through which the message is sent. |
channel.route | SMS route | SMS route associated with the configured sender. |
channel.connection | Connection identifier | Internal connection identifier linked to the SMS configuration defined in the Custom Webhook Connections section. |
msg | Text message | Text content delivered to the contact's device. |
WhatsApp POST message example
If a WhatsApp user sends your application a message, either as a reply to one of your outbound message templates or by initiating the conversation, your application has a 24-hour customer service window to send messages without using a message template.
Messages sent within this 24-hour window are known as Session Messages. The following example sends a WhatsApp Session Message and can be used only while the 24-hour window is active.
{
  "type": "MESSAGE",
  "channel": {
    "type": "WHATSAPP",
    "sender": "584123149352"
  },
  "msg": "Thank you for attending. We look forward to seeing you again soon."
}| Parameter | Required value | Description |
|---|---|---|
type | "MESSAGE" | Event type injected into the chat session. |
channel | Object | Communication broadcast configuration used to route the outbound message through the WhatsApp infrastructure configured in the Custom Webhook integration. |
channel.type | "WHATSAPP" | Communication broadcast through which the message is sent. |
channel.sender | WhatsApp sender number | WhatsApp sender number associated with a registered WhatsApp Business Account (WABA). This value must match a sender configured and activated within the Custom Webhook Connections section. |
msg | Text message | Text content delivered to the contact's device. |
Test the endpoint URL
After you create and activate the Custom Webhook integration, test the endpoint URL from the Communications Platform. Testing lets you simulate an outbound message response and verify that your endpoint and routing configuration work before moving to production.
To test the endpoint URL:
- Go to Preferences → Integrations.
- Locate your Custom Webhook integration.
- Select the Details icon on the integration card.
The platform opens the integration configuration window.
- Select the API Details tab.
- Open the Try Out sub-tab.
The platform displays the endpoint URL used to send response events to active chats.
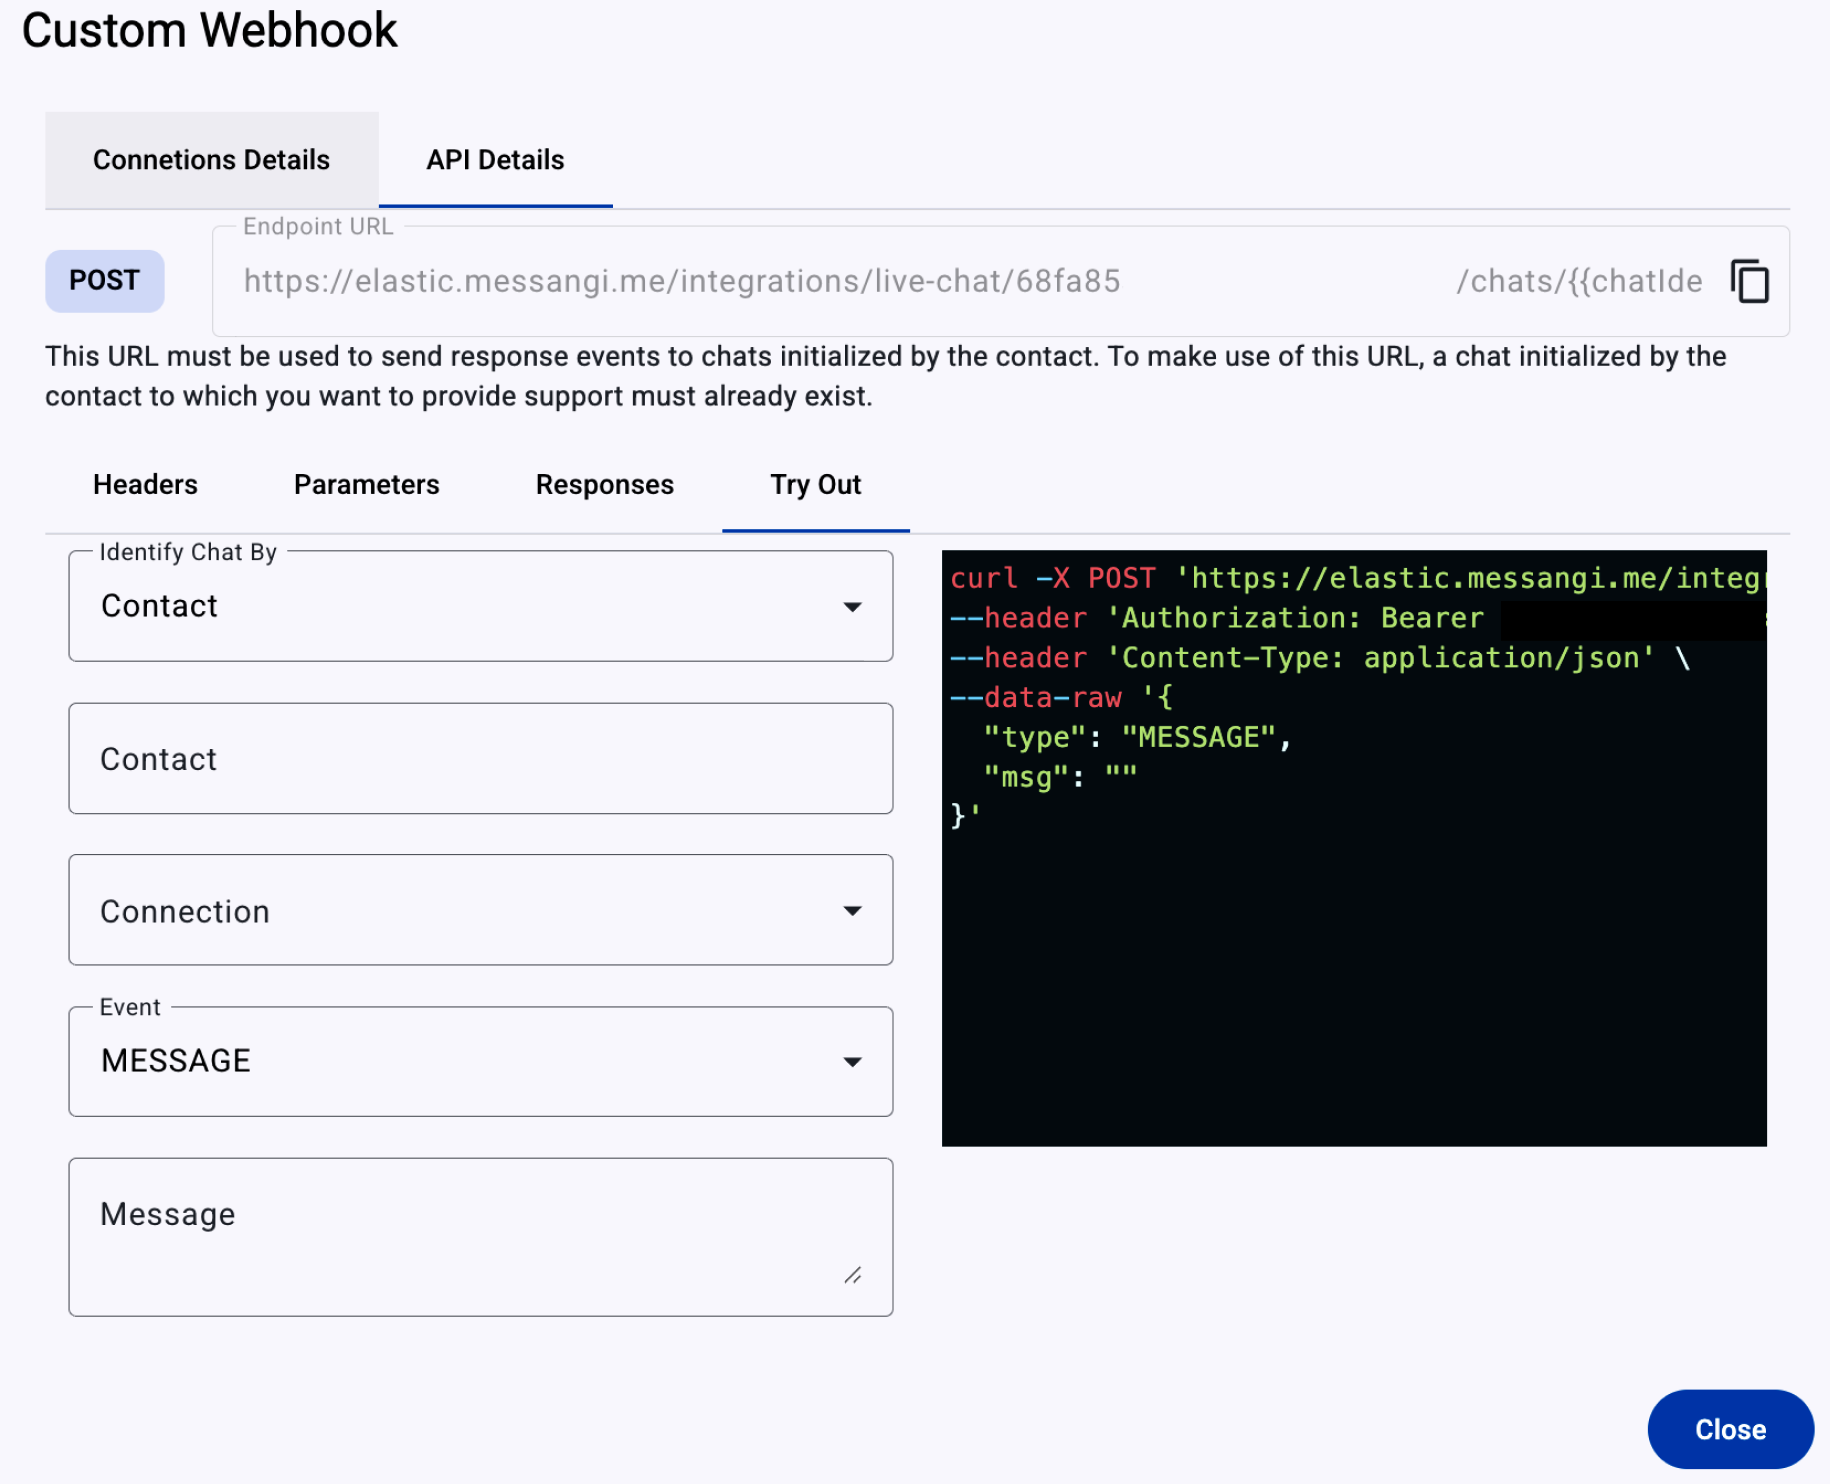
NOTEUse this URL only to send response events to chats activated by an inbound message from the contact.
- Under Identify Chat By, select Contact.
- In the Contact field, enter the contact number.
- Select the internal connection identifier linked to the SMS or WhatsApp configuration defined in the Custom Webhook Connections section.
- Choose the
MESSAGEevent type. - In the Message field, enter the message content to deliver to the contact.
As you complete these fields, the platform generates the corresponding cURL request on the right side of the screen.
Copy the generated cURL request and paste it into your terminal. The generated request includes the endpoint URL, required Bearer token authorization header, Content-Type: application/json header, and JSON request body that contains the message event.
Use the response to confirm that the message was injected into the active chat session and routed through the configured broadcast.
Updated 20 days ago