Digital Coupon Template
The Digital Coupon Template allows to predefine the configuration of coupons to be used on campaigns to help you create images and other user interface elements aligned with your brand.

The template is optimized for both iOS and Android (Google Wallet) environments, and includes a responsive preview panel that displays your changes in real time as you configure each element
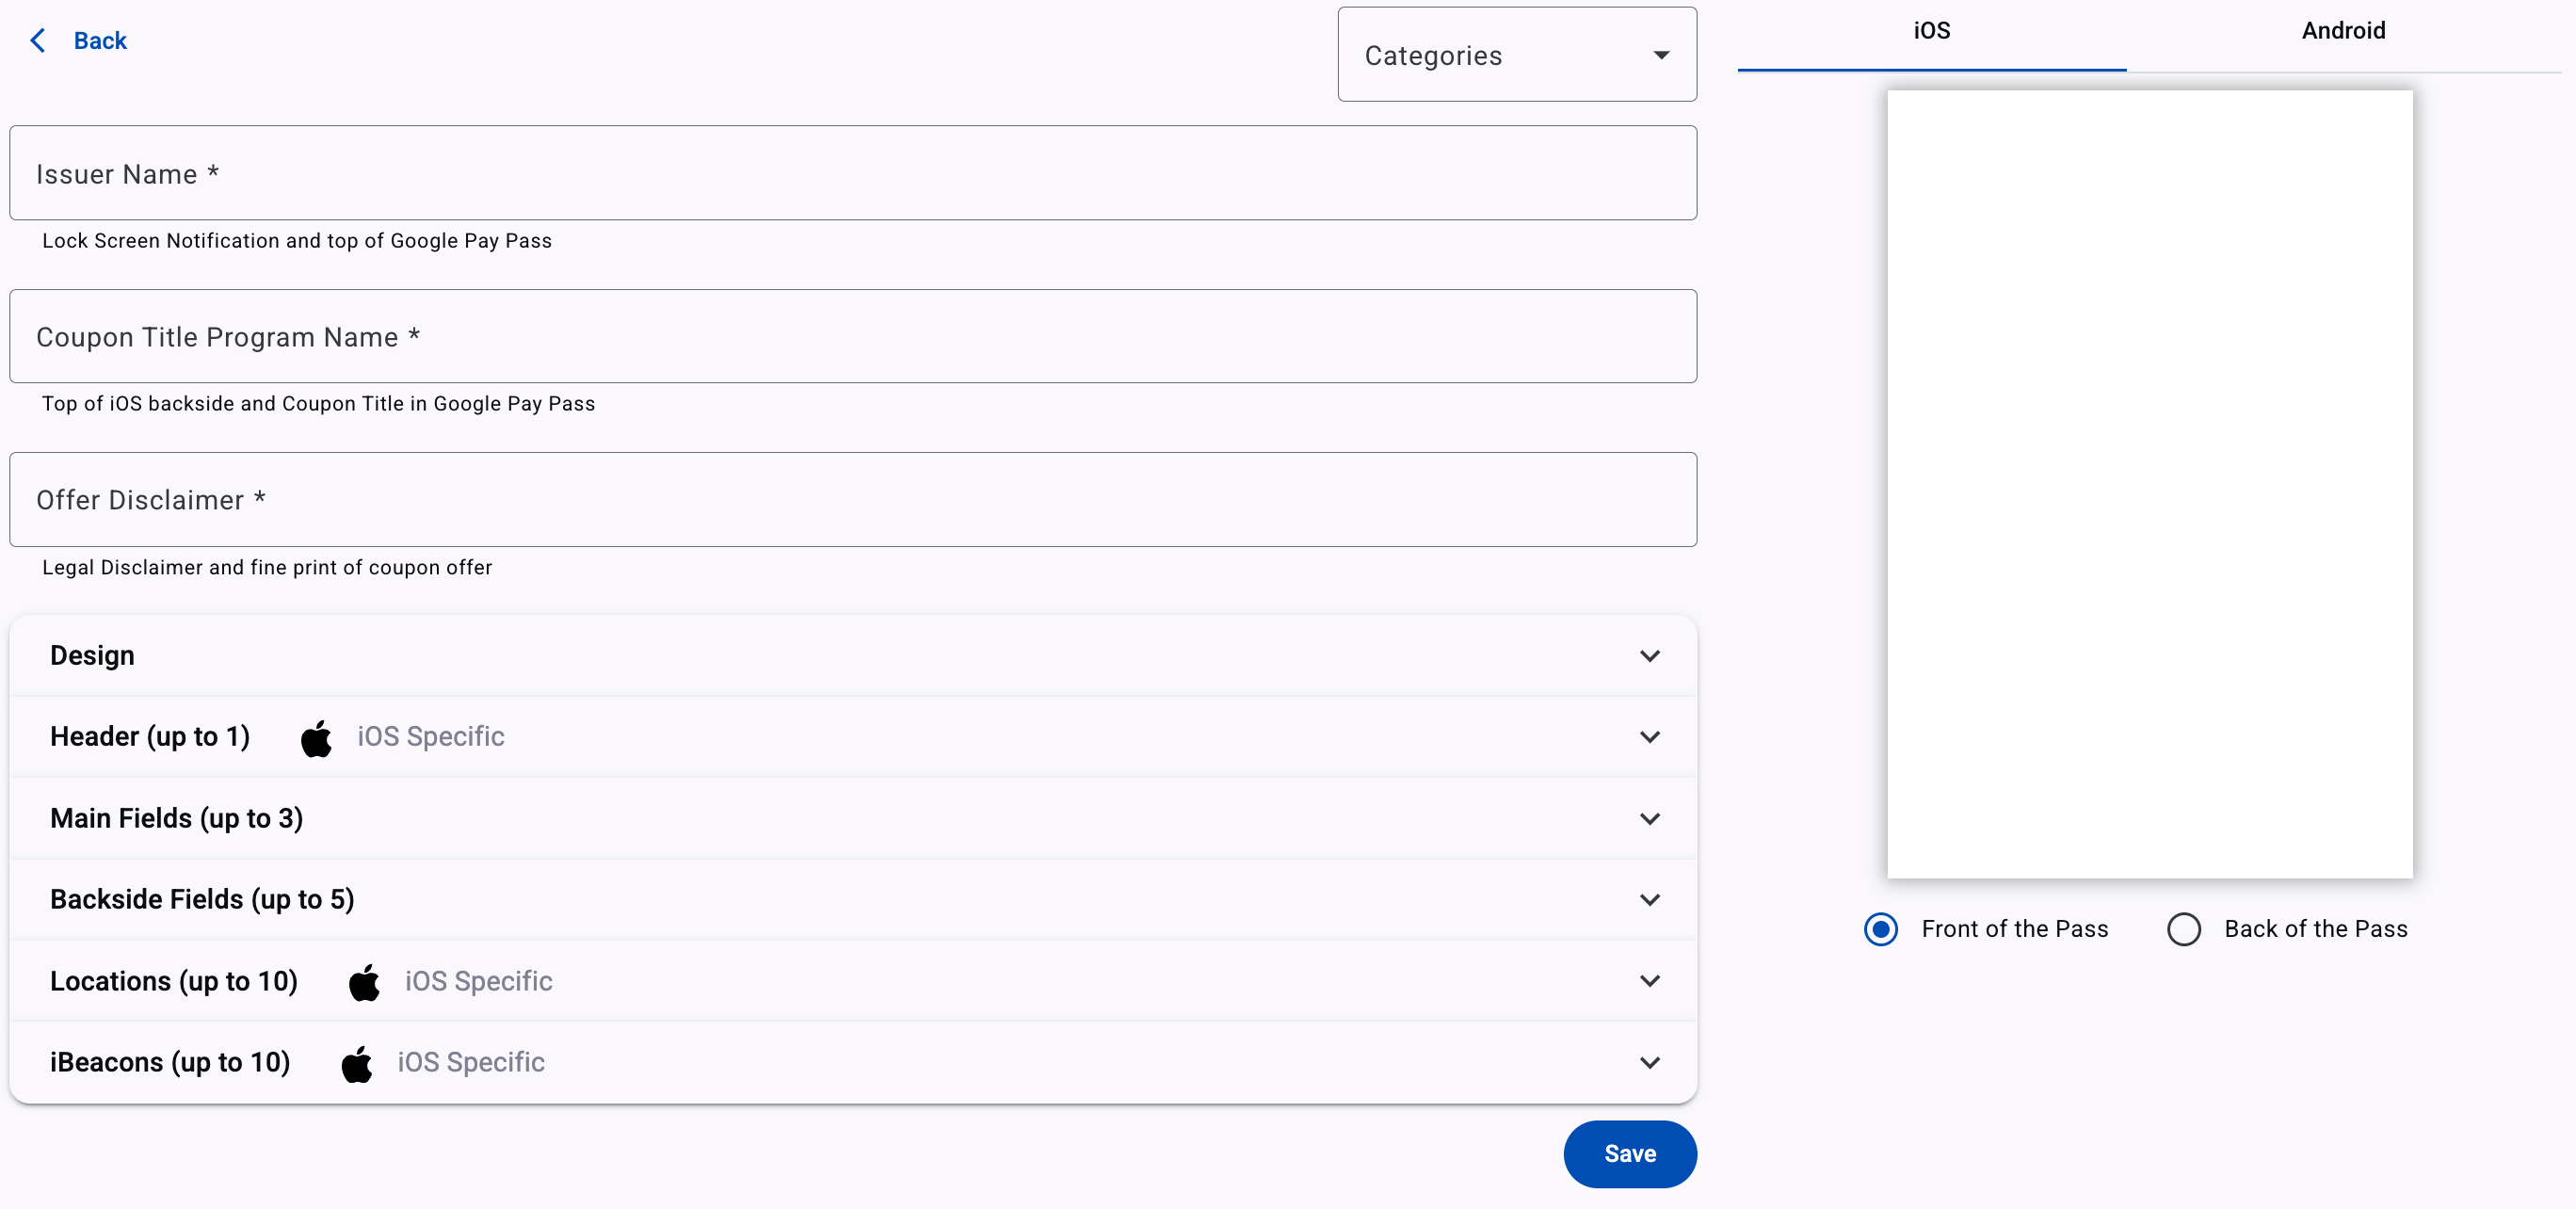
NOTESome fields and visual elements behave differently or are exclusive to specific platforms (iOS or Android). Make sure to preview your design for both platforms as you configure it.
These are the steps to configure the Digital Coupon, from top to bottom in the main pane:
- Issuer Name: Identify the template in the grid of the Templates section, which will appear in the lock screen notification and on the top of the Google Pay Pass.
- Coupon Title: Appears at the top of the iOS backside and appears as the Coupon title in Google Pay Pass
- Offer Disclaimer: Enter the terms and conditions of the promotion. This information will appear on the back of the Coupon for the iOS case and further down on the Android screen as you scroll in that direction.
Additional sections allow further customization: Design, Header, Main Fields, Backside Fields, Locations, IBeacons
Design
In this step, you set the appearance of the Coupon with your brand's colors and fonts and add your logo, icon, and a Strip image if you'd like.

The overall design has three main components,
- Pass Design: Upload images for Logo, Notification Icon, Strip Image, and Hero Image (optional).
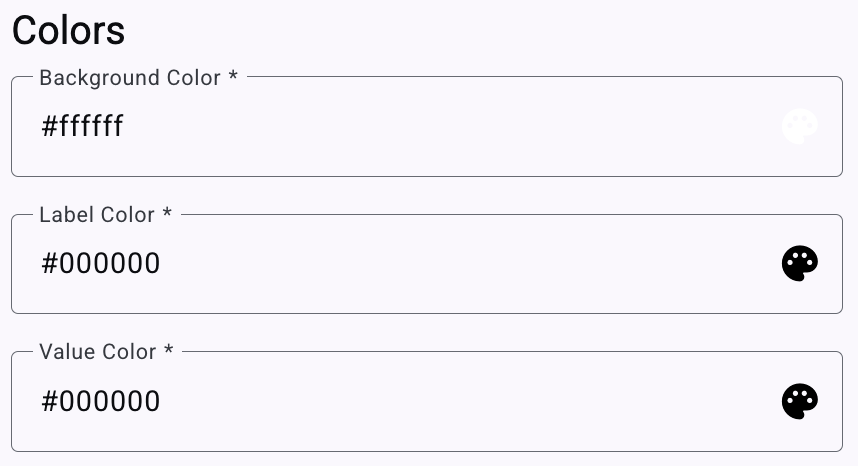
- Colors: Set background, label, and value colors.
- Barcode: Select a barcode format (QR, Aztec, PDF-417, or Code128) or disable it.
Pass Design
The Pass Design step allows you to customize the visual appearance of the coupon by uploading images that represent your brand. This step ensures the digital coupon aligns with your branding and provides a professional look. You can add up to four different images, each with a specific function:

Image | Details |
|---|---|
Logo | In iOS, the logo image is displayed in the top left corner of the pass, next to the logo text. Dimensions: 480 pixels wide x 150 pixels high. In Android, it is displayed in the top middle of the pass. Dimensions: The minimum size of the logo on the Google Pay pass is 660 x 660 pixels. |
Notification icon | The icon image is shown when a Push Notification is received from the Wallet Pass in the user’s lock screen. Dimensions: 87 pixels wide x 87 pixels high. |
Strip Image | The strip image is displayed beneath the logo. Dimensions: 1125 pixels wide by 432 pixels high. |
Hero | The hero image is used only on Google Pay passes. Dimensions: 1032 pixels wide by 336 pixels high. |
Click on the Generate Google Pay Pass toggle to enable Google Pay Pass.

If you don't want to generate an Android digital coupon, disable the toggle. Hero Image for Android will not be available, and the Android tab in Mobile Digital Coupon Composer will disappear.
If you want to display a strip image (below the logo), toggle the Strip Image option on.

NOTEIf you don't add the Hero Image into the Digital Coupon, the Strip Image is added by default.
Colors
The Colors step defines the visual theme of your digital coupon by setting colors for different elements. You can use a color picker to match your brand's theme.
Barcode
The Barcode step enables automatic barcode generation, allowing users to redeem their coupons by scanning a machine-readable code. If someone scans the barcode with a mobile device's code reader, they are redirected to promotional information designated by the creator.

Selecting the Barcode Type dropdown menu, you will see the four options available for the Wallet Pass Coupon:

QR

Aztec

PDF-417

Code128
The coupon will not include a barcode if you select 'none' in the dropdown.
The Mobile Wallet Pass Composer allows you to view the Wallet Pass's content according to the device's operating system, including the notifications, by selecting the IOS, Android, and Notification tab. It helps to visualize how your users will receive notifications and Wallet Coupons!

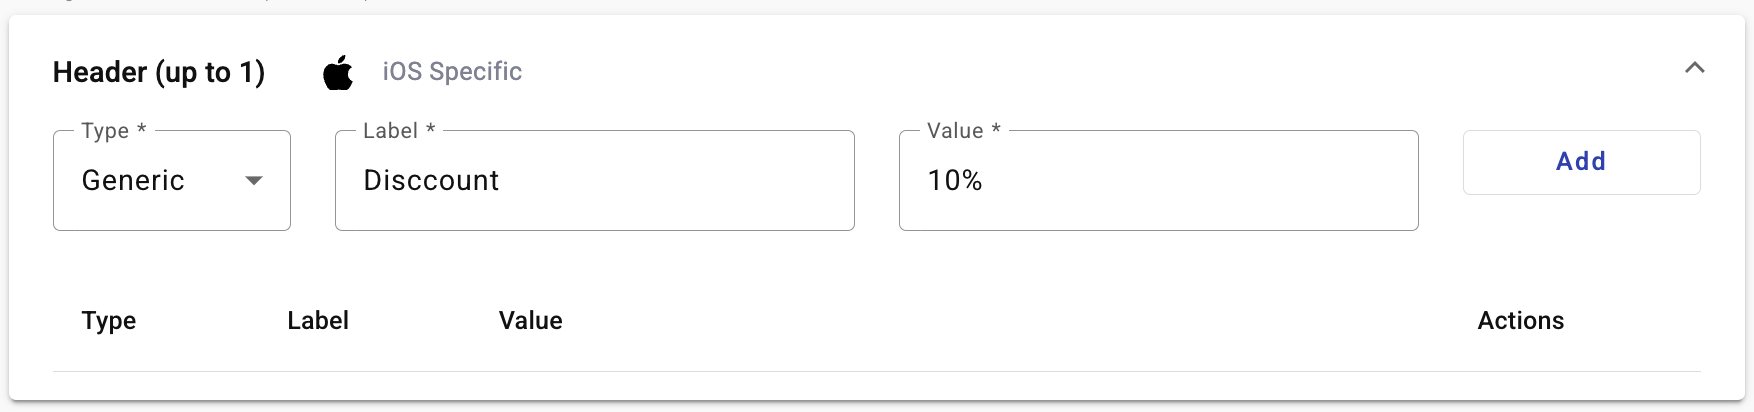
Header
The Header is an iOS-specific element of the Coupon setup, and it refers to the content that will appear in the top right corner of the iOS version of the coupon. It contains highly relevant information as it will be the visible component of the coupon pass when it is stacked up in the iOS wallet app.

The Header consists of:
-
Field Type: The Digital Coupons allow you to display personalized and variable fields for each user. Field values can be Generic or unique, depending on the pass style.
- Generic The value of the Generic Fields will be static for all users.
- Unique Fields are personalized for each digital coupon generated, which means they display personalized and variable fields for each user.
-
Label: A short text descriptor (e.g., "Discount"). This variable is a label that identifies an item in the Coupon.
-
Value: The actual value shown (e.g., "$10 Off" or "Exclusive Offer"). This variable depends on the Type selected for this entry. For the Generic Type case, the Value field can be used to establish a monetary amount, a discount percentage, or something that describes the value proposition of the Coupon. Still, it has no restrictions as to what can be entered. For the Unique Type case, as we mentioned above, the Value variable will be restricted to the options offered by the pull-down menu displaying the existing platform fields. These fields are used throughout the platform to customize other types of Messaging or Interactive Campaigns.
Main Fields
Through Main Fields, you can offer the details of the coupon promotion. It also addresses iOS and Google Pay Passes to best adapt to each coupon configuration. You can configure up to three Fields for the Coupon presentation to cover all the promotional information.
For the case of iOS, the Main Fields are located under the Strip Image, and for the Google Pay Pass, because of its configuration, the Main Fields can be found by scrolling down on the phone screen to uncover them.
Configuring the Main Fields is done the same way as for the iOS Header, having the same elements, characteristics, and constraints. The Type_can be Generic and Unique, _Label _identifies the Coupon items, and _Value shares the same properties as the case of iOS Header. Below is an example of a fully defined Main Fields section.

Notice that once a coupon field is defined, you have the option to edit it or delete it under Actions.
Backside Fields
Backside Fields address the “reverse side” of the Coupon for iOS, while for the Android case, they continue populating the coupon further down into it. Up to 5 fields can be configured.

The configuration of each Field uses the same approach used in the areas above: Type, Label, and Value, with the added twist of ensuring that the data format of the contents of the Generic Type Value is restricted to the format option you select in the Format entry box, whereas before, the Generic Type Value was open to having any value.

The data entered in the Value box must conform to the Format selected from the options shown. These are strictly formatting options and are not confused with Subscriber platform Fields. You can see an example of A fully populated Backside Fields section in the image below.

Locations (iOS Only)
These features enable location-based notifications, allowing users to receive alerts when they are near a store. To learn how to configure it, go to Mobile Wallet Elements.
IBeacons (iOS Only)
This Apple technology standard allows Mobile Apps to listen for beacon signals and react accordingly. It will enable Mobile Apps to understand their position on a micro-local scale and deliver content to users based on location using Bluetooth Low Energy technology. To learn how to configure it, go to IBeacons.
Final Steps
Once all configurations are complete:
- Categories (Optional) - You can organize your template by assigning it to a category using the Categories dropdown. This makes templates easier to find later.
- Click Save
- The template will be added to the Digital Coupon templates type in your Templates dashboard
You can now use this template when creating new campaigns involving digital membership cards, enabling faster and consistent deployment across devices.
Updated 2 months ago