Credits Plan
Create and manage credit limits for a Workspace in the Administration Console.
Use a credit plan to keep Workspace usage within an estimated number of credits. Credit plans help you manage costs, prevent overspending, and keep usage predictable across configured delivery channels.
You can apply credits to all channels combined or to specific channels individually. Use all-channel limits for a shared Workspace budget, or use channel-specific limits to restrict channels such as SMS, WhatsApp, or email based on business priorities.
Before you create a credit plan, open the credit plan configuration for the Workspace.
From the Environment List, select the Workspace where you want to create, edit, delete, or manage the credit plan. Then click Space Config.
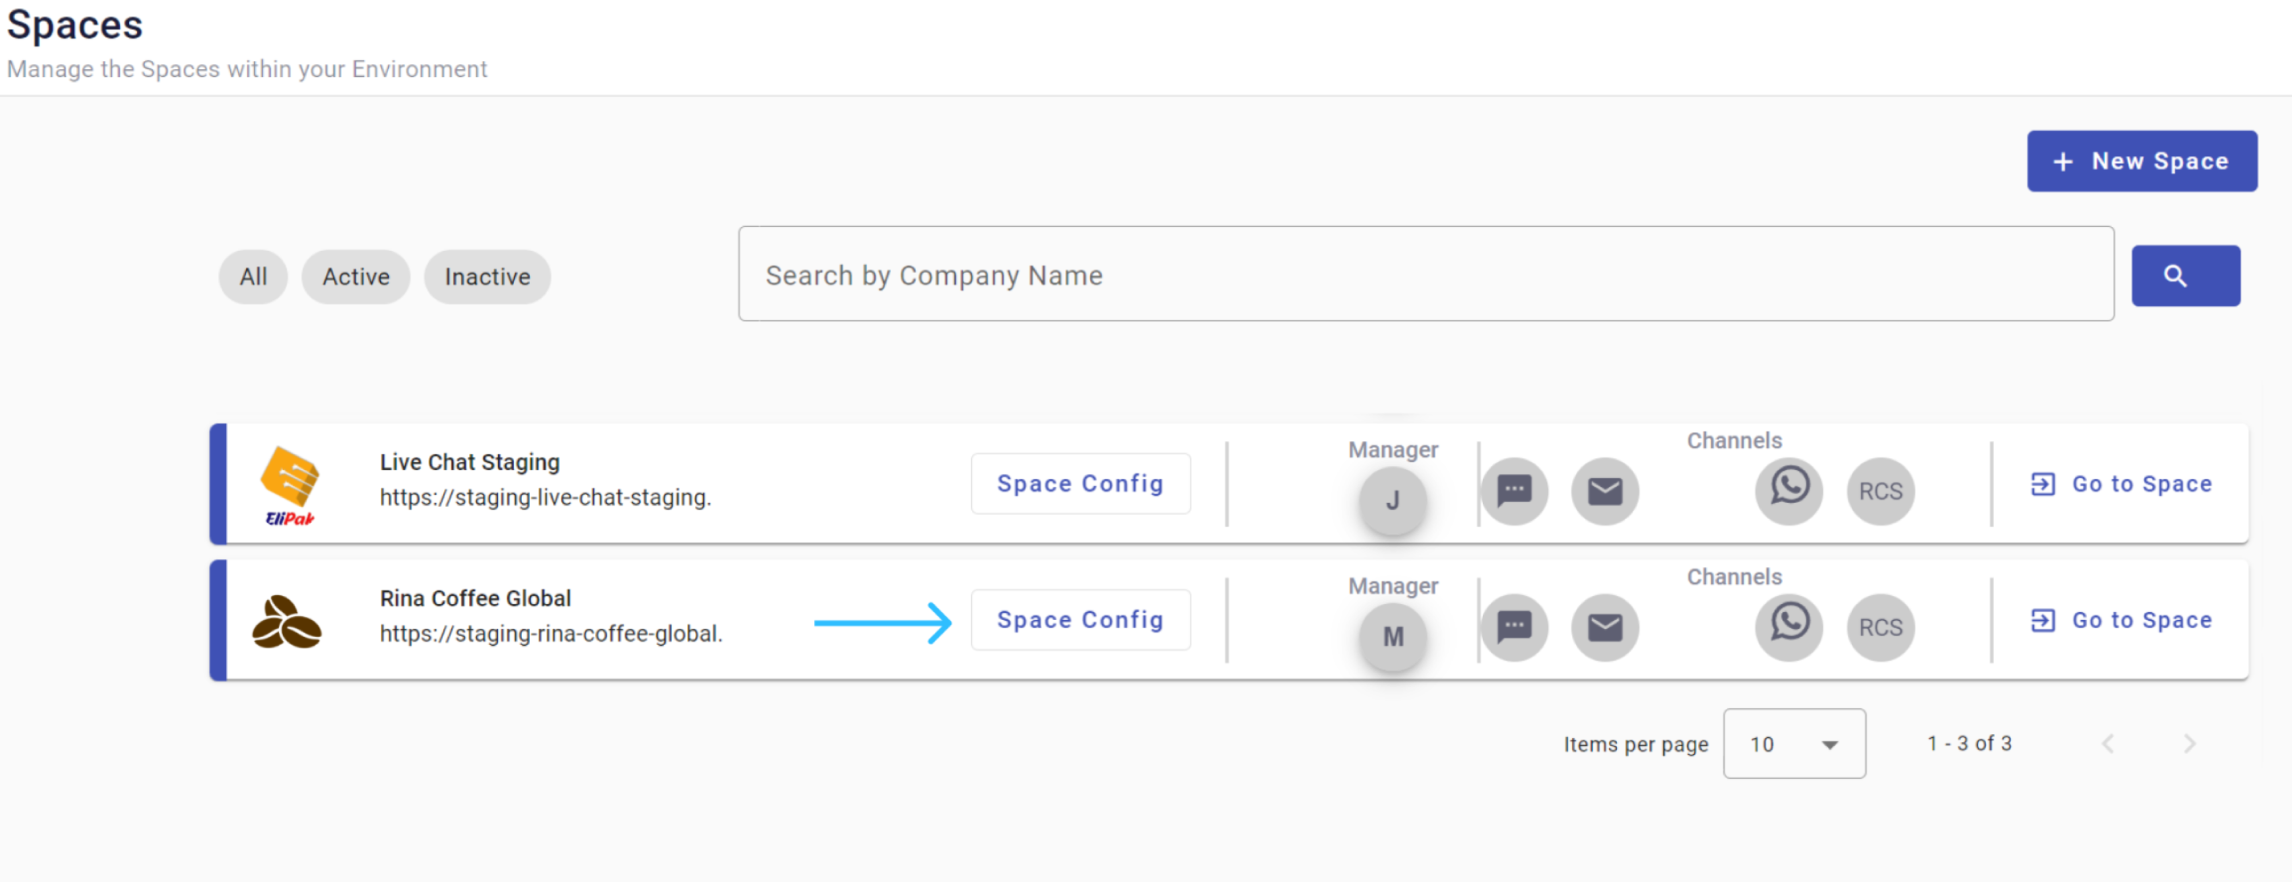
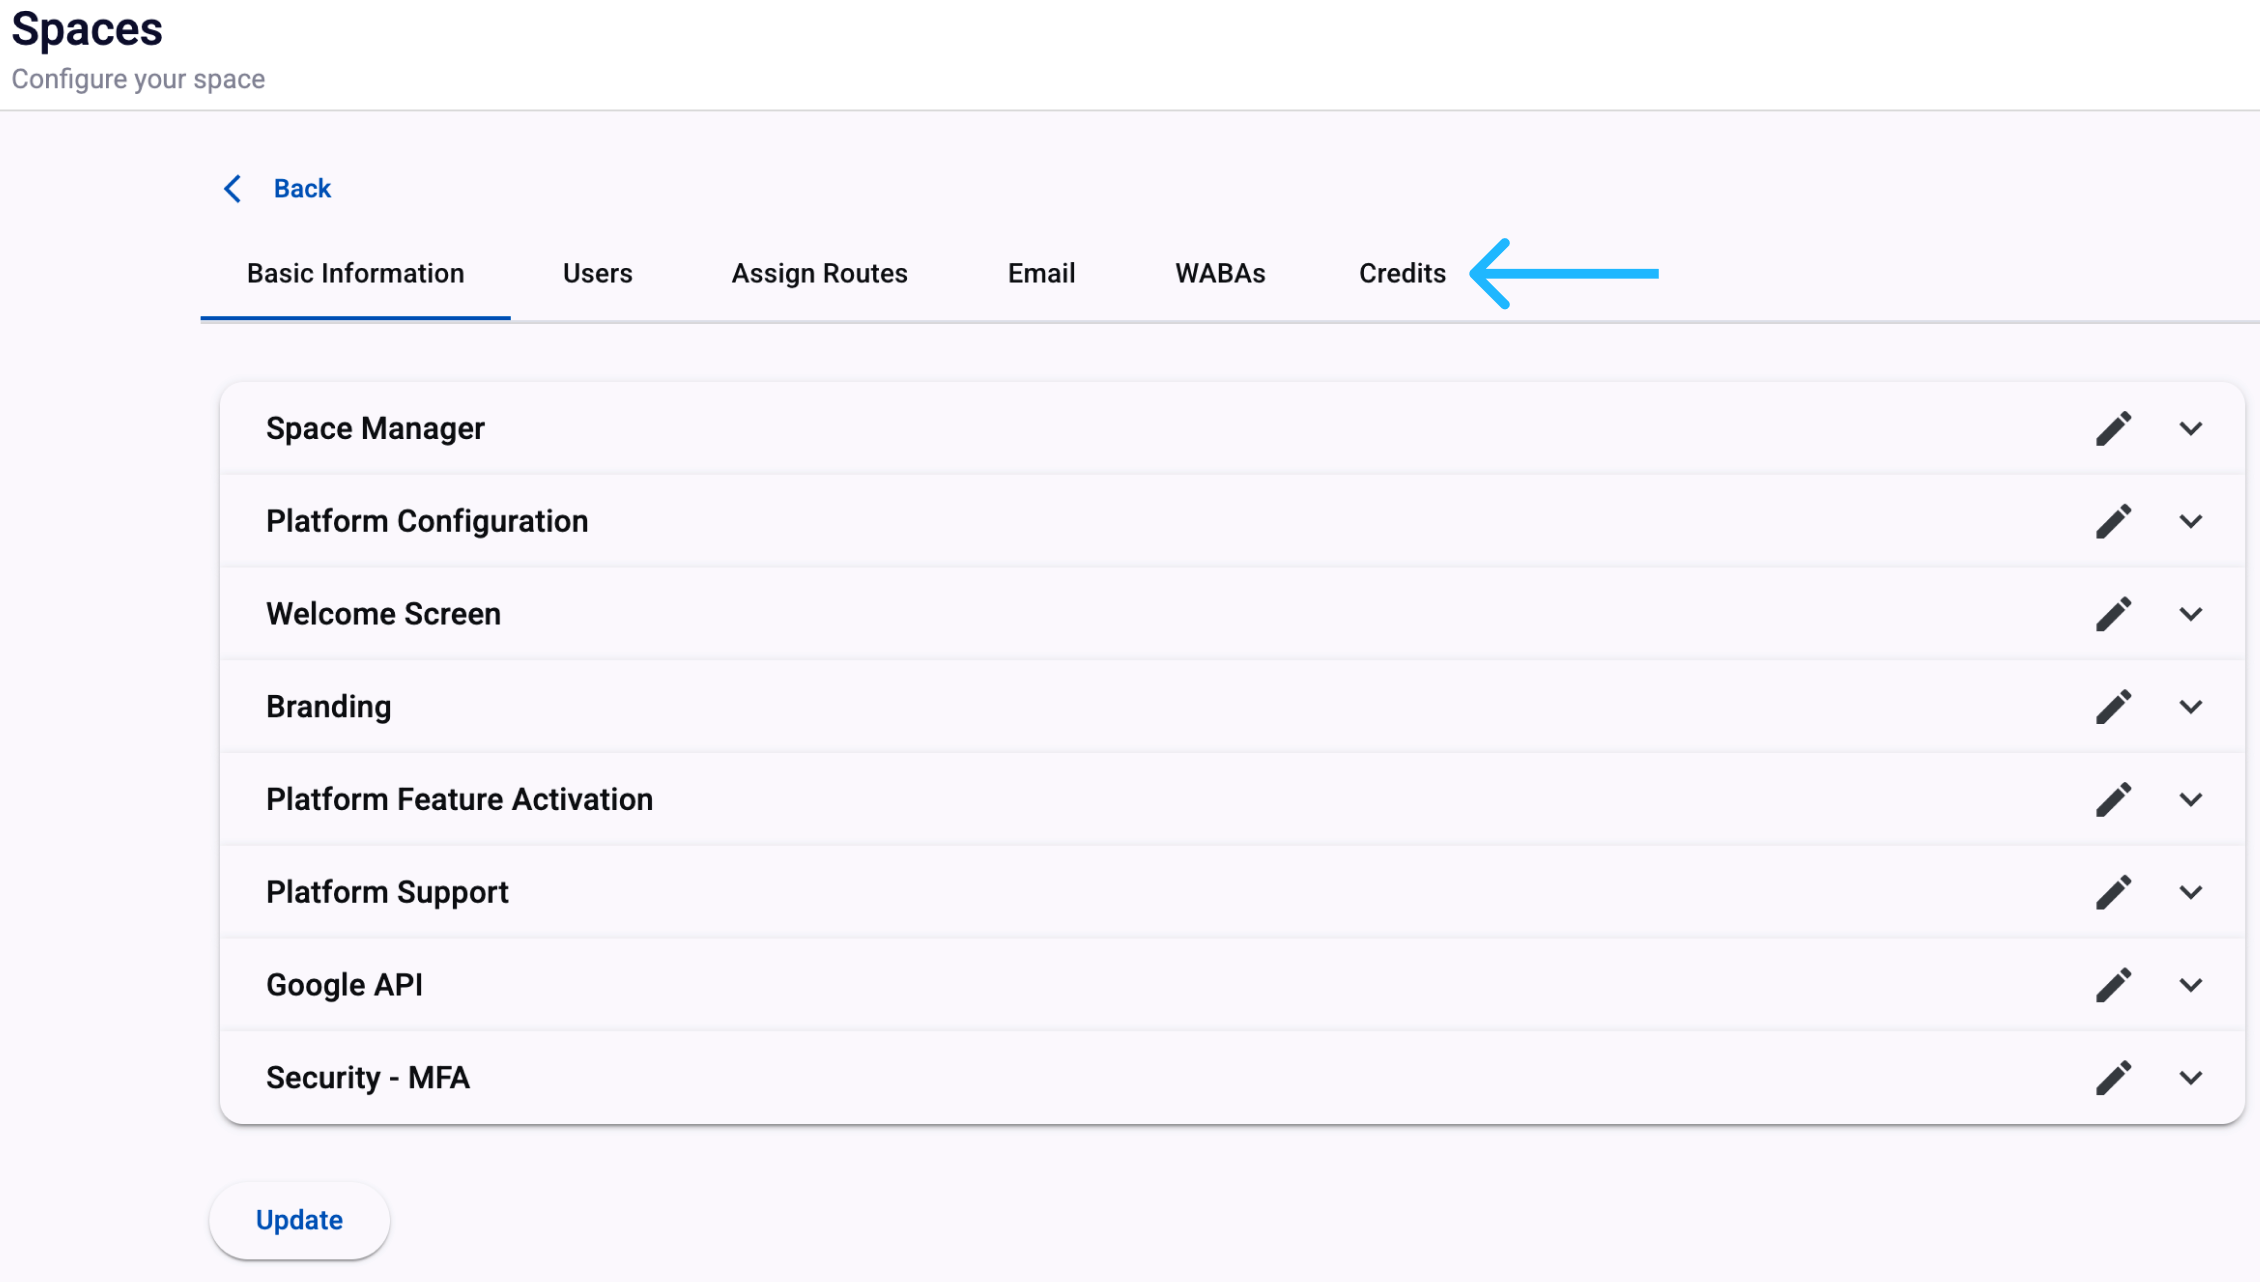
The platform redirects you to the Workspace configuration. Select the Credits tab.
Follow these steps to create a credit plan.
Step 1. Start a new credit plan
When no credit plan exists for a Workspace, the Credits tab displays an empty state with the option to add one.
Click New Credit Plan to begin setting up a plan for the Workspace.

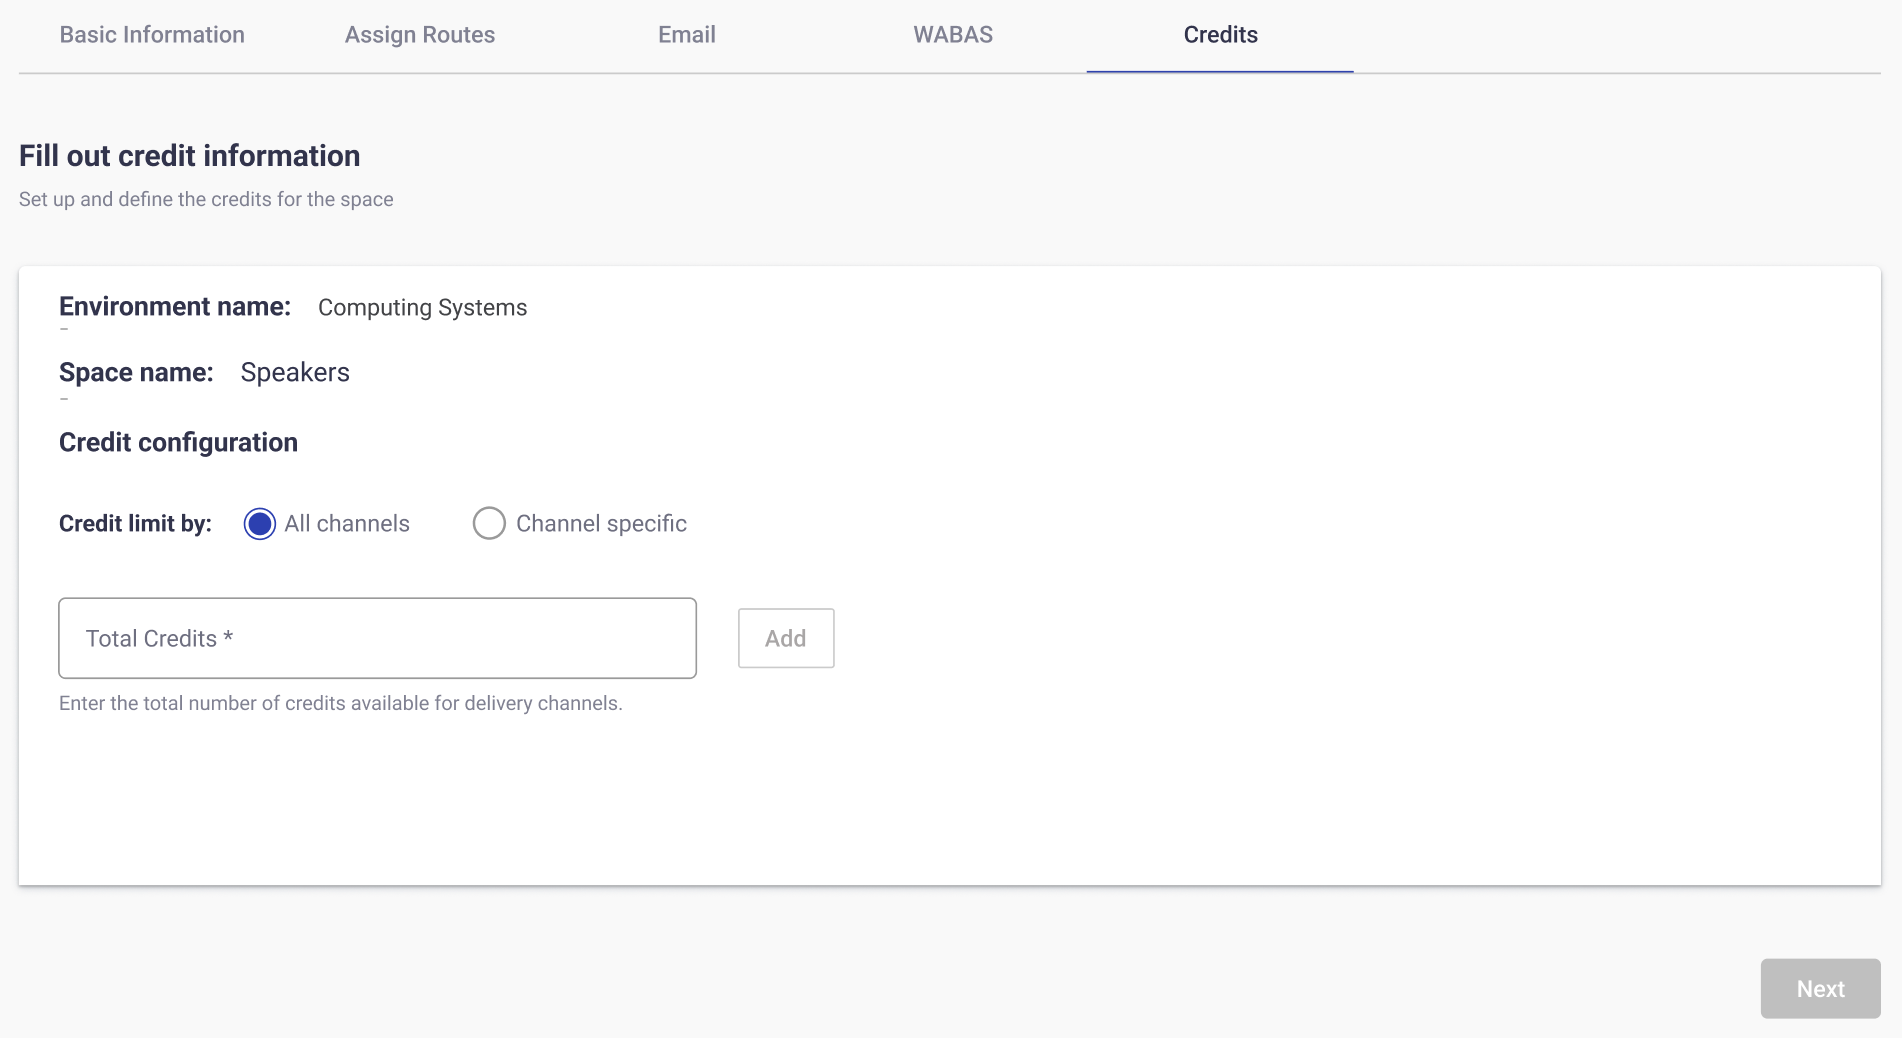
Step 2. Fill out credit information
Enter the details for the new credit plan.
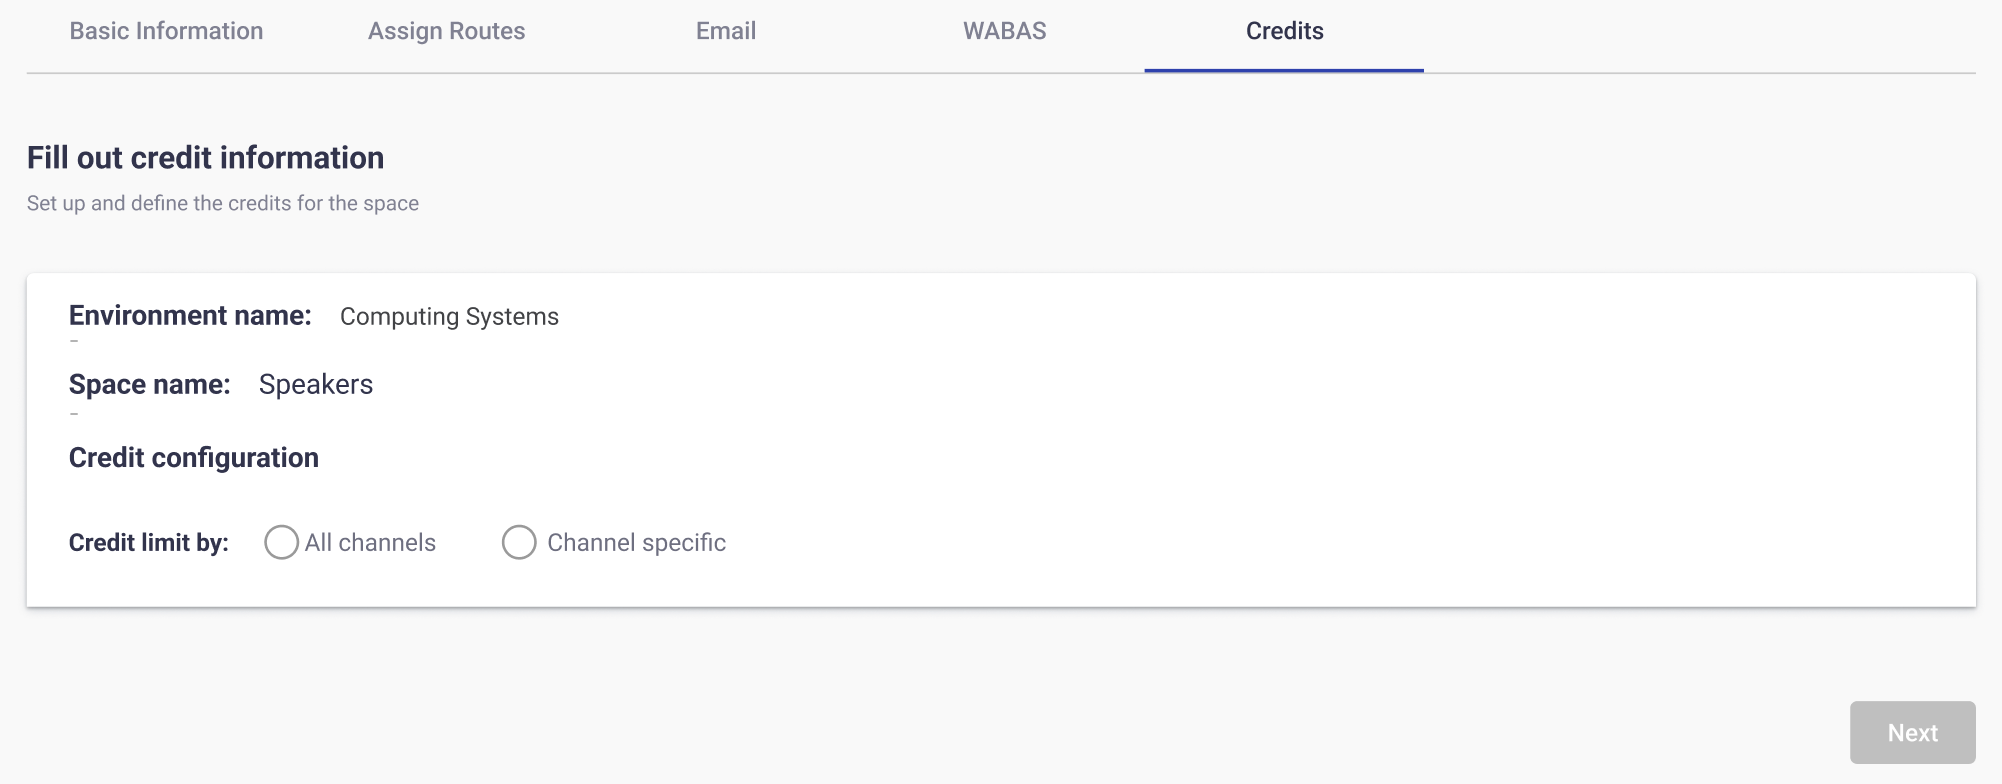
This section displays the following fields:
-
Environment name: The Environment where the Workspace is configured.
-
Space name: The specific Workspace where you are configuring the credit plan.
-
Credit configuration: Choose how the credit limit will be applied.
You can select one of the following options:
- All channels: Apply the credit limit across all available delivery channels in the Workspace.
- Channel specific: Apply the credit limit to one or more delivery channels individually in the Workspace.
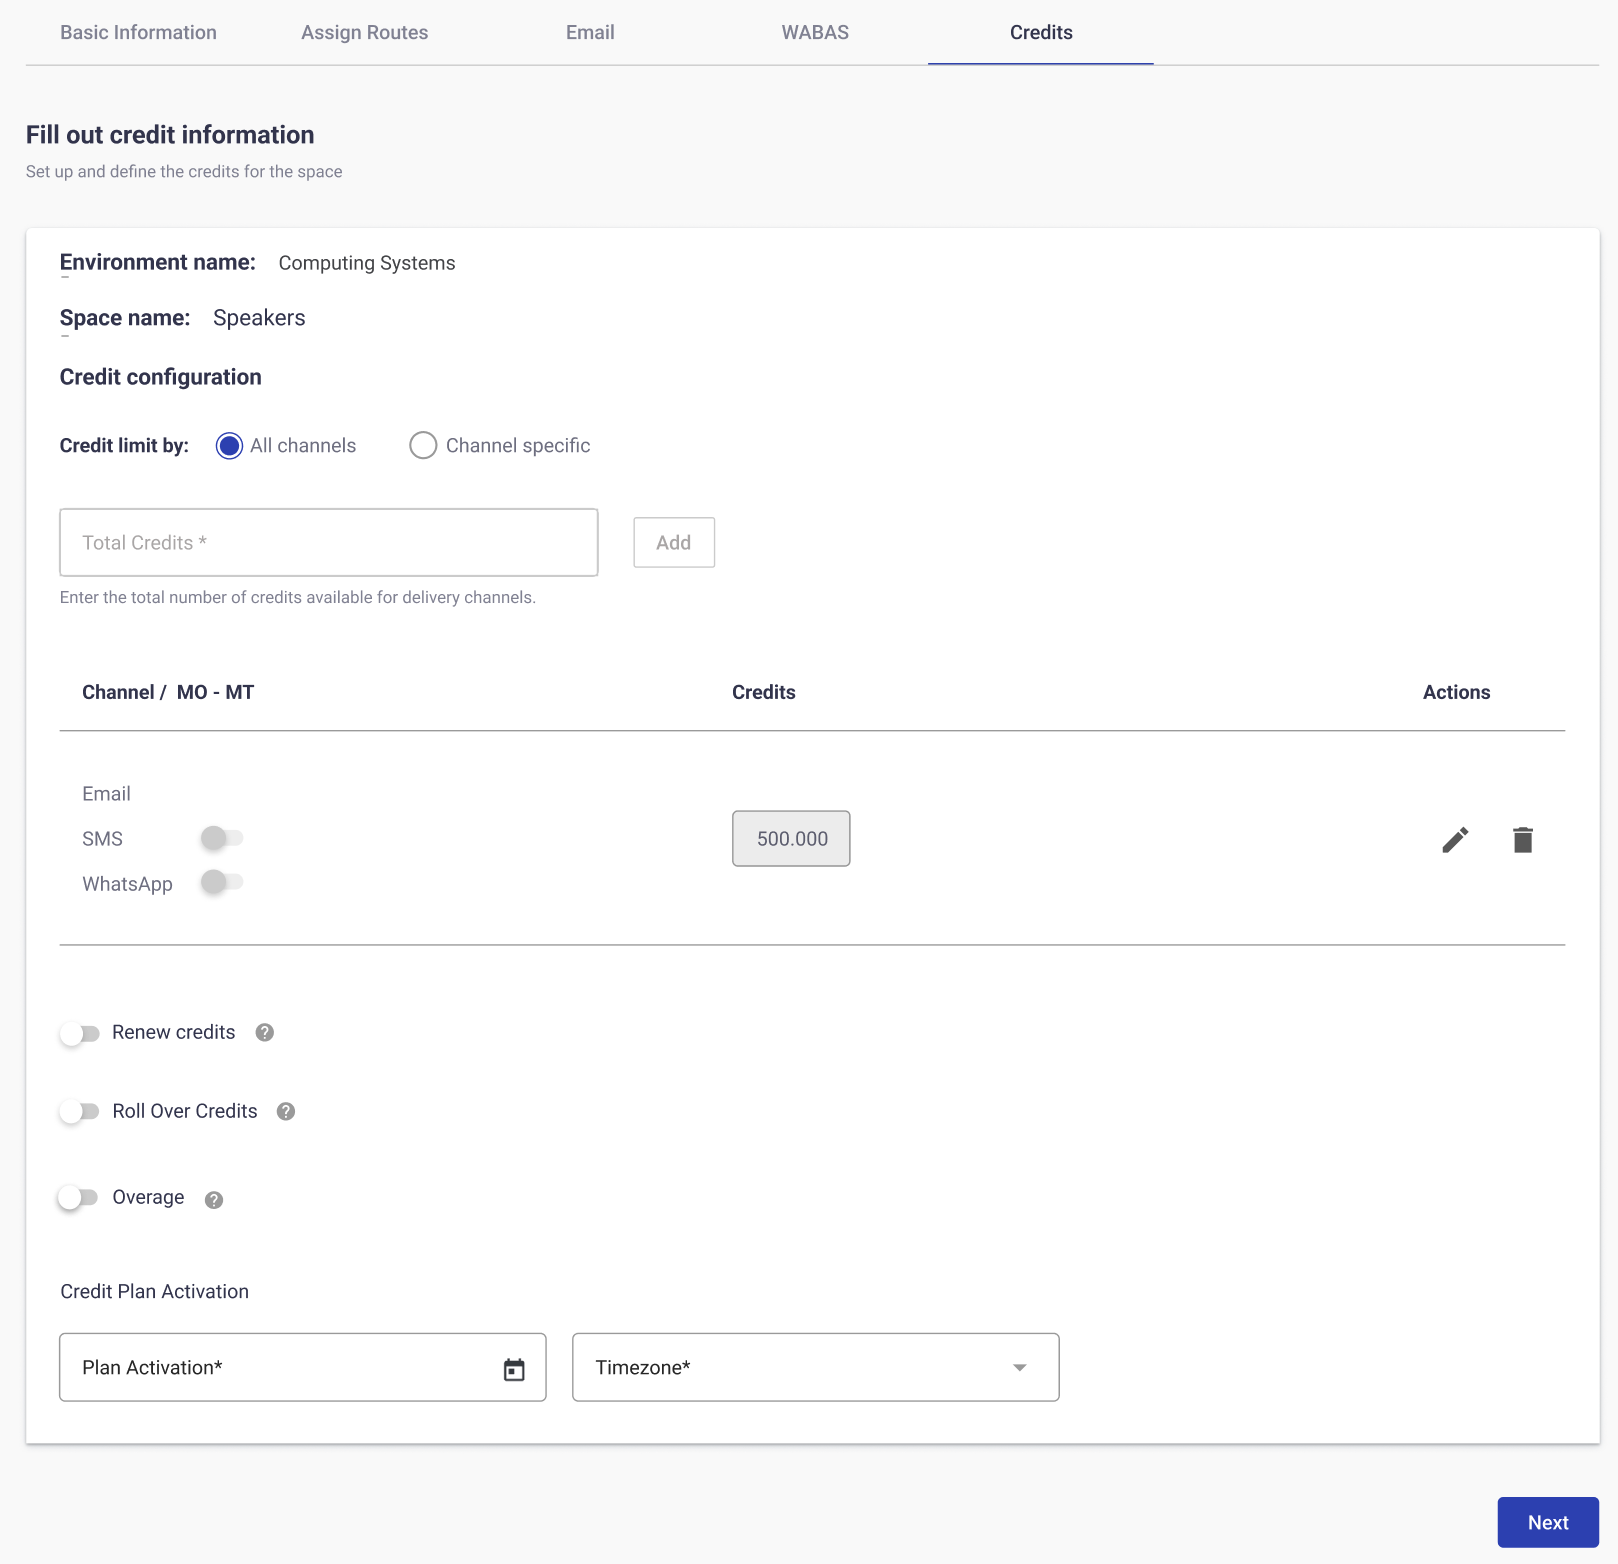
All channels
If you choose All channels, the system applies a single credit limit shared across all delivery channels in the Workspace.
-
In the Total Credits field, enter the maximum number of credits you want to allocate.
-
Click Add to confirm the credit amount.
-
After you add the total credits, the system displays a configuration table and additional options for managing the plan.
In this table, you can edit or remove the credits assigned to all delivery channels.
-
Renew Credits: Use this toggle to automatically restore the assigned credits at a defined interval.
When you enable this toggle, select one of the following renewal periods:
- Weekly – Credits reset every week.
- Monthly – Credits reset every month.
- Quarterly – Credits reset every three months.
- Half-year – Credits reset every six months.
- Annually – Credits reset once per year.
At the start of each renewal period, the credit amount returns to its originally configured value.
Example: If you allocate 500 credits to SMS and select Monthly as the renewal period, the system will automatically restore the SMS credits to 500 at the beginning of each month. This applies regardless of whether all, some, or none of the credits were consumed in the previous month.
-
Roll Over Credits: This toggle becomes available only when Renew Credits is enabled. Use it to define how unused credits from one period are handled when a new renewal cycle begins.
- ON: Any unused credits from the previous period are rolled over and added to the new credits for the next period.
- OFF: Unused credits are not carried forward. At the start of the new period, the system resets to the configured credit amount only.
Example: If you configure 500 credits per month for SMS,
-
With Roll Over Credits ON, if only 300 credits are used in January, the remaining 200 will carry over into February. At the start of February, the SMS channel will have 700 credits (200 rolled over + 500 new period credits).
-
With Roll Over Credits OFF, the credits reset strictly to 500 at the start of February, regardless of any unused balance from January.
WARNINGWhen Roll Over Credits is enabled, unused credits from a previous period are carried forward into the next period. This functionality is limited to a maximum of three consecutive periods. After the third period, any remaining unused credits will no longer roll over.
- ON: Any unused credits from the previous period are rolled over and added to the new credits for the next period.
-
Overage: Use this toggle to control whether credits are automatically replenished when the configured credit limit is fully consumed.
- ON: When credits reach zero, the system will continue to allow message delivery by automatically adding additional credits beyond the original plan limit. This ensures that communication is not interrupted, even if the assigned credits are exhausted.
- OFF: Once the configured credits are consumed, no further messages can be delivered until the plan is manually updated or renewed in the next cycle (if Renew Credits is enabled).
Example: If you configure 500 credits for SMS and enable Overage ON, once all 500 credits are used, the system will automatically allow additional credits to be consumed (e.g., 520, 600, etc.), ensuring that messaging is not blocked mid-delivery.
WARNINGWhen the Overage is enabled and the credits are fully consumed, the system will increase the credit allocation by 100% of the originally assigned amount for that period.
- Example: If the plan was configured with 100 credits, once they are consumed, an additional 100 credits will be added automatically.
- This increase occurs only once per period.
If Overage OFF, message delivery will immediately stop once the 500-credit limit is reached, preventing any further usage until credits are replenished or renewed.
- ON: When credits reach zero, the system will continue to allow message delivery by automatically adding additional credits beyond the original plan limit. This ensures that communication is not interrupted, even if the assigned credits are exhausted.
-
Credit Plan Activation: Define when the configured credit plan is applied. Set both the start date and timezone so credits are applied according to your organization’s schedule.
- Date: Select the specific calendar date on which the credit plan should begin. From this date onward, the configured credits and rules (renewal, roll over, overage) will be enforced.
- Timezone: Choose the timezone that applies to the activation date. This ensures that credits renew, roll over, or expire consistently with your organization’s operating region or business hours.
- Date: Select the specific calendar date on which the credit plan should begin. From this date onward, the configured credits and rules (renewal, roll over, overage) will be enforced.
-
Click Next to continue with the credit plan configuration.
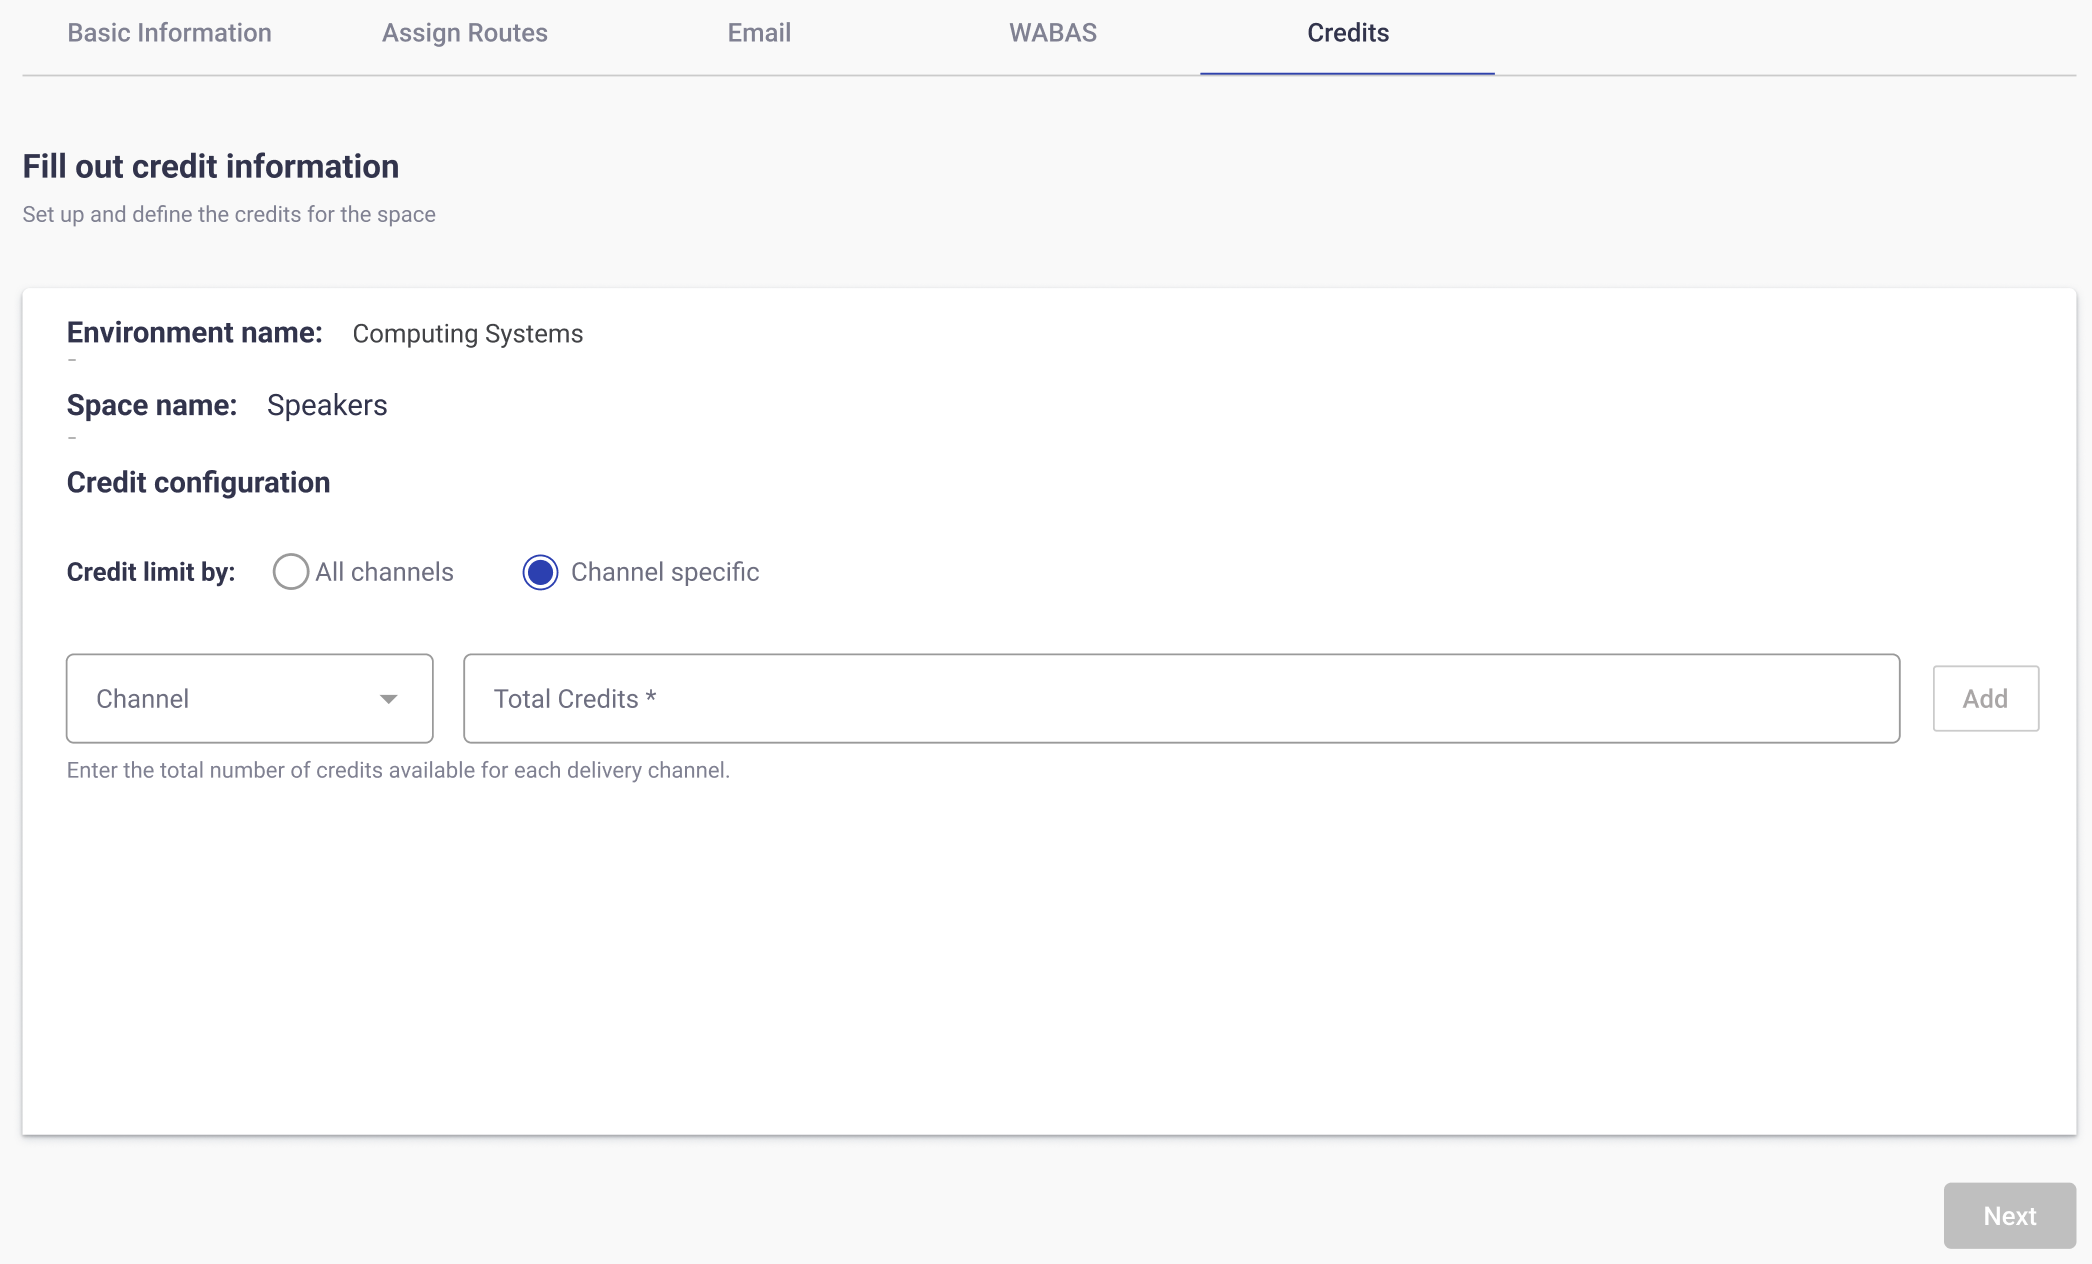
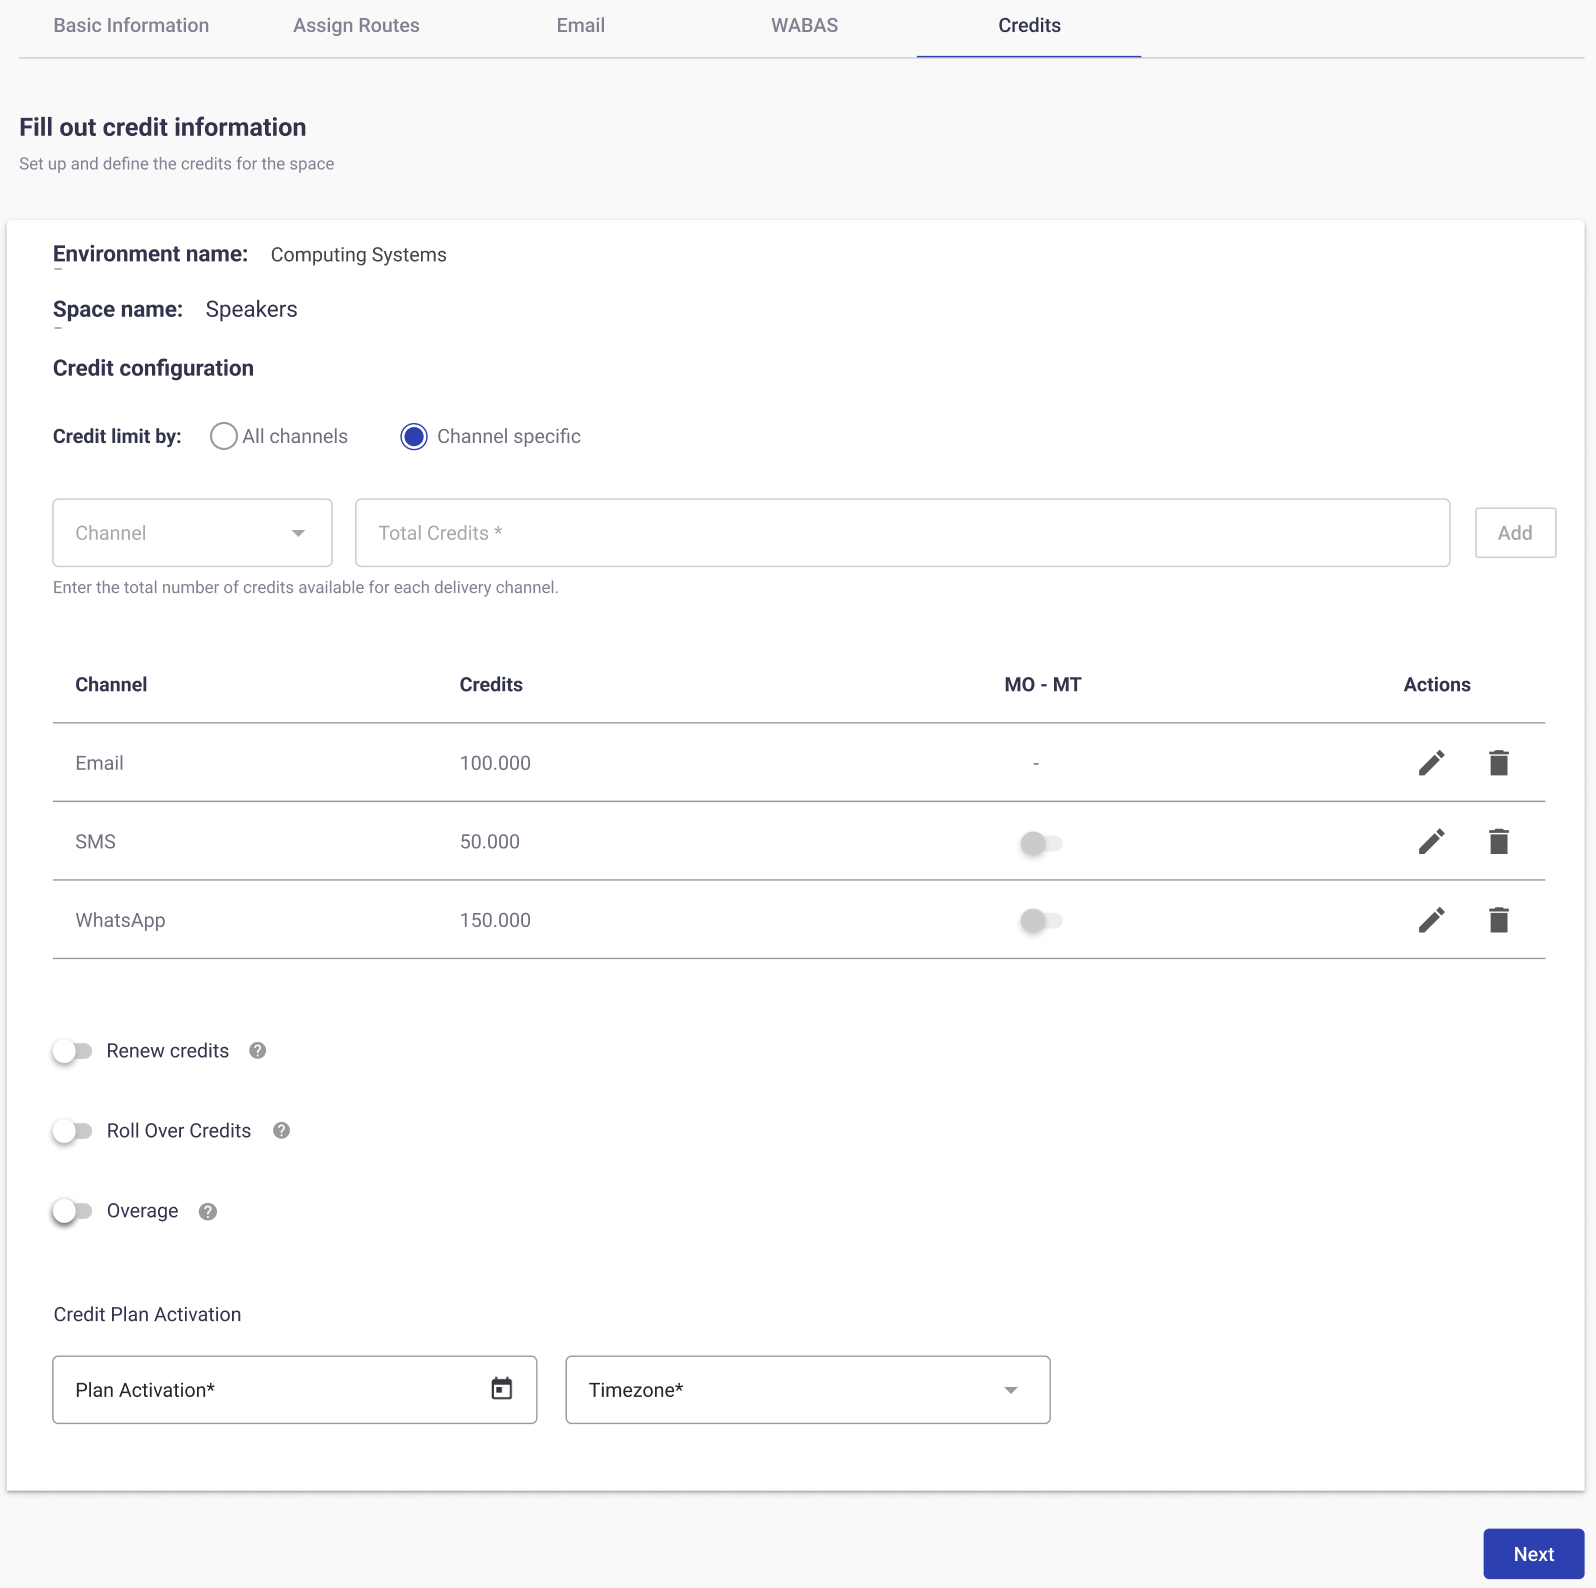
Channel specific
If you choose Channel specific, you can assign a separate credit limit to each delivery channel. Use this option to control and monitor credit usage independently for SMS, WhatsApp, Email, or RCS, according to the delivery channels available in the selected Workspace.
-
Assign Credits per Channel: Use the Channel dropdown to select the channel where you want to apply credits. Then enter the number of credits you want to allocate to the selected channel. Channels that have not yet been assigned credits appear as selectable options in the dropdown. After a delivery channel has been assigned credits, it is no longer available in the dropdown.
-
Click Add to confirm the credit amount.
-
After you add credits for each delivery channel, the system displays a configuration table and additional options for managing the plan.
In this table, you can edit or remove the credits assigned to each delivery channel.
-
Renew Credits: This toggle allows you to automatically restore the assigned credits at a defined interval, ensuring that usage limits are consistently replenished without manual intervention.
When this toggle is enabled, a dropdown menu is displayed to select the renewal period. The available options are:
- Weekly – Credits reset every week.
- Monthly – Credits reset every month.
- Quarterly – Credits reset every three months.
- Half-year – Credits reset every six months.
- Annually – Credits reset once per year.
At the start of each renewal period, the credit amount returns to its originally configured value.
Example: If you allocate 500 credits to SMS and select Monthly as the renewal period, the system will automatically restore the SMS credits to 500 at the beginning of each month. This applies regardless of whether all, some, or none of the credits were consumed in the previous month.
-
Roll Over Credits: This toggle becomes available only when Renew Credits is enabled. This feature determines how unused credits from one period are handled when a new renewal cycle begins.
- ON: Any unused credits from the previous period are rolled over and added to the new credits for the next period.
- OFF: Unused credits are not carried forward. At the start of the new period, the system resets to the configured credit amount only.
Example: If you configure 500 credits per month for SMS,
-
With Roll Over Credits ON, if only 300 credits are used in January, the remaining 200 will carry over into February. At the start of February, the SMS channel will have 700 credits (200 rolled over + 500 new period credits).
-
With Roll Over Credits OFF, the credits reset strictly to 500 at the start of February, regardless of any unused balance from January.
WARNINGWhen Roll Over Credits is enabled, unused credits from a previous period are carried forward into the next period. This functionality is limited to a maximum of three consecutive periods. After the third period, any remaining unused credits will no longer roll over.
- ON: Any unused credits from the previous period are rolled over and added to the new credits for the next period.
-
Overage: This toggle controls whether credits are automatically replenished once the configured credit limit is fully consumed.
- ON: When credits reach zero, the system will continue to allow message delivery by automatically adding additional credits beyond the original plan limit. This ensures that communication is not interrupted, even if the assigned credits are exhausted.
- OFF: Once the configured credits are consumed, no further messages can be delivered until the plan is manually updated or renewed in the next cycle (if Renew Credits is enabled).
Example: If you configure 500 credits for SMS and enable Overage ON, once all 500 credits are used, the system will automatically allow additional credits to be consumed (e.g., 520, 600, etc.), ensuring that messaging is not blocked mid-delivery.
If Overage OFF, message delivery will immediately stop once the 500-credit limit is reached, preventing any further usage until credits are replenished or renewed.
WARNINGWhen the Overage is enabled and the credits are fully consumed, the system will increase the credit allocation by 100% of the originally assigned amount for that period.
- Example: If the plan was configured with 100 credits, once they are consumed, an additional 100 credits will be added automatically.
- This increase occurs only once per period.
- ON: When credits reach zero, the system will continue to allow message delivery by automatically adding additional credits beyond the original plan limit. This ensures that communication is not interrupted, even if the assigned credits are exhausted.
-
Credit Plan Activation: This feature determines when the configured credit plan will take effect. It allows you to define both the start date and the timezone, ensuring credits are applied precisely according to organizational schedules.
- Date: Select the specific calendar date on which the credit plan should begin. From this date onward, the configured credits and rules (renewal, roll over, overage) will be enforced.
- Timezone: Choose the timezone that applies to the activation date. This ensures that credits renew, roll over, or expire consistently with your organization’s operating region or business hours.
- Date: Select the specific calendar date on which the credit plan should begin. From this date onward, the configured credits and rules (renewal, roll over, overage) will be enforced.
-
Click Next to continue with the credit plan configuration.
Step 3. Review the credit summary
After you configure the credit plan and click Next, the system displays the Summary Credit screen. Review the credit settings assigned to the Workspace and delivery channels before you save the plan.
This summary includes:
-
Environment name: The Environment where the Workspace is configured.
-
Space name: The specific Workspace where you are configuring the credit plan.
-
Credits assigned to the delivery channels – Displays the channels included in the plan and the amount of credits configured.
If All channels was selected, the summary displays the total number of credits applied collectively across all delivery channels in the Workspace.

NOTEThe Channel / MO - MT column indicates whether the delivery channel supports bidirectional traffic.
- MT (Mobile Terminated): Outbound messages sent from the platform to end users.
- MO (Mobile Originated): Inbound messages sent by end users to the platform.\
This option to enable Bidirectional consumption will be available in a future release. At present, only MT traffic is considered for credit consumption.
If Channel specific was selected, the summary lists each configured delivery channel individually, along with its assigned credit limit.
 NOTE
NOTEThe MO - MT column indicates whether the delivery channel supports bidirectional traffic.
- MT (Mobile Terminated): Outbound messages sent from the platform to end users.
- MO (Mobile Originated): Inbound messages sent by end users to the platform.\
This option to enable Bidirectional consumption will be available in a future release. At present, only MT traffic is considered for credit consumption.
-
Renew Credits – Indicates whether automatic renewal is enabled and the selected renewal period.
-
Roll Over Credits – Indicates if unused credits will be carried over to the next cycle.
-
Overage – Indicates whether additional credits beyond the configured limit are allowed.
-
Credit Plan Activation – Indicates the exact date and timezone from which the credit plan will be applied.
Click Save to activate the credit plan.
Step 4. Activate the credit plan
After you complete the configuration and click Save, the system performs the following actions:
-
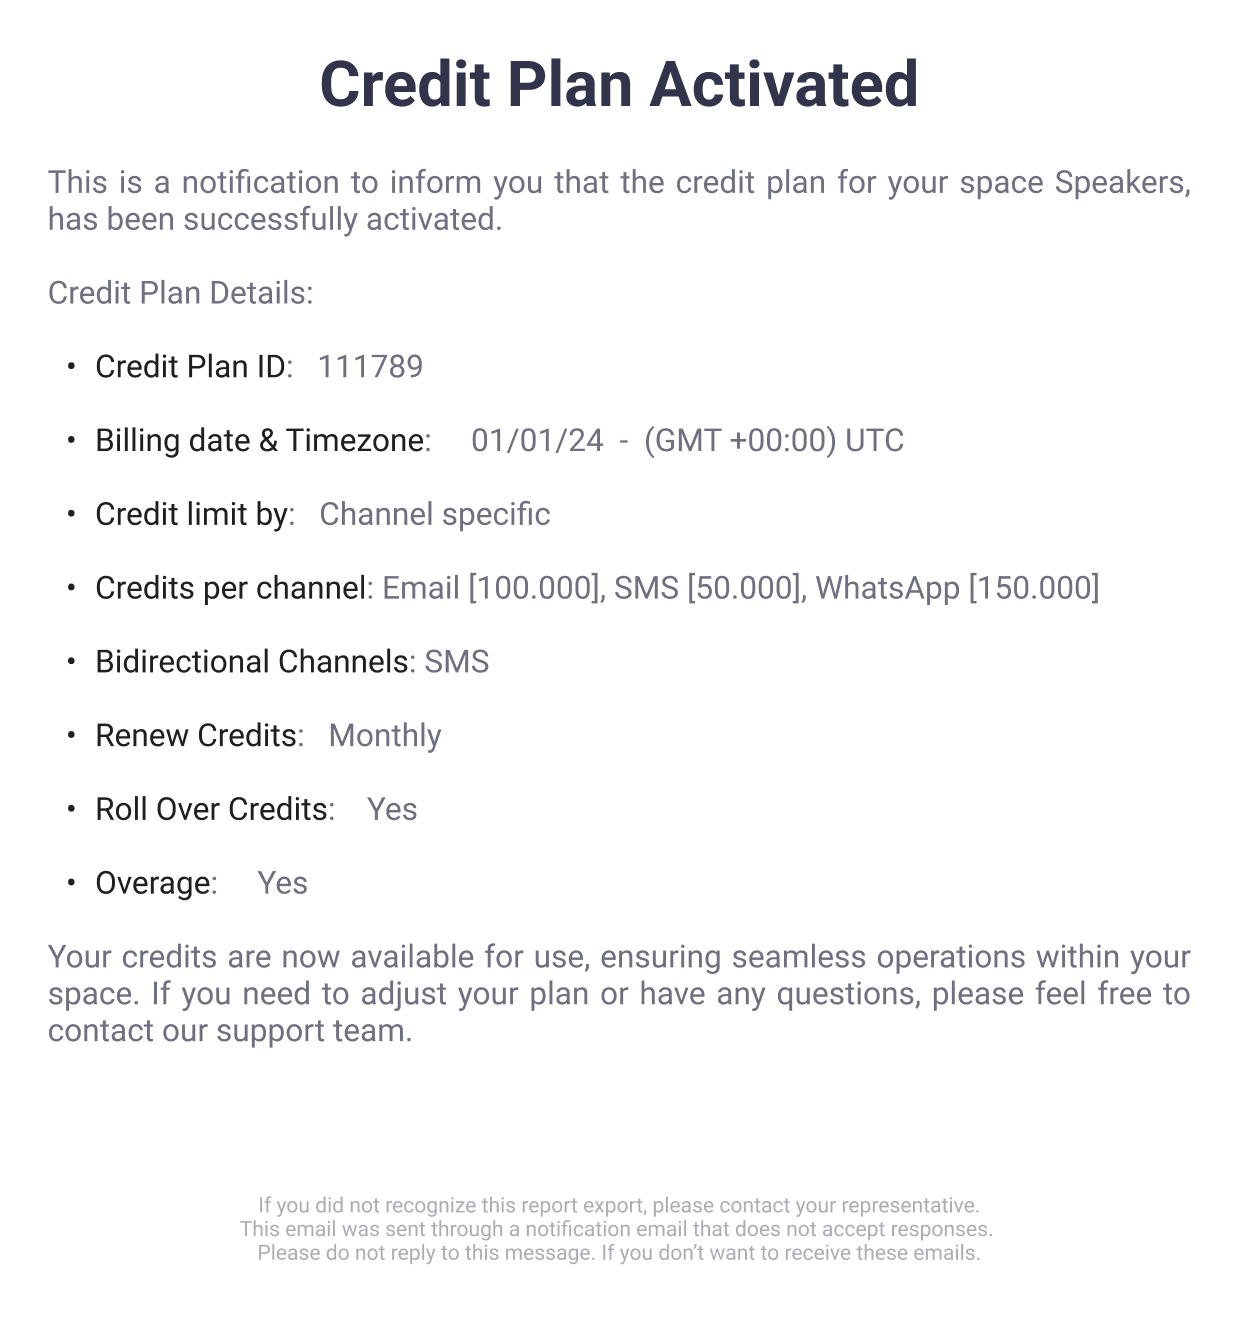
Confirmation email: After saving, the platform sends a notification email titled “Credit Plan Activated” to the Account Manager of the Workspace.
This email confirms that the credit plan has been activated according to the plan activation date and provides a detailed summary of its configuration:
-
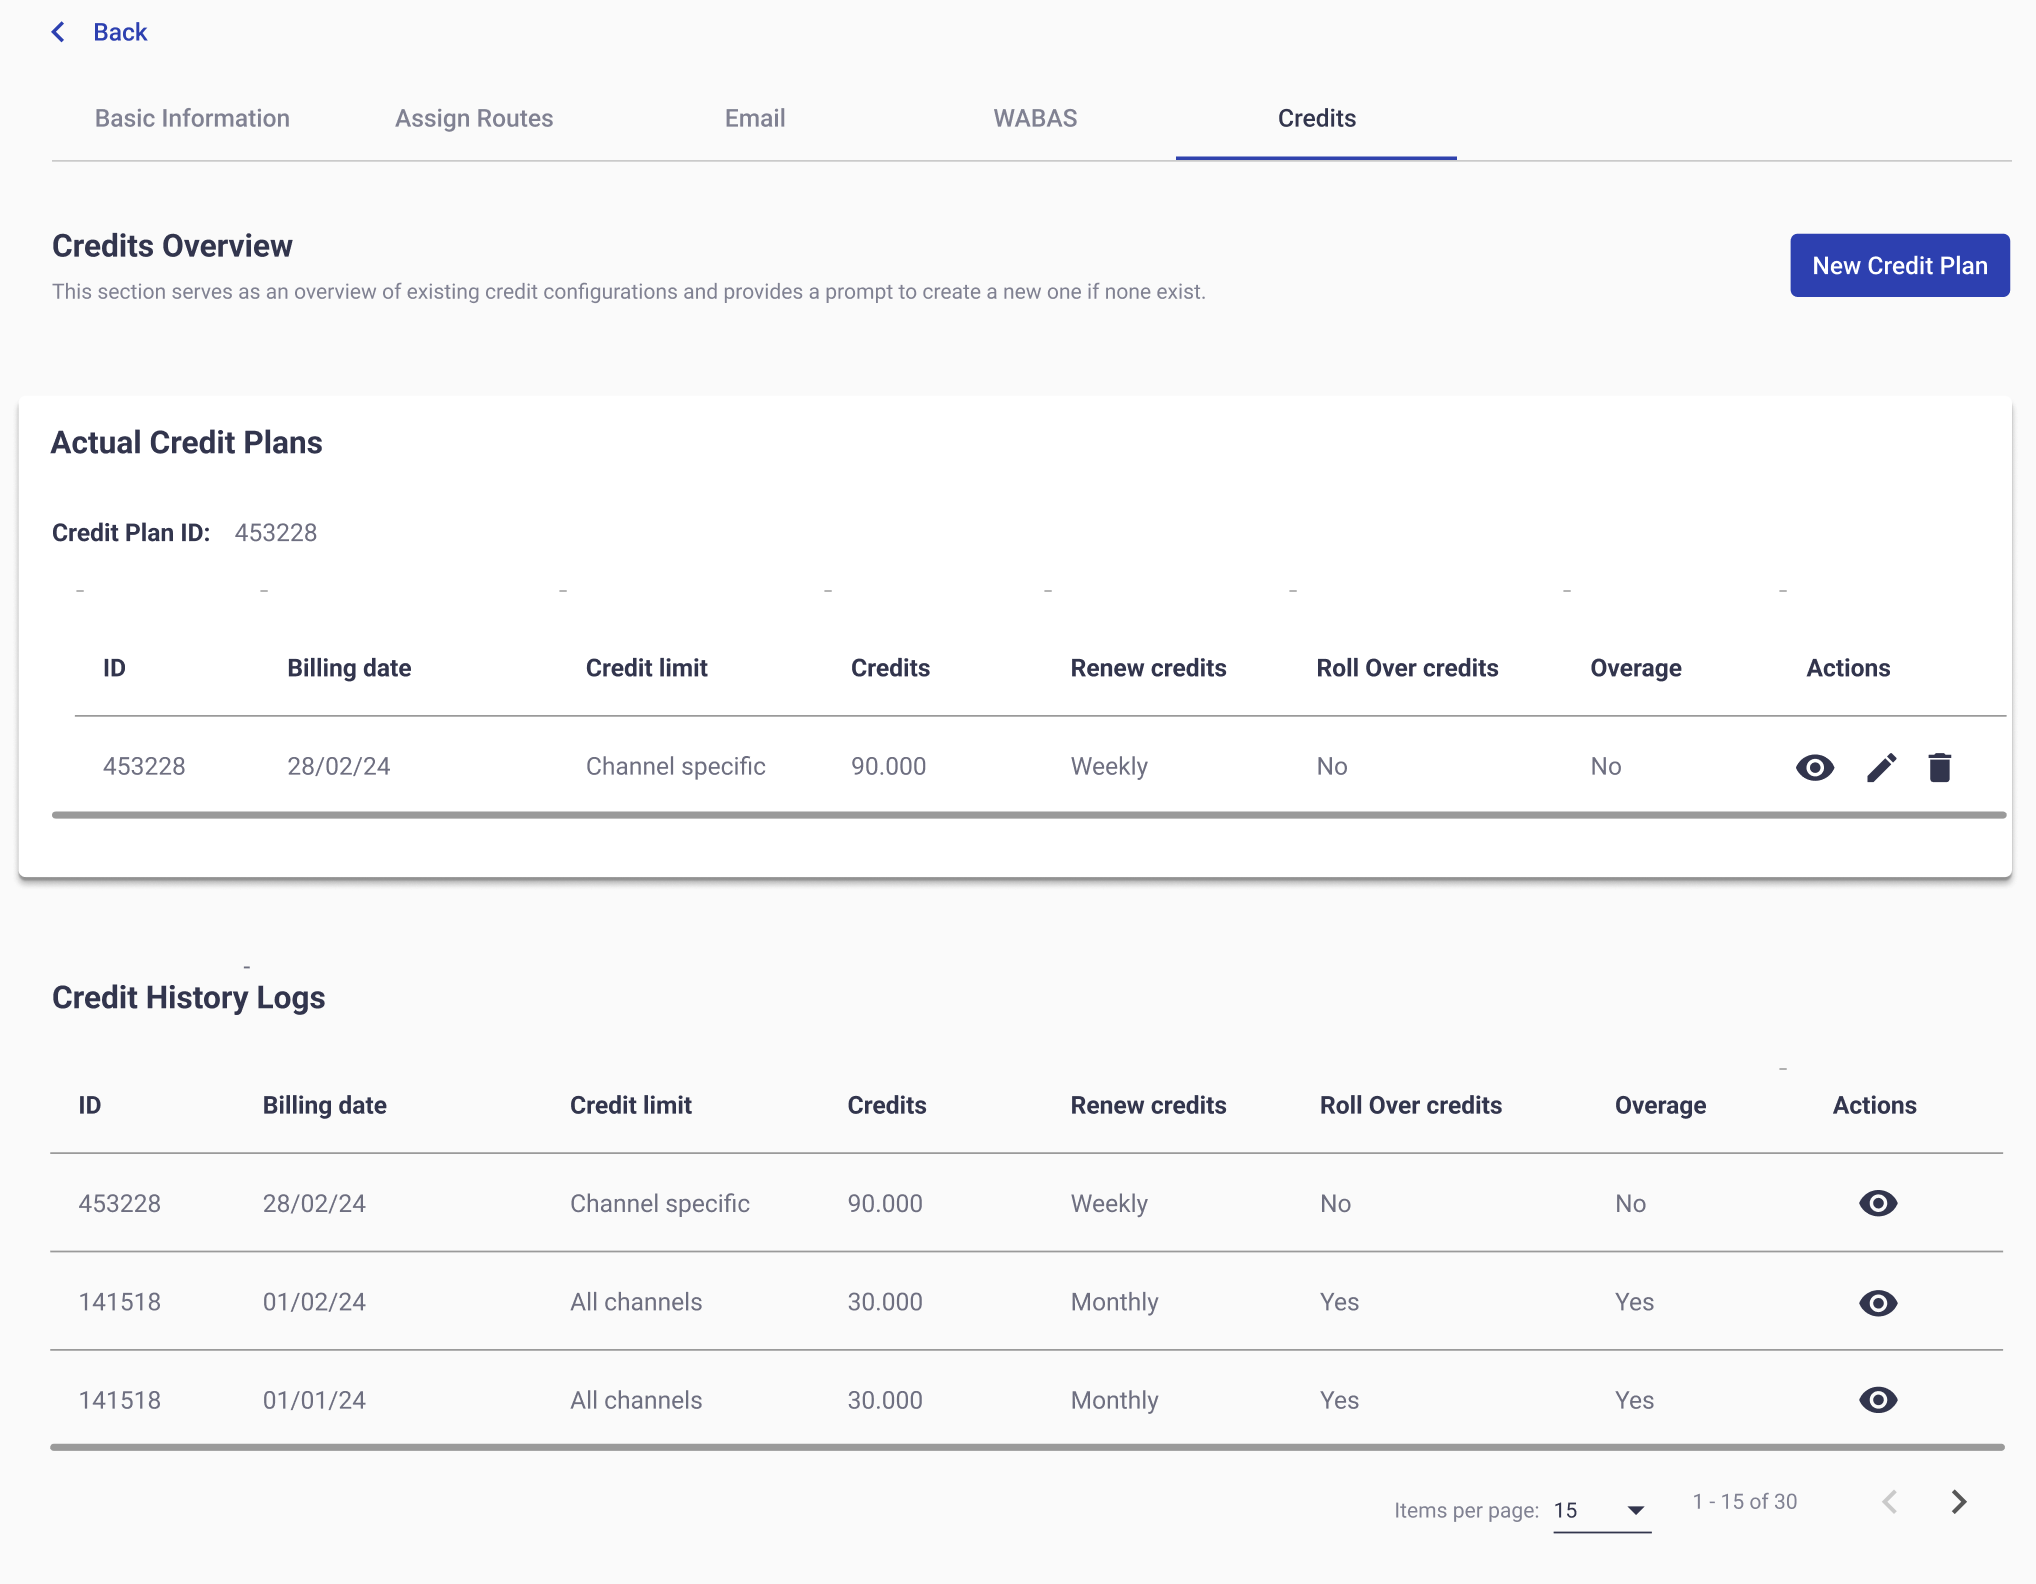
Credits Overview redirection: After saving, the admin is redirected to the Credits Overview page.
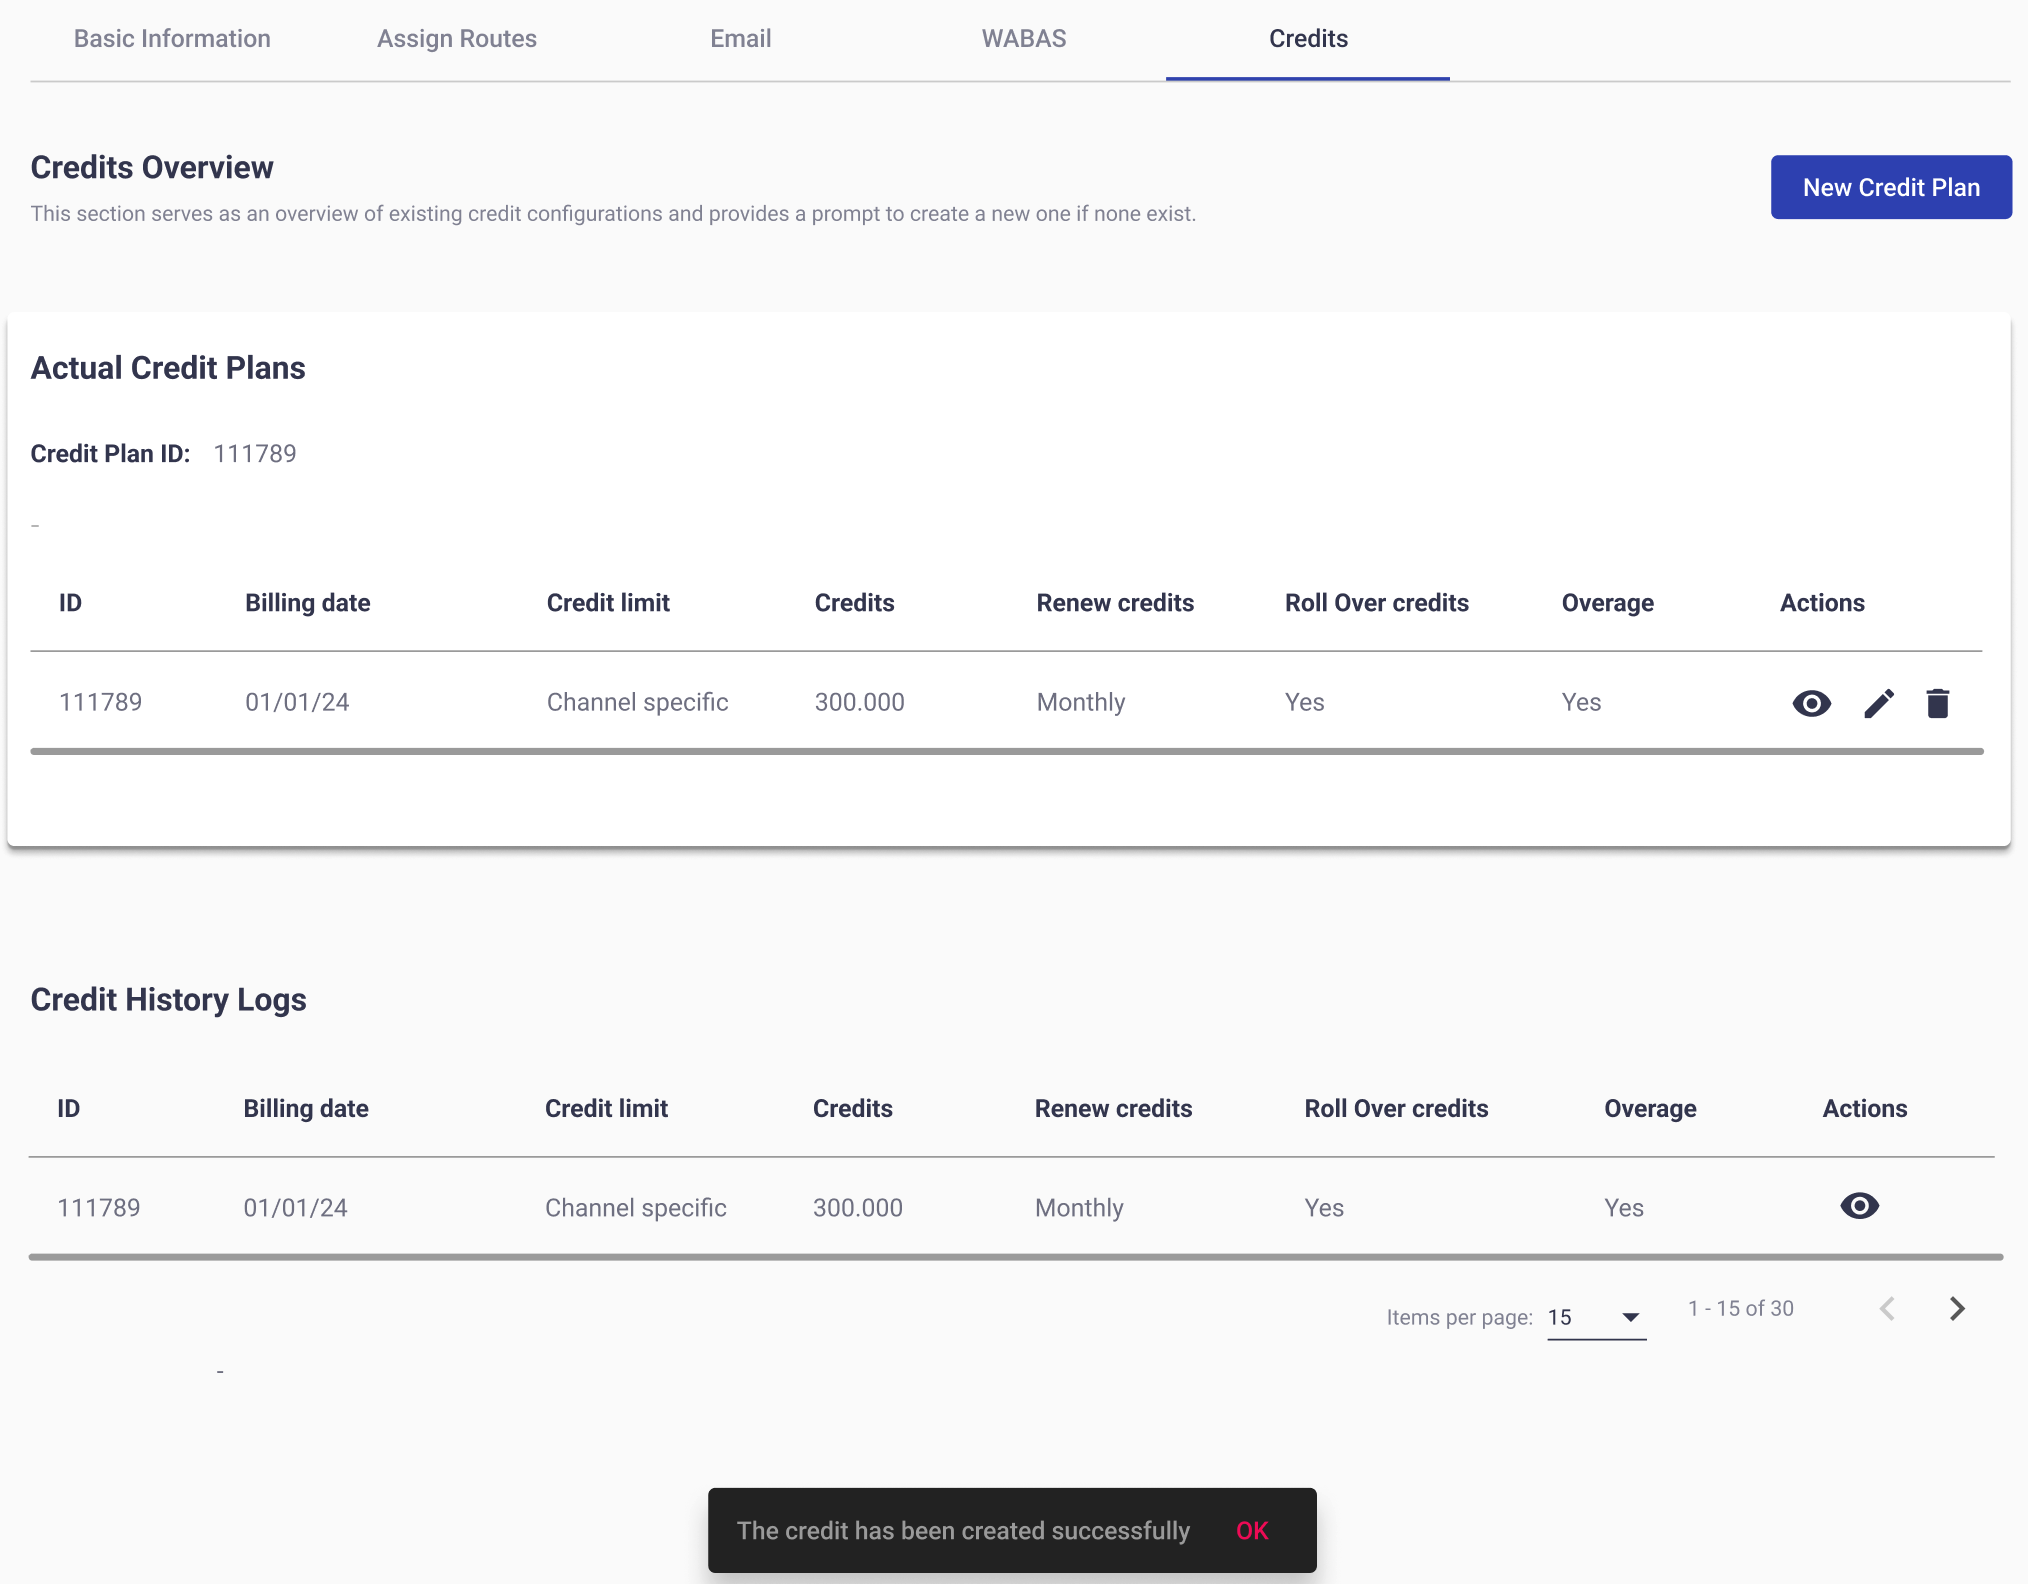
This section is the central dashboard for managing credit plans and includes two main areas:
-
Actual Credit Plans: Displays the credit plans that are currently active for the selected Workspace. This table gives you an overview of the main attributes of the plan and provides direct actions to manage it.
-
ID - Unique identifier of the credit plan.
-
Billing date - Indicates the start date of the credit plan.
-
Credit limit - Displays the type of credit allocation selected during configuration (All channels | Channel specific).
-
Credits - Displays the total amount of credits assigned, either as a shared pool (All channels) or the sum of all credits configured per channel (Channel specific).
-
Renew credits - Indicates whether the Renew Credits option is active and specifies the renewal period (e.g., Weekly, Monthly, Quarterly).
-
Roll Over credits - Shows if unused credits will be carried over to the next renewal cycle (Yes) or if they will be reset at the beginning of the new cycle (No).
-
Overage - Displays whether the Overage option is enabled. If Yes, credits may exceed the configured limit once the plan is consumed; if No, delivery will stop once the limit is reached.
-
Actions - Provides management options for the credit plan:
-
View details (eye icon): Opens the detailed view of the actual credit plan, showing credits per channel, consumption, and remaining balances. For more information about monitoring credit plan consumption per delivery channel, go to the Monitoring & Managing the Credit Plan section.
-
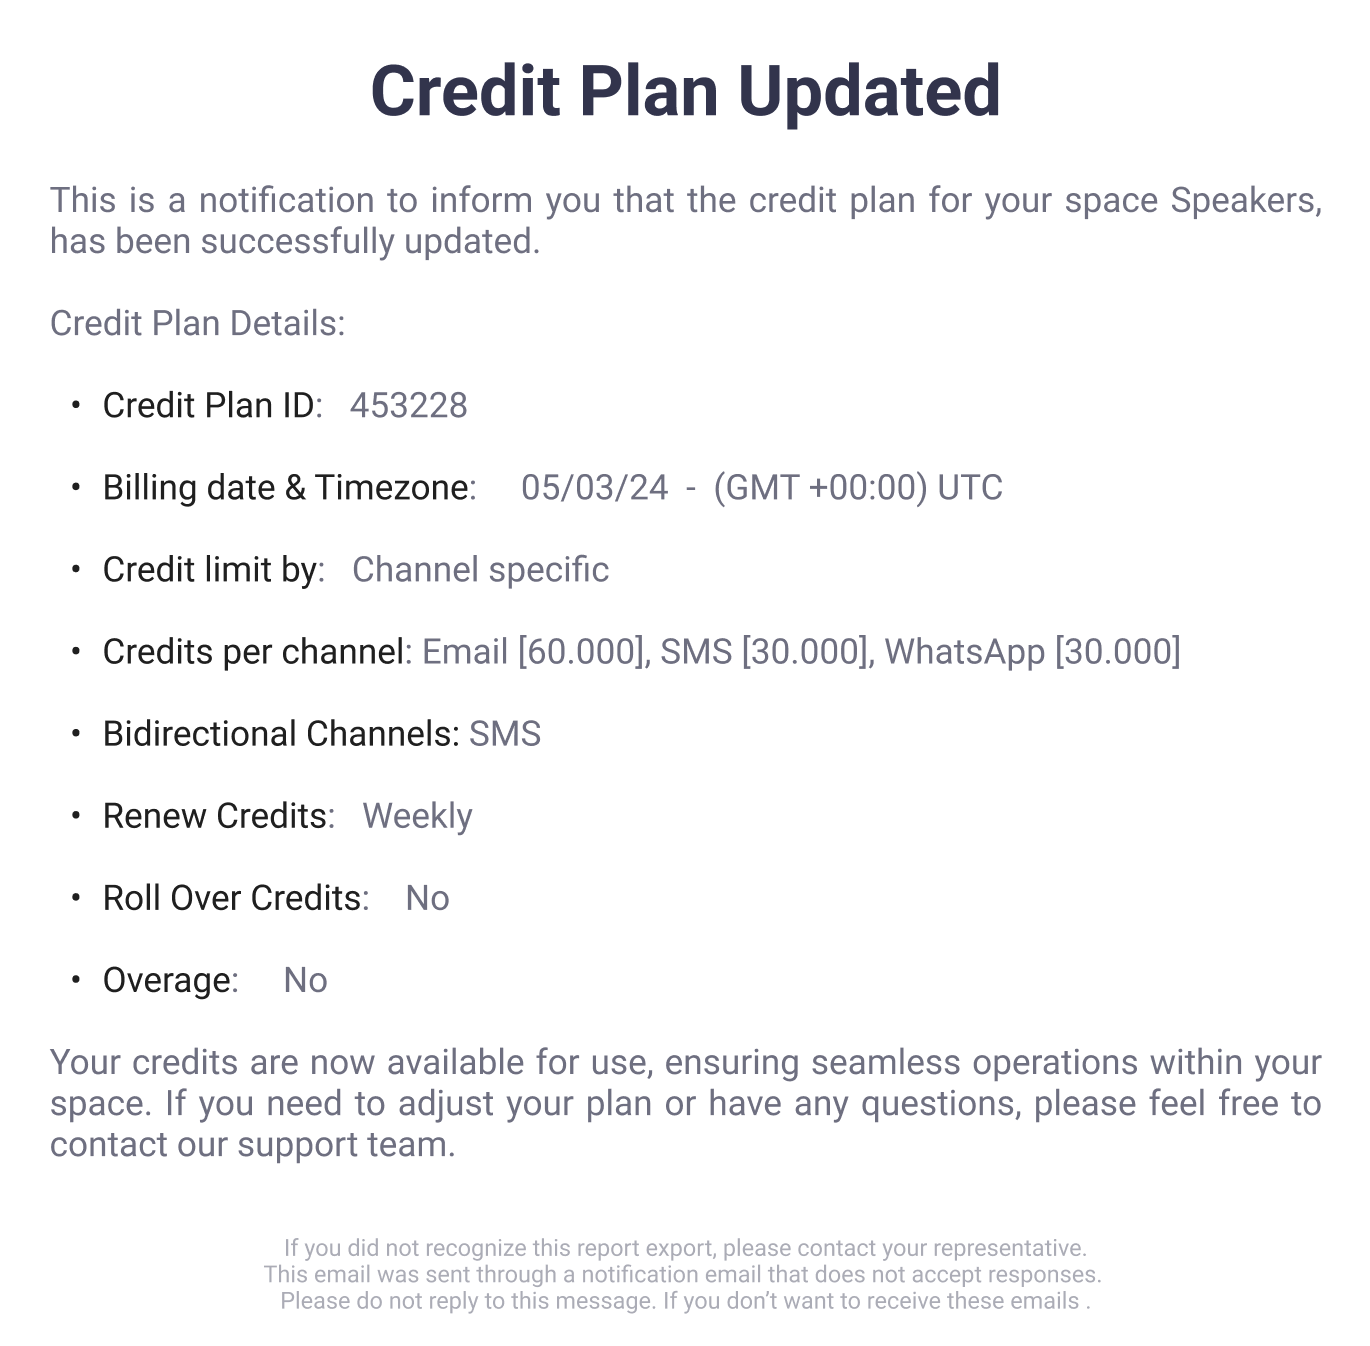
Edit (pencil icon): Allows modifications to the actual credit plan configuration. If you choose to edit an existing actual credit plan, the system will update the configuration and apply the new parameters based on the selected date and timezone. Once the update is confirmed, the Account Manager will receive a notification email titled “Credit Plan Updated”. This email serves as confirmation that the changes were successfully applied and includes all relevant details of the updated plan.
In addition, every time a credit plan is edited, the changes are automatically recorded in the Credit History Logs table. This table provides a chronological record of all credit plans that have been created or updated within the Workspace, allowing you to audit changes over time.
WARNINGWhen editing an existing credit plan, the system does not add credits to the remaining balance. Instead, the configured amount represents the total credit allocation for the plan, including any credits already consumed.
Example: If a credit plan was originally set to 100 credits and all 100 have already been consumed, editing the plan and entering “100” again will still result in 0 credits available, since the total allocation remains 100 (all already consumed).
To increase the available credits, the administrator must configure a value greater than the amount already consumed. For instance, if the plan is updated to 200 credits, and 100 were previously consumed, the system will show 100 credits available for use.
-
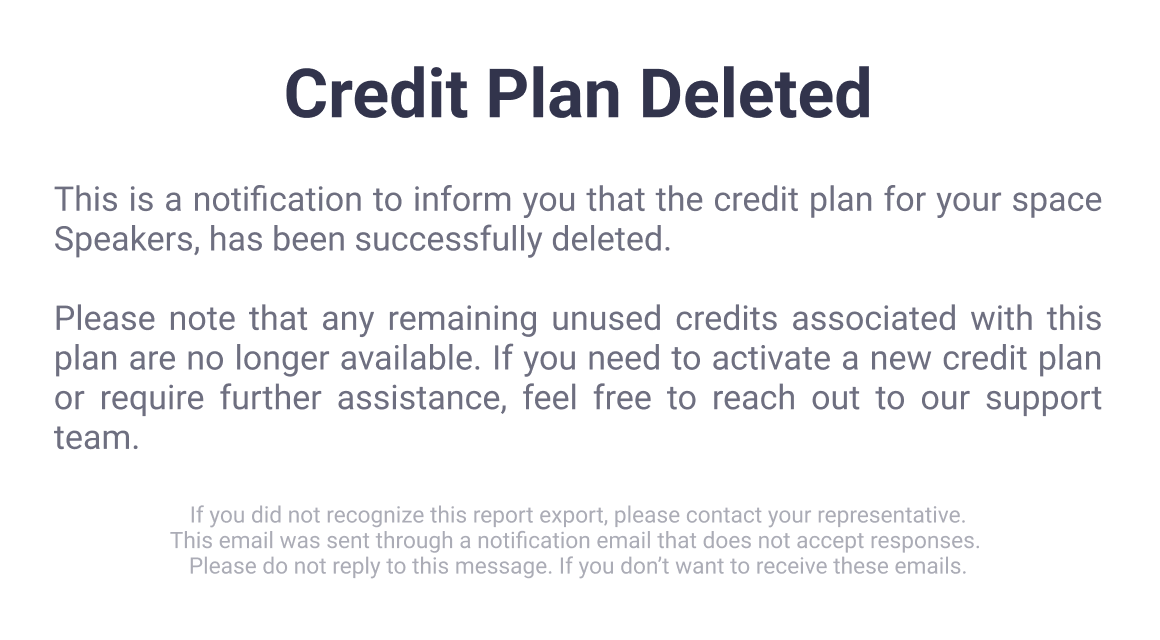
Delete (trash icon): Removes the actual credit plan. If you decide to delete the current credit plan, the system will remove the plan and immediately send a confirmation email titled “Credit Plan Deleted” to the Account Manager.
-
-
-
Credit History Logs: Maintains a record of past credit plans associated with the Workspace. Each entry includes the same key attributes as active plans.
-
The Credits Overview ensures you can immediately verify that the plan has been activated and provides a consolidated view of both current and historical configurations.
Monitoring & managing the credit plan
To review detailed consumption metrics, select the View details (eye icon) from the Actual Credit Plans table.

NOTEThe platform allows the creation of more than one credit plan, but this is only possible under specific conditions:
Channel specific plans: If the credit plan was created using the Channel specific option, multiple credit plans may be created as long as there are delivery channels that have not yet been assigned credits. Each plan can allocate credits to different channels, ensuring no duplication of credit assignments across plans.
Example: If Email and SMS already have credits assigned in the first plan, a new credit plan can be created only for the remaining channels, such as WhatsApp or RCS.
All channels plans: If the credit plan was created using the All channels option, no additional credit plans can be created. This is because the shared pool of credits already applies collectively to all delivery channels within the Workspace.
WARNINGIf a Workspace originally included three delivery channels under a credit plan and a new channel is later added to the Workspace:
- If the plan was configured with the All Channels option, the newly added channel will automatically consume credits from the shared pool.\
- If the plan was configured with the Channel specific option, the newly added channel will not be included automatically. In this case, you must either create a new credit plan or edit the existing one to assign credits specifically for that channel.
The details view differs depending on whether the plan was configured as All channels or Channel specific.
All channels
When a credit plan is configured with All channels limits, click the View details icon (eye) in the Actual Credit Plans table to open a detailed view of the plan’s configuration and current usage.
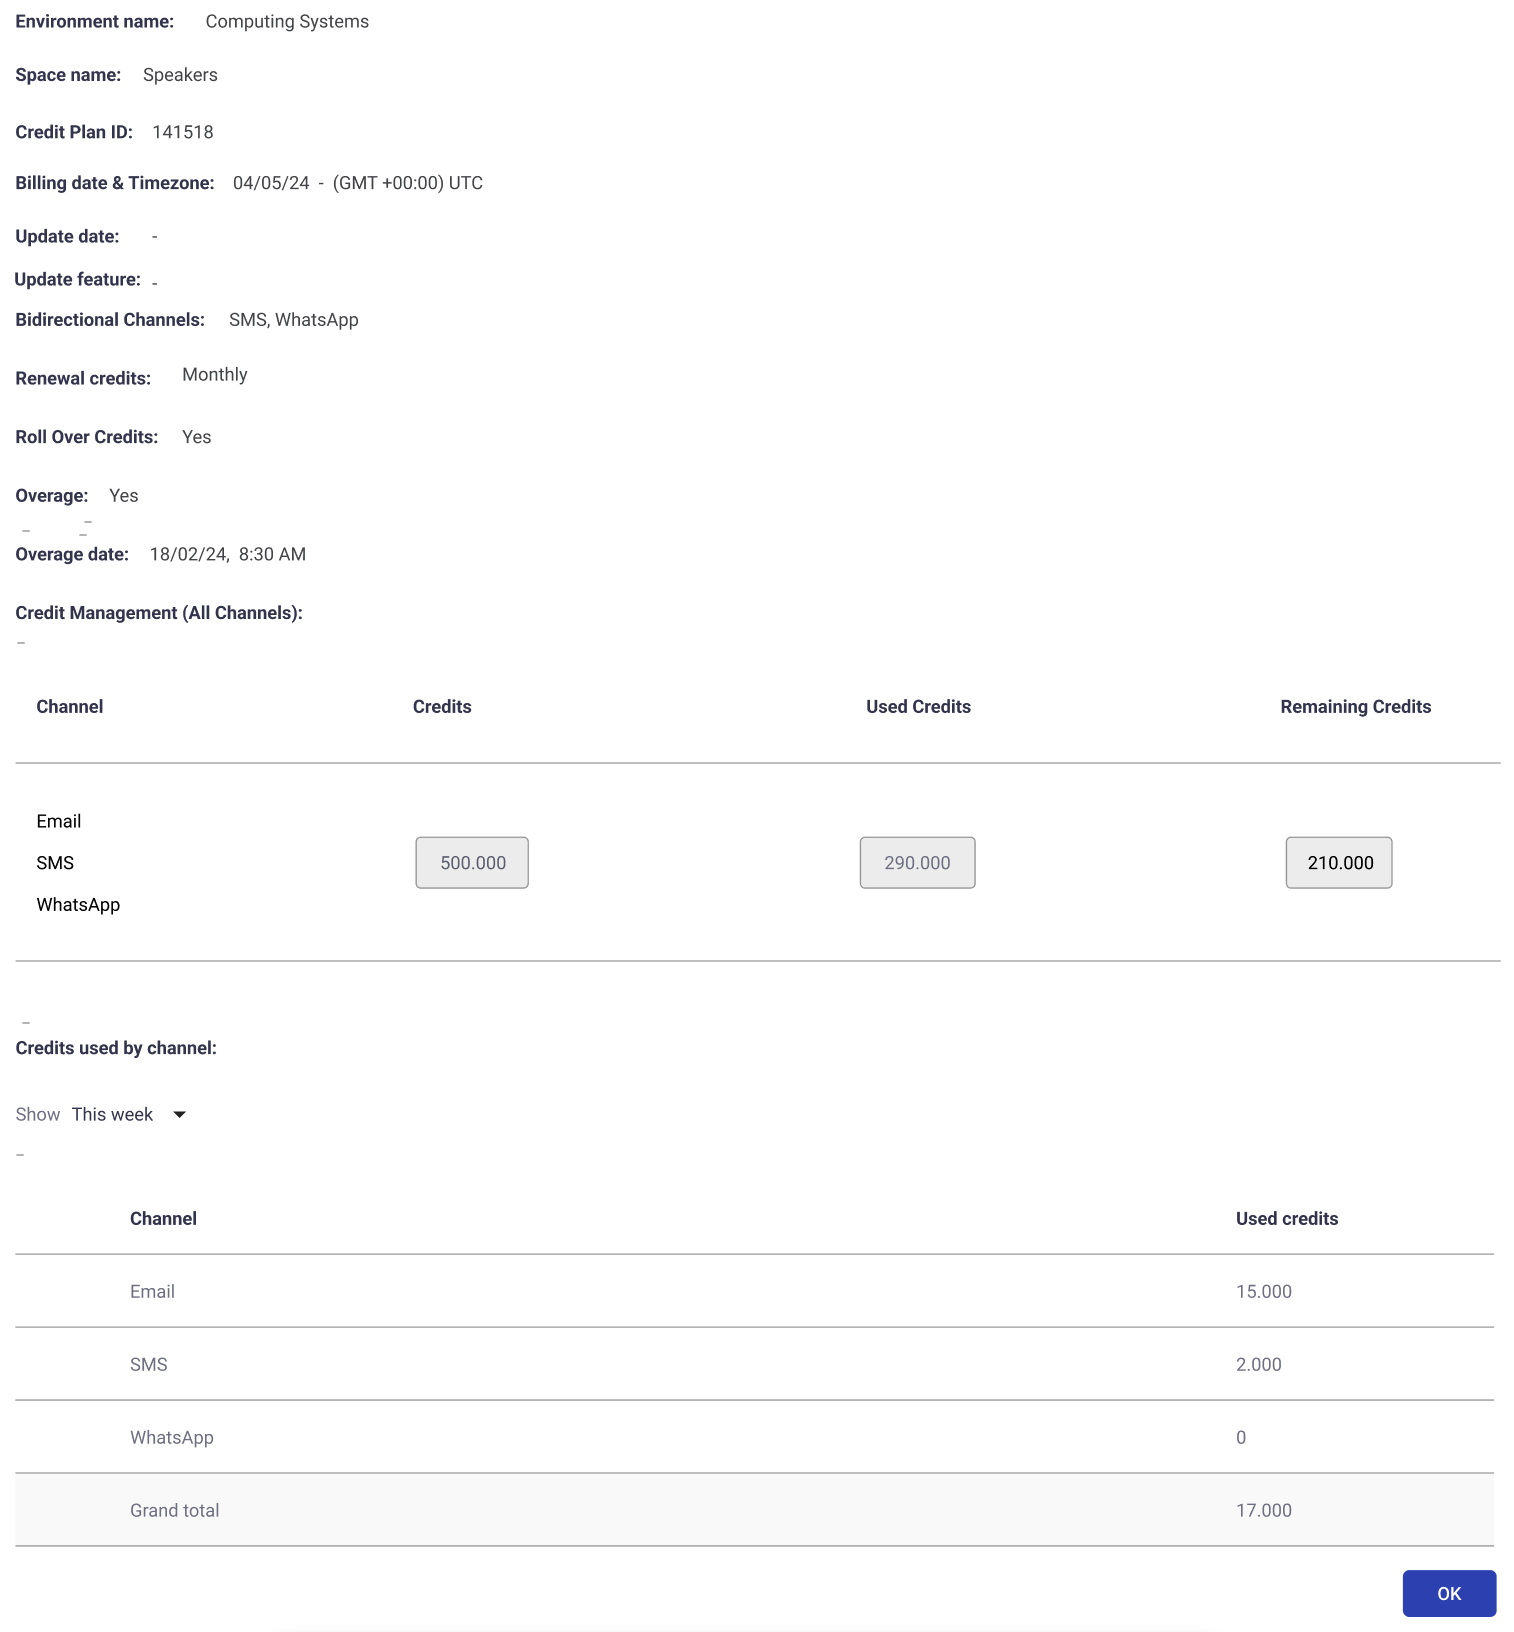
This page includes three main sections:
- Plan Information: At the top of the screen, review the general attributes of the plan:
- Environment name – The Environment where the Workspace is configured.
- Space name – The specific Workspace where your credit plan has been configured.
- Credit Plan ID – Unique identifier of the credit plan.
- Billing date & Timezone – Indicates the start date of the credit plan.
- Update date / Update feature – Reserved fields showing when the plan was last updated (if applicable).
- Bidirectional channels – Lists the delivery channels that support two-way communication within this plan.
NOTE
It indicates whether the delivery channel supports bidirectional traffic.
- MT (Mobile Terminated): Outbound messages sent from the platform to end users.
- MO (Mobile Originated): Inbound messages sent by end users to the platform.\
To enable Bidirectional consumption will be available in a future release. At present, only MT traffic is considered for credit consumption.\
- Renewal credits – Indicates whether the Renew Credits option is active and specifies the renewal period (e.g., Weekly, Monthly, Quarterly).
- Roll Over Credits – Shows if unused credits will be carried over to the next renewal cycle (Yes) or if they will be reset at the beginning of the new cycle (No).
- Overage – Displays whether the Overage option is enabled. If Yes, credits may exceed the configured limit once the plan is consumed; if No, delivery will stop once the limit is reached. If enabled, an overage date will also be displayed to indicate the date it was applied.
- Environment name – The Environment where the Workspace is configured.
- Credit Management (All Channels): In this section, the table reflects the shared credit pool applied across all delivery channels. It includes the following columns:
- Channel – Lists the delivery channels included in the Workspace (e.g., Email, SMS, WhatsApp).
- Credits – Displays the total credit pool configured for the credit plan.
- Used Credits by Channel – Shows the amount of credits consumed from the shared pool, regardless of the originating channel.
- Remaining Credits – Indicates the balance of credits still available in the shared pool.
- Channel – Lists the delivery channels included in the Workspace (e.g., Email, SMS, WhatsApp).
- Credits Used by Channel: This table provides further visibility into consumption per channel over time.
- A time filter (e.g., This week) allows you to review consumption for a specific period.
- A table lists each delivery channel with the number of credits consumed during the selected timeframe.
- A Grand total row aggregates the overall usage across all channels.
Channel specific
When a credit plan is configured with Channel specific limits, click the View details icon (eye) in the Actual Credit Plans table to open a detailed view of the plan’s configuration and current usage.
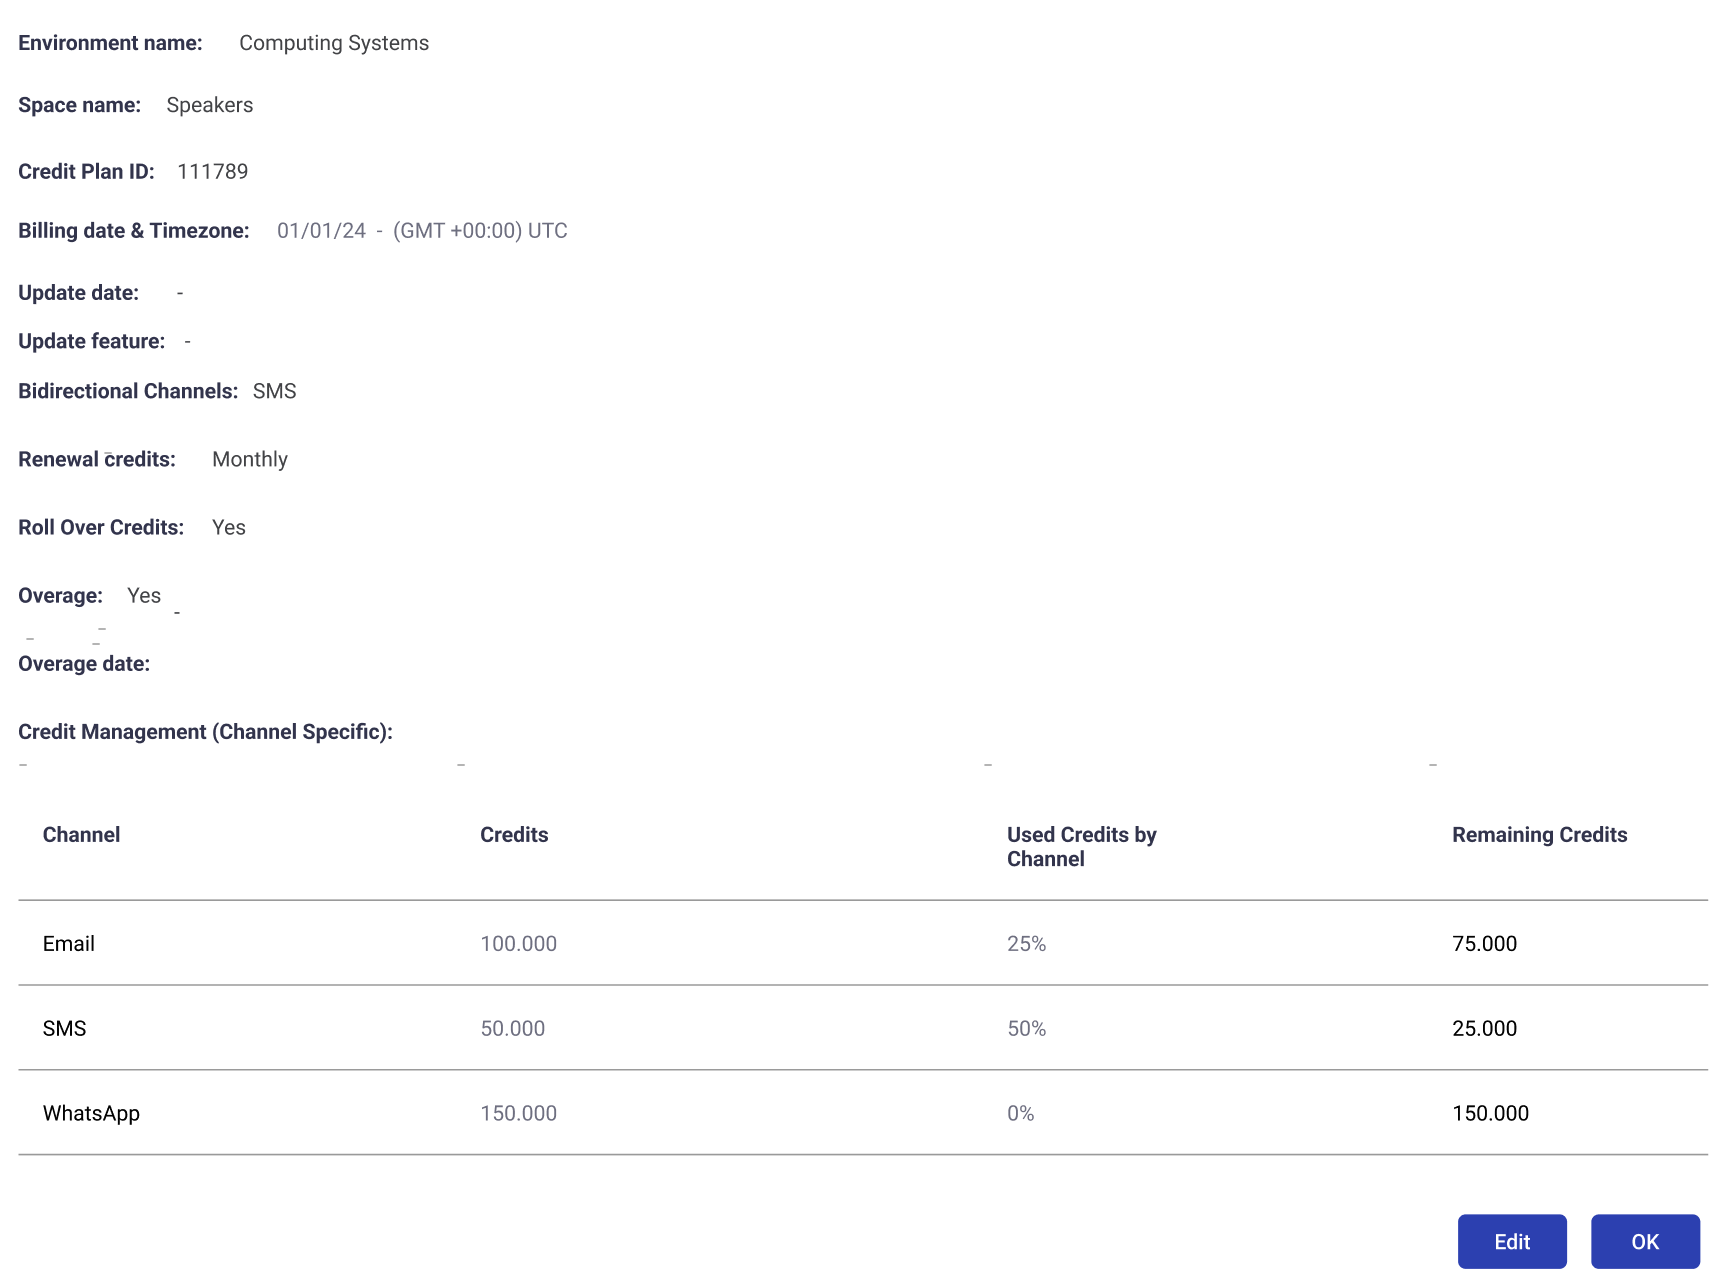
This page includes two main sections:
- Plan Information: At the top of the screen, review the general attributes of the plan:
- Environment name – The Environment where the Workspace is configured.
- Space name – The specific Workspace where your credit plan has been configured.
- Credit Plan ID – Unique identifier of the credit plan.
- Billing date & Timezone – Indicates the start date of the credit plan.
- Update date / Update feature – Reserved fields showing when the plan was last updated (if applicable).
- Bidirectional channels – Lists the delivery channels that support two-way communication within this plan.
NOTE
It indicates whether the delivery channel supports bidirectional traffic.
- MT (Mobile Terminated): Outbound messages sent from the platform to end users.
- MO (Mobile Originated): Inbound messages sent by end users to the platform.\
To enable Bidirectional consumption will be available in a future release. At present, only MT traffic is considered for credit consumption.\
- Renewal credits – Indicates whether the Renew Credits option is active and specifies the renewal period (e.g., Weekly, Monthly, Quarterly).
- Roll Over Credits – Shows if unused credits will be carried over to the next renewal cycle (Yes) or if they will be reset at the beginning of the new cycle (No).
- Overage – Displays whether the Overage option is enabled. If Yes, credits may exceed the configured limit once the plan is consumed; if No, delivery will stop once the limit is reached. If enabled, an overage date will also be displayed to indicate the date it was applied.
- Environment name – The Environment where the Workspace is configured.
- Credit Management (Channel Specific): The lower section provides a table that breaks down credit allocation and usage for each configured channel. The table includes the following columns:
- Channel – Lists each delivery channel that was included in the credit plan.
- Credits – Shows the total number of credits allocated to that specific channel.
- Used Credits by Channel – Displays a percentage of credits already consumed for that channel.
- Remaining Credits – Indicates the number of credits still available for the channel.
Updated 22 days ago