Flows with Message Templates
WhatsApp Flows can be delivered not only during an active customer conversation window, but also proactively through approved WhatsApp Message Templates. This configuration is intended for outbound communication scenarios in which the business needs to initiate the interaction, such as promotional messages, operational notifications, or transactional communications. In practical terms, the message template serves as the delivery vehicle and entry point, while the Flow is the interactive experience the user launches by selecting the message template’s call-to-action (CTA) button.
When a Flow is delivered through a message template, it is no longer constrained by the same limitations that apply to session-only messaging. Instead, the Flow is presented as part of a message template-based interactive message, enabling businesses to prompt structured user input outside the 24-hour conversation window, provided that the message template has been approved under WhatsApp’s policies. Therefore, message templates are crucial for starting a dialogue with your customers. They are the only way to contact users who have not yet messaged your business. Message Templates must follow the WhatsApp business and commerce policies to receive approval, at which point you can begin using them.
How Flows Are Associated with Message Templates
From a configuration perspective, WhatsApp Manager provides two standard ways to associate a Flow with a message template:
- A business may create a new Flow directly during the message template creation process using WhatsApp’s form-based editor, or
- It can attach an existing published Flow that was previously created in the Flows section.
Although these paths differ in how the Flow is built, both produce the same functional outcome: an approved message template containing a CTA that launches a Flow inside WhatsApp.
After understanding how Static WhatsApp Flows are created, published, and sent within an active conversation window, the next step is to explore how Flows can be delivered proactively using WhatsApp Message Templates.
What You Will Learn in This Section
The goal of this section is to show, step by step, how a Flow can be created directly within the message template creation process and how that Flow becomes part of the approved message template experience.
By the end of this section, you will understand:
- How WhatsApp Message Templates can be used as entry points for Flows
- How to create a new Flow while creating a message template
- How the Flow is embedded into the message template through a call-to-action (CTA) button
- How the end user experiences the message template and launches the Flow from the chat
To keep the focus clear, we will use a simple and practical use case that illustrates a common outbound scenario.
Getting Started with WhatsApp Flows in Message Templates
To better understand how WhatsApp Static Flows can be created and delivered through message templates, this section walks through a practical and common use case.
The example demonstrates how to build a static Flow directly during the WhatsApp message template creation process, showing how screens, form components, and predefined navigation are configured to create a guided user experience that can be launched directly from a template-based message.
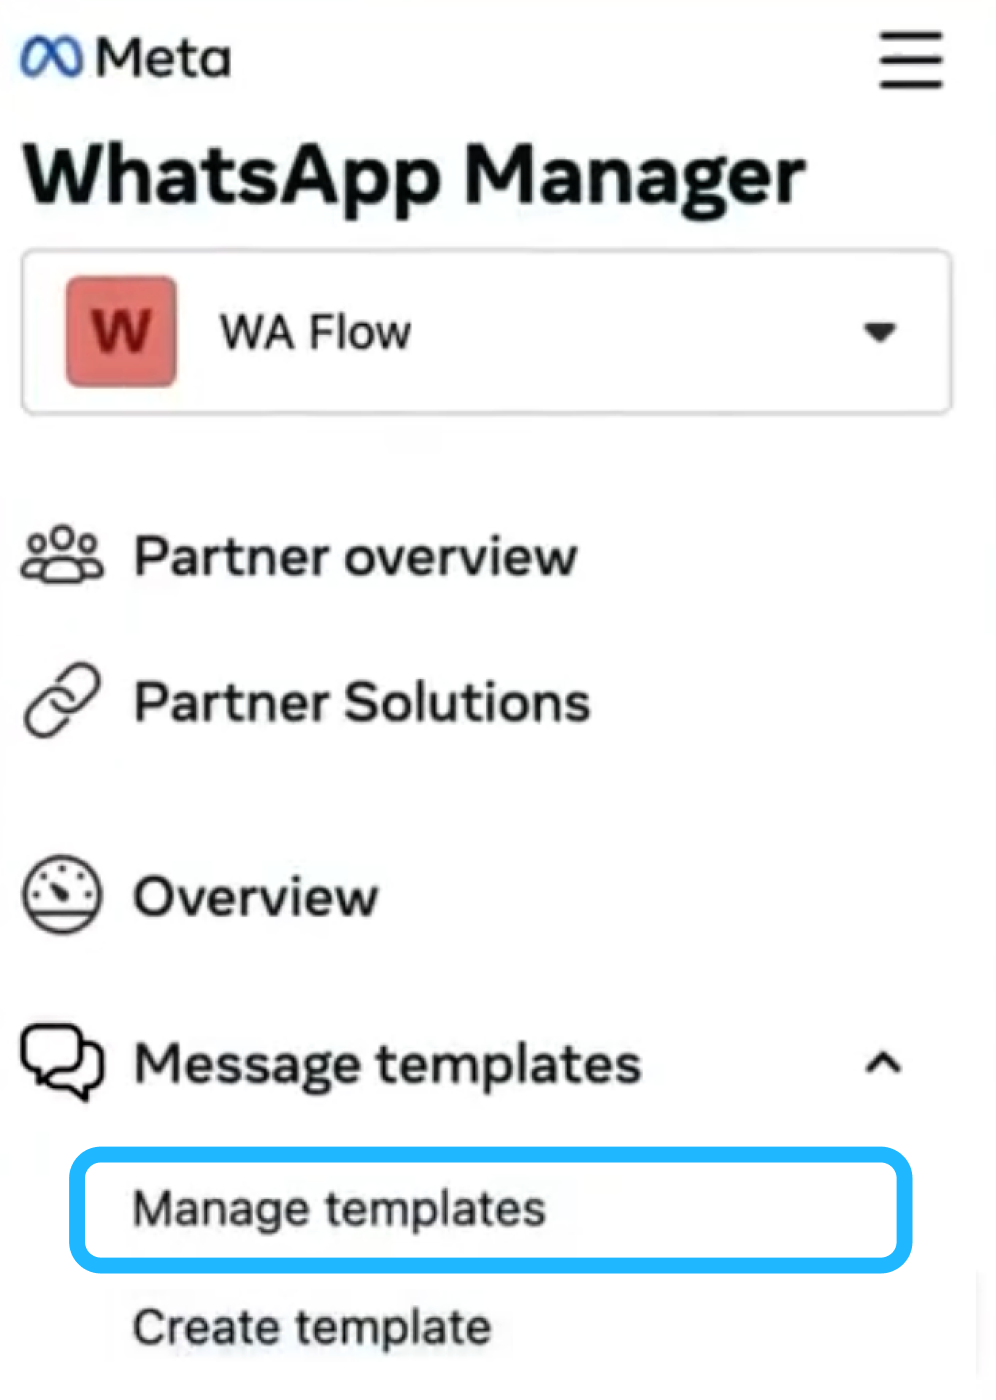
Before creating a Flow within a message template, you must first access the Message Templates section in WhatsApp Manager. This is where all WhatsApp message templates are created, reviewed, and managed. The steps below describe the typical path in WhatsApp Manager. Exact labels may vary slightly depending on the account configuration and UI updates, but the workflow remains the same.
To access the Message templates section, follow these steps:
-
Sign in to the Meta Business Manager platform.
-
From the Meta Business Manager, click the Message templates option located in the left sidebar. This will open the WhatsApp Manager module. Then select the Manage message templates section, where all existing message templates are listed, and new message templates can be created.
Once you are in the Message Templates section, you can proceed to create a new message template and associate it with a WhatsApp Flow.
Before continuing, it is important to note that Flows delivered through Message Templates follow the same structural principles as any Static WhatsApp Flow.
The concepts explained in the section Understanding the Structure of a Static WhatsApp Flow fully apply here, including:
- the definition of screens as discrete steps,
- the use of components to collect user input,
- predefined navigation between screens,
- validation rules, and
- Flow completion behavior.
Creating a Flow within a message template does not introduce a different Flow type or execution model. The difference lies only in how the Flow is delivered to the end user.
Example (Use Case): Customer Feedback Flow for Event Attendees
In this example, a business wants to collect structured feedback from users who attended an event. Instead of sending a long series of free-text messages or redirecting users to an external survey, the business sends a WhatsApp message template that includes a Flow.
The message template introduces the context and invites the user to participate. Once the user selects the CTA button, a Flow opens inside WhatsApp, guiding them through a short questionnaire.
Before beginning, WhatsApp Manager allows businesses to create a Flow directly during the message template creation process, without requiring Flow JSON. This is done using a form-based editor that provides a visual, guided experience.
To follow this example, ensure that you have access to WhatsApp Manager and that your WhatsApp Business Account is properly configured.
Configure Message Template Details
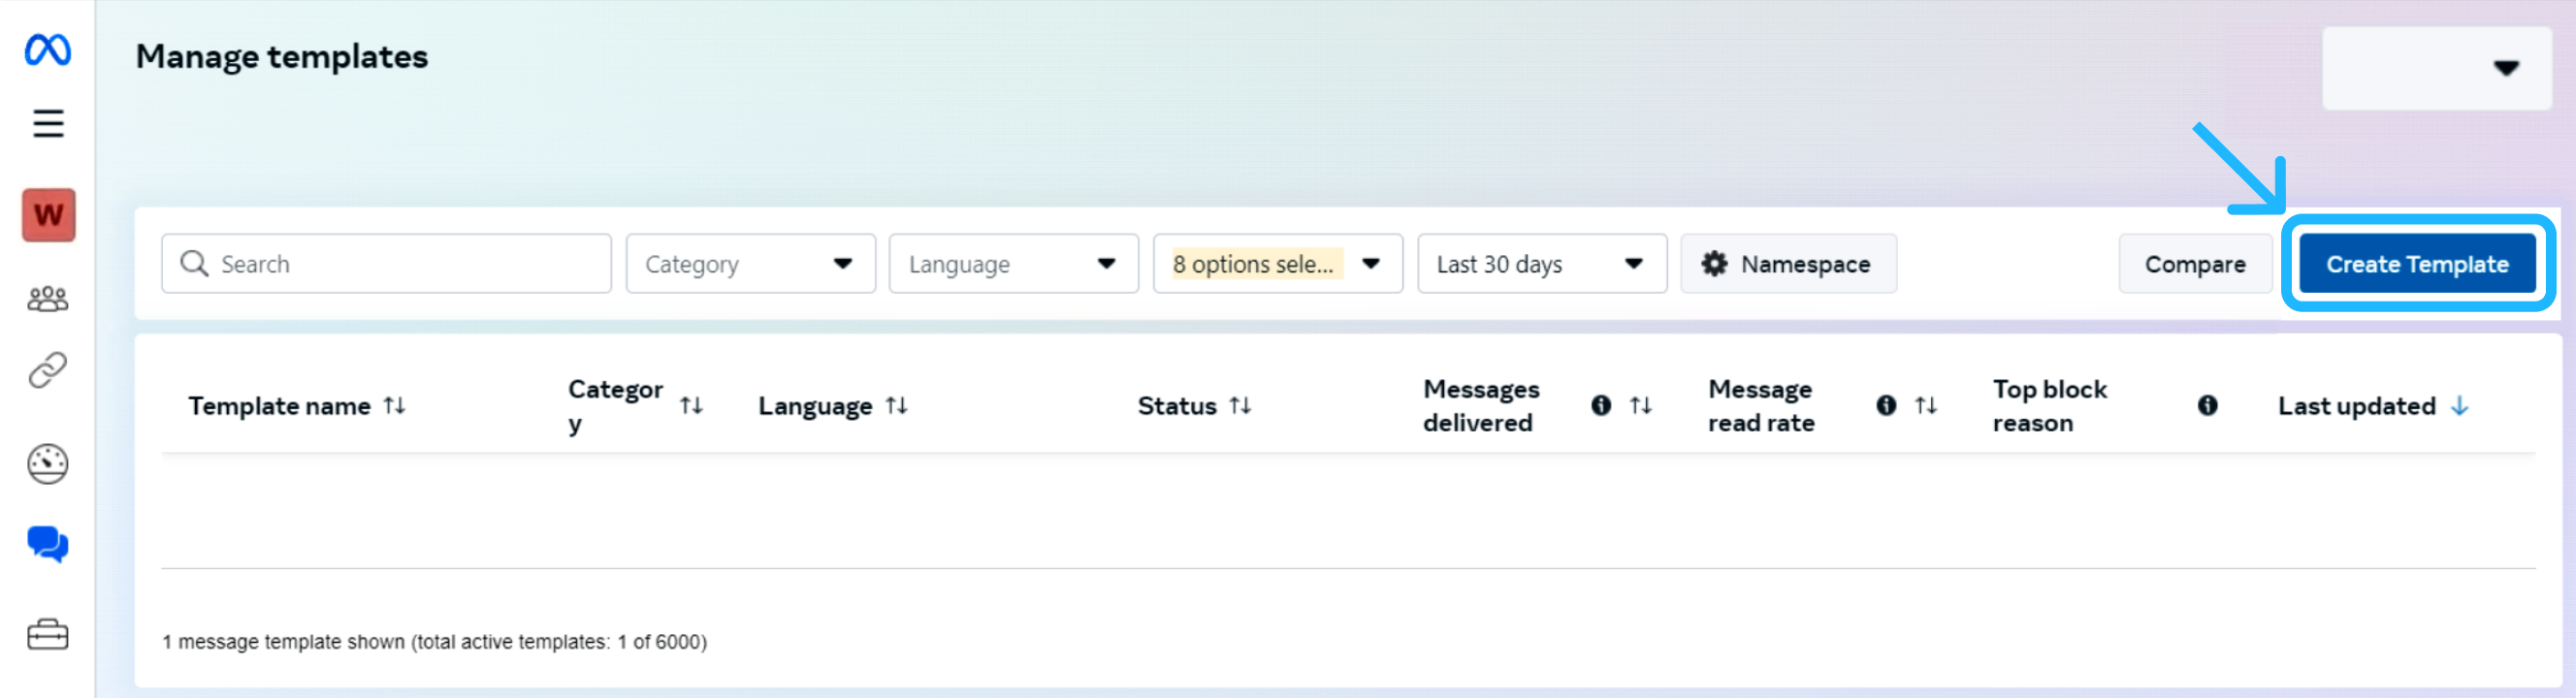
From the Manages message templates section, click Create Message Template at the top right corner.
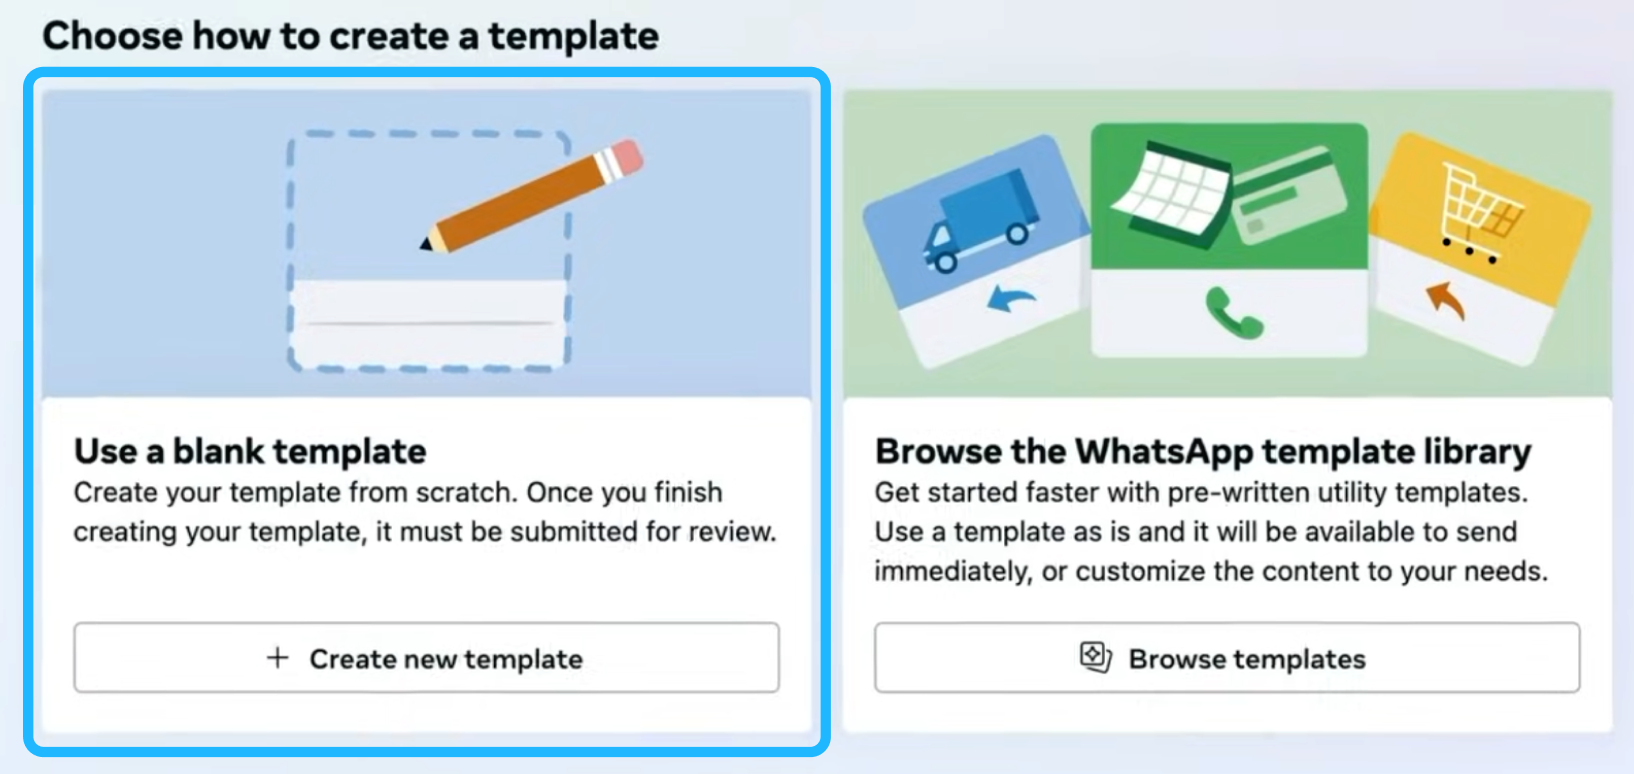
Then, select Use a blank message template.
Once the blank message template has been selected, the next step is to configure the message template details and create the Flow directly within the message template creation process.
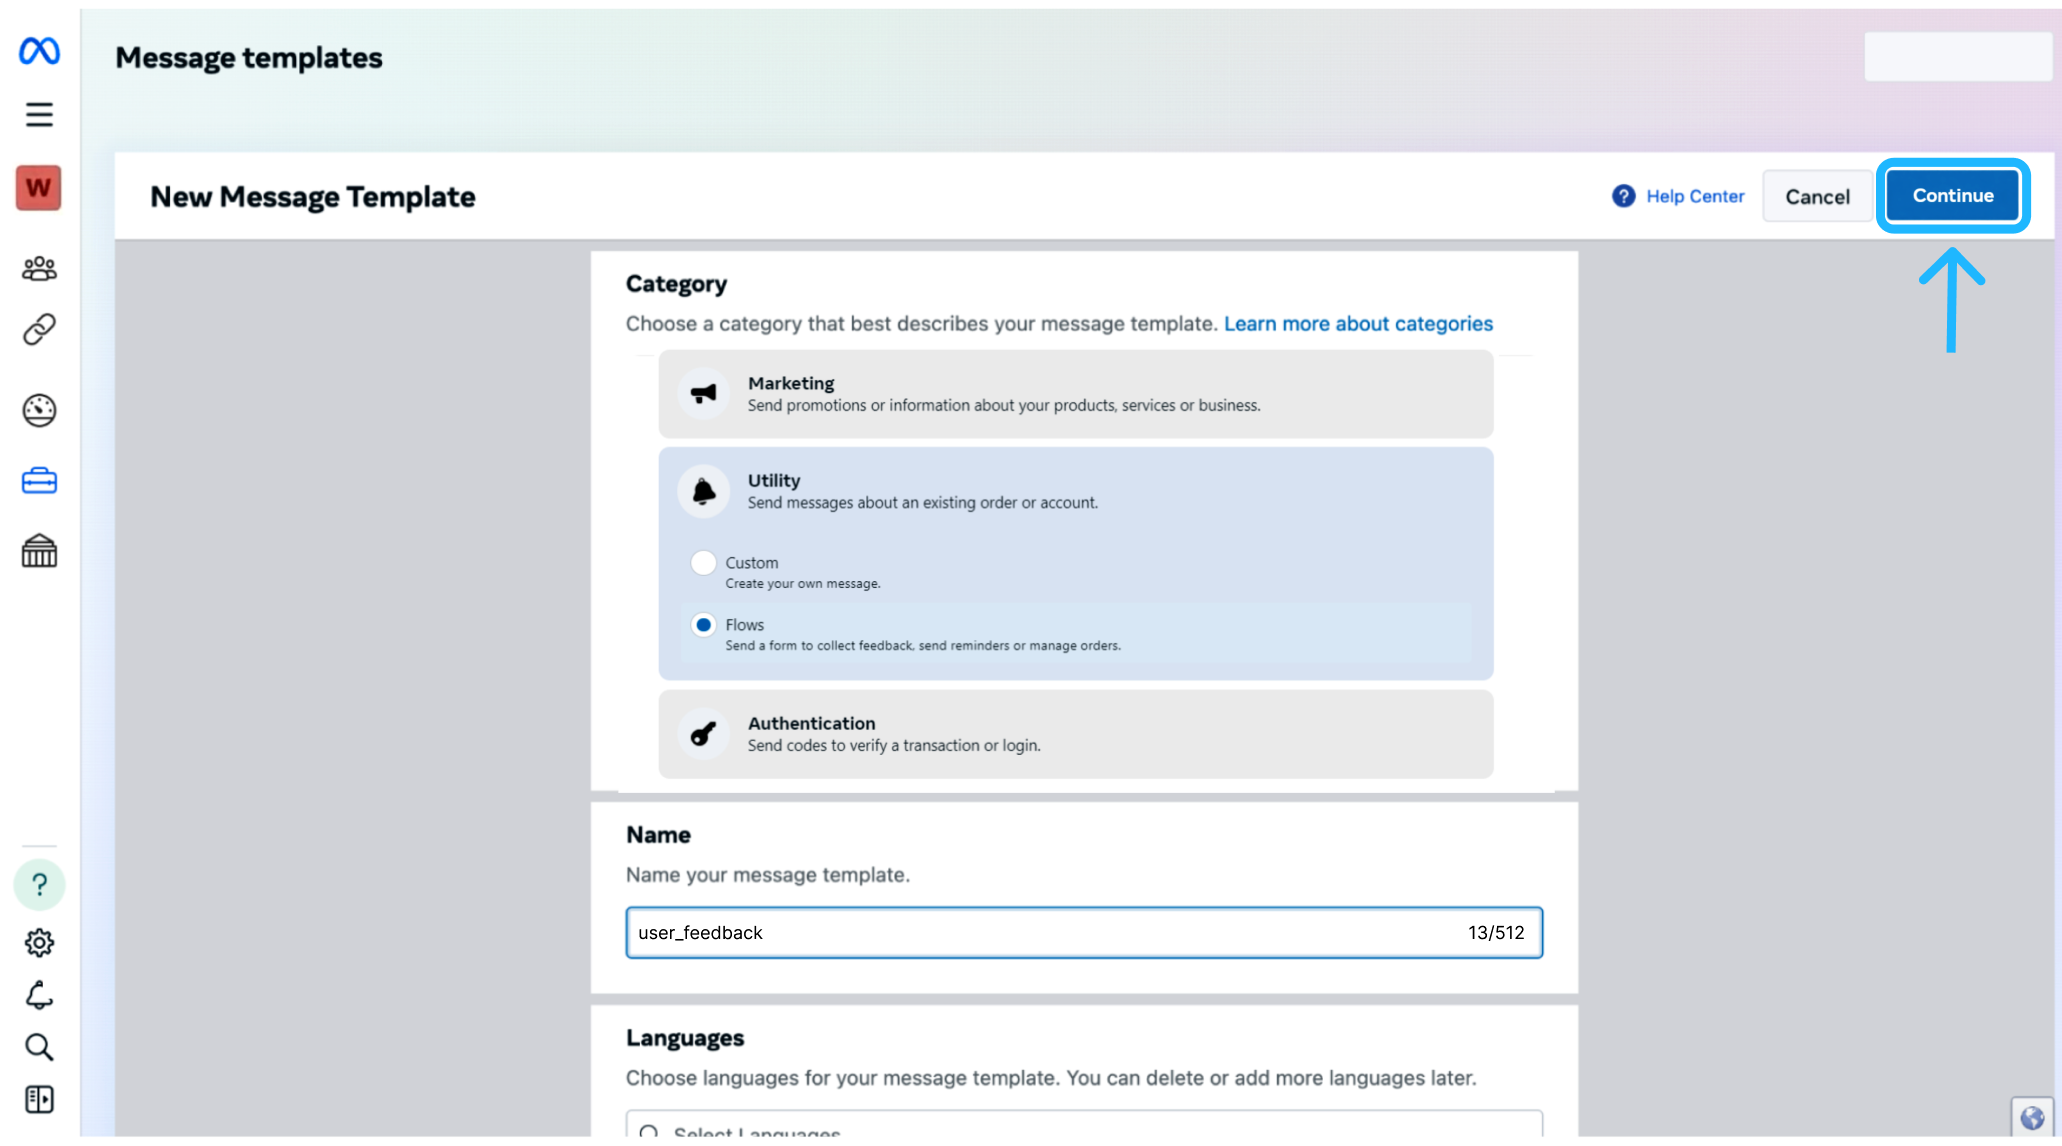
In the New Message Template configuration screen, provide the required message template information:
-
Category: Select the category that best matches the purpose of the message. For this use case, choose Utility, as the message relates to a specific interaction with users following an event — for example, Form. And click Flows.
-
Message Template Name: Enter a unique name for your Message Template (for example,
"user_feedback"). -
Language: Select the desired languages in which the message will be sent.
-
Once these fields are completed, click Continue to proceed.
Define the Message Template Message Content
In this step, you configure the message content that will be delivered to the end user and that serves as the entry point to the Flow. This message provides context before the user launches the interactive experience.
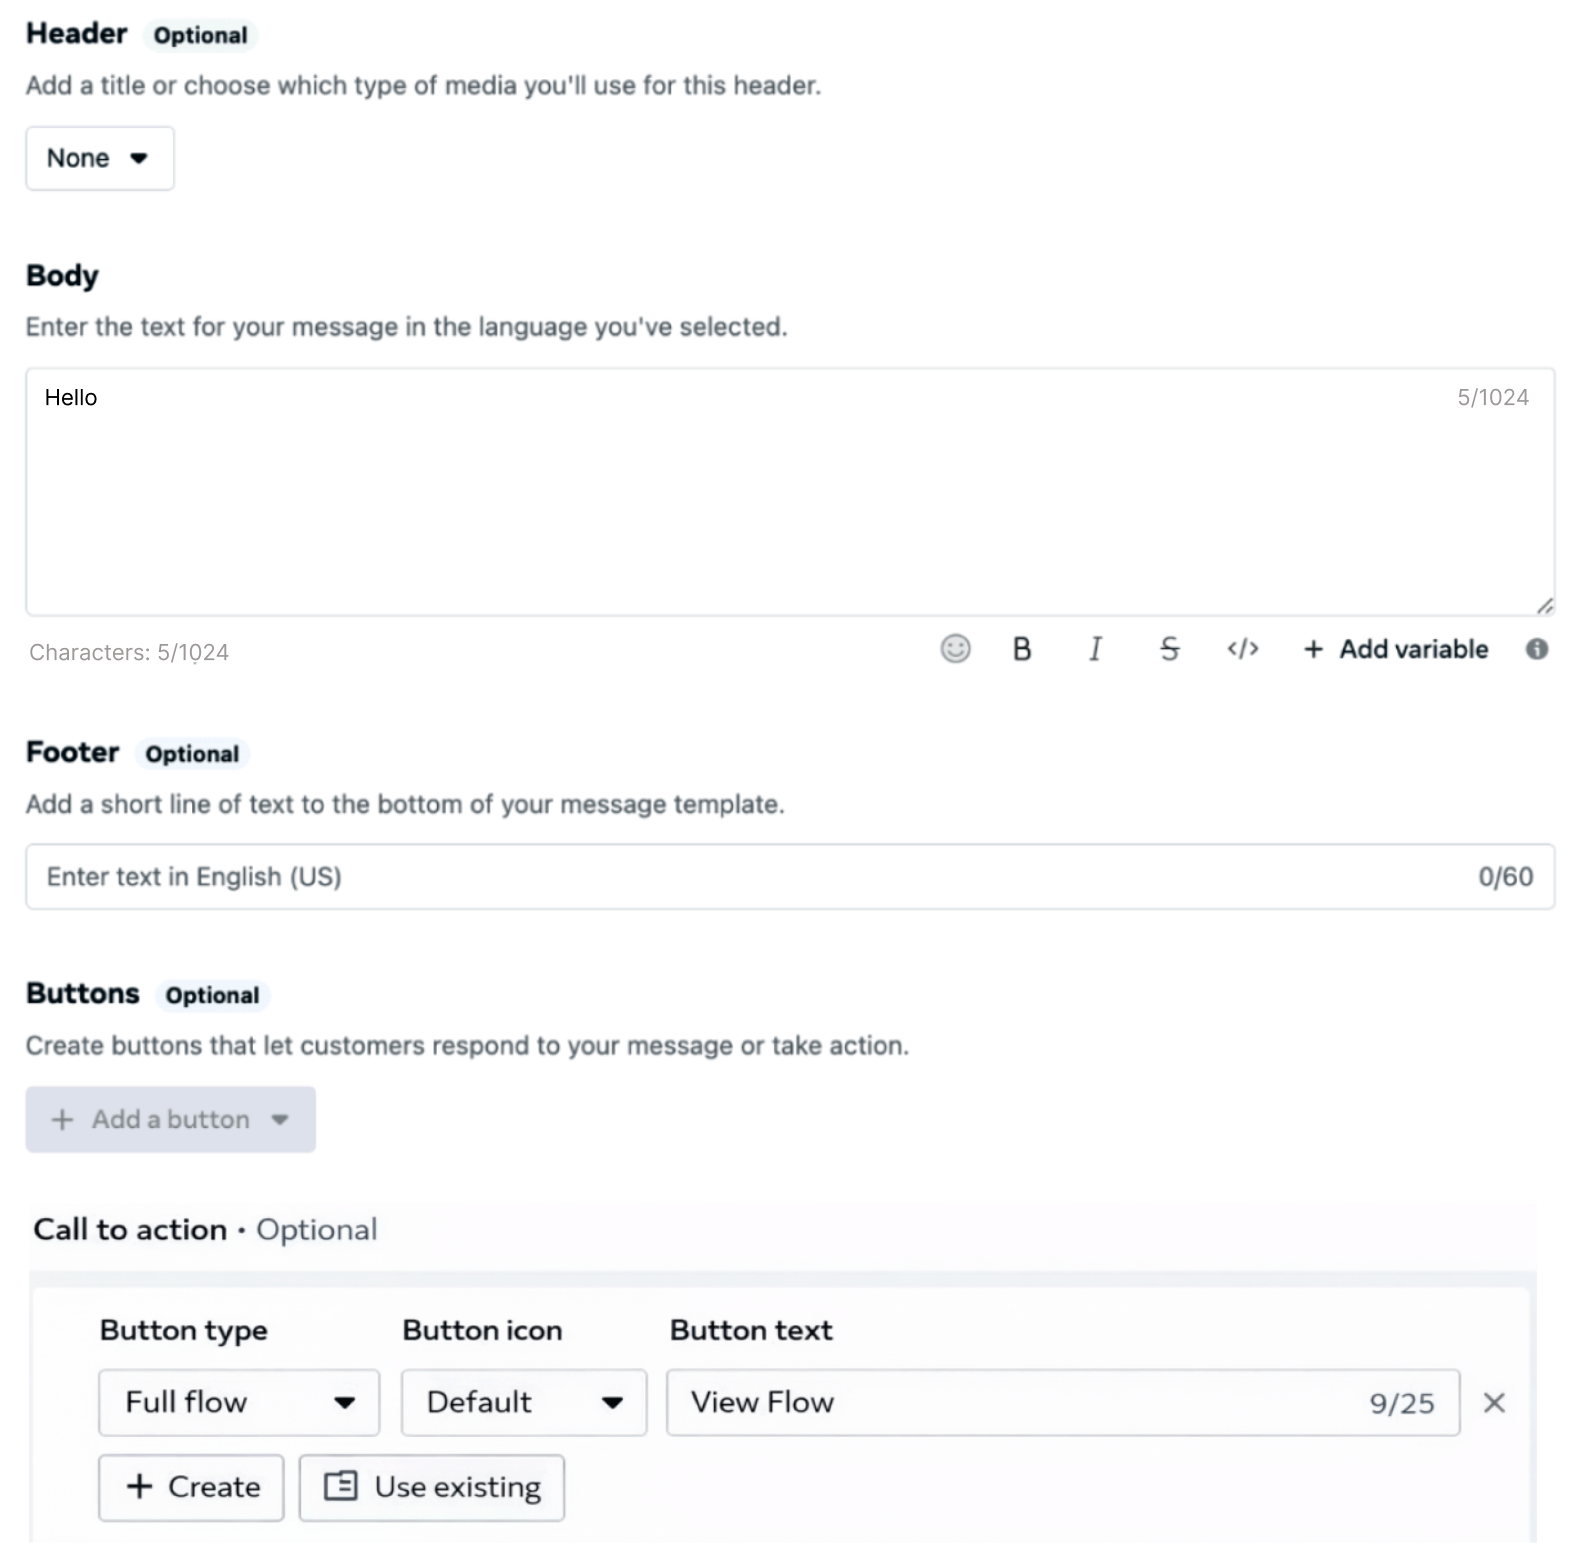
A message template that includes a Flow can be composed of the following elements:
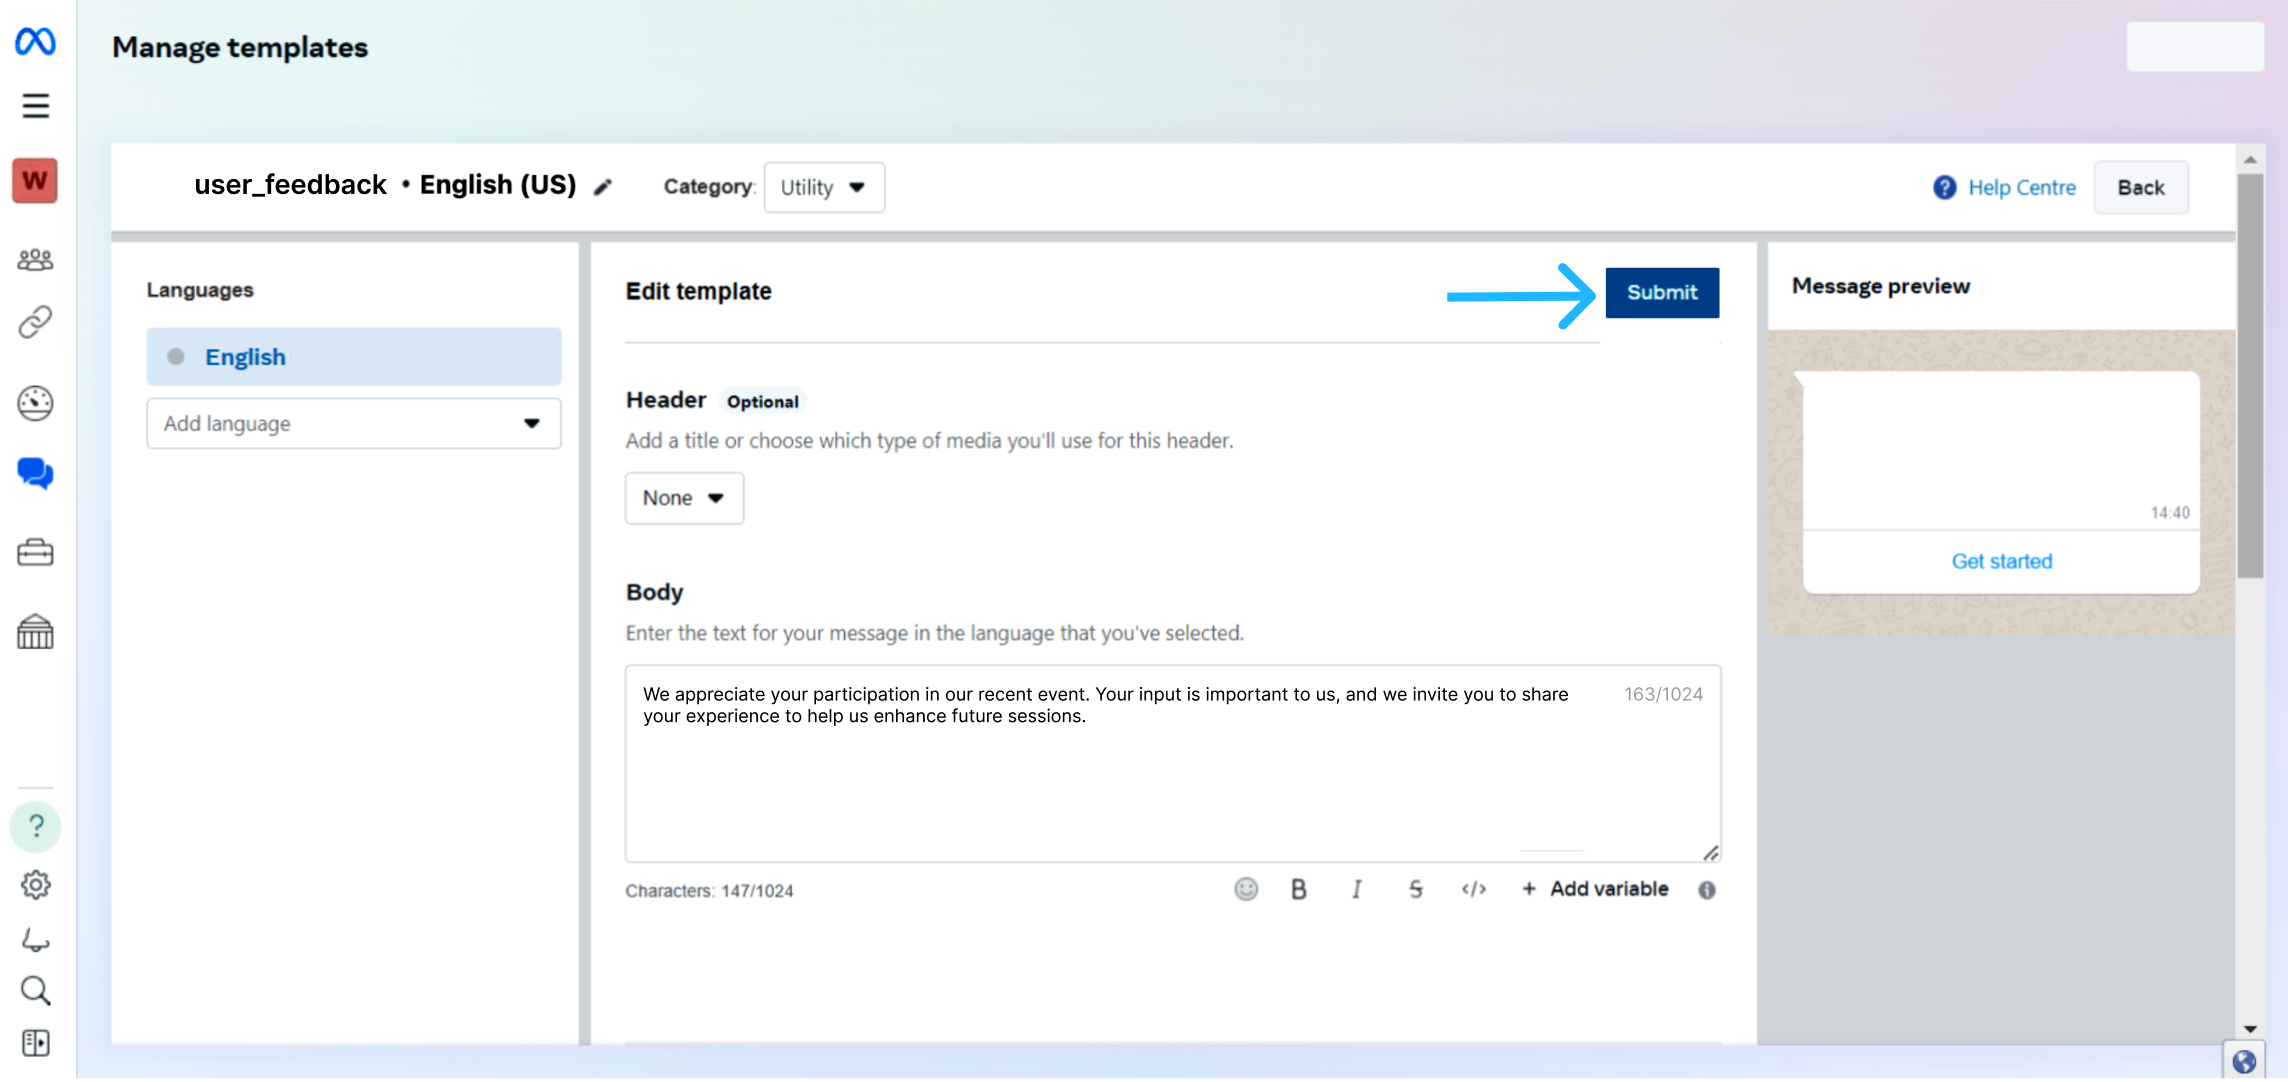
- Header (Optional): Displays contextual content at the top of the message. The header can be configured to show text, an image, a video, or a document, depending on the use case and the type of information that needs to be highlighted before the Flow is opened.
- Body: Contains the primary message shown to the user. This section typically explains the purpose of the Flow, provides brief instructions, or sets expectations about the interaction the user is about to complete.
- Footer (Optional): Displays a short line of text at the bottom of your message. It is commonly used for additional context, disclaimers, or short clarifications that do not require strong visual emphasis.
- Call-to-Action (CTA): A button that allows the user to launch the Flow. The CTA label defines the action the user is about to take, such as Open Flow, View Flow, Start, or Continue.
Text Header & Body (Variables)When using a text header, a body, or both with variables in a Message Template Flow, only numeric variables are currently supported.
Alphanumeric variables (e.g. names, email addresses, or text strings) are not allowed at this time and will result in a validation error at the moment of sending the message.
- Example of a valid variable:
{{1}}- Example of a invalid variable:
{{name}}
These elements are rendered together in the WhatsApp chat and provide clarity and context before the user enters the Flow experience.
- a Body, which explains the purpose of the message and invites the user to participate, and
- a Call-to-Action (CTA) button, which opens the Flow.
No Header or Footer is included in this example. Although both components are supported when sending a Flow through a message template, they are optional and not required for this scenario.
The Body contains the main message shown to the user and provides the necessary context before the Flow is launched. In this use case, the body thanks the event attendees for their participation and explains why their feedback is being requested. For example, you can enter a message such as: We appreciate your participation in our recent event. Your input is important to us, and we invite you to share your experience to help us enhance future sessions..
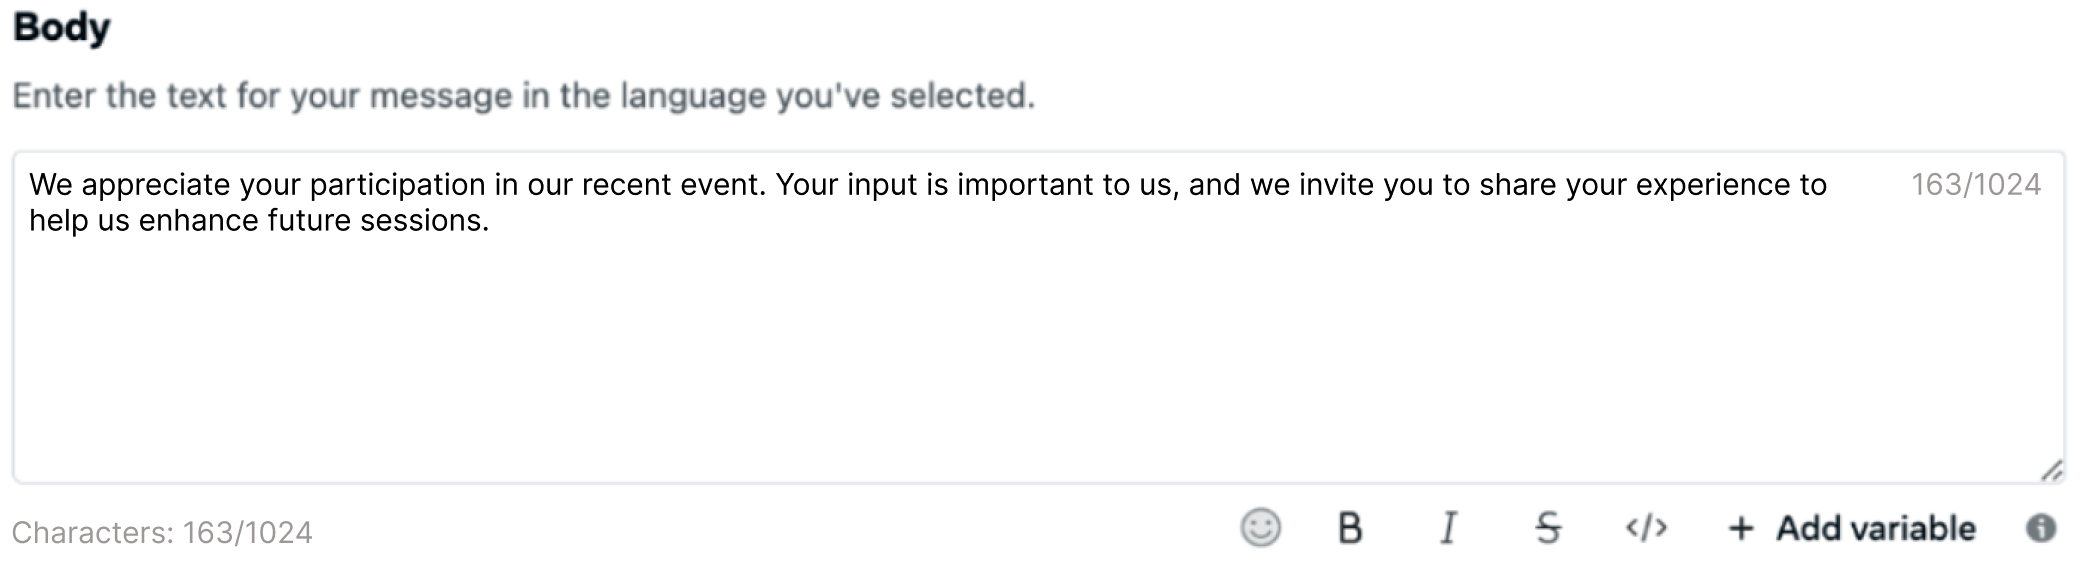
Below the body text, define the Call-to-Action button. This button is what the user taps to open the Flow, so the label should clearly indicate the next action to begin the feedback process. For this example, a CTA label such as Get started is appropriate, as it invites the user to begin the feedback process.
At this point, you must associate the message template with a Flow. WhatsApp Manager provides two ways to do this, depending on whether you want to create a new Flow or attach an existing one.
-
Create new Flow: Select the Create button to build a Flow directly as part of the message template creation process.
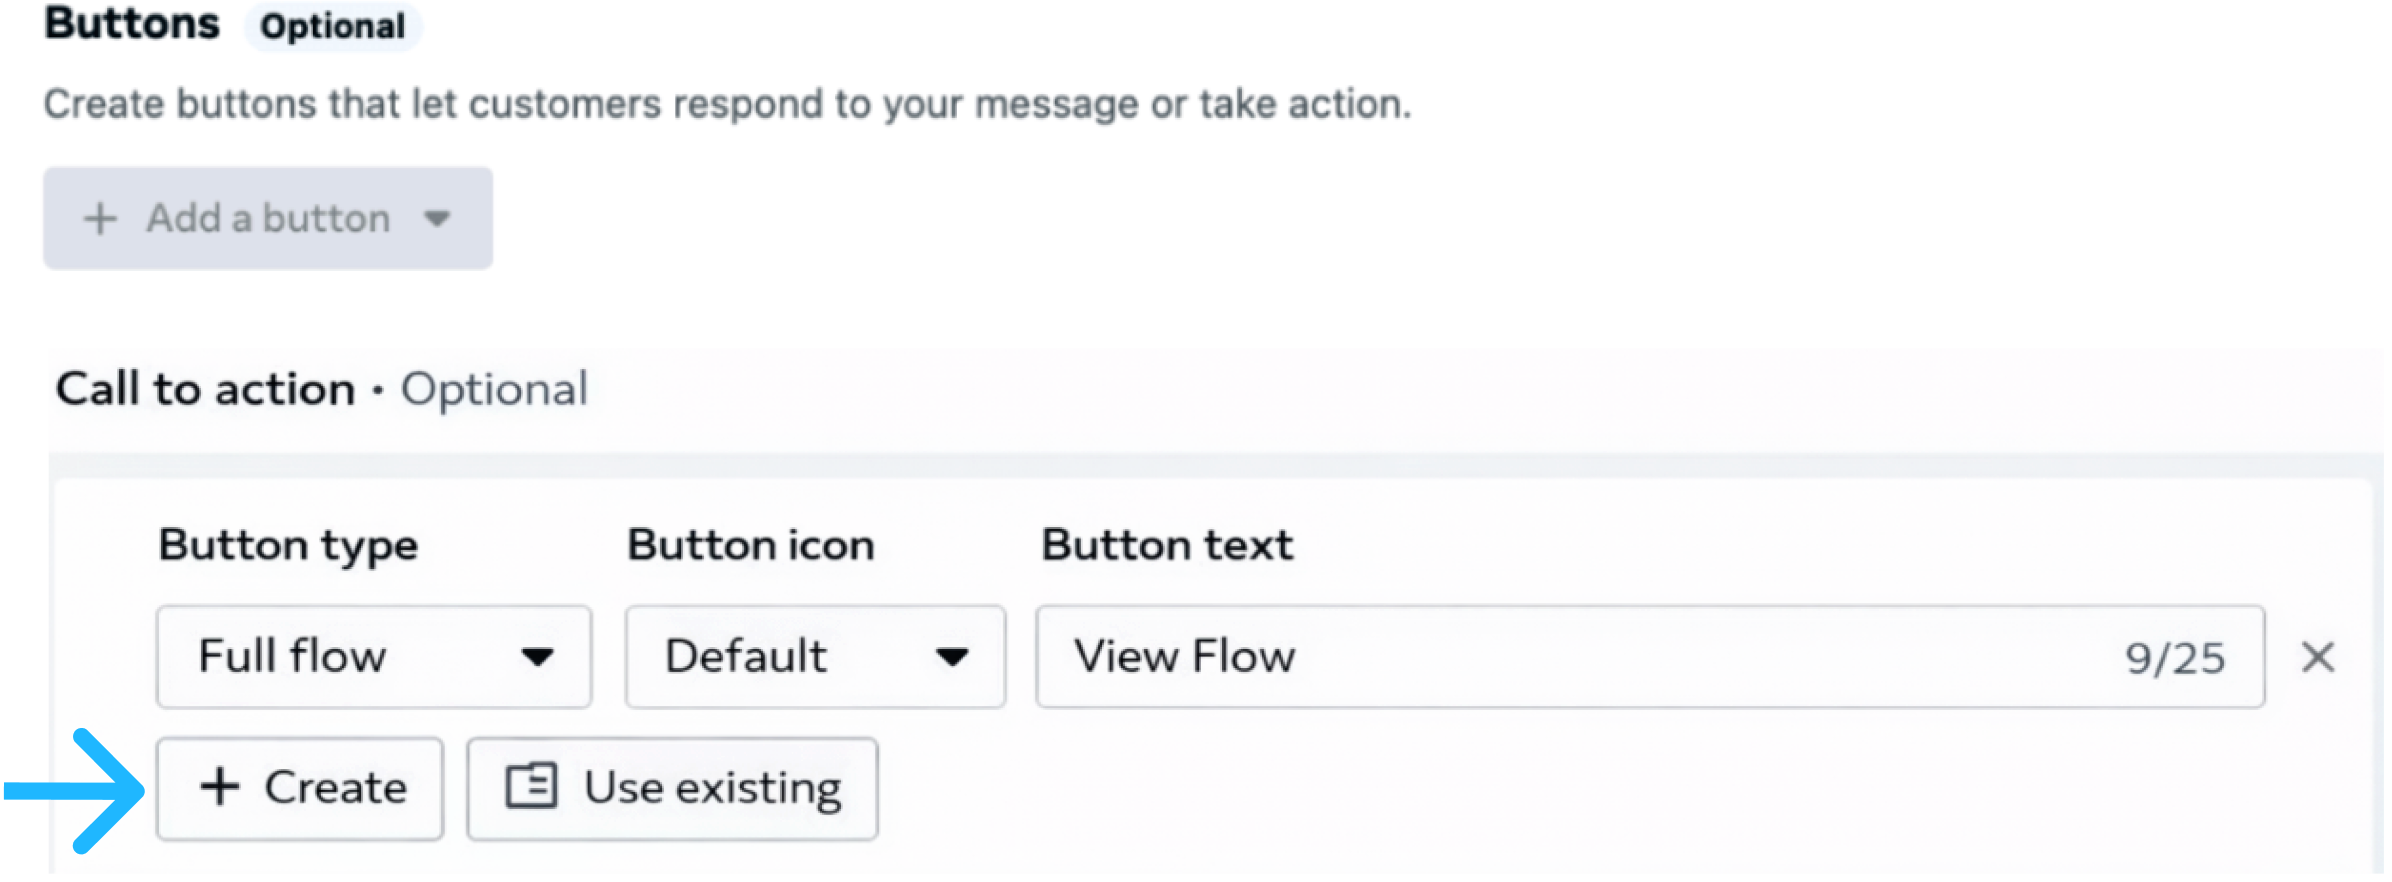
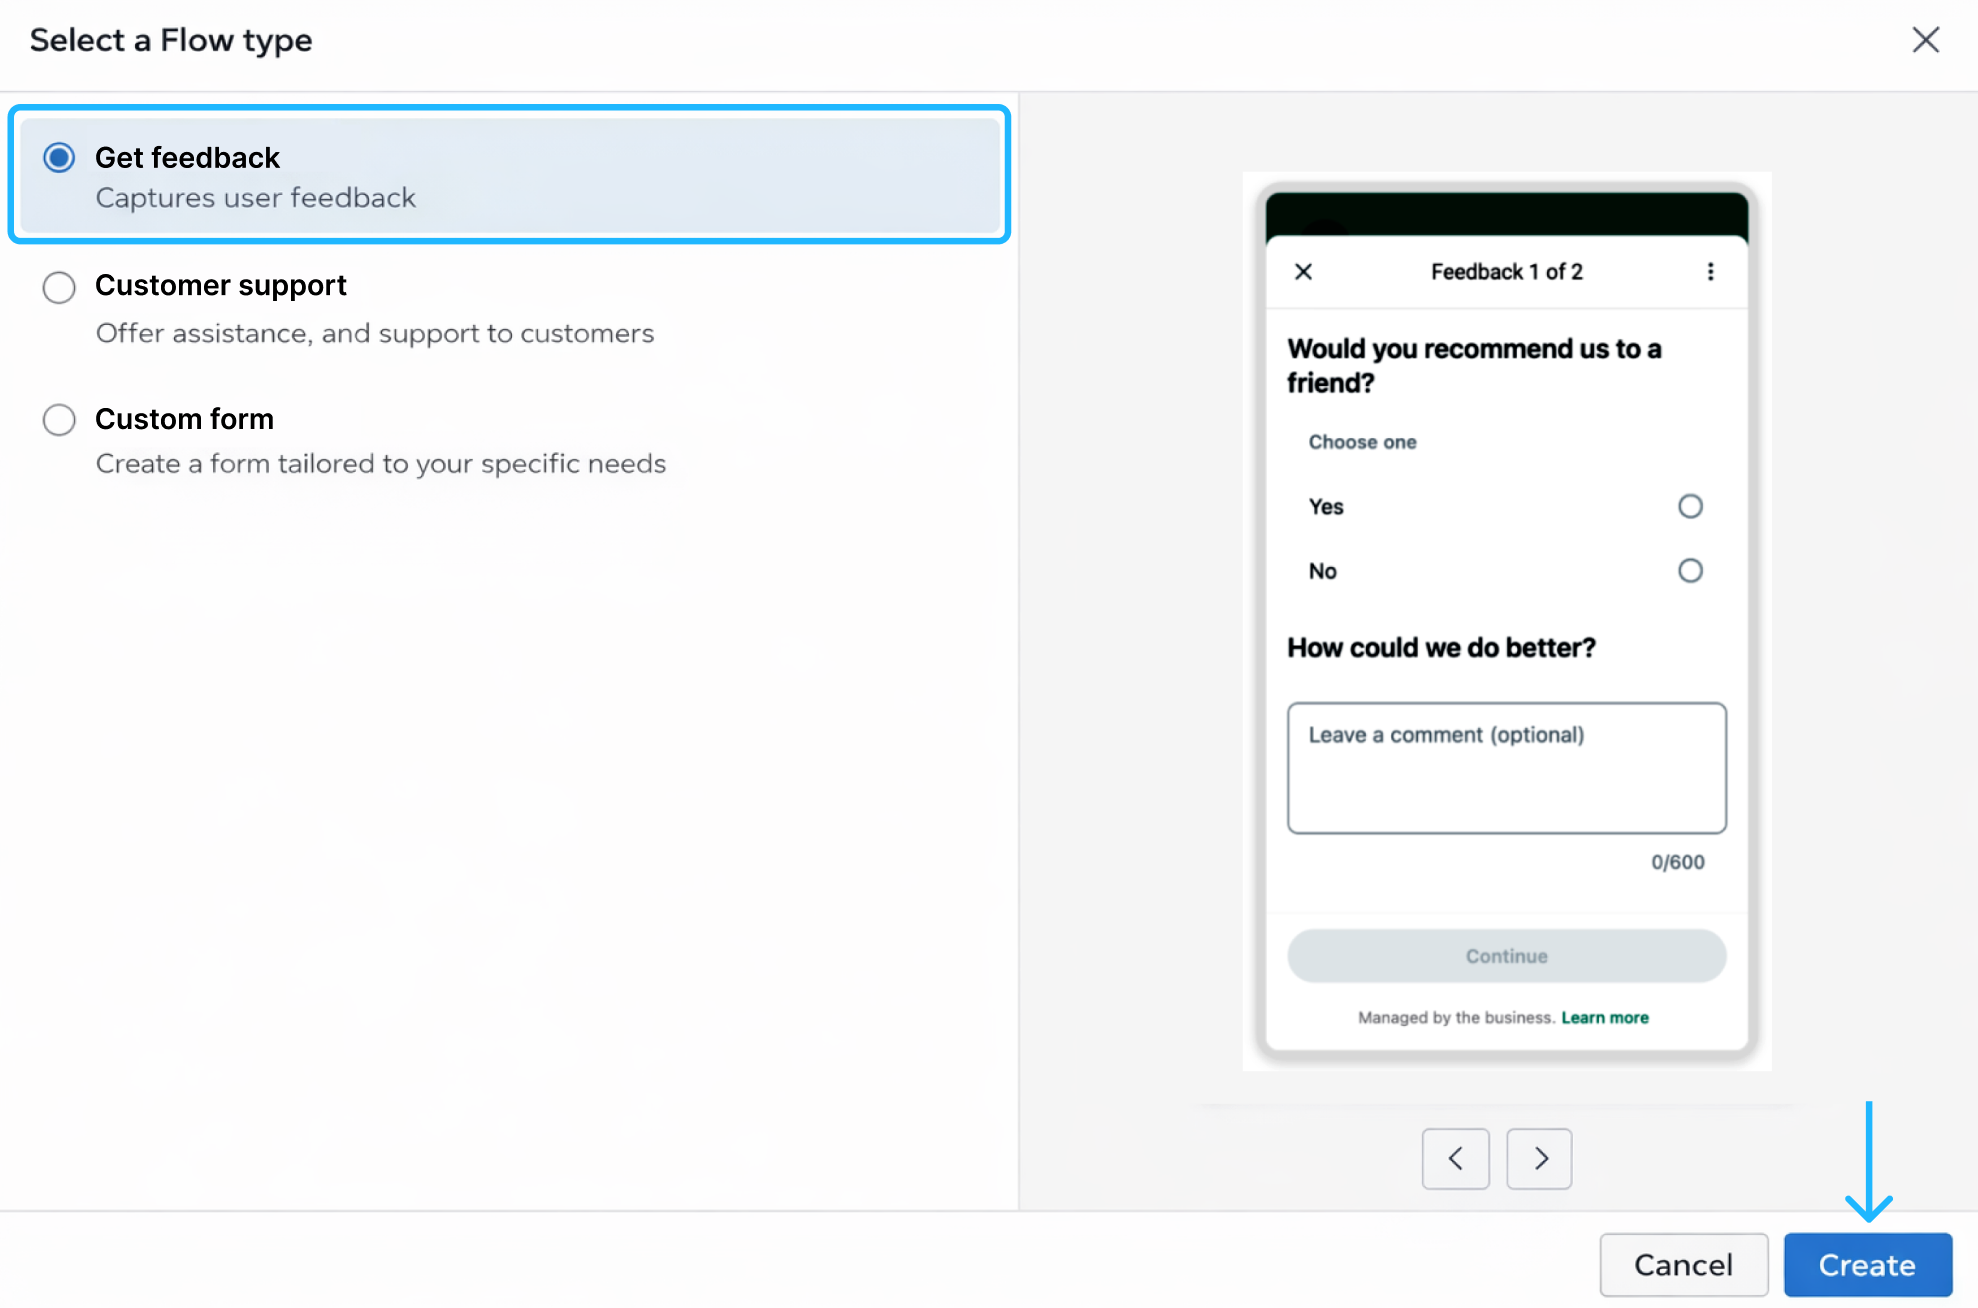
Then, for this customer feedback use case, select Get feedback. This option is specifically designed for collecting structured feedback from users and automatically provides a form-oriented Flow structure optimized for survey-style interactions.
Once the CTA button label and the Type of flow are defined, click Create.
-
Attach an existing Flow: If you already have a Flow created and published, you can attach it to the message template by selecting Use existing instead of Create. This option opens a selection window where you can choose from your available published Flows.
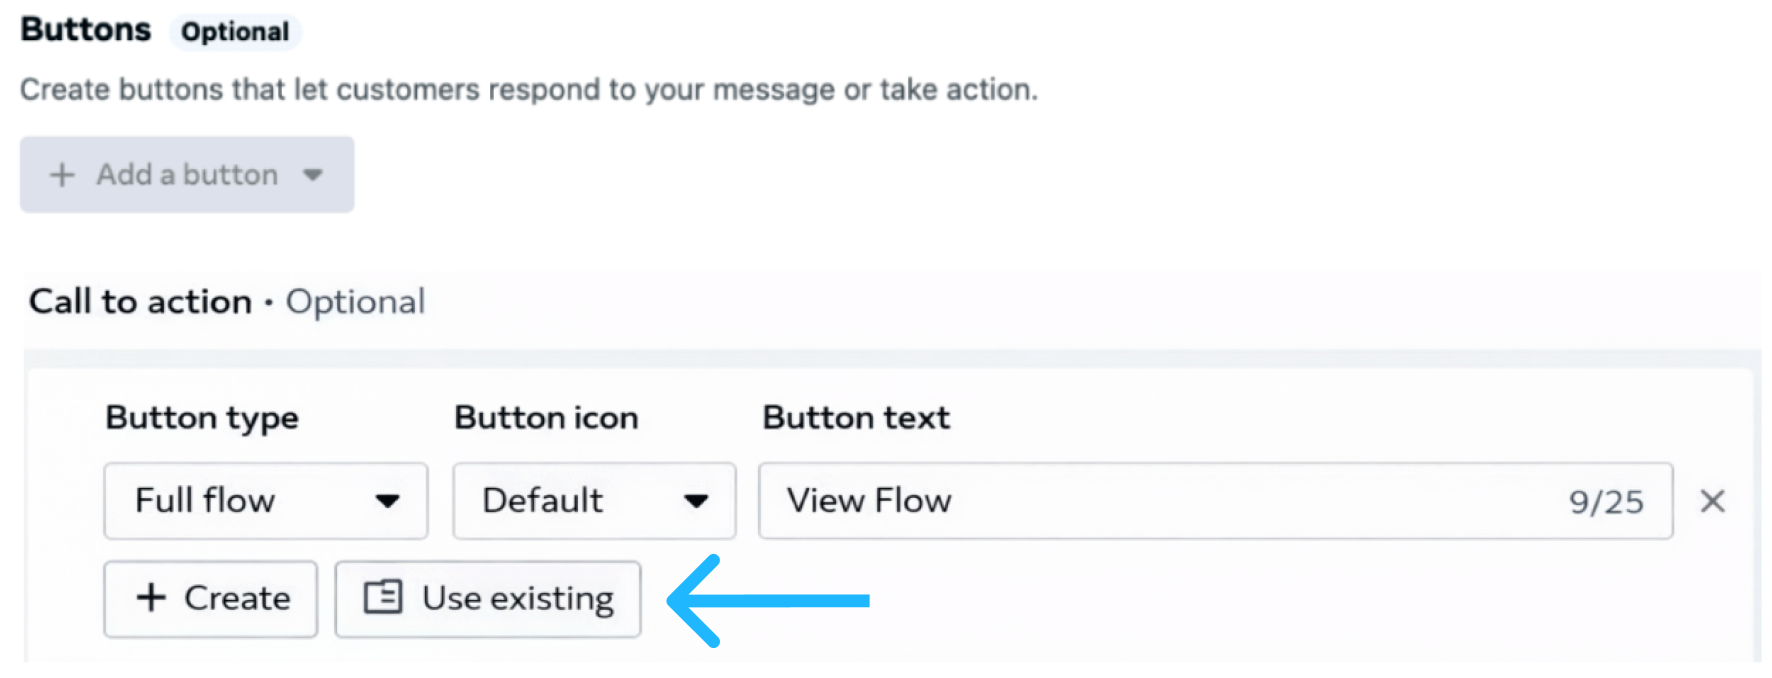
Only Flows in Published status are available for selection. Draft Flows cannot be attached to message templates. Once selected, the existing Flow is linked to the message template and will be launched when the user taps the CTA button, following the same behavior as a newly created Flow.
As part of the Message Template flow creation process, once you select the Get feedback flow type and click Create, WhatsApp Manager opens the Flow configuration dialog, where you can begin building the Flow itself. This interface allows you to define the screens, questions, input components, and navigation that make up the feedback experience, all within a visual, guided editor.
The Flow configuration dialog is divided into 3 main panels:
- Left panel: In this panel, you are able to add new screens to your Flow.
- Middle panel: In this panel, you are able to add fields for the current screen.
- Right panel: In this panel, you are able to visualize your Flow in real-time.
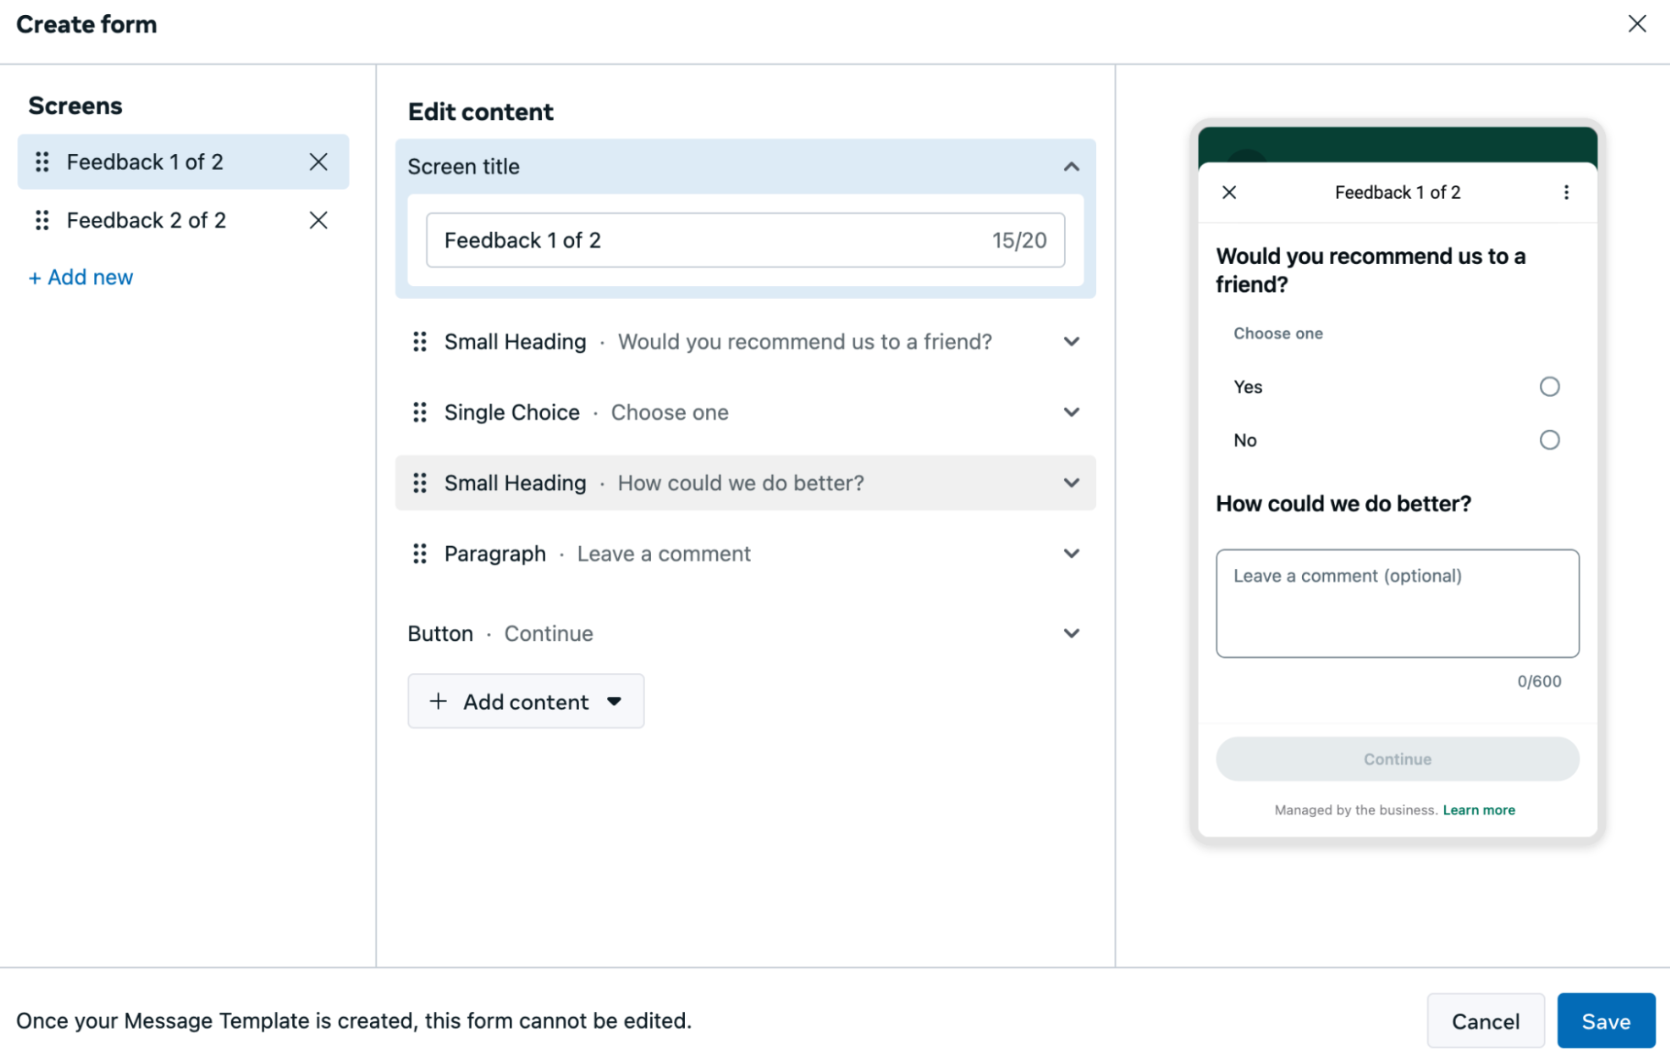
When the Flow editor opens, the first screen is created automatically and includes several preconfigured fields related to the Get feedback message template. These default elements can be removed or adjusted to better match your use case. Therefore, in the next steps, we will configure the Flow screen by screen, applying changes incrementally to build the complete customer feedback experience.
-
Select the first screen in the left panel. Then, in the middle panel, add a title to the screen. For example, enter
Get Startedto clearly indicate the beginning of the interaction.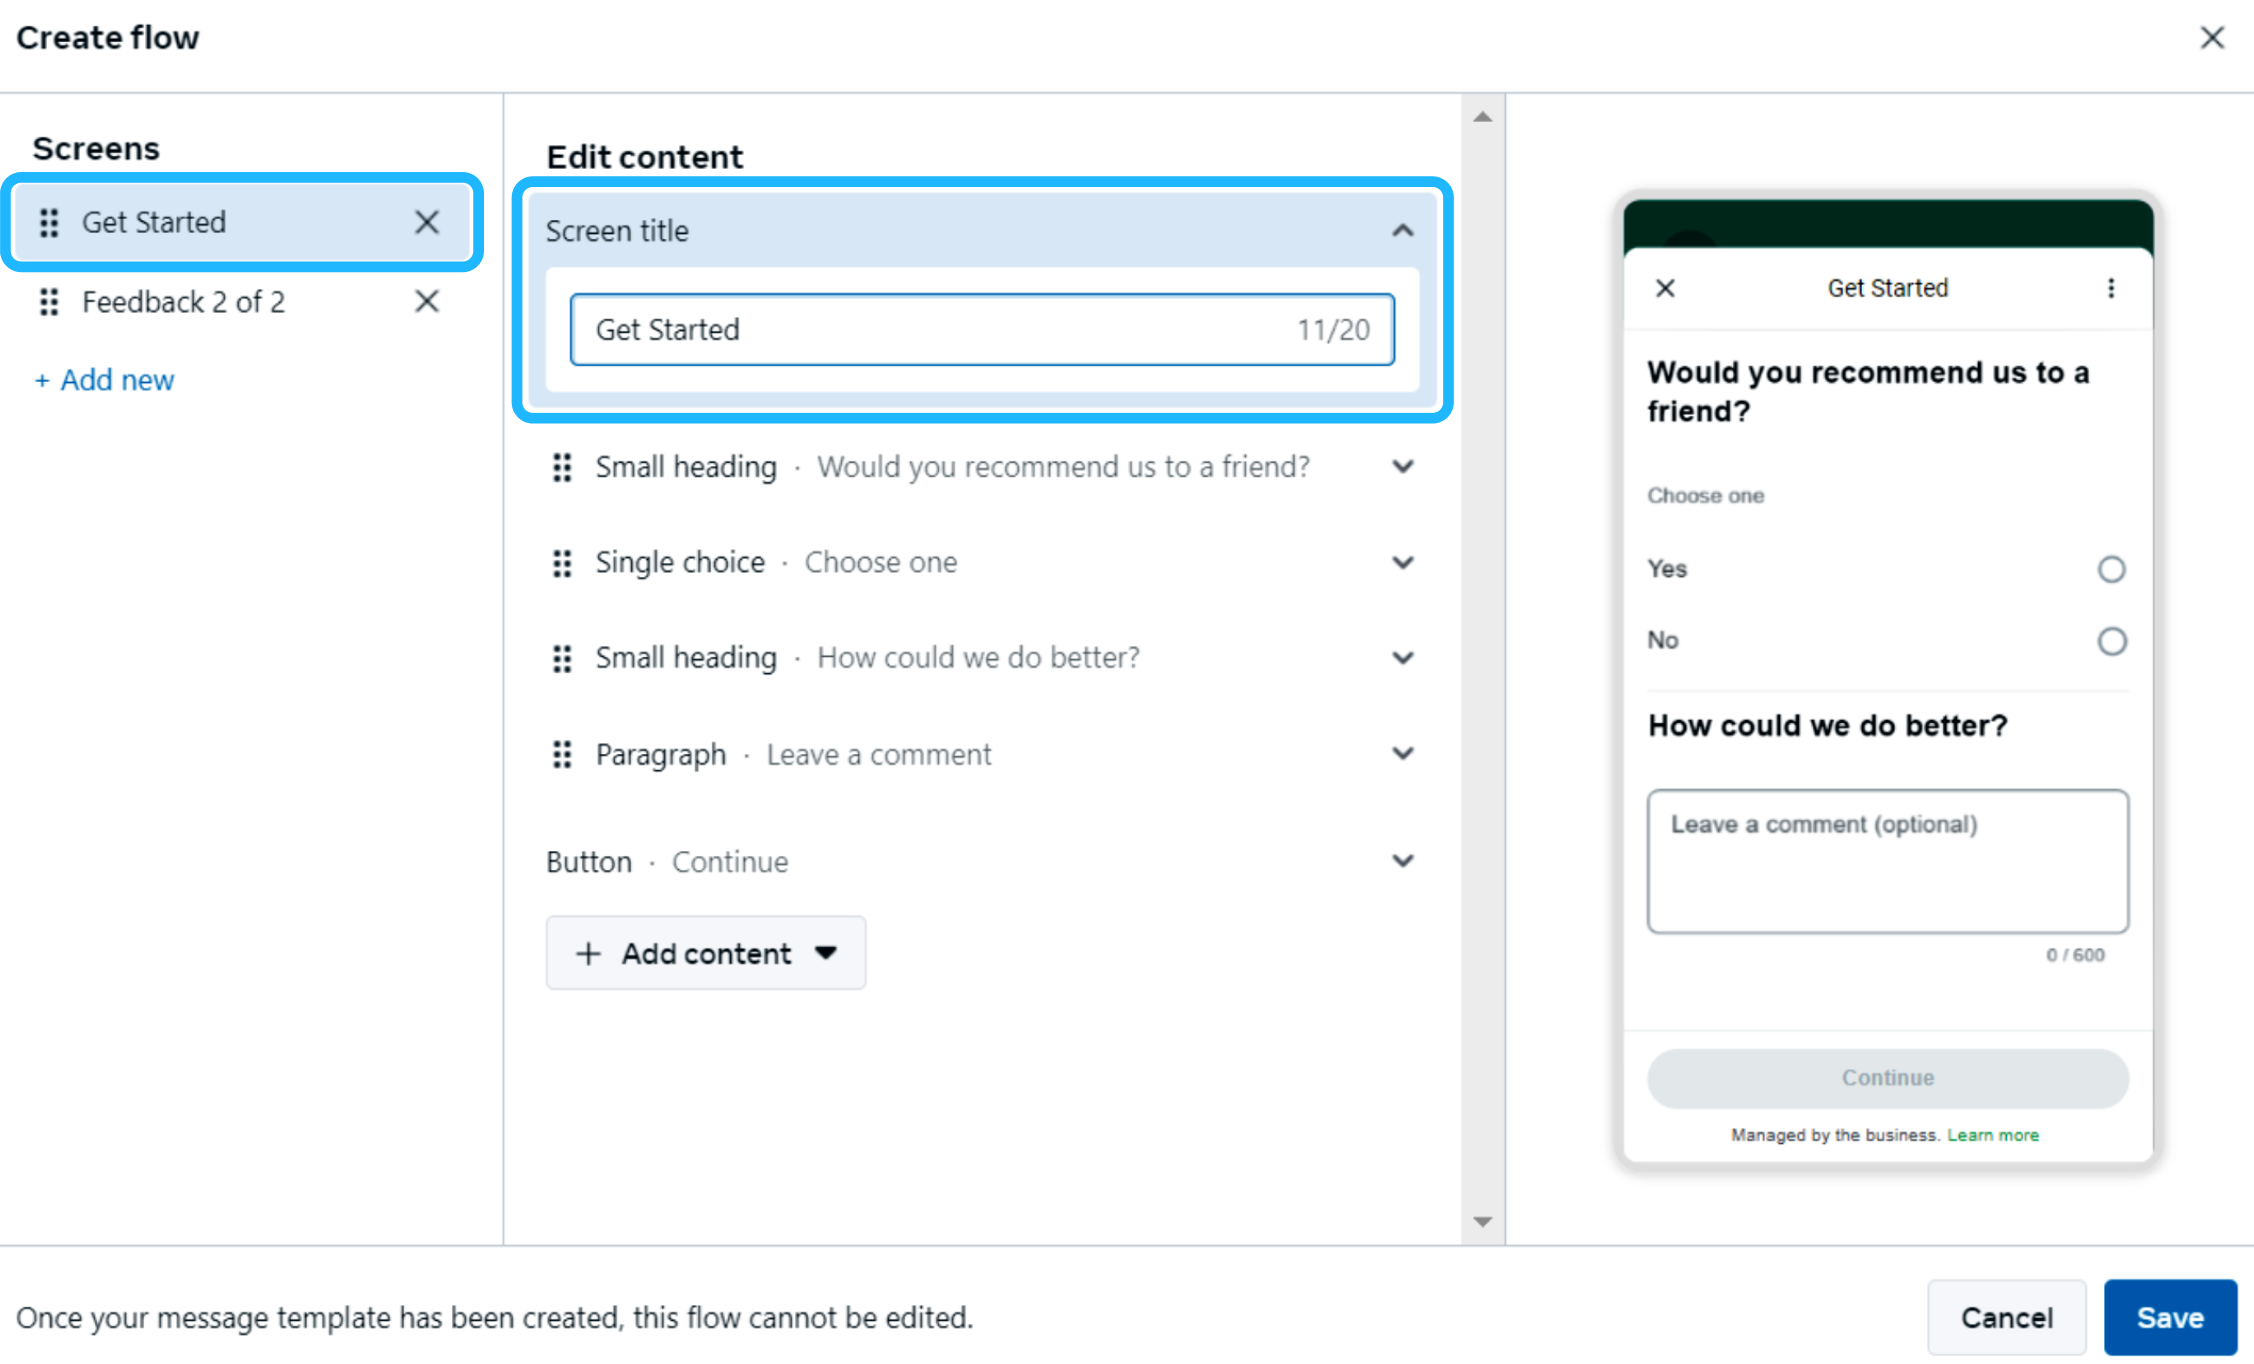
Next, select the second screen and set its title to
Questions, making it clear that this is where the user will start answering the flow’s prompts. Then, delete any pre-built questions in the second screen.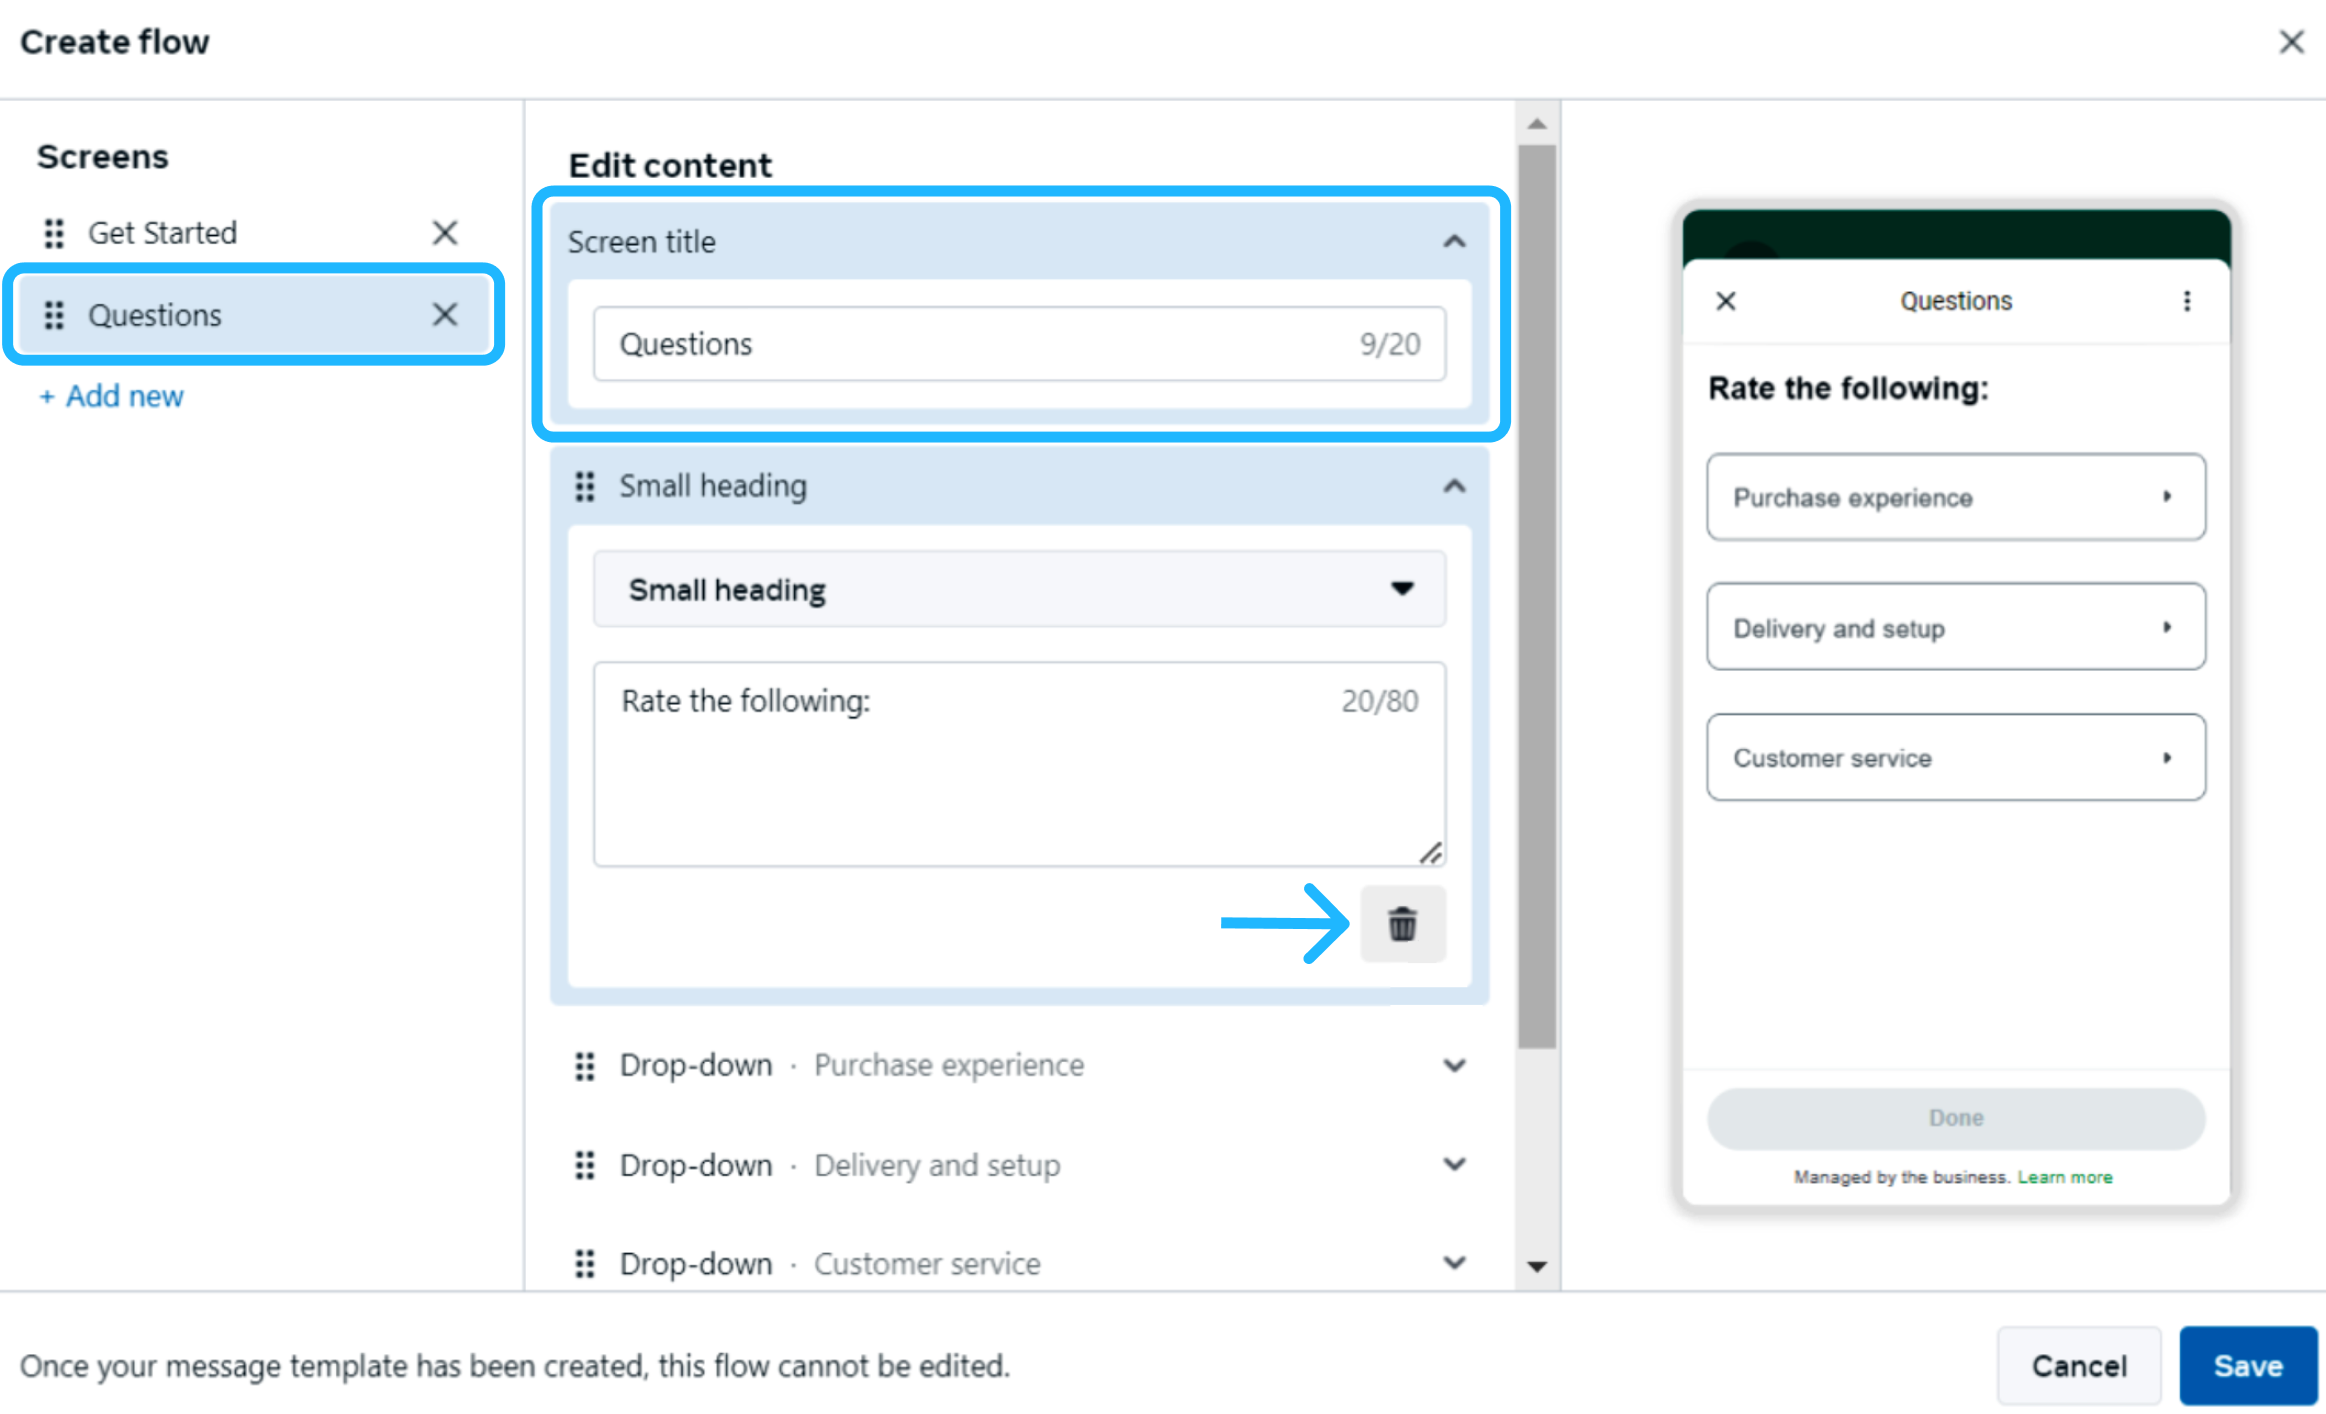
-
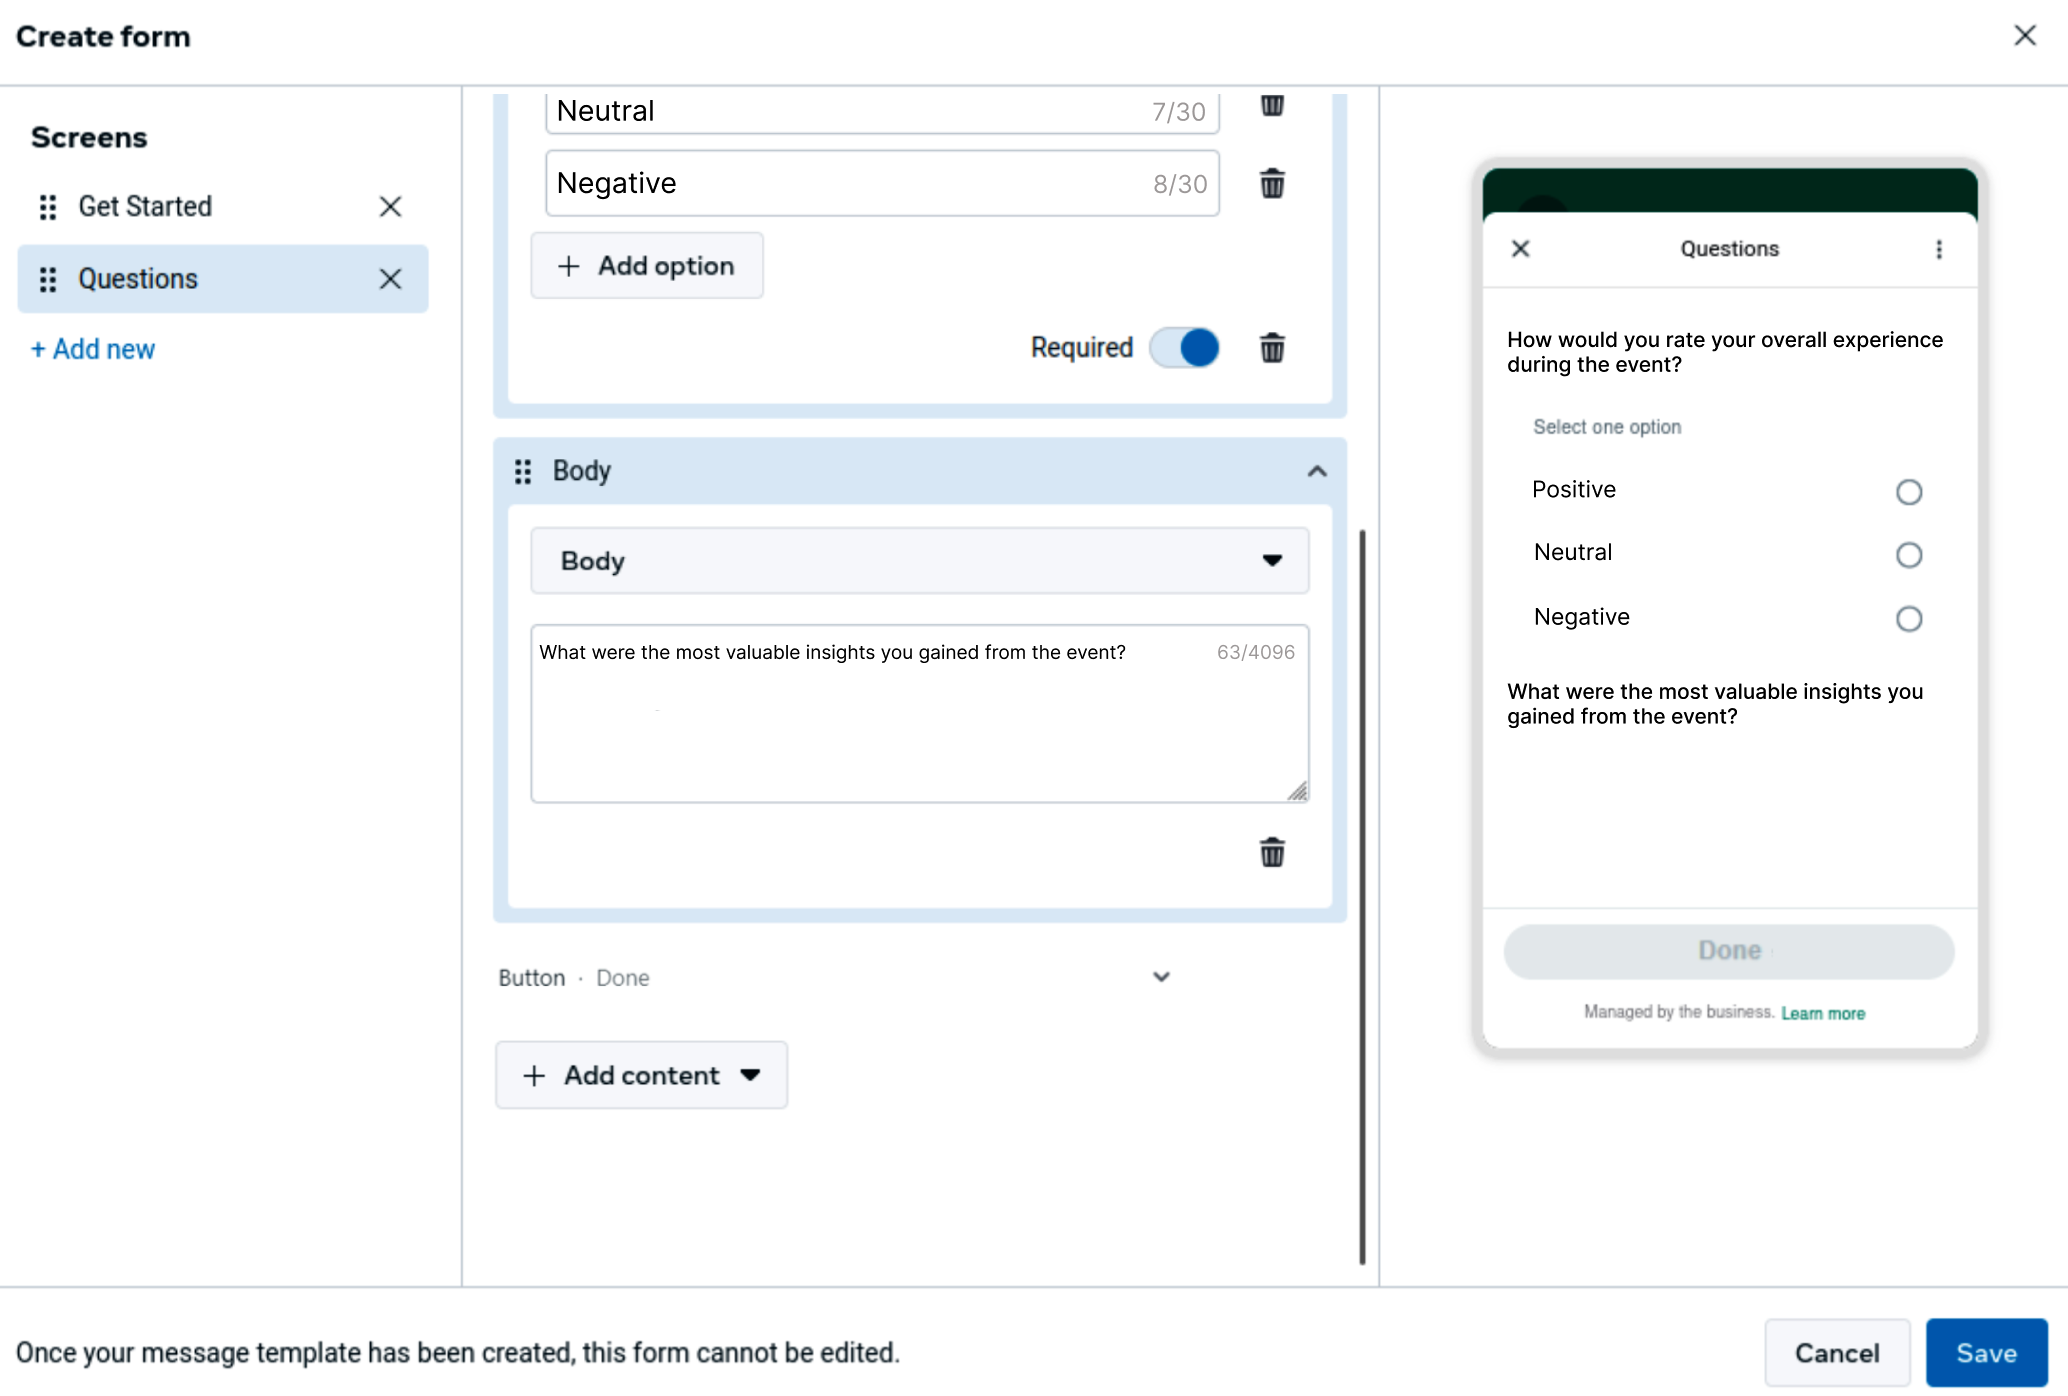
On the second screen, start adding the questions that will collect participant feedback, including multiple-choice or open-ended text responses. For example:
- Question: How would you rate your overall experience during the event?
Options: Positive, Neutral, Negative - Question: How clear and effective was the presenter when delivering the content? Options: Very clear, Acceptable, Not clear
- Question: Did the event length meet your expectations? Options: Too short, Appropriate, Too long
- Question: How would you rate your overall experience during the event?
-
For example, the first question can be configured as a single-choice question, where the user is allowed to select only one option. To add this question, click the Add content dropdown menu in the middle panel, hover over Text, and select Body.
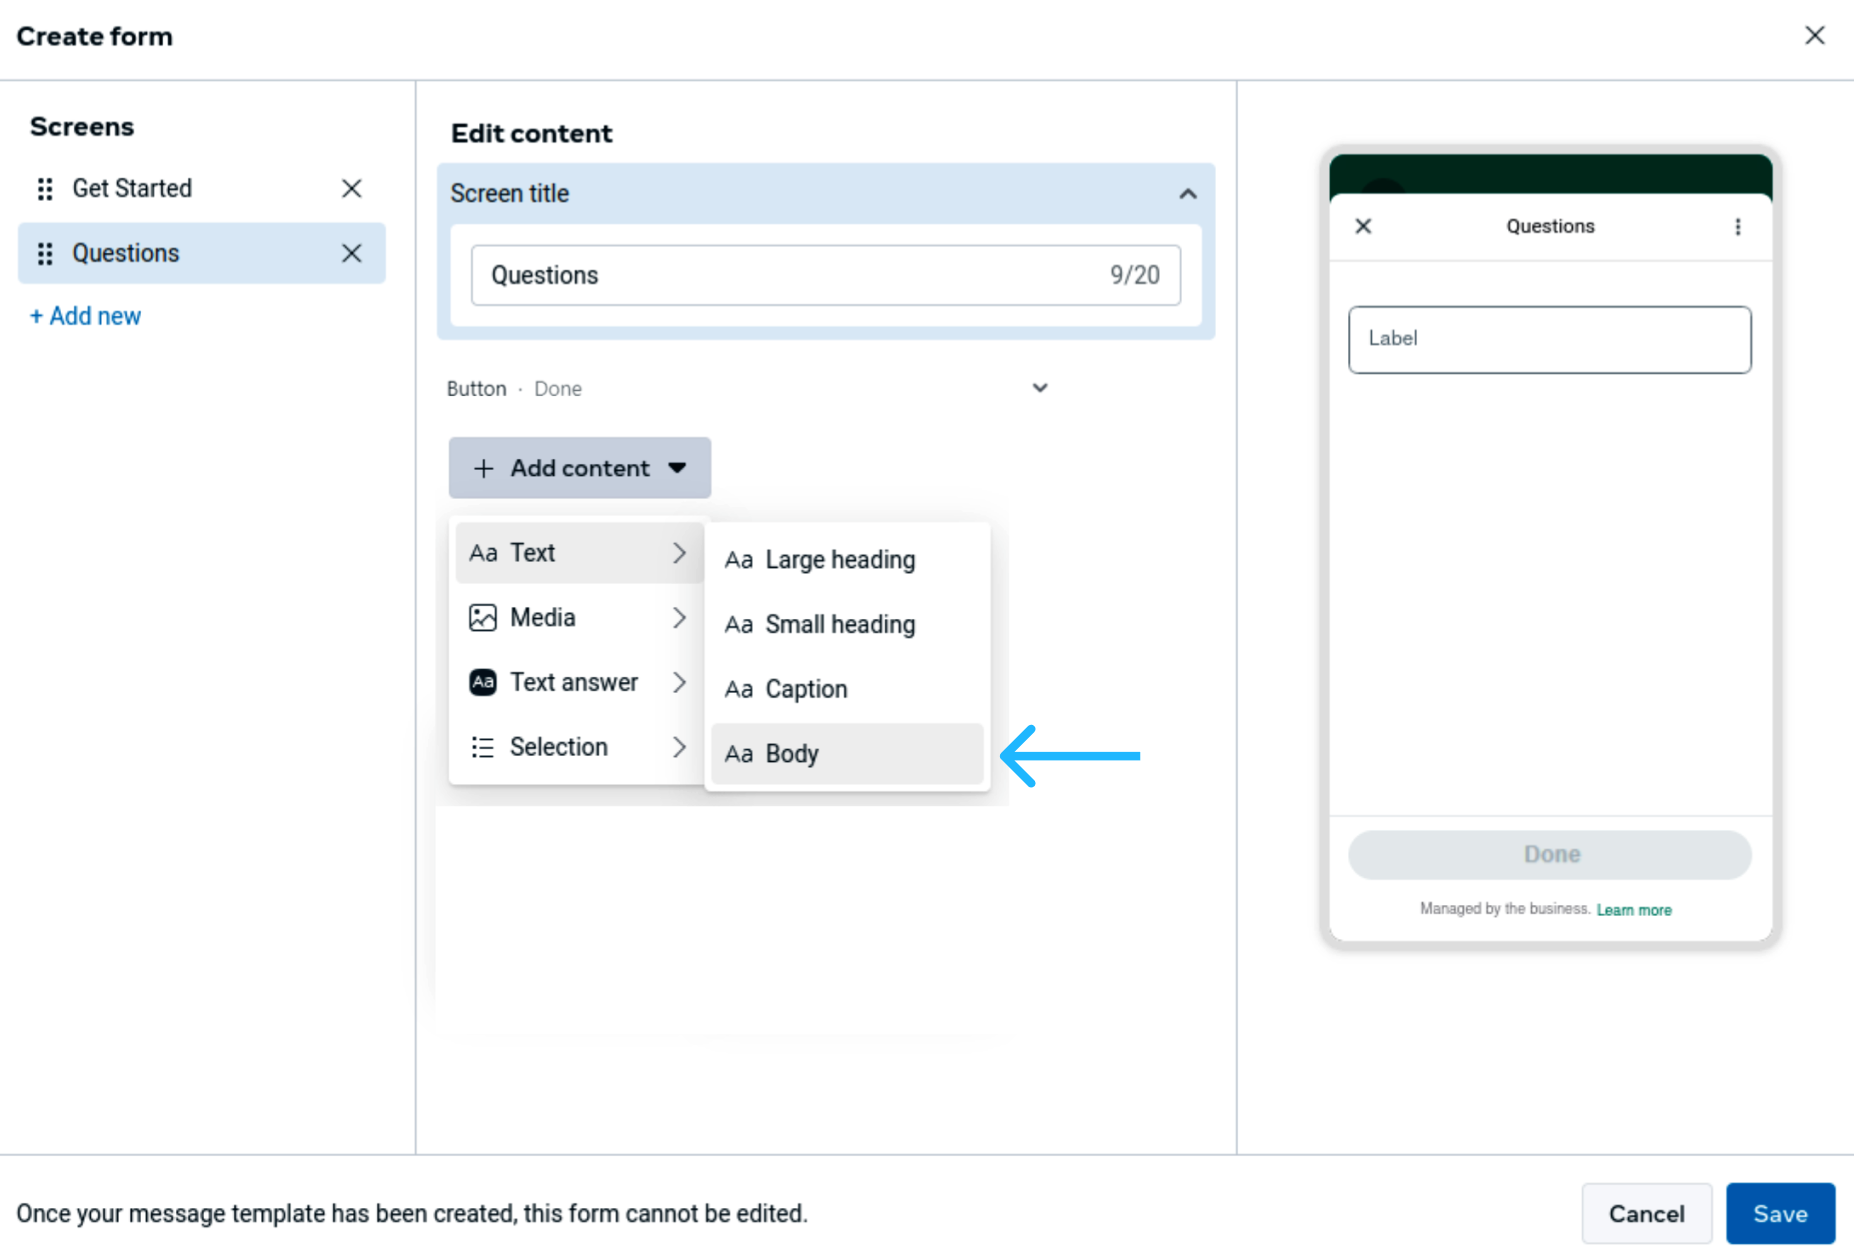
Then enter the first question in the text field:
“How would you rate your overall experience during the event?”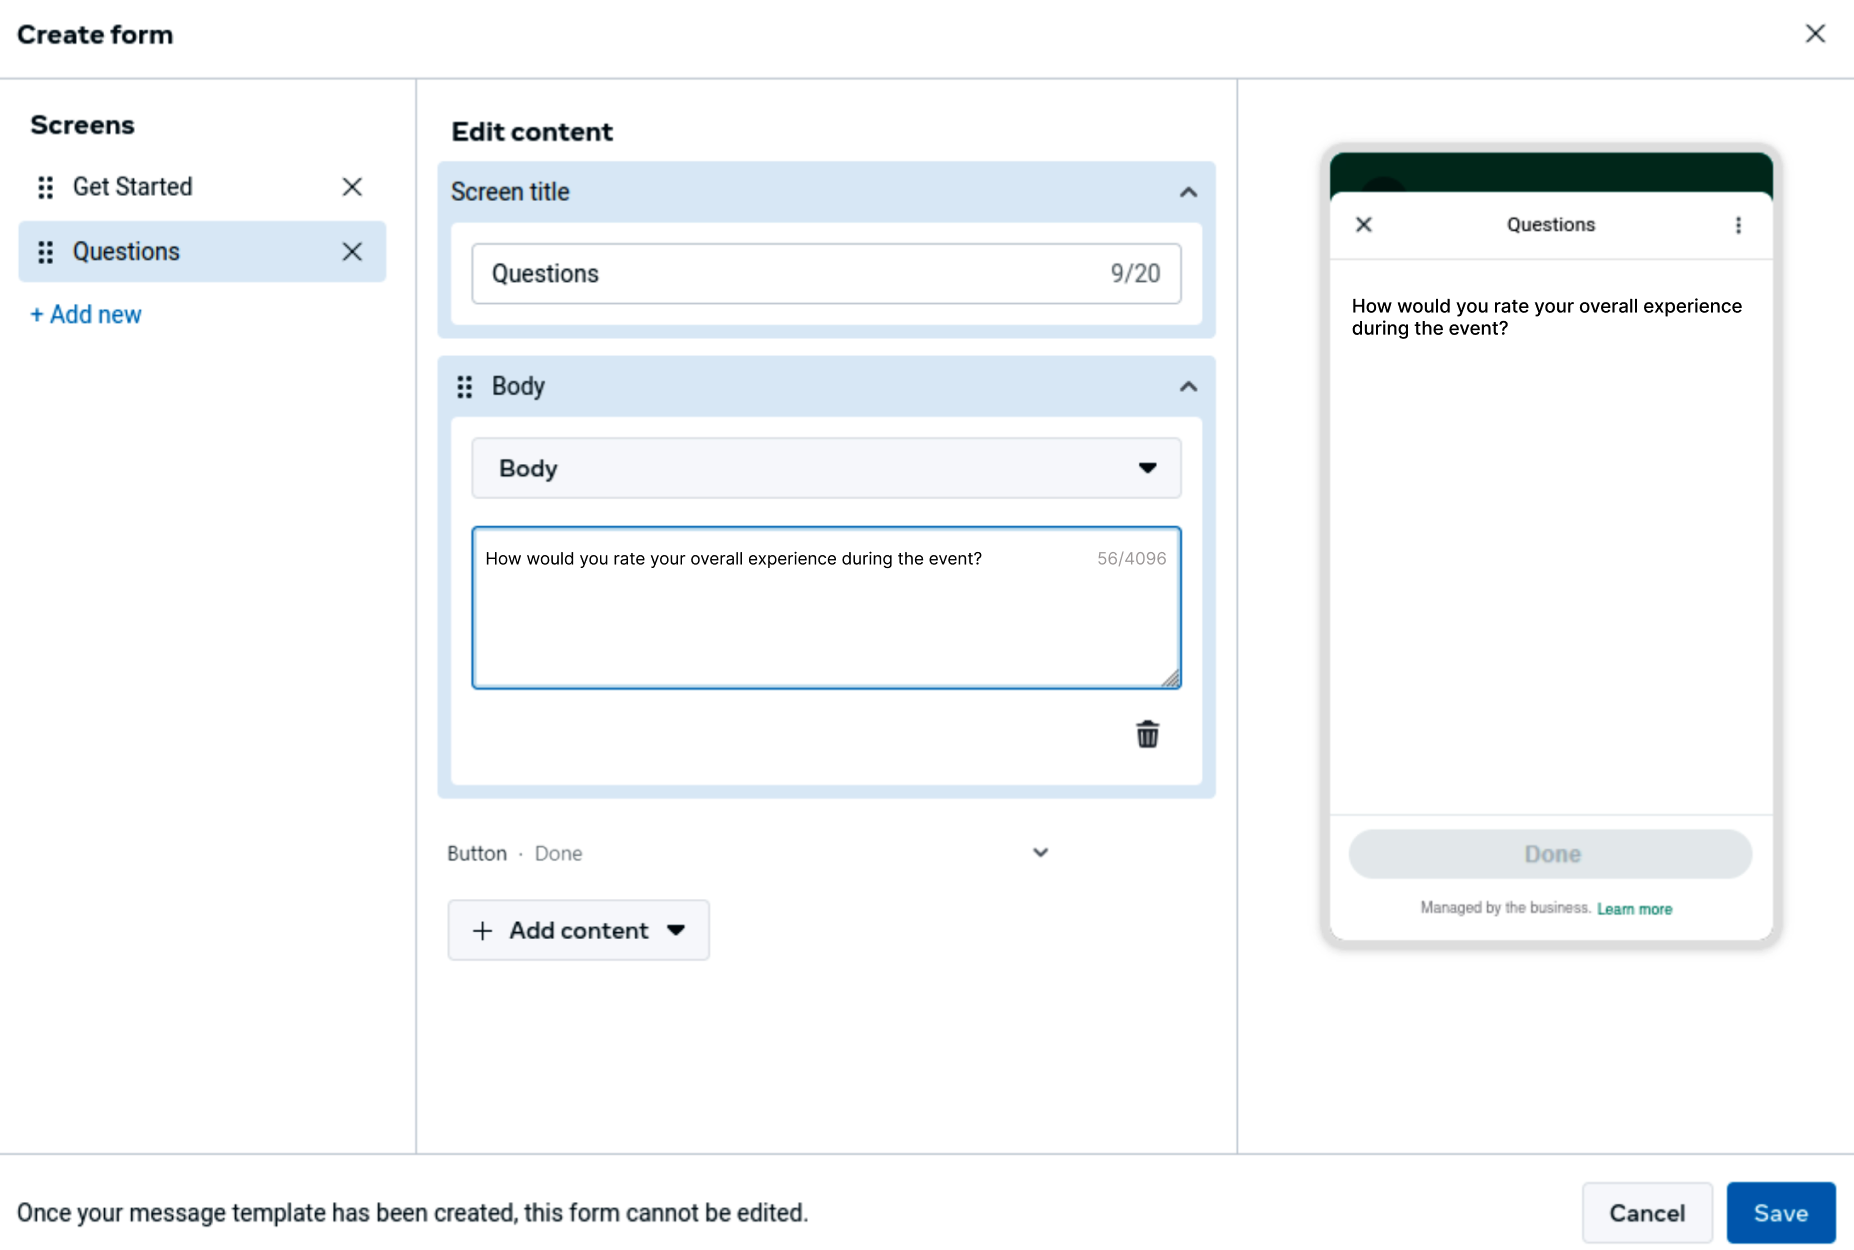
After adding the question text, you can define the available response options. Select the Add content dropdown menu again, hover over Selection, and choose Single choice.
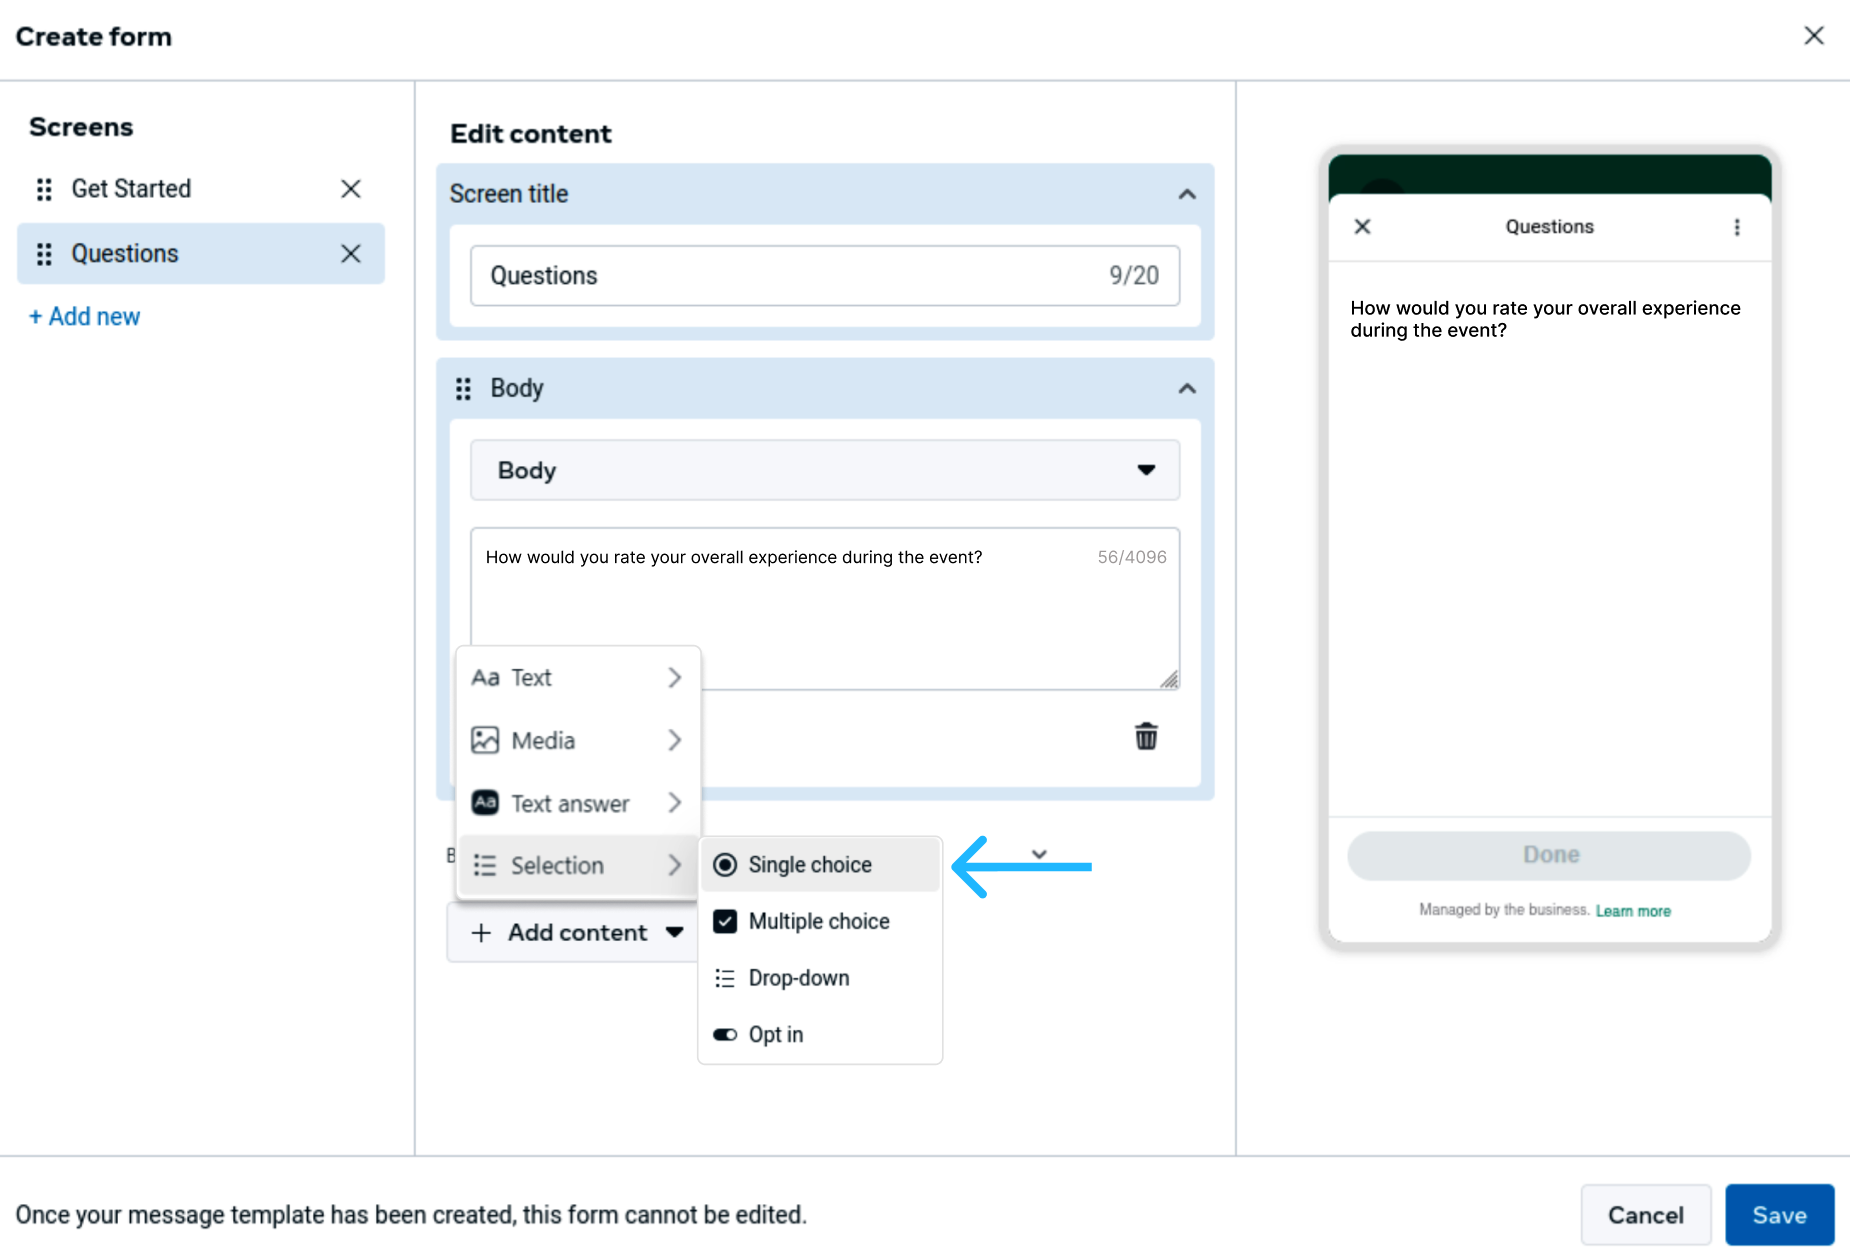
In the Single choice added block, replace the default label with an instruction like
“Select one option”and add the predefined options that best represent the possible responses, for example:Positive,Neutral, andNegative. You may also mark the question as required to ensure the user provides an answer before continuing.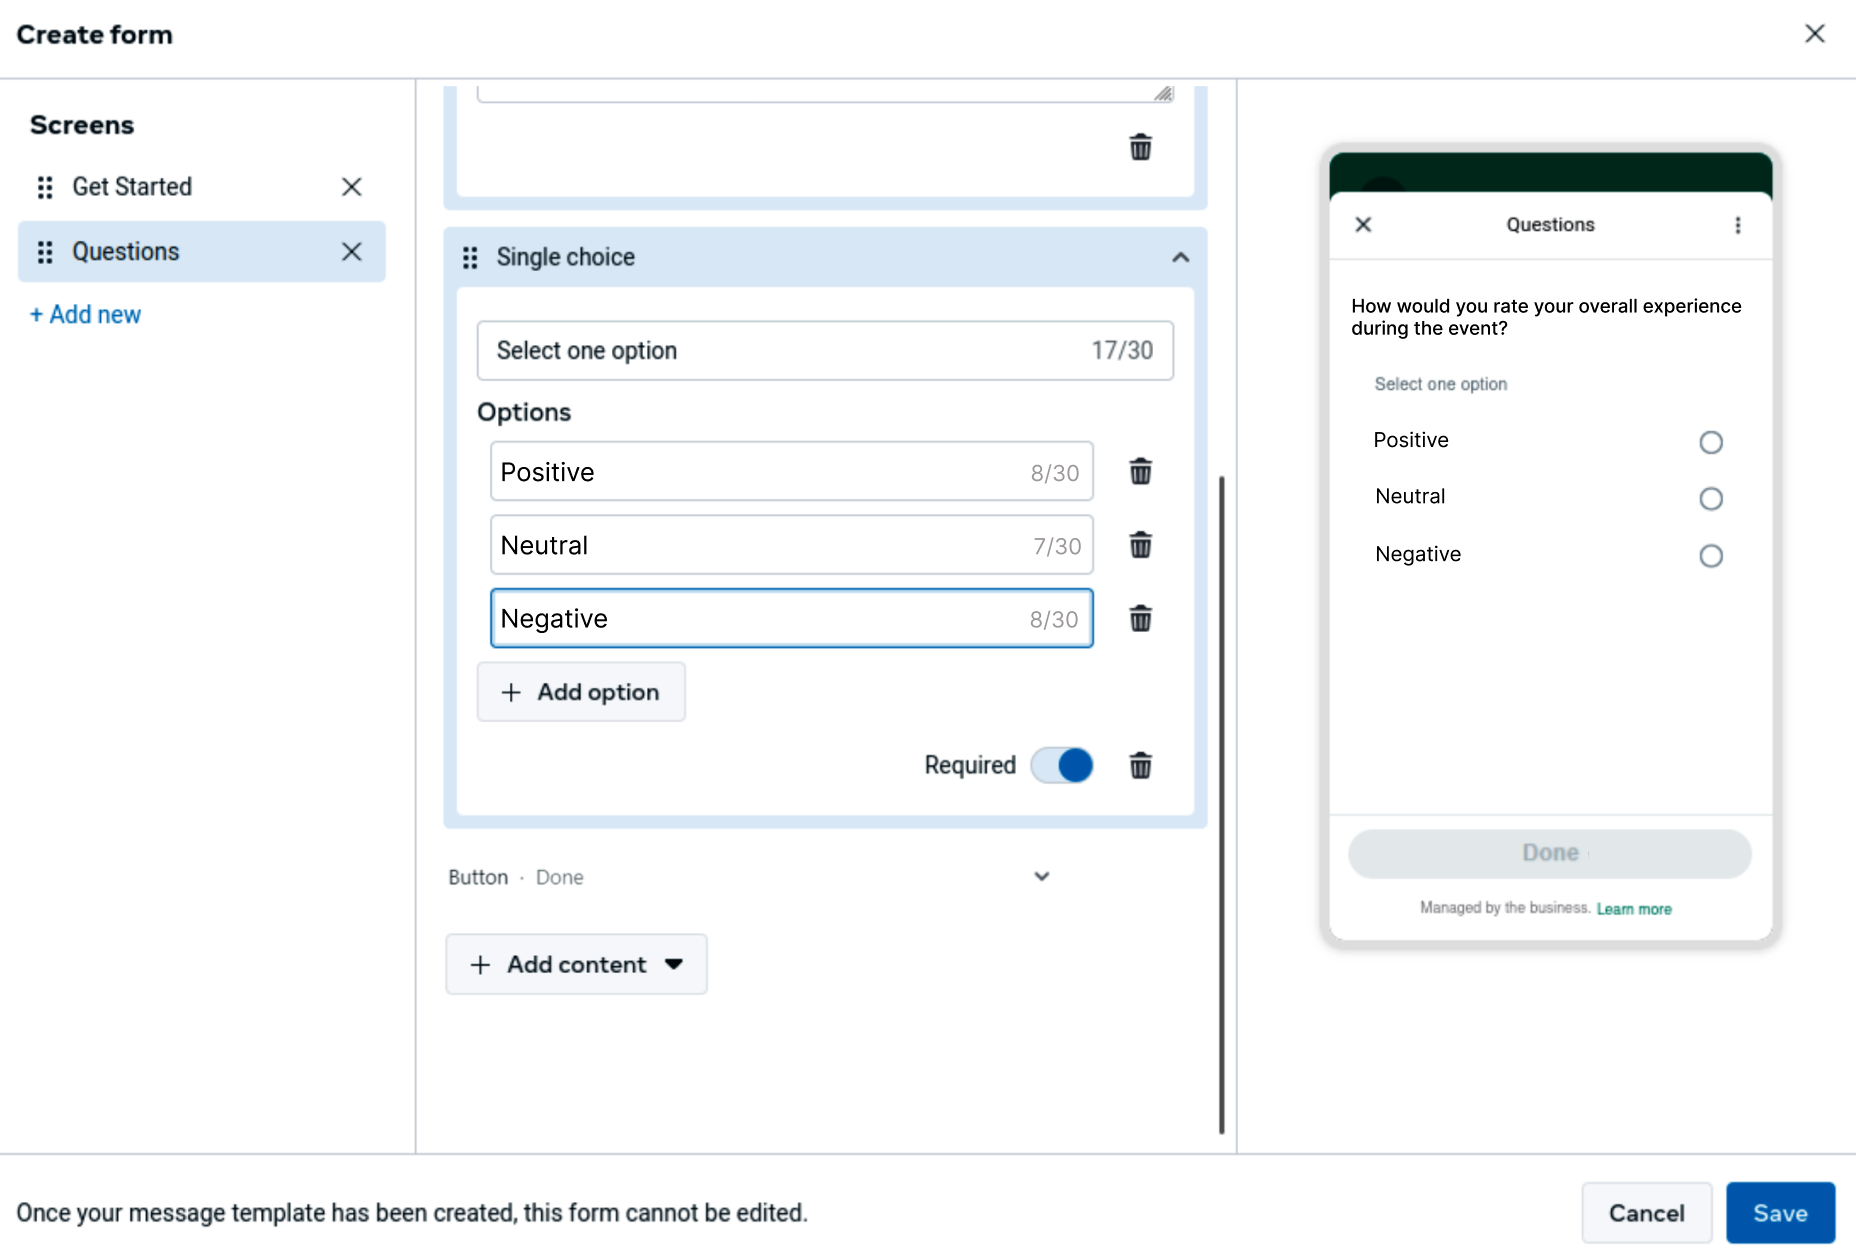
This same process can be followed to add additional choice-based questions. Depending on the scenario, you may use single-choice components for exclusive selections or multiple-choice components when more than one answer is allowed. If you want to add multiple-choice questions, ensure you choose Multiple choice under Selection.

-
The Flow can also include open-ended questions that allow users to provide more detailed input. To add this type of question, select Add content, hover over Text, and choose Body to enter the question text. This is useful for questions that invite reflection or explanation, such as asking users to describe key takeaways or share suggestions.
For questions that require written input from the user, the Flow supports different text answer input types depending on the kind of response you want to collect. When adding an input field, you should first consider the expected format of the user’s answer. From the Add content, hover over Text answer to choose one of the following options:
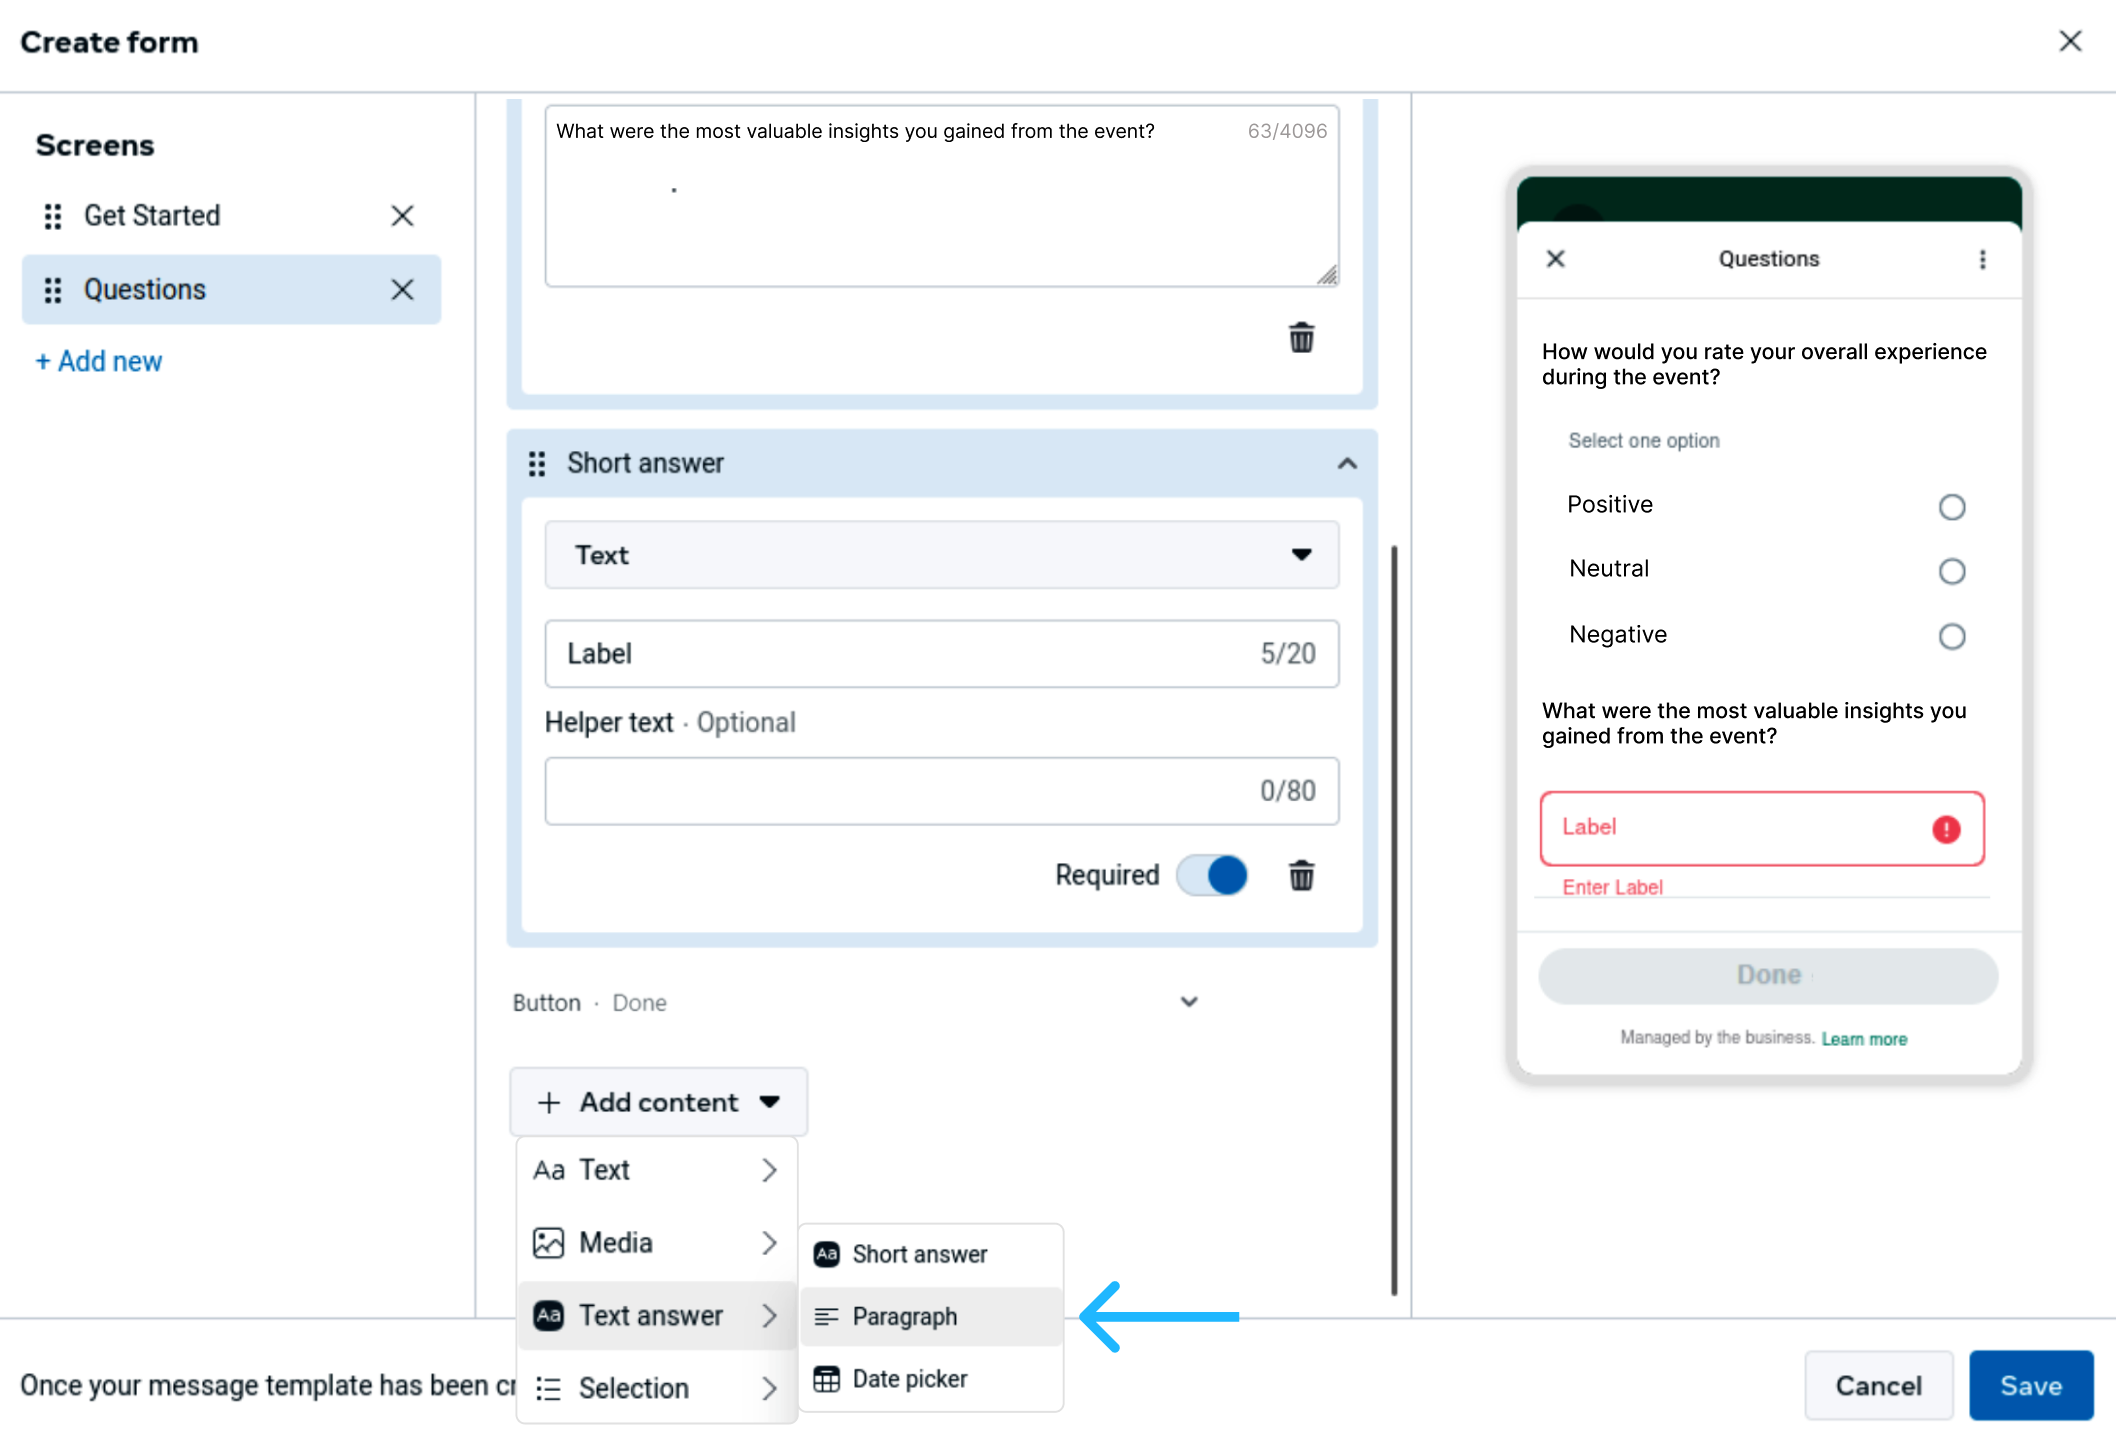
- Short answer: Designed for brief responses, such as a name or a short sentence. This option is suitable when only limited input is required.
- Paragraph: Intended for longer, free-form responses where users may need more space to explain their thoughts or provide detailed feedback. This is the most appropriate option for qualitative feedback.
- Date picker: Allows users to select a specific date using a calendar interface. This option is useful when the response must follow a date format rather than free text.
In this customer feedback Flow, a paragraph input is used to capture open-ended responses. After selecting this option, replace the default text "Label" with a clear instruction, such as
Enter your response here..., to guide the user. The field can also be marked as required to ensure that the user provides input before continuing.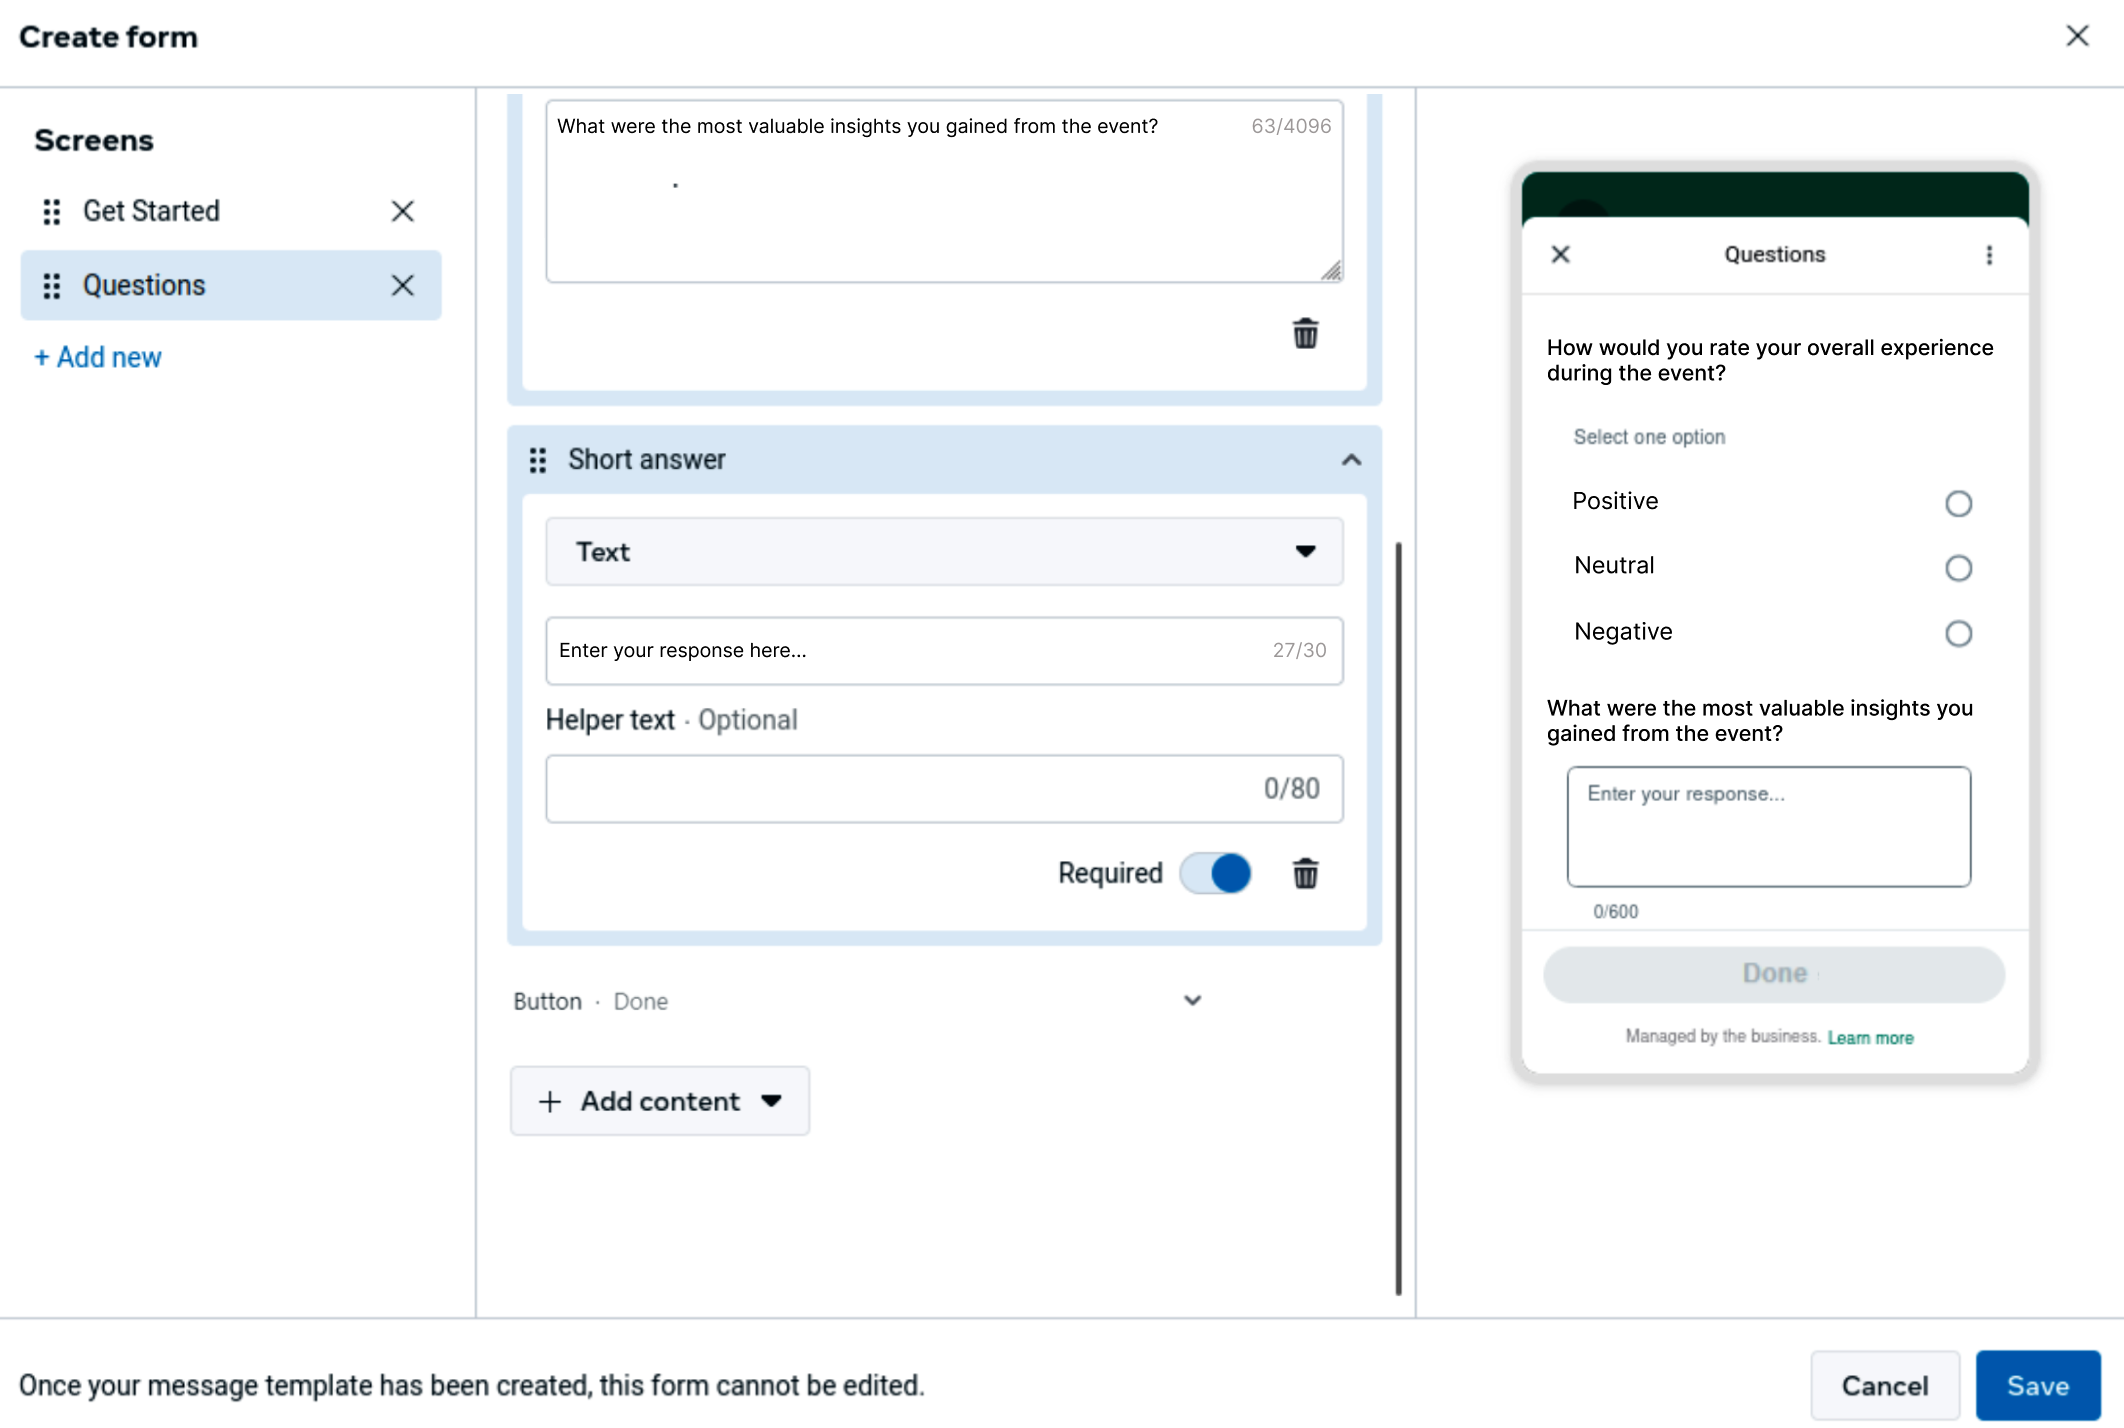
You can repeat this process to include as many questions as required, combining selection-based inputs and open-ended responses as needed for your use case.
-
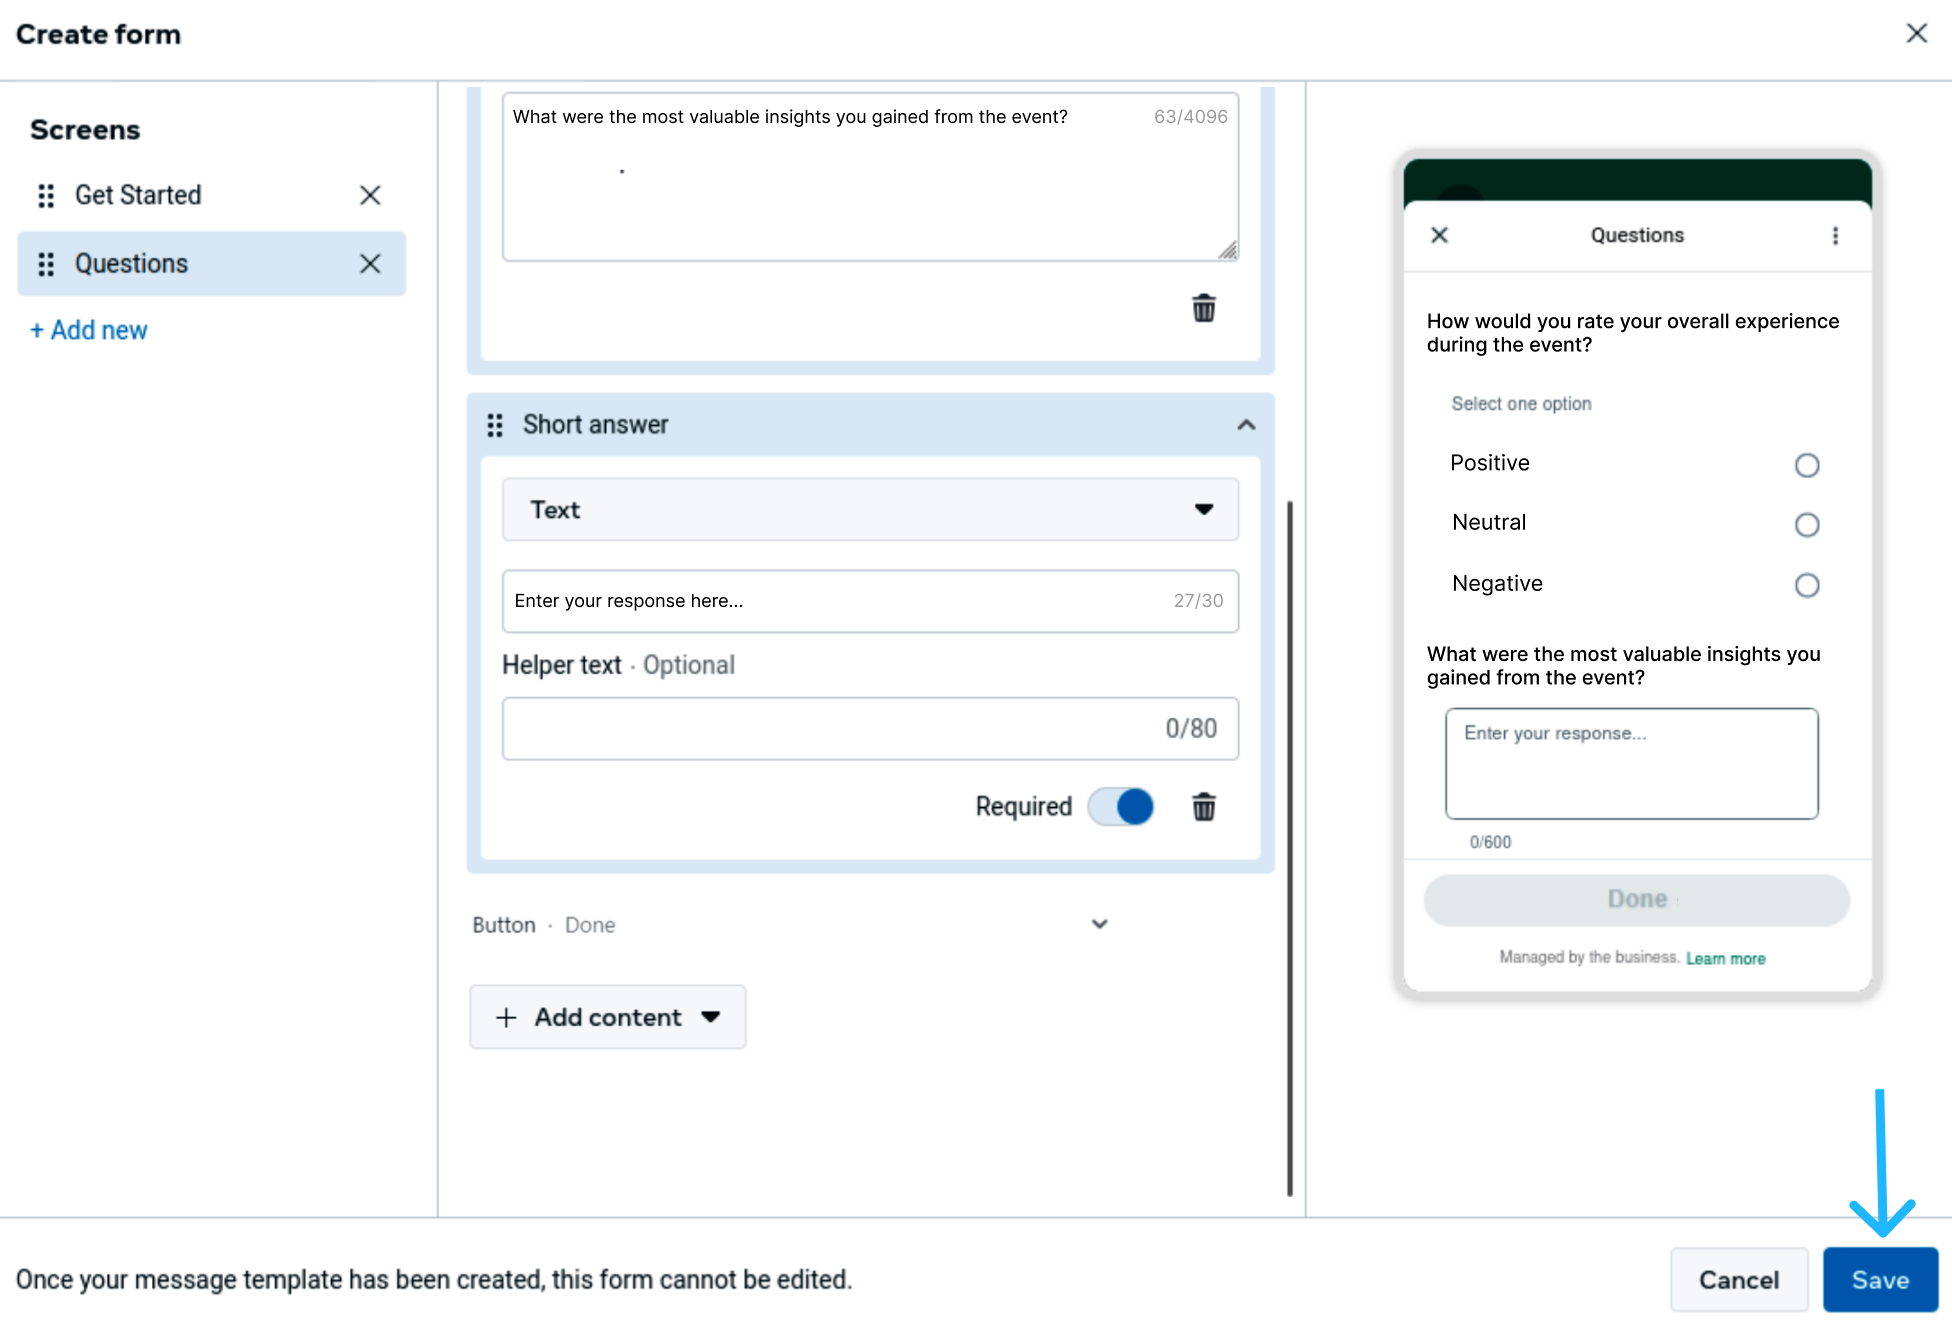
Once all questions have been added and configured, click Save to store the Flow configuration.
-
After the configuration dialog closes, click Submit to finalize the Flow and associate it with the message template.
-
Once you click Submit, WhatsApp Manager prompts you to confirm which language versions of the message template you want to submit for review. This confirmation step ensures that only completed language variants are sent to WhatsApp.
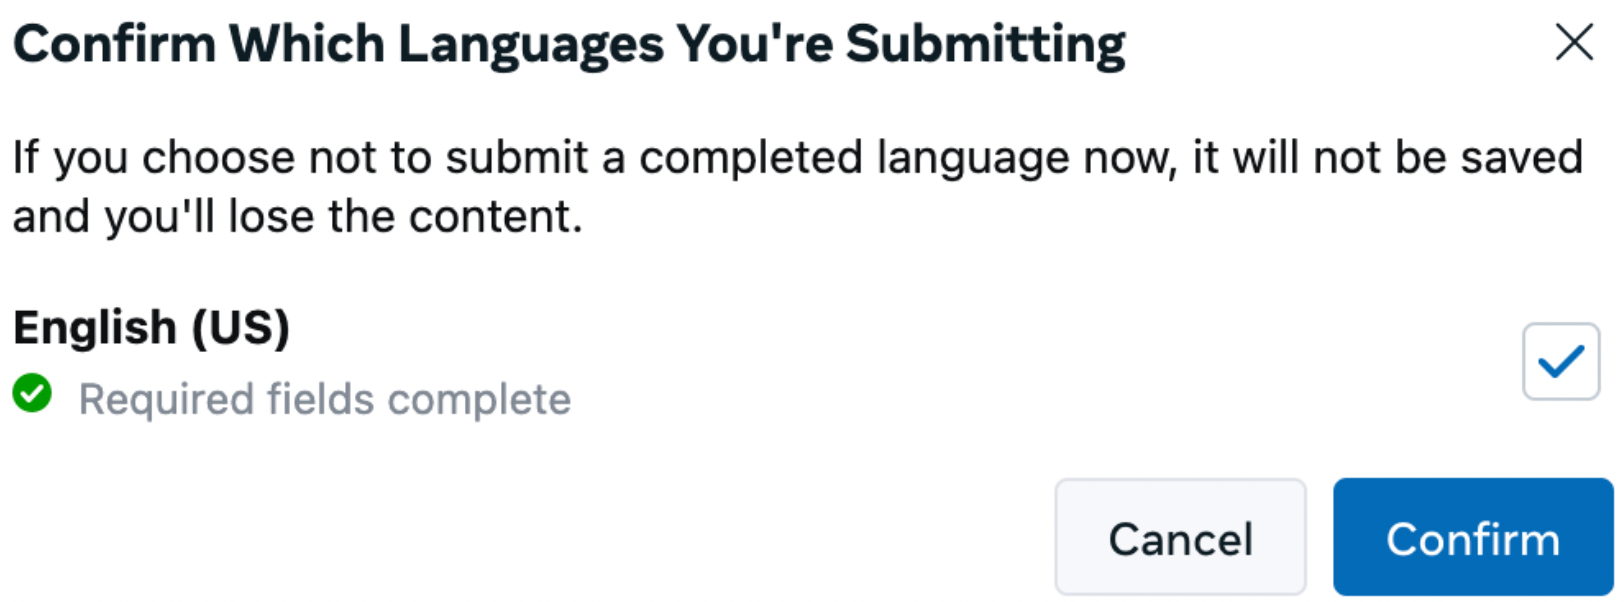
If a language is not selected or confirmed at this stage, its content will not be saved, and any unsaved changes for that language will be discarded.
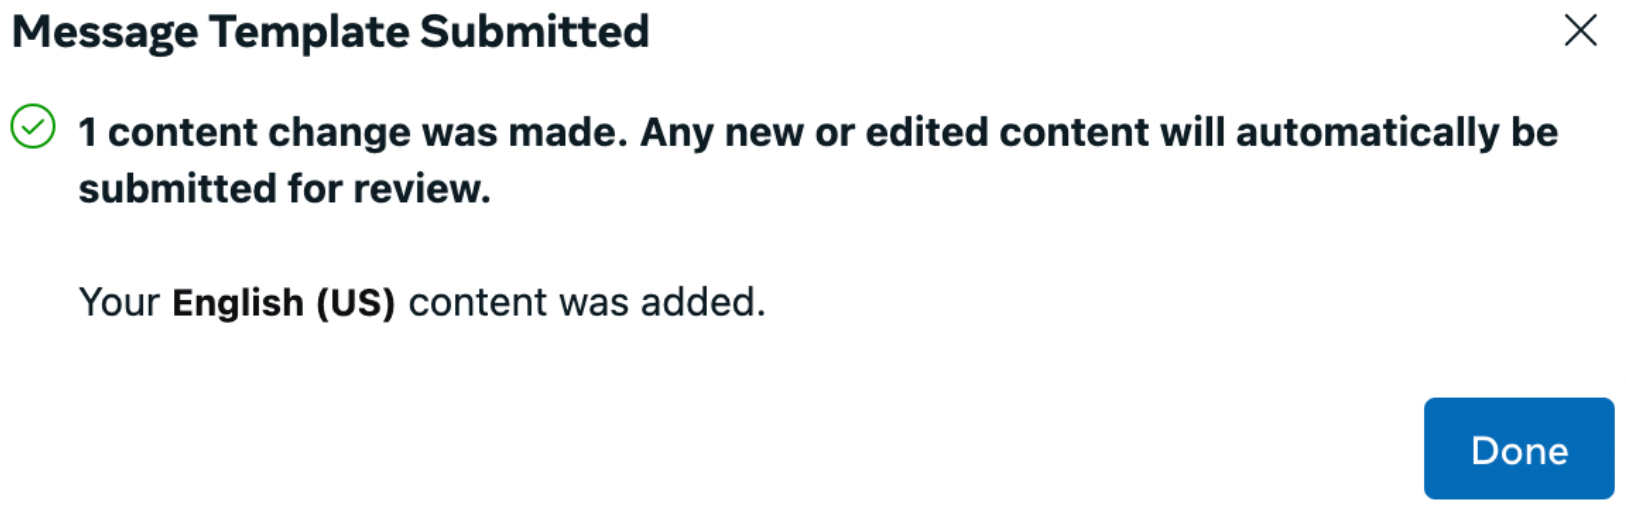
After confirming the language selection, WhatsApp submits the message template — together with the associated Flow — for review. A confirmation message is displayed indicating that the message template has been successfully submitted and is now pending approval. At this point, no further edits can be made to the message template or the Flow until the review process is completed. You can track its status in the Status column.

Once approved, you can send this message template just like any other message template, using the Send Flow with Message Template endpoint.
Sending Flow
When a WhatsApp Message Template includes a Static WhatsApp Flow, the Flow becomes an integral part of the message template definition. It is delivered automatically whenever that message template is sent to an end user.
This delivery method is designed for outbound communication scenarios, where the business initiates the interaction without relying on an active customer conversation window.
From a sending perspective, the message template acts as the entry point, while the Flow represents the interactive experience that the user launches by selecting the message template’s call-to-action (CTA) button. Once the CTA is tapped, WhatsApp renders the associated Flow directly within the chat.
It is important to note that, at send time, there is no functional difference between:
- a Flow that was created independently, published, and later attached to the message template, and
- a Flow that was created directly during the message template creation process.
In both cases, the Flow is already embedded in the approved message template, and WhatsApp applies the same delivery behavior when the message template is sent.
NOTEUnlike session-based Flow delivery, sending a Flow through a message template does not require an active 24-hour conversation window, as long as the message template has been approved under WhatsApp’s policies.
Before sending a WhatsApp Message Template that includes a Static Flow, ensure that the following conditions are met:
- The message template has been approved by Meta.
- The Flow associated with the message template is ready for use, either because:
- It was created independently, published, and then attached to the message template, or
- It was created directly within the message template creation process and finalized as part of the message template approval.
- The message template language matches the language specified in the send request.
An active 24-hour conversation window is not required, since message template messages are designed for outbound communication.
In the following example, we will send the WhatsApp Message Template that was configured in the previous steps, and that includes the customer feedback Flow through the use of the Send Flow with Message Template endpoint.
HTTP Request: POST /v3/messages
{
  "from": "1000000001",
  "to": "+1000000002",
  "templateName": "user_feeback",
  "templateLanguage": "en",
  "callbacks": [
    "http://www.mycallback.com?id=123"
  ]
}
Parameters present in the request body example when sending a Static Flow within a Message Template are the following:
| Parameter | Required | Description |
|---|---|---|
from | Yes | Phone number of the sender. The phone number provided during the WABA account setup will be used as the sender of the notification message. Only accepts numeric characters. Do not include the "+" sign. |
to | Yes | Determines the destination phone number for your message template. Numbers are specified in E.164 format → (‘+’ and a country code). |
templateName | Yes | Name of the Message Template created and approved in your WhatsApp Business Account. |
templateLanguage | Yes | Message Template Language you set when creating the message template. Currently, the API supports 3 Languages: English, Spanish, and Portuguese. Required if you want to send message templates in languages other than English.
|
placeholders | No | Object that contains the personalized values assigned to each variable defined in the text header, body, or both. You must provide a key-value structure where:
For example, for a text message body like |
callbacks | No | Indicate one or more (separated by a comma) webhook URLs to notify about the status of the message delivery. That is, if you want to receive the status of the message you've sent to your contacts, you need to specify your endpoint. Your endpoint must have an HTTP POST access method and receive a JSON body. The URL is the external callback where the events of the Email will be registered and published. Once an email is processed, its status will be posted to your callback URL. To view the full list and meaning of each status, please refer to the WhatsApp Status section. |
When you send a Static Flow within a Message Template, the response body contains the following data:
{
    "meta": {
        "timestamp": 1770665577223,
        "transactionId": "9384hgf121820"
    },
    "data": {
        "id": "141518202530",
        "from": "1000000001",
        "to": "+1000000002",
        "statusDate": "2026-02-09T19:32:57.221606127Z",
        "externalId": "12345",
        "owner": "elipackage",
        "operator": "elipackage",
        "status": "QUEUED"
    }
}
Parameters presented in the response body example when sending a Static Flow within a Message Template are the following:
| Parameter | Description |
|---|---|
data | Data contained in the Message object. |
data.id | Unique identifier of the WhatsApp message. |
data.from | Phone number of the sender. Phone number provided during the WABA account setup will be used as the sender of the notification message. Only accepts numeric characters. Do not include the "+" sign. |
data.to | Determines the destination phone number for your message. Numbers are specified in E.164 format → (‘+’ and a country code). |
data.statusDate | Date when the last update or status change. |
data.externalId | Alphanumeric identifier used for reporting purposes. |
data.owner | Owner or creator of the message. |
data.operator | User who is a member of the owner or creator’s Workspace. |
data.status | When a Message is sent, the system assigns one of the following possible statuses to a WhatsApp message:
|
Updated 2 days ago